Author of the article
Vladimir Novoselov aka Rescator
Technical support specialist, PHP programmer, WordPress developer
Ask a Question
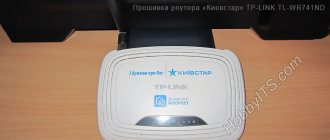
The logical continuation of the D-Link Dir 615 model was the company's new development - the D-Link Dir 620 router. It would be a stretch to call the version new. It has the same speed on the ports, the same wireless communication standards and a large number of modifications DIR-620D1, S, etc.
Buttons, ports and indicators
Unlike the 615, where the buttons could be found in the most unexpected places, the new model has everything arranged according to the standards.
The top cover received operation indicators and a brand logo. The rear panel contains ports, antennas, a connector and a button for connecting power. The feature that distinguishes the model (USB 2.0) is located right there on the rear panel. In the latest modifications it was moved to the front panel. There are versions in the 620 line with two ports.
A sticker with useful information, claws for installing the device on a flat surface, and ears for wall mounting are located on the bottom cover. The factory reset button is also located here (in tribute to the memory of 615).
Considering the presence of USB 2.0, the top panel received 9 indicators.
The official website of the device describes them as follows (from left to right):
- nutrition;
- Wi-Fi;
- WPS;
- WAN (cable connection to the provider);
- numbers 1-4 - to indicate operation with wired devices connected to the same ports;
- USB.
The developers didn’t bother with setting the glow modes. On - connected, off - off, blinking - data is being transferred.
Some color music can only be achieved by the ports of wired devices. When the firmware for the D-Link Dir 620 router is updated, they blink in pairs when the device boots up - one by one.
The USB port is located on the left side of the rear panel, next to the buttons for turning on WPS (it was also responsible for turning Wi-Fi on/off), powering the router itself, and a connector for connecting it to a 220V network. Otherwise, everything remains unchanged. Antennas and five ports. Yellow - for the provider, black for home devices.
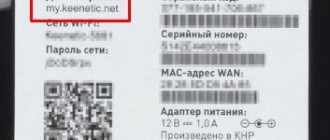
The data from the sticker on the bottom cover needs to be rewritten or, better yet, photographed, because out of the box the router received a configured Wi-Fi network, but with a small surprise - a set password. The network name and password are listed here in the Wi-Fi Name (SSID) and WPS Pin columns. A number of numbers had to be entered when logging into the network for the first time.
In general, setting up a router yourself is not difficult. It's still the same 615, with an additional port.
D-Link DIR-620 and dd-wrt - budget NAS and torrent downloader
December 5, 2011 | dimio
I’ve been thinking for a long time about the need to make a NAS (network drive) at home in order to have a common storage for all home computers (and now smartphones) for music, movies, backups and some common files that need to be synchronized between several machines. The idea of building another computer on something like Atom was discarded after some thought - it would take a long time and be relatively expensive, although of course it would be interesting. Therefore, I decided to look towards ready-made devices with the possibility of flashing, specifically routers that support dd-wrt/openwrt, etc.
First I settled on the D-Link DIR-320 - which has already become a classic option for creating a home NAS, organizing a small full-fledged network and solving other similar problems. Pros: very reasonable price, has been on the market for a long time and is already densely covered with all sorts of manuals for alteration and modification. However, it turned out that the store did not have it and I bought DIR-620 - a more modern version of the 320. Otherwise, there is not much difference - the DIR-620 also has the ability to flash third-party firmware, is equipped with a USB output (USB host, to be precise) and costs about the same money (in my case it was even 70 rubles cheaper).
Alternative firmware for DIR-620
Since I didn’t find any positive reviews about the standard firmware of the router (mine had version 1.21), but, on the contrary, I found a lot of negative ones (about all versions up to 1.21 inclusive), I didn’t even bother setting it up and immediately started looking for alternative firmware for DIR- 620. There were enough of them, I settled on three - dd-wrt, zyxel keenetic and openwrt. After familiarizing myself with the theory, I installed only dd-wrt, and that’s what I use. I found OpenWRT too late - I just read about it, but didn’t try it. I thought about installing Zuxel Keenetic in case I don’t figure out dd-wrt - it wasn’t useful. A collection of firmware, bootloader updates and instructions for flashing are collected on the website deadc0de.ru.
Zyxel Keenetic firmware for DIR-620
The Zyxel Keenetic hardware is almost similar to the D-Link DIR-620 and therefore the latter can be flashed with the firmware from the first (the original one in case of a small alteration - you need to solder a resistor to the board or a modified one - in this case no alteration is required). The advantages of this firmware include a very nice web interface, where everything is simple and clear; USB printer support with easy driver installation, built-in torrent client (transmission-daemon) and dlna server (minidlna). I’ll say right away that the latter is not needed if various media content from the NAS will be opened on the computer and is needed if there is a desire to connect, for example, a TV to the NAS (which naturally should support dlna). Why didn't I flash this firmware? Firstly, the beauty of the web interface is only needed during setup, i.e. ideally - once (and I prefer to configure it through the console), secondly - although it is possible to install the software through a package manager (only for the “full-fledged” Keenetic) - there are quite a few packages, thirdly - this firmware is closed and There is a rather unpleasant story associated with it - recently, many DIR-620s flashed in Keenetic have failed (and it is also not clear whether they will check the originality of the hardware in the future - it all depends on the goodwill of Zyxel). So I settled on dd-wrt.
Windows setup
If you previously inserted the provider cable directly into the computer, it is possible that some network routes were configured in Windows. You need to check this before connecting the D-Link Dir 620 router. Make sure that the network settings in the OS are set to automatic.
In Windows 7 and later this is configured like this:
- In the control panel, in the “Network and Internet” block, select “View network status and tasks.”
- Then “Local Area Connection” and in a new window - “Properties”.
- In the window that opens, select “Internet Protocol Version 4”. Click “Properties” again.
- The checkboxes in the new window need to be selected, as in the right window of the screenshot.
Firmware via Zyxel Keenetic: why is it needed
This flashing method is used to specifically remake the router itself. Using a similar method, people pursue the goal of improving the functionality of their device (the ability to simultaneously work on the Internet and local networks or support for IP television, for example) or performance.
How to flash a router via Zyxel Keenetic
First, you will need to disassemble the router itself. In this case, you need to find a wire to connect to the serial port.
Then you will need to disconnect the connector from the cable in order to connect it to the device board. After this, you will need to solder a piece of the connector to the cable (usually soldered from the flop cable). The pins from the connector must then be connected to the disconnected serial port.
Connection
After you have set the correct OS parameters, you can connect the cables and start working with the router. The developers recommend setting up the device via a wired connection; only three cables are enough for this.
The connection diagram looks like this:
- The provider cable is inserted into the yellow WAN socket on the back wall of the router.
- The supplied wire is used to connect the socket on the computer to one of the black LAN sockets.
- The power supply is inserted into a special connector on the back wall of the device. The other end into a 220V socket.
- Turn on the computer, turn on the power to the router on the back wall next to the power connector.
- After a short “color music”, all the lights on the router go out, and the power and indicators of the connected cables light up evenly.
The router is ready to go. The remaining cables can be connected later.
If the user wants to use a wireless connection, the scheme will be identical, with the exception of point 2.
But in the wireless connection option, you will need information from the bottom cover - Wi-Fi Name (SSID) and WPS Pin.
Login to the admin panel
The login information for the admin panel is provided on the bottom cover, but you can enter the settings of the D-Link Dir 620 router using the default login and password.
In any browser installed on the user, enter the address 192.168.0.1 in the address bar, and in response to the prompt that appears, enter admin in both fields.
The web interface often starts in English. But the device usually picks up the system language correctly.
A request is displayed at the top of the window. Next to it, you can click on the flag and translate the interface into Russian. The names of some of the functions do not change, but it will not be possible to make a PPPoE connection screen in Russian without losing the meaning.
Hardware specifications
| Version | CPU | RAM | ROM | Interfaces | WiFi | USB | Serial | JTag |
| A1 | Ralink [email protected] | 32 MB | 8 MB | 4 LAN + 1 WAN | 2×2 2.4Ghz 802.11n 300 Mbps | 1×2.0 | Yes | YES |
| D1 | Ralink [email protected] | 32 MB | 8 MB | 4 LAN + 1 WAN | 2×2 2.4Ghz 802.11n 300 Mbps | 1×2.0 | Yes | ? |
| C1 | Broadcom [email protected] | 64 MB | 8 MB | 4 LAN + 1 WAN | 2×2 2.4Ghz 802.11n 300 Mbps | 1×2.0 | Yes | ? |
| F1 | Mediatek [email protected] | 64 MB | 8 MB | 4 LAN + 1 WAN | 2×2 2.4Ghz 802.11n 300MiBit/s | 1×2.0 | Yes | ? |
The device has 2 non-removable dipole antennas, with an SMA connector
There are 2 versions of the DIR-620 D1 board: *11340Y20IM00002B1* (old) and *11340Y20IM00002C1* (new, 2013).
Setting up wired Internet
One of the distinctive features of the router was the absence of the annoying automatic configuration wizard. After logging in, the user is immediately presented with a standard summary screen - menu blocks on the left, and settings in the center.
But it can be noted that the quick setup block remains - several quick setup wizards are hidden under the “Start” button on the left panel:
- network - wired (WAN/LAN);
- network - wireless (Wi-Fi);
- TV;
- virtual server. It is needed by those who run their website on their home computer, but since the prices for decent hosting are now below par, we will not configure it.
Setting up the Dir 620 starts with the “click'n'connect” screen.
After checking that the cable is connected, the router will prompt you to select your country and provider from the drop-down list on the next screen.
Rostelecom is not in the list, so you can leave the default value and click “Next”.
A new window offers a selection of all possible protocols for connecting to the Internet.
These include those that work only via 3G, but setting up a 3G modem for Dir 620 will be discussed separately below.
If you don't know what type of connection to choose, look into your contract with your Internet provider. All the necessary settings and connection method are indicated there.
Rostelecom, Dom.ru
Rostelecom, like a number of other providers, uses a PPPoE connection.
Setting up the D-Link Dir 620 router under Rostelecom consists of just two steps:
- Select the connection type.
- In a new window, enter data from the agreement with the provider. Typically this is a username and password.
A small clarification: the “connection name” does not play a special role at this stage. It is needed only for designation.
Additional DNS settings are usually not required, and it’s not on the page. If this is needed, the type of connection will be different, and the provider’s contract contains all the necessary information.
By clicking “Next”, check the parameters, and then click “Apply”. In the new screen, you can test your connection by trying to connect to some node on the network. For example, Google. If the connection is successful, the network is configured; if not, check the detailed settings. They are hidden in the “Network” block on the left panel.
Beeline
In principle, Beeline is represented in the list of providers, so you can limit yourself to the detailed settings screen. The process is the same as when connecting to Rostelecom, only the type of connection will be different.
- connection type select L2TP or PPTP + Dynamic IP;
- indicate any name;
- see the username and password in the Beeline agreement;
- VPN server address: tp.internet.beeline.ru;
- don't forget to save the settings.
All data is provided in the provider agreement.
If the network is down
Sometimes the provider may indulge in recording the addresses of devices connected to it. If you insert its cable into another device (router), the Internet will not appear, although everything will be correct in the settings. In this case, you can call the provider’s support service and tell them about the router. A service specialist will be able to resolve the issue.
But you don’t have to tell your provider about the router. On the network settings screen in the MAC line, you can either change the device address or enter your own. To do this, there are two buttons to the right of the MAC field.
If the router is configured from the computer to which the provider’s cable was previously connected, the operation will take only a few seconds. The changes made are saved by clicking “Apply”. After this, the Internet should appear: the provider will be sure that the same device was connected to its equipment that was used to provide the Internet.
Setting up a USB modem
The presence of USB allows you to create a backup connection to the Internet. But you need to buy a modem separately. It is not included in the kit. A list of compatible models is included in the package as a separate document.
The setup itself is not much more complicated than a regular wired connection. In the “select provider” item, leave the “manual” position, and in the list of connections, select one of the two positions at the very bottom (3G or LTE).
Having chosen the type, go to a new screen.
All data required for connection must be provided by the provider. This is what your 3G connection settings might look like.
Specific settings vary by provider.
WiFi
After checking the connection to the Internet, the “click'n'connect” wizard offers to install a wireless network, but this can be done later from the WI-FI block (or from the same “Start” block by calling the appropriate wizard).
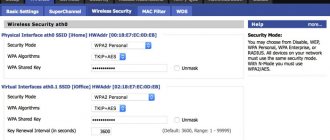
The main WI-FI settings for Dir 620 are collected on the first two tabs of the block of the same name.
The first one – “Basic settings” – is responsible for the network name, channel selection and operating mode. You need to configure the desired settings, check that “Enable wireless connection” is checked, and click on the “Apply” button.
Then go to “Security Settings”. Here you need to set a password (“security key”) so that strangers do not use the network, the rest can be left alone.
The number of other screens depends on the firmware version. The settings on them can be changed only by clearly understanding what you want to get.
How to choose firmware and where to download it from
The firmware is selected based on the model or versions of the original DIR-620 software supported by the router revisions. Some types of flashing are also selected based on the internals of the router. So, based on the above characteristics, software is selected.
You can download the required version from the following sites:
- https://wiki.openwrt.org – A site where you can download all available types of third-party software for different routers. You can download the specific version for DIR-620 from this link
- ftp://ftp.dlink.ru/pub/Router/DIR-620/Firmware/ - By going to this address, a folder structure opens, each of which contains versions for different revisions of the router of this model.
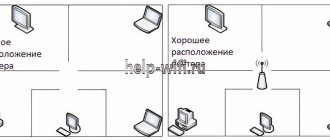
Repeater mode
A special case of a wireless module operating on a router is repeater mode. In this option, the router does not create its own network, but strengthens a third-party one. A device that connects to the network uses the capabilities of the main transmitter, and when the signal strength of the main one is insufficient, it connects to the repeater.
The settings for this function are located in the same “Wi-Fi” block. Tab – “Client”. The first editions of the firmware do not have it, but if you download/install a new version, the tab will appear.
After going to it, you need to check several boxes, as indicated in the picture.
A few clarifications:
- “Enable” — switches the device to this mode.
- “Select a wireless network”—specify the network needed for amplification. You can use the “Search for networks” button.
- “Wireless network settings” - the device will set them automatically when you select a network. They must repeat similar ones on the device whose network will be strengthened. Particular attention should be paid to ensure that “Network Authentication” and “Encryption Settings” match. After setting all the parameters, click “Apply”.
- The router will switch to repeater mode.
- It is also recommended to clear the “DHCP” checkbox on the LAN (block network) tab so that devices do not conflict with each other when connected.
The problem can be solved by flashing the router by installing an alternative version. DD-WRT is considered the most popular.
According to user reviews, there is no normal version for 620 on the team’s website. Therefore, it is recommended to install only official versions.
A1 recovery
You can restore the firmware as follows:
Installing the official Zyxel bootloader on DLink DIR 620
One of the most pressing problems of happy owners of DLink products is that all devices clearly lag behind alternative firmware in their characteristics.
But at the moment it is already possible to turn one router into another.
Firstly, it is worth noting that the devices have almost the same element base.
Both have a USB port, 8 MB of flash memory, assembled on one chip - Ralink 3052 2T2R (300 Mbit) and 32 MB of RAM.
Although at the moment support for Yota and 3G modems is already available in the latest official firmware for the DIR 620, someone will probably want to turn it into a full-fledged Keenetic 4G by installing the official Zyxel bootloader on the device.
Advantages
1.When restoring a router, you do not have to open the device, but simply use software.
2.You will be able to install firmware for Keenetic 4G
3. Possibility of restoring the firmware without opening it.
Disadvantages and Cautions
1 Naturally, what you decide to do is all at your own peril and risk.
2. The installation of the official Zyxel downloader on the DIR 620 must be carried out through a UPS-uninterruptible power supply. If this is not done and the power goes out during installation, then further restoration of DLink functionality is possible only with the help of a programmer.
Information
If the device has firmware 1.0.6 and it was previously flashed in ZyXEL Keenetic, then you do not need to update the uboot bootloader in this way - the beta version of ZyXEL Keenetic itself updates the bootloader after the firmware.
The factory firmware version can be found on the bottom side of the router case:
Bootloader installation process
We enter the control panel of the DIR-620 router and then - System - System software update - Then click “Browse...” and point to the desired bootloader firmware file. Next - “Update” After a successful flashing process, the router should reboot.
Firmware recovery example
We remind you that the method described below works with a previously installed bootloader from Zyxel.
1.Download the tftp server (mirror link) and be sure to unzip it into a separate folder.
2.Next, download the firmware that we are going to upload and rename it to rt305x_firmware.bin and transfer it to the same folder.
3. Set the IP address on your computer to 10.10.10.3 and the subnet mask to 255.255.255.0;
4.Turn off the power to the router;
5 Connect the computer to the LAN router;
6.Press the RESET button and turn on the router, holding the button for 5 seconds; 7.Next, press the RESET button and the router starts automatically downloading the file from the tftp server;
8.Next, the device will reboot itself after going through the firmware process
For additional information, we advise you to visit the website of the author of this method.
IPTV
The developers have simplified TV setup to a minimum. In the “Start” block, select “IPTV Setup Wizard”.
On the page that opens, you need to select the port(s) to which the set-top box is connected. Then click “Save”.
The router itself will take care of the correct network settings. The only downside is that the specified port is disconnected from the Internet; only TV traffic will be sent here. If you don’t have a set-top box, you don’t need to do any additional steps to watch TV on your computer.
Changing the login password
Unlike its ancestor (version 615), the router does not offer to change the password for logging into the web interface during the setup process, believing that the user will do this later, independently.
And since the default password for the DIR-620 is standard, known to everyone who has ever configured network devices, for security purposes it is suggested to change it.
For this and a number of other functions, the admin panel has its own “System” block. And the “Administrator Password” tab is responsible for setting the user’s own password, different from the factory one.
D-Link does not allow you to change your username, but you can set your password. As usual, for the new password there are two fields for verification. After filling them out, click “Apply”. The device will reboot, prompting you to use the new password to log in.
Installing u-boot for A1
Attention! The firmware of the router bootloader (uboot) makes it possible to restore the router without opening it if the firmware is unsuccessful. However, if a failure occurs while flashing the bootloader (shutdown, power surge), then the router can only be restored using the programmer. Therefore, it is highly not recommended to perform this procedure without an uninterruptible power supply!
If the factory firmware of the DIR-620 was version 1.0.6 and it was already updated to the beta version of ZyXEL Keenetic, then there is no need to update uboot using this method - the beta version of ZyXEL Keenetic itself updates the bootloader after the firmware. The factory firmware version can be found on the bottom side of the router case:
BootloadersFor versions 0.0.3 and 1.0.0, for version 1.0.6 The firmware differs only in that for versions 0.0.3 and 1.0.0 the presence of the serverip and ipaddr variables in the bootloader configuration is checked and, if they are absent, these variables are written to configuration
Firmware update
Being constantly connected to the Internet, the router can check for a new firmware version both automatically and at the user’s request. Both options are located on one “Software Update” tab in the “System” section.
And if there is a new version, an offer to update the software is also offered in the header of the web interface. Clicking the button will take you to the same tab where you can download the firmware, then use the “Browse” button to find it on your computer and “Apply settings.”
In order for the D-Link Deer 620 firmware to be checked automatically, you need to indicate the nearest update server on the page; for Russia you can specify it as in the picture above.
How to resuscitate?
Give the firmware a new name “habr.bin”. Then specify the following parameters for the computer’s network card:
- "IP" - 10.10.10.3.
- Mask – “255.255.255.0”;
- The main gateway is “10.10.10.123”.
- Click “Ok”.
Next you need to do several sequential actions:
- Download tftpd32 from “https://tftpd32.jounin.net/download/tftpd32.400.zip”, and if the user has a 64-bit system installed, then tftpd64;
- Save the downloaded software in the tftpd32 or tftpd64 directory;
- Then run tftpd32, if the system is 32-bit, in the Tftp Server tab, click Browse and the directory for saving the software;
- Enter Serial and specify “COM3” (may differ, so be sure to check with the device manager), fill in all the fields below exactly as shown in the following figure:
- Then open the “Session” tab and click “Open”;
- Next, connect USB-UART to COM in the device and turn on the device. Immediately after this, within a few seconds, click “2”;
- Then you need to positively agree with the messages that appear by pressing “Y” and “Enter”;
- Wait until the process completes and the router restarts.
Factory reset
You can save, restore the configuration or reset all settings on the “Configuration” tab of the same name (the “System” block).
The page contains a number of buttons, by clicking on which you can either save the configured configuration or reset it to factory settings. When you select reset, the router will ask you to confirm your desire, but if you wait a minute and a half, it will regard this as consent.
When rebooting, the settings set by the manufacturer will be used.
A hardware reset of the router is also provided. To do this, you need to press the RESET button on the back panel of the router for 5-10 seconds. After the indicators blink, the device will reboot and the settings will be reset.