Author of the article
Maxim aka WisH
Higher education with a degree in Information Systems. Experience as a system administrator - 5 years.
Today we will review and configure the TP-Link Archer A5 router. Devices of this brand are traditionally popular in home networks, as well as in small offices. The reason for this is clear: they are inexpensive compared to more famous and professional brands, but they are reliable and have a large number of settings. So apartments often have devices from this manufacturer, as well as from several other large Chinese companies.
Characteristics
First, let's describe the characteristics of the Tp-Link Archer A5 ac1200 wireless router:
- Supports Wi-Fi 802.11ac standard.
- Total bandwidth up to 1.2 Gbps: up to 867 Mbps at 5 GHz and up to 300 Mbps at 2.4 GHz.
- 4 external antennas for connection and optimal network coverage.
- It can also be controlled using the Tether program from your phone.
- Ports: 1 WAN port 10/100 Mbps, 4 LAN ports 10/100 Mbps.
- Supports IGMP Proxy, bridge mode and 802.1Q TAG VLAN for IPTV service.
- Processor: (SoC) TP-Link TP1900BN custom made by MediaTek (in firmware it is called MT7626). Single-core processor with a frequency of 1.2 GHz.
- RAM: 32 MB, information on internal storage capacity could not be found
In general, it was once a good router for the home. Now it is capable of performing its functions in full, but it is more suitable for small cities and towns. All its characteristics are sufficient for operation at normal speeds; only the ports let us down. Their maximum throughput is 100 Mbit/s. This is not bad, but in most cities 100 is the starting speed of the provider on the simplest tariffs. Then it grows and can reach 500 Mbit/s. When using such a device, it is useless to take such tariffs; this is worth taking into account.
DD-WRT
DD-WRT is the most famous firmware that was based on OpenWRT, but it is easier to install. DD-WRT has many features such as real-time traffic monitoring, access control, QoS which allows you to distribute Internet bandwidth between VOIP, video streaming and websites.
You'll also get plenty of other extra features, like Wake-On-LAN, which lets you put computers on your home network to sleep and wake them up when you need to connect to them, for example, from abroad. Or the Dual WAN function, which will switch you to another Internet provider if the main one becomes unavailable.
Built-in OpenVPN, PPTP and L2TP allow you to use one VPN server on multiple devices, eliminating the need to establish a VPN connection on each connected device. All this is packaged into a simple interface.
DD-WRT supports select chipsets from Atheros and Ralink. Therefore, you can install it on routers from well-known manufacturers such as Linksys, Netgear, Asus, TP-Link, D-Link. Right on the settings page you can easily update to the new version when it becomes available. You can check whether this firmware is compatible with your device on a special page.
Appearance and equipment
The Tp-link Archer A5 router has standard equipment for such devices:
- router, white;
- power unit;
- Ethernet cable;
- instructions.
So you won't encounter any surprises when unpacking. Just keep in mind that the included cable is not very long, about a meter, so immediately buy another one if you plan to install the device far from the computer.
Gargoyle
Based on OpenWRT, Gargoyle is another firmware that adds bandwidth quota setting and network access rules. It mainly supports TP Link devices, as well as some routers from Asus, Netgear, Linksys.
Since Gargoyle is a web interface for OpenWrt, most OpenWrt tips will also work on it. If the web interface does not provide a specific feature, simply log in as root via SSH, install the required packages, and run the required commands. There are approximately 1500 packages available for installation using the opkg package manager.
Built-in features include the ability to limit bandwidth and set restrictions for a specific IP address. The settings are very flexible: administrators can limit quotas to only certain days or hours. You can also block specific ports, protocols, or sites.
In the latest experimental branch, admins can also throttle bandwidth when a quota is reached, allowing them to slow down their Internet connection speeds instead of completely blocking network access.
Connecting and logging into the web interface
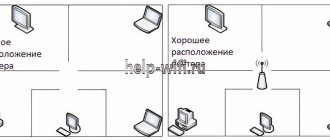
Now let's move on to installing and connecting Tp-Link Archer A5. Choose a place in the apartment where you will place the router. Teach that reliable transmission goes 15-20 meters even through concrete walls. If you have a larger room or the walls shield the signal well, then you will have to take this even more seriously.
The router should not be installed near a battery or where water may leak or condensation may begin to drip. All these effects are harmful to electronics.
Also consider the length of the wires; they should not be stretched. At best, this threatens that they will jump out of their connectors; at worst, it threatens to damage the wire or device.
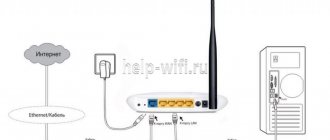
Connect the wire from the provider to the blue connector, it is labeled as WAN. Plug the wire from the computer into any of the yellow connectors, there is no difference. The power connection is made to the leftmost socket; it is difficult to confuse it with others. Once all the necessary wires are in place, press the power button, which is located next to the cable coming from the electricity.
Now turn your router over and look at the bottom of it. There is a sticker on which all the necessary data is located. On the right side is written the name of the wireless network and its password, which are available in the router initially. On the left is the login address, as well as the login and password for your personal account.
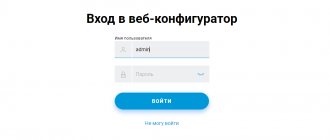
Connect to Wi-Fi or connect via wire, then type 192.168.1.1 or tplinkwifi.net in the address bar of any browser. Enter your login and password. The default is admin in both fields.
If the data does not match, then someone has already configured the router. In this case, find the recorded data or reset everything to factory settings.
After logging in, select Russian to make it more convenient to configure everything.
Automatic configuration of the TP-Link Archer C5 router
To use the router's automatic configuration option, you need to get into the web configurator. On the left side we find the “Quick Settings” function and select it. In the next window, you need to select your service provider who provided you with Internet in the village. If you haven't found your provider, let's install o.
In the next window that opens, you need to select the connection type. When selecting the PPPoE network protocol, you will need to enter a login and password. This data is provided by the provider. In the next automatic settings window, we specify the operating ranges for the Wi-Fi wireless network. Next, you will need to specify the name of the network and enter a password for it. The PPPoE network protocol is used by Rostelecom and many other providers.
After entering new settings, do not forget to save the changes. After clicking the “Save” button, the automatic settings will be completed successfully.
Quick setup
There are two ways to configure the Tp-link Archer A5 Wi-Fi router. In the first case, you will use the quick setup, which opens immediately after the first launch of the router. In the second case, you will set all the parameters yourself. If you do not need to set any additional parameters, then it is better to use the quick setup. Everything is collected in one place here, so it will speed up the process.
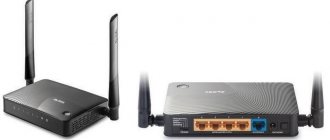
In the first window, select a mode. Choose the top one if you want to set up a regular router, and the bottom one to use the device as a repeater.
In the next window you will have to select sections that will affect the possibility of further customization. Here, indicate the country, city, your provider, and the type of network connection. Here, choose carefully, because in different cities operators may have different types of connections. If you don’t find what you need, then it’s better to go straight to manual settings. True, you can check the “I did not find the necessary settings” checkbox, then you will have to set everything manually. If you want, you can go this route, but in my opinion, it’s easier to do the setup completely manually.
In the next window you will have to set connection settings. They will change depending on which connection type is selected. So check in advance with your operator or in the instructions what type of connection you have, as well as your data.
On the next page you select which networks you want to connect. You can leave only one, or both. Select the broadcast range and click next. A window for one of the networks will open. In the top line, enter the name of the Wi-Fi, then the password for it. If you select the “Advanced settings” checkbox, you can configure channels or operating mode. After that, do the same for the second network.
There will be a final window in which you will need to check your connection details. There are provider and wireless network settings here, so immediately make sure that everything is set correctly.
Setting up PPtP (VPN) with a static local IP address
- In the WAN Connection Type field : select PPTP/Russia PPTP
- User Name : your contract login
- Password : your contracted password. In some firmware, just below it asks to confirm the password ( Confirm Password )
- Select Static IP address
- In the Server IP Address/Name , IP Address , Subnet Mask , Gateway enter the data from the contract. In the DNS you can enter the DNS address of your provider
- WAN Connection Mode : Connect Automatically
- After entering the above settings, click Save . Internet is set up
Manual setting
The router can also be configured manually. The difference is that you will have to click more on the menu to move from one section to another. This method is suitable for more precise settings or if the necessary parameters are not available in the quick setup. All sections are located in the left column. If your menu is in Russian, then everything is clear. If it is not translated, then it is better to do the flashing first, so as not to experience difficulties in understanding the following steps.
Click on “Network” – “Wan”. This will take you to setup your connection.
The most important point here remains the choice of connection type. If you don’t know him, then call the provider’s technical support, look at the data in the contract or look for instructions on his website.
After selecting the connection type, different parameters will appear in the top line, which will depend on it.
At the top of the window there are those fields that are required to be filled out. If you click on the “Advanced” button, optional options will expand. Here, set the parameters as specified by the provider.
If authorization takes place using your MAC address, then go to the last item in the “Network” section. Here you will be able to clone your computer's address for use by the router.
What to do if the router does not distribute the Internet after configuration
The reason for this behavior of the router may be either incorrect wi-fi settings or problems on the part of the provider. To rule out the latter, you can simply call your telecom provider's hotline and ask if they are carrying out any preventative work. At the same time, specify for subsequent verification of the data entered by you in your personal account: what type of connection your provider uses, whether it binds by MAC address with a dynamic IP, which one uses the password and username, server address with PPTP.
WiFi
Now let's move on to Wi-Fi. In the left column, select the “Select operating frequency” section. There are two items here with the names of the ranges. Check one or both boxes. If all your devices are new and there are no devices that operate only at 2.4 GHz, then you can turn it off. Otherwise, it is better to leave both ranges.
Now it remains to move on to the two points that are located below it. The first is 2.4GHz wireless mode and the second is 5GHz wireless mode. Both the parameters are the same, so there is no point in analyzing them separately. Know that you will have to configure the one that was ticked in the previous paragraph.
In the basic settings section, you set the network name, mode and channel. Apart from the name, it’s better to leave the rest as default unless you scanned the channels in advance and found out that some of them are free. Leave broadcast enabled if you want your network name to be visible in searches.
Go to Wireless Security. This section specifies security settings for wireless networks. Choose WPA2-PSK, this is the most suitable method available. Set your network password here and save your settings. The rest is unlikely to be useful, except perhaps the section for viewing connection statistics.
Is it possible to configure the router through the application?
The developer specially created a mobile application called Tether to simplify the procedure for setting up a router from a smartphone. The software can be selected for gadgets that operate on the Android and iOS platforms. If you want to download the app on your iOS smartphone, go to the Apple App Store. Owners of Android devices can download the application on Google Play. After successful installation of the program, you can connect your smartphone to the wireless network and activate the application.
In the welcome window, we indicate the router model that we will work with in the future. Next you will need to enter your username and access key. After the authorization procedure, you will be taken to the settings menu.
Changing the administrator password
The standard username and password combination is not secure enough to be relied upon. After logging in for the first time and completing the setup, it is better to change them to secure your router.
Go to "System Tools" and from there to "Password". In the window that opens, enter your old username and password, and then specify the data that you want to set. You will be kicked out of the settings after saving this item, so be prepared for this. You shouldn’t set complex combinations, because you need to ensure that you don’t forget them until next time. Too simple won't do any good, so choose the middle option when coming up with a password.
Configuring PPtP (VPN) while automatically obtaining a local IP address (DHCP)
- In the WAN Connection Type field : select PPTP/Russia PPTP
- User Name : your contract login
- Password : your contracted password. In some firmware, just below it asks to confirm the password ( Confirm Password )
- Select Dinamic IP address
- In the Server IP Address/Name we put the address specified in your contract
- WAN Connection Mode : Connect Automatically
- After entering the above settings, click Save . Internet is set up
IPTV
In fact, all the settings are already set here so that IPTV works immediately after all the wires are plugged in. If the automatic detection mode does not help, then go to the “Network” section, and from there to IPTV. In the mode, select the bridge, and in the next line indicate the number of the port into which the TV is plugged in.
Read how to connect your TV to the Internet.
Port forwarding/forwarding
This function automatically redirects requests for certain services from the Internet to the appropriate host on your local network, located behind the router’s firewall. This function should be used if you want to create a server (for example, a Web server or mail server) on the local network behind the router’s firewall. Go to Forwarding, click Add New.
IP address - the network address of the device to which the request will be redirected Service Port - the number of the port that needs to be opened Protocol - Select the required protocol Status - Enable Click Save .
Firmware update
To update the firmware, first go to the manufacturer’s official website, find your router model there and download the latest firmware from there. Now go to the router’s web interface, go to “System Tools”, and then to “Firmware Update”. Click on “Select file” and specify the path to the downloaded firmware.
Click on the "Update" button and wait for it to finish. The router will reboot after the update.
Fresh Tomato
Fresh Tomato is an improved version of Tomato, which in turn is based on DD-WRT. It is easy to use and provides a number of additional features such as QoS and shell access. This firmware allows you to simultaneously configure two OpenVPN servers, between which you can easily switch, even if they are from different providers. There are integrated Tor and Bittorrent clients.
And there's real-time throughput monitoring, with daily, weekly and monthly reports, while DD-WRT only offers real-time monitoring. If there are several devices on your network, this will allow you to see which of them are clogging the channel, causing the Internet speed to slow down.
It is especially important for FreshTomato on older routers with little NVRAM to use mini-firmware, since the router may have too little space for a successful update. As a result, the router will stop working. Check their official website to make sure your device (version number is also important) is listed as compatible.
Reset
If you nevertheless forgot the password for your router or did something wrong in the settings, and now you cannot understand what the error is, then you will have to reset the router to factory settings. It will return to its original settings, and you will have to do all the configuration again. However, sometimes this is the only way.
Find the “Reset” button on the back panel, it is located next to the power button. Press it and hold for 10-15 seconds. The router will reboot and its settings will return to factory settings.
Advanced Tomato
Advanced Tomato is also an improved version of the original Tomato firmware with an improved user interface. It has a new network monitor, more advanced QOS and access restrictions.
As well as new features such as WDS, client mode, more maximum P2P connections, the ability to run custom scripts and Telnet/SSH connections. It is possible to reprogram the SES/AOSS button and much more.
AdvancedTomato uses a double version format that looks like this: 2.5-124. This means the GUI version is 2.5 and the Tomato by Shibby version is 124. The firmware is based on many open source projects that are released under the GPL license. Therefore, its source code can be found on Github.
Connecting the router and preparing the “computer” for setup
We insert the cord from your provider into the blue-violet connector, which is routed into the apartment or house. Insert the Ethernet cable from the kit into the yellow port (any). The second end, as we already understood, needs to be connected to the same output on the computer. This will be the network card slot - on a laptop it is on the left or right, and on a desktop PC it is on the back.
We insert the Internet cable from the provider into the blue connector
We insert the power adapter into the outlet and turn on the device using the round Power button on the back. Now let’s proceed to the preliminary setup of the “computer”:
- Click on “Start” and select the “Control Panel” section.
- Click on “Network and Sharing Center”.
- Click on the line “Change adapter parameters” in the left column.
- In the new window we see a connection via a local network or Ethernet. Right-click on the tile and select the last item with properties.
- From the list, select the Internet protocol (its fourth option) and click on its properties.
- In the new window, check the boxes next to receiving all data automatically, and then click OK.
Learn more about the benefits of Archer C64
For most users, the words MU-MIMO, Beamforming and others will not mean anything. It is not clear what these router functions are and why their presence in a relatively inexpensive device is quite rare.
Now I will explain everything in order in simple words:
MU-MIMO technology is responsible for the simultaneous exchange of information between the router and several devices at once, and the information is simultaneously received and transmitted.
MU-MIMO technology at a glance.
In other words, if several smartphones, a tablet, a smart speaker with a voice assistant are connected to the Archer C64, and all these devices simultaneously connect to the Internet, the router will be able to simultaneously both receive information from the gadgets and broadcast it back to the devices.
Beamforming technology is responsible for generating a directional signal from the router depending on the location of the device connected via Wi-Fi.
This is how Beamforming works.
That is, if the router is installed in my hallway, and I am sitting in the farthest room with a tablet and want to watch the latest videos on YouTube, the router will automatically increase the signal strength in my direction to minimize possible delays in playback due to walls and ceilings.
Smart Connect monitors which device is connecting to the router and switches it to the optimal channel.
Four antennas with a power of 5 dBi each, quite enough for an apartment.
For example, I went online to read new material on the site, and the girl next to me opened her tablet to watch videos on photomontage. The router will give its connection priority and a “fattier” channel so that the video runs without lags. And I will get a slower connection, but I won’t notice it, because I’ll just read the text.
Thus, even when connecting many devices, they will all use the Internet without delays, thanks to proper load distribution.
Airtime Fairness technology improves wireless network performance and speed.
For example, if my Internet speed is 300 Mbps, and one of my devices supports a maximum speed of 54 Mbps, it will not slow down the entire network.
Four high-speed ports are enough for a TV, PC and console. And there will be one more left in reserve.
It is worth adding that in the router, in addition to one gigabit WAN port, there are 4 gigabit LAN ports, to which you must connect a game console, desktop PC or smart TV.
These multimedia devices, connected to the Internet via a wire and not via Wi-Fi, will definitely not fail or “freeze” at the most crucial moment: during an online battle, watching a movie or streaming to Twitch.
Tests and measurements: stable connection in any corner
I have a two-room apartment with a small balcony. I placed the router in the hallway, connected the TV set-top box and PS4 console via wire, and the iPhone via 5 GHz Wi-Fi.
My tariff plan is 150 Mbps, and taking into account the working TV and updating Fortnite on the curling iron, the Wi-Fi connection speed was as follows:
I showed the download speed in green, and the upload speed in Mbit/s in blue.
As you can see, there is decent communication in all rooms, even on the balcony, which is as far away from the access point as possible. The TV does not lag, updates are downloaded, YouTube looks great on the smartphone in the toilet.
No more is needed. Thank you TP-Link.
Local LAN and DHCP server
“Local” can be configured as follows:
- Go to the block with network parameters. Open LAN. Here you can only change the current address of the router in the local area. If you change it, the web interface will also move to the new address.
In LAN you can change the address of the router on the network
- Basic local settings are located in the DHCP section. We immediately activate the server. Using the two lines below, we set the number of local IP addresses that will be assigned to devices on the network.
Be sure to enable DHCP
- We do not change the rental time and network gateway. Click on “Save”.