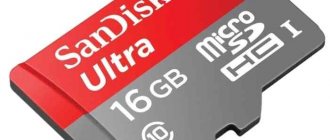
Counterfeit memory cards (micro) SDHC
As a rule, the package arrives quite quickly, and the happy buyer inserts the memory card into the card reader on a computer or other device. Outwardly, everything is smooth: the computer detects the card, its size corresponds to the 32 GB marking, the flash drive is formatted, data is written and read onto it without problems (although the read/write speed is not too high, but you can turn a blind eye to this). A happy buyer confirms receipt of the goods, leaves positive feedback to the seller and rejoices at a successful purchase. Problems come a little later and, as a rule, unexpectedly...
The buyer of such an SD card begins to actively use it for its intended purpose and one day suddenly realizes that some of the recorded files are unreadable. Agree, it’s a shame to return from their vacation to find that most of the photographs taken are unreadable. The fact is that Chinese craftsmen are reflashing the SDHC card controller so that it creates the appearance of a larger volume. When writing data to such a flash drive after exhausting the physically available space, it may simply not be written anywhere (/dev/NULL) or overwrite the old data. Those. Some files are irretrievably lost.
How to connect storage devices to a computer
First of all, I would like to draw the attention of readers to the existence of many types of devices designed for storing computer files (text, photos, videos, etc.). All these devices are called "storage devices".
Each of the storage devices, regardless of its type, is suitable for storing files of all types. That is, there are no flash drives or disks only for text files or only for photos. Each storage device can store any type of file.
In this case, the size of the free space of the storage device is of key importance. If the file size is less than or equal to the free space on the device, then the file can be written to that device. More information about file sizes can be found in this article.
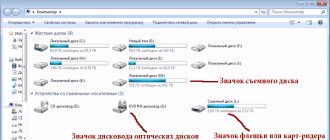
To open a flash drive, memory card, disk or other device
, it must first be physically connected to the computer. If you know how to do this, skip straight to the last section of this article. If not, I suggest that you first briefly familiarize yourself with the procedure for connecting main storage devices to your computer.
Types of storage devices and how to connect them to a computer
The most common computer storage devices today are.
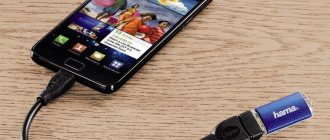
A flash drive
(flash drive)
– due to its small size, low cost, reliable data storage and sufficient “capacity”, is the most common portable storage device.
There can be a lot of variations in the appearance of flash drives. There are no standards in this matter. The only feature that all flash drives, without exception, are similar to each other is the presence of a USB plug. This plug connects the flash drive to a computer or laptop ( see image below
).
This is what flash drives might look like:
This is what a USB plug looks like, which connects flash drives to a computer.
How to connect a flash drive to a computer
Any modern computer or laptop has at least one USB connector (usually several). See the image on the right for what a USB connector looks like. These connectors are located on the front and/or back of the computer system unit. On laptops, USB connectors are located on the sides or back panels.
To connect a flash drive to a computer (laptop), you need to insert the plug of the flash drive into the USB connector.
Important. If the plug of the flash drive is blue, it is advisable to connect it to the blue USB connector of the computer. In this case, the flash drive will operate at maximum speed. If your computer does not have a blue USB connector, the flash drive can be connected to any other USB connector (it will work a little slower than its maximum capabilities).
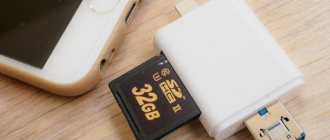
Removable drive
– Outwardly, it differs from a flash drive in its more significant size and weight. But in terms of its “capacity” it is also significantly superior to a flash drive. Typically, a removable disk is rectangular in shape (see picture).
Like a flash drive, a removable disk is connected
to the USB connector of a computer or laptop. For connection, a special cord is used, which comes complete with a removable disk. On one side of this cord there is a USB plug, on the other there is a small plug for connecting the cord directly to the removable drive.
Important. In some cases, the removable drive cord may have two USB plugs on one side. This cable must be connected to two USB ports on the computer at the same time. Otherwise, the storage device may not work (see image).
Optical disc
– a storage device that uses the principle of laser recording to store files.
Modern optical discs come in three main types - CD, DVD and Blu-Ray (BD). But each of them uses the same principle of operation and in terms of their physical dimensions they are all very similar to each other (see image on the right).
As a rule, one side of an optical disc has a shiny, almost “mirror” surface without any inscriptions. It is on this surface that files are recorded. It must be protected from all kinds of scratches and dirt. Sometimes even minor damage to it can lead to the loss of data recorded on the disk.
In some cases, both sides of an optical disc may have a storage surface. Accordingly, such disks are capable of storing twice as many files.
You can learn more about the types of optical disks, the technical side of recording information on them, and other features of their operation from this article.
How to connect an optical drive to a computer
.
To access the space on an optical disc, it must be placed in a special device on your computer or laptop called a "disk drive." On a computer, the drive usually looks like this.
On a laptop, the drive looks like this and is located on the side panel.
Some computers or laptops may not have an optical drive. In this case, you can solve the problem by purchasing a separate “external” drive, which is connected to the USB connector of a computer or laptop using a special cord (see image below). The procedure for using it is no different from working with conventional “internal” drives.
To place an optical disc in the drive, you need to press the button located on it. After a short time, a “shelf” will come out of the drive, on which you need to place the optical disc with the storage side down
. In a computer, you just need to put the disk in the recess on the shelf, and in a laptop, the disk must be inserted with the hole onto a special latch. After this, the drive shelf needs to be slightly pushed towards closing. On the computer, she will then go inside on her own. On a laptop, you will have to push it all the way in by hand and press it a little until it clicks.
Memory card
- a miniature storage device.
Due to their small size, memory cards are used mainly in portable devices - digital cameras, camcorders, car DVRs, mobile phones, smartphones, tablets, etc.
They come in several types. The most common are MiniSD cards (see image on the right).
Memory cards can be connected to a computer to copy videos, music, photos and other files to them, or vice versa - to transfer photos, videos and other information created using portable devices to a computer.
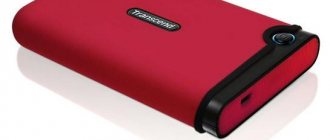
To connect memory cards
A special device called a “card reader” is connected to the computer.
Card readers can be “built-in” into a computer or laptop, or they can be in the form of “separate” devices (see image) connected to the computer with a special cord via a USB connector.
To connect a memory card to a computer, you need to insert it into the card reader slot. If the card reader is a “separate” device, it must first be connected to the computer.
Where can I get a card reader?
This question is not relevant if the card reader is built into a computer or laptop. If you don’t have one, you can buy a card reader for relatively little money at any computer store (on average about $10).
Important. The card reader can be replaced by any device that supports working with a memory card and connects to a computer (camera, smartphone, telephone, etc.). That is, if you need to connect a memory card used, for example, in a camera, to a computer, and you have a cord to connect this camera to the computer, you will not need a card reader. Just insert the memory card into the camera and connect it to the computer. It will completely replace the card reader.
How to test a purchased SD card
The value of data on a flash drive is usually much higher than the price of the media itself, therefore, in order not to encounter problems at the most inopportune moment (videos / photos taken during a trip cannot be read, important documents cannot be opened, etc.), it is advisable to test the flash drive in advance for fakes.
For testing we need the H2testw . The program is free, does not require installation, you can download it from the website of the German developers.
The default interface language is German, for convenience it is better to switch to English (English)
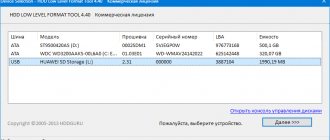
We insert the card under test into the computer, click Select target (select the drive letter corresponding to the memory card), and then run a full test of the memory card by clicking the Write + Verify .
The testing process can take up to several hours. If everything is fine with the flash drive, the test results will contain the inscription: “Test finished without errors.”
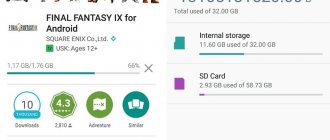
If the card size does not correspond to the declared size (it is too high), the log window will be highlighted in red, and the report will contain approximately the following lines: Warning: Only 31905 of 31995 MByte tested The media is likely to be defective.
3.5 GByte OK (7474008 sectors) 27.5 GByte DATA LOST (57867432 sectors)
Those. of the declared 32 GB, only 3.5 GB are actually available (the actual capacity of this flash drive is only about 4 GB).
A little lower in the log there is the text: Writing speed: 8.20 MByte/s Reading speed: 9.40 MByte/s This means that the speed characteristics of the memory card are also overestimated, which corresponds to class 4, but not class 10, as indicated on the card itself.
We recognize a fake and determine the real capacity of a flash drive
- To do this, we need a small utility called h2testw, download it from Yandex.Disk and unpack the archive. We launch h2testw.exe and for convenience (I don’t know German) switch to English. Click the “Select target” button.
- We select our problematic flash drive. Be careful not to make a mistake, otherwise you will lose all the data on the flash drive.
- Click the “Write+Verify” button.
- The process of filling the flash card will begin, and then the program will check how much was recorded and how much is actually on the storage media. It took me a little over two hours to use a flash drive with a true capacity of 8 GB (about an hour for writing and an hour for reading).
- Based on the results of the check, the program will display a report (it is filled out as the check is carried out and conclusions can be drawn earlier). Now we take a screenshot of the window and add it as evidence to the dispute, with a higher probability you will get your money back, since the product does not meet the stated technical characteristics. The report shows that the true amount of flash memory is 7.7 GB, and everything else is drawn.
- Now let’s get the flash card in order so that it can be used without the risk of data loss (as far as possible with a Chinese counterfeit card:) and for this we need one value, which is in the report. So before closing the window, copy or rewrite the number of sectors for the working volume.
How to return a fake card to its real size
So, having tested the card, we were convinced that its size is too high, and it cannot be used in this form. You can, of course, use the card to store unimportant data, for example in an mp3 player. Or you will have to constantly ensure that the size of the data on the flash drive does not exceed 4 GB. Is it possible to fix such a memory card by returning its real capacity?
Yes, but using the OS itself you won’t be able to reformat it to fit the actual volume. You can use Acronis Disk Director or a simple Chinese utility MyDiskFix.exe . Both tools allow you to restore the real size of “fake” Chinese flash drives with an inflated amount of memory, but the MyDiskFix utility is a little easier to use (besides, it does not require installation). The utility does not modify the flash drive controller, but can correctly format the actual working capacity. Its main drawback is the Chinese interface language.
- Launch the MyDiskFix program with administrator rights.
- Select a fake SD card from the drop-down menu.
- Move the switch to the second position
- In the data field, enter the actual number of sectors. This value is taken from the H2testw program log. In our example it is 7474008
- Then press the highlighted button.
- The utility will prompt you several times to warn you that all data on the card will be lost. We agree.
If the flash drive is not formatted or is write protected (The disk is write protected error), use the recommendations from the linked articles. You need to read these articles after you have returned the flash drive to its real size. Low-level formatting of a flash drive with incorrect dimensions in a re-flashed controller can completely destroy the device.
After reformatting, it is advisable to test the memory card again using the H2testw utility. If there are no errors, the (micro) SD card should be determined in the system with a real size and will become suitable for use (but how durable and reliable it will be is a matter of luck).
Determining the volume of a flash drive
A few words about memory cells and the controller
Any flash drive consists of memory cells (in fact, where data is written) and a controller (this “thing” links the memory cells and allows you to work with them).
It is clear that if the memory cells in a flash drive have a capacity of 8 GB, then you cannot write more than 8 GB onto a flash drive (this is simply physically impossible to do). But what is responsible for the volume shown in the properties of the flash drive and for its operation? Controller ! ☝
Controllers are often made universal, compatible with a specific series of flash drives. And then it is flashed in the required way, for the specific volume of the flash drive.
But there are cunning businessmen who reflash the controller the way they need - and the flash drive in your properties begins to show 500 GB or 1000 GB (in fact, the memory cells will still be the same 8 GB). Do you feel where the “dog” is buried?
Actually, dishonest sellers/manufacturers can reflash a flash drive to the size they need and sell it. And how will it work when those 8 GB are filled - they don’t care!
And the deception is usually not revealed immediately: many users fill the volume gradually (and not everyone will understand what’s what - some kind of error has appeared... Well, they appear often).
*
Flash drive diagnostics: determining the actual size of memory cells
For this work we need a specialist. utility...
H2testw
Website: https://www.heise.de/download/product/h2testw-50539
A utility from German programmers. Very simple, no installation required.
Main purpose: scanning a flash drive for its real physical memory capacity. It will help you quickly and accurately determine the real state of your drive: capacity, operating speed. Below I will test one such “super” flash drive with a capacity of 120 GB.
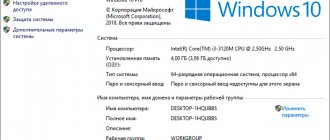
And so, below I will first show the properties of the experimental flash drive (this will make it clearer what we’re talking about).
Note : Copy all important data from this flash drive, during the process of restoring it, all current data from it will be deleted.
Flash drive 120 GB
Next you need to download and run the H2testw , and:
- switch the language in the utility to English (I think this is more convenient);
- select the media - that is, our flash drive (Select Target button);
- press the “Write + Verify” button and patiently wait for the test to finish (which can take several hours, it all depends on the speed of the flash drive and its capacity).
Start scanning
I have highlighted the scanning results specifically:
- Writing: actual writing speed to a flash drive (2.82 MByte/s);
- Verifying: actual reading speed from a flash drive (12.4 MByte/s);
- 14.8 GByte OK: actual size of the flash drive, i.e. ~15 GB. By the way, copy or remember the number of sectors – 31068072 ( highlighted in the screenshot below, you will have your own number! You will need it to restore the flash drive).
Real read, write speed and real flash drive capacity
By the way, if everything is in order with your flash drive, then you will see not a red stripe at the bottom of the utility window, but a green one and it will say “Test finished without errors” (translated into Russian as “Testing completed without errors”). Example below...
The test passed normally, no errors were found
*
Flash drive treatment and recovery
To format the drive and restore its actual capacity, we need one more utility: MyDiskFix.
MyDiskFix
English version: https://www.usbdev.ru/files/mydiskfix/
(What’s interesting is that the utility is made in China)
MyDiskFix is a free utility designed for low-level formatting of failed flash drives. Capable of resuscitating media and bringing them into working condition. With its help you can restore the actual volume of a flash drive.
Now let's look at how to format a flash drive in the MyDiskFix and restore its operation and its actual capacity.
And so, first we launch the utility and enter the following parameters:
- indicate the storage medium (our flash drive), the Choose Device column;
- set the formatting method to Low-Level (low-level);
- indicate our number of working sectors (the Sectors column), which we received from the H2testw utility (see the previous screenshot);
- and click the Start Format button (see screenshot below);
- note: if you have a Chinese version of the MyDiskFix utility, then be guided by the location of the modules in the English version, all functions in the Chinese version are located in the same places!
Setting up the MyDiskFix utility
After the MyDiskFix utility formats the flash drive, you will see a message from Windows that it has found new media without a file system, and an offer to format it (see the screenshot below).
Formatting a flash drive in Windows
You can go to “My Computer” yourself, select a flash drive and format it in the standard way. By the way, please note that the capacity of the flash drive will be real, i.e. 14.5 GB (not ~120 as before)!
The flash drive has been restored, the actual capacity of the flash drive is 14.5 GB
The flash drive should now work normally.
*
PS
If you couldn’t restore the flash drive in this way, try to find a special utility for the flash drive controller (having previously found out the VID and PID identifiers) and format the media with it. In general, this topic is quite large and I covered it in one of my articles (I provide the link below).
To help!
Restoring a flash drive: identifying the controller and flashing the drive firmware - see step-by-step instructions
*
That's all, everyone should keep a cool head when choosing and purchasing goods.
Good luck!
First publication: 06/23/2017
Correction: 01/03/2020
Useful software:
- Video Editing Great software to start creating your own videos (all steps follow!). Even a beginner can make a video!
- Computer accelerator A program for cleaning Windows from junk (speeds up the system, removes junk, optimizes the registry).
How to distinguish a fake (micro) SD from a real one and get your money back
Even for an experienced buyer, it is quite difficult to distinguish a real micro SDHC memory card from counterfeit ones. You can come across fake Chinese memory cards on almost all sites, including Aliexpress.com, DHgate.com and Ebay.com. The first sign of a fake card is a low price (does the miser pay twice?). Secondly, you should pay attention to the appearance of the product: the manufacturing company, capacity characteristics and memory class must be indicated (without errors!). Well, focus on the seller’s rating (not the most indicative criterion).
When you receive a flash drive, you need to check it with the H2testw utility; if a fake is detected, immediately file a complaint (dispute) with the seller and ask for a refund (as a rule, the card itself does not need to be returned).
Using a flash drive via USB
To use a USB port to connect your device to a personal computer, you need to do a number of simple steps:
Connection
- Pick up the flash device and check the presence of the connector; you also need to make sure that it is not deformed (obvious bends, scratches, cracks, etc.).
- Find a panel with USB connectors, which should be located either behind the system unit or in front. There is an option for placing panels where they are located both at the back and at the front. In this case, choose a panel that is convenient and accessible to you.
Opening
- Now it's time to use the flash device. In order to open it, you need to use the standard “My Computer” explorer. So go to the Start menu and select the Computer option.
Once opened, you can safely access the resources of your device.
Extraction
If the drive's data usage time has come to an end, then you need to safely remove the flash drive. This procedure is carried out by following simple steps:
- Close the windows that you called from the device memory.
- Go to the “My Computer” file manager and right-click on the flash drive icon. Select "Extract".
Thus, having completed all these steps, you do not have to worry about the health of the flash drive and the system.
Free up disk space in Windows 10
The space required to complete a feature update depends on two factors: the update path you select and the size of additional content and other updates that are applied to your PC when you install the feature update.
Windows uses three different paths to update features, depending on the amount of disk space available.
1. For PC with a lot of free disk space
Windows automatically tries to perform most of the update process in the background while you use your computer. This significantly reduces the amount of time your computer will be disconnected from
(or become unusable) during the update, although it may temporarily use more disk space to complete the update. Learn more about our efforts to improve battery life during updates (currently in English only).
2. For PCs with limited free space but enough to complete the update automatically
Windows will automatically perform optimizations to reduce the amount of free disk space required to install the update. This will result in longer offline installation times.
3. For computers that do not have enough space to install the update automatically
Windows will prompt you to free up disk space or use external storage to temporarily expand the storage on your PC. If you're using an external storage device, Windows won't need as much free space on your system drive as it temporarily uses your external storage.
For each of these update paths, the total amount of free disk space required will vary depending on additional content installed and other updates that apply to your PC. For example:
- Additional functions
.
Many additional features available for Windows are pre-installed or purchased by the system upon request or manually by you. You can see which ones are installed on your PC by going to Settings
>
Applications
>
Apps & features
>
Manage advanced features
. Open Advanced Feature Settings These features range in size from less than 1 MB to nearly 2 GB for Windows Mixed Reality Portal. You can reduce the amount of space required to install a feature update on your computer by removing advanced features that you do not use. - Number of installed languages
.
Windows is localized into many languages. Although many people use only one language at a time, some people switch between two or more languages. You can see what languages are installed on your computer by selecting Start
>
Settings
>
Time & Language
>
Language
. Open Language Preferences During each update, you must update all language resources and all associated typing recognition, text-to-speech, speech-to-text, and handwriting resources. Content for each language can range from 175 MB to over 300 MB. You can reduce the amount of space required to install a feature update on your computer by removing languages that you do not use. - Driver updates
.OEMs and other hardware partners sometimes publish new graphics, networking, sound, and other drivers along with a new OS update. The size of these drivers can vary significantly depending on your computer and which drivers have been updated.
- Quality of OS updates
. During a feature update, Windows attempts to download and automatically install the latest quality update so that your computer is fully up to date when you start using it. Shortly after a feature update is released, the quality update for that feature update may only be a few hundred MB, but as more are implemented number of quality and security changes, a quality update may increase to 1 GB or more. Your PC is running out of disk space, you can download and install a quality update after the feature update is completed.
Finally, Windows Update will temporarily disable hiberfile.sys, pagefile.sys, and other system files to use the space that these files normally occupy to apply the feature update. Any files that have been disabled from applying the update will be automatically re-enabled once the update is complete . Because these files vary in size depending on how you use your computer and the amount of RAM your PC has, even in cases where two different PCs have the same OS image, the amount of free disk space required to complete updates may vary.
The combination of the upgrade path and features means that a wide range of free disk space is required to complete the upgrade. Here are some examples of upgrading your PC to Windows version 1803:
| Optimized for reduced battery life | Optimized for minimal disk space | Optimized for minimal disk space with external storage | |
| Minimal additional features, languages and updates | 20 GB | 5.5 GB+ | 4.5 GB+ |
| Many additional features, languages and updates | 20 GB+ | 13.75 GB+ | 7 GB+ |
.
System malfunctions
If your file manager does not have access to it when you connect the media, then there are several solutions.
The system does not recognize the device
You can see if you have access to the drive through another file manager:
You can use the popular TotalCommander software.
- To do this, go to any convenient browser and download this program.
If these steps do not help, and the device is not found, then the USB drivers may be damaged.
You need to remove them and install new ones by following these steps:
- Go to the main system menu "Start". And select the Control Panel option.
Having completed all these steps, reconnect the flash device to your personal computer, and the system will install the missing drivers for using the drive, after which its icon should appear in the file manager.
The system cannot open the device
If an error occurs when opening an external storage medium, then the best way is to format the device and then restore the data. This procedure is done through simple steps:
- Right-click on the flash drive icon and select “Format”.
Video - How to open a flash drive on a computer
Having problems connecting and opening a flash device
A number of problems often arise with the connection and further operation of the storage medium. Let's look at fixing these problems.
Physical damage
Your device may not work due to a malfunction of the flash media itself. This could be a damaged connector:
- bends;
- cracks;
- broken contacts, etc.;
- also damage to the board itself, due, for example, to deformation of the case.
Note! The solution to this problem can be either purchasing a new device or having it repaired by a specialist if you do not have the skills to repair such devices.
As for the USB connector, the cause of problems with connecting the media may be hidden in a malfunction of the system unit panel connector.
Advice! Make sure the USB is working by using another playback device, or select a different connector.