Home / Phones / Android / Android Repair
Back
Published: 03/04/2022
Reading time: 6 min
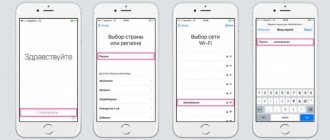
This article will tell you about the reasons why the touch screen on an Android phone or tablet does not work, as well as what repair and diagnostic procedures you can carry out yourself, and what is better to contact a service center.
This article is suitable for phones and tablets of all Android device manufacturers: Samsung, LG, Sony, Huawei, Xiaomi, HTC, ZTE, Fly, Alcatel and others. We are not responsible for your actions.
- Reasons for sensor failure in Android
- What to do if the sensor does not respond?
- Restoring the sensor (safe mode)
- Android Screen Calibration Basic Calibration Methods
- Screen calibration using Android
- Android screen calibration apps
Why is this happening?
The sensor on Android or iOS can start to fail completely unexpectedly. The reason may be poor quality repairs or components, or a fall. Typically, inadequate sensor performance on almost any smartphone is associated with mechanical impact. To protect the touchscreen from impacts, protective glass or films are installed on it, since without additional protection, unpleasant situations may arise due to an impact or fall. As a result, the sensor on the phone malfunctions, or it completely fails.
The touchscreen may start to fail for several reasons:
- Testing the battery: top rating of the best applications for checking the smartphone battery in 2020–2021
- Moisture entering the device body.
- Software errors.
- Incorrect replacement of the touchscreen or poor quality of components.
If you know for sure that your phone has not been subjected to mechanical stress or moisture, but the touchscreen does not respond to touches or reacts incorrectly to them, then most likely the problem is a software error. It is possible to fix this yourself.
Causes of the problem
Often, the phone presses buttons on its own due to a hardware or software failure. In the first situation, the reason is a breakdown of components, and in the second, a software problem.
Let's look at the most common reasons when the phone screen clicks on its own:
- Mechanical damage to the gadget.
- Phone falling.
- Low quality resistive screen.
- Poor quality assembly.
It is necessary to start solving problems with software methods. If they do not help, then you should resort to hardware repair.
Reboot your phone
As stated above, the problem may be software. In this case, rebooting the device may help. If your iPhone sensor is faulty, you need to:
- Press and hold the power and home buttons (power and volume down buttons on iPhone 7 and above).
- Wait for the Apple logo to appear on the phone screen.
- Check the functionality of the sensor by touching the icon of any application after loading the system.
If the sensor malfunctions on a smartphone running Android, the instructions for rebooting will vary, since the key combinations depend on the device manufacturer. For example, for most Samsung smartphones, a combination of the power key and volume down key is suitable. Rebooting the device can solve the problem of the sensor not working properly due to a software error.
Hardware problems
If the problem is not solved using software methods, perform the following steps:
- Clean the screen. The sensor may malfunction due to contamination. A soft, lint-free cloth and sensor cleaner work well to clean the screen. You can also use wet wipes that are designed specifically for screens.
- Checking protective accessories. Due to the presence of additional protection on the phone, the sensor may work independently. This happens when the protective glass or film is applied incorrectly. To solve the problem, remove all types of glass protection.
If the above methods do not solve the problem, then you should contact the service center. The screen may need to be replaced.
Only qualified service center specialists using special equipment can reliably replace the screen.
Indicate the device model and what signs of failure it has. Then we can help you.
Advertising on the site helps keep it running and answer your questions.
Check protective accessories
It happens that it is the additional protection that interferes with the operation of the sensor. Because of this, the sensor may not respond immediately or may slow down when you press one of the sides of the case or mechanical buttons on the device. For example, the sensor may completely stop responding to touches across the entire display, or only in the lower part, if the protective film or glass was glued to the phone screen incorrectly.
The market today is replete with affordable security solutions for smartphones, but not all of them are of high quality and do their job properly. If your case covers any part of the screen, it will interfere with the normal functioning of the device, causing the touchscreen to malfunction or freeze. What to do if your iPhone sensor is faulty? In order to identify what causes the touchscreen to respond incorrectly, you need to remove the case and check the sensor. If interruptions in the operation of the display are caused by the protective cover, then after removing it, the functionality of the sensor will be restored. But if the screen continues to fail, you should look further for the problem.
Main reasons
Among the reasons why Android slows down or freezes, there are several main ones:
- slowdown can be caused by a large number of simultaneously running applications, albeit in the background;
- due to a recent update, a smartphone that previously did not slow down may begin to do so;
- any device can freeze even when it starts to run out of free space;
- a small amount of RAM can even cause the gadget to spontaneously reboot;
- Sometimes the phone may glitch due to problems with the touchscreen.
What should you do if your phone starts to slow down for one of the reasons listed above?
What to do if the problem cannot be resolved?
If rebooting the device, re-gluing the glass and removing the protective case did not produce any results and the touchscreen is still buggy, most likely the issue is not software errors and incorrect accessories, but a malfunction of the internal components of the device. In this case, you should contact the service professionals who will carry out diagnostics, identify the breakdown and replace the failed part.
- The sensor on the phone presses by itself
If, after the device is dropped, the keys periodically work incorrectly or do not work at all and the touchscreen does not respond to presses, then the technician will first find out the cause of the breakdown and then eliminate it. After the diagnosis, they will explain to you in detail why the touchscreen was buggy or not working, and will tell you about the condition of your device after it was dropped or exposed to moisture. Next, if necessary, a specialist will clean the device from traces of moisture or replace the display module.
Connect an external keyboard and mouse
If you cannot install any application, then connect an external keyboard and mouse to your mobile device. There's nothing complicated about it. You only need to connect the appropriate cable or set up a Bluetooth connection.
Please note that phones and tablets usually have one USB connector, so to simultaneously connect a keyboard and mouse via a USB interface, you may need a splitter (USB hub).
When might a screen replacement be needed?
The display of any phone is constantly exposed to mechanical stress, as a result of which it may stop responding to touches, or the sensitivity of the sensor may decrease.
Deep scratches on the glass can also cause the bottom of the screen to stop working. To solve problems with a touch display that is completely or partially not working, it is necessary to replace the glass or the entire display module. Also, replacing the display if the sensor does not work correctly or information is displayed incorrectly on the screen is necessary after:
- Phone falling.
- Moisture gets into the housing, which negatively affects the sensitivity of the sensor and causes incorrect responses.
- Scuffs and deep scratches on the glass due to normal wear and tear.
- Other mechanical damage to the touchscreen.
Replacing the display module if damaged or not working correctly is quite simple. But if you disassemble and install a new screen yourself, you can damage thin cables and mounting sockets, which will lead to more expensive repairs.
Many owners of Android devices with a touch screen often encounter a problem when the screen “does not listen to them.” That is, when you touch the touchscreen with your finger or stylus at one point, the phone perceives it as a touch at a completely different point. Or the sensor completely carries out orders only after 3-4 attempts. And most likely the cause of these problems is the incorrect operation of the screen, and to fix it, you need to calibrate the touchscreen of the Android device.
What it is?
Screen calibration is the process of adjusting the touch display to correctly execute commands when touched with your fingers or a stylus. Of course, you can work with your device without such settings, but then get ready to waste your nerves, time and other troubles.
This procedure is required in most cases after the phone has been dropped, especially in water. Replacing the screen, a water stain underneath, even the smallest damage may require urgent adjustments. Checking whether you need calibration is as easy as shelling pears. First, remove the protective film so that the sensor operation is as clear as possible, then simply enter a number or letter. If you selected, say, “B”, and “A” appeared on the screen, then rest assured that you need to configure the touchscreen.
There are two main types of screens used in the production of Android devices: capacitive and resistive. Capacitive is now used in the vast majority, as it is more reliable and of higher quality. But problems often arise with resistive ones, and they require tuning more often. But it’s fortunate that these days they are rarely used - only in outdated or budget models.
How to calibrate the screen on Android?
There are two main ways to fix a broken touch sensor - special programs and with your own hands. We should also remind you that for HTC, Samsung, Nokia and other Android devices, the calibration procedure is almost identical. You can also see how to set up auto-rotate screen.
Configuration using special programs
In free, and most importantly - free, access, you can find a lot of software for screen calibration. They are easy to install, easy to operate and, most importantly, produce results. For example, Clinometer, TOPON, Bubble - just look at Google Play. But? even if you do not have access to Google Play, you can adjust the display without it using the second method.
- The sensor does not respond to touch - what is the reason? Touch screen
Self-configuration
In order to independently adjust the touchscreen of Android 4 (or another version) without any problems, we will present you with step-by-step instructions:
- The first step, of course, is to go to the Settings menu.
- Next, select “Phone Settings”.
- Find the “Calibration” item and a target cross with a dot inside will appear in front of you.
- We aim at the center of the target several times (3 will be enough).
- After this, your device will remember the touches and calibration can be considered complete.
- After completing the setup, check the operation of the sensor. If exactly the symbol you clicked on appears on the screen, then everything was done correctly. Congratulations! (How to reset settings)
Setting touch screen sensitivity on Android: Video
Contacting the service center
Now you know two ways to calibrate the screen on your Android device yourself. But there is a third option for setting up your device - an official or private service center. It would seem, why contact the master for such a trifle? But such a problem is not always a trifle. It happens that the cause of the breakdown is not due to lost settings, but to a serious breakdown or manufacturing defect of the display. In this case, it is really better to contact the service if the first two do not work.
After touchscreen smartphones replaced push-button phones from the gadget market, users were faced with a new problem. The sensor may be “ dull ”, not respond to requests, or even during a touch, open something that is not what the user needed, as if displacing it. In order to avoid such problems, the sensor must be calibrated.
Before you calibrate the sensor on Android, you must be sure of the accuracy of your actions. First, you have to check your smartphone for touch errors. Turn on, for example, a message and press certain letters. If what you clicked appears on the screen, then no calibration is required. Well, if the symbols are different, then you need to configure your smartphone.
It is necessary to calibrate the sensor:
- Every month or two of using the smartphone (if you notice obvious changes in the behavior of the display)
- Gluing the glass to the display
- Having bought a smartphone second-hand or a new one
- After the fall, flooded with water
- After changing the touchscreen and screen
- After changing the protective film
Content
show 1.How to calibrate the sensor on Android manually 1.1.Using applications 2.Calibrate the Android screen through the engineering menu
Optimize response time
If your touchscreen works but is slow to respond to touch, you can try to resolve the issue using the Touchscreen Repair app.
This application can do screen calibration and reduce response time. The program will ask you to touch the screen in several places, after which it will set the optimal delay, taking into account the features of the phone.
The effectiveness of Touchscreen Repair depends on the phone model and manufacturer. Some manufacturers' default sensitivity settings are already close to optimal values. In this case, the effect will be minimal. However, it’s still worth a try, especially if none of the above helped.
How to manually calibrate the sensor on Android
It’s worth saying right away that a large number of gadgets can be configured completely differently, and perhaps you are the owner of such a smartphone. The manufacturer may change or even eliminate this setting in the smartphone. Below we will consider the option of setting up calibration in the usual way.
- Go to settings, and there go to the “Phone Settings” tab.
- Go to the “Phone calibration” tab.
- After this, a cross with a target will appear on a white background in the middle of the screen. Click on it three times.
- After this, the calibration will be completed. After this, check the sensor in the same way as described above.
After calibration, it is recommended to reboot your device!
Using apps
If your smartphone does not have the ability to configure screen calibration, you can use a special application. In this case, it will be identical as in the standard version, and you will need to do the same as in a smartphone with this built-in feature. Some similar applications allow you to configure settings more accurately than native ones.
To search for such applications, go to Google Play through the application, and enter “Screen calibration” in the search, and then select the one you need. Unfortunately, we cannot advise you on specific programs, since they will display differently on different devices. BUT, I personally recommend the applications I used!
An Android device can be configured in a variety of ways, and in particular, many utilities have been created to help with such a simple task. “MachScreen Calibration” is probably the most popular program in this case. Also, “Touchscreen Calibration” is an equally popular and simple option for sensor calibration.
Background programs
If you have applications that cause a drop in Android performance, then you have the opportunity to delve into their settings and disable some of their functions or, for example, set a longer synchronization period, and so on. Another option is to freeze the application, which is close to deleting and is not suitable if you want to use the program occasionally.
However, there is a third way.
Solution
You can put the application into deep sleep. Sleeping programs will wake up and perform their functions as usual when you click on the icon. To use this method, try Greenify (Root required).
After installing the program, click the + button and you will be taken to the App Analyzer page. The applications listed in the Running in background and May slow down the device when... sections require special attention, as these are potential culprits of slowdowns. Select the ones you want to put to sleep and click Accept in the top right corner to send them to sleep.
Android screen calibration through the engineering menu
The most reliable and sure way to configure the correct operation of your screen!
- Go to "Challenges"
- Enter a special code (it may differ on different models, try it)
- *#*#3646633#*#*, *#*#4636#*#*,*#15963#* or *#*#6484#*#*
- Next we find an item with screen calibration (different variations on different versions of Android, something with “Sensor”
- After going to the calibration submenu, press start
- If everything was done correctly, you will see the calibration result
Now in pictures. I give an example of entering the engineering menu on Xiaomi Mi5 .
This code worked on my phone. We are looking for the item with calibration, in my case it is number 9. Press “Calibrate”
| Listen to the article |
If your smartphone screen stops working properly, you can try to solve the problem yourself. First, you should find out what caused the breakdown and what options are available to correct the problem.
Content
Why the touchscreen or touch buttons may not work
If the sensor on your smartphone stops working, the cause may be physical impact or a software failure.
Options for harmful physical impact:
- a strong blow or fall from a height;
- contact with liquid;
- sudden temperature change;
- dents, scratches and cracks on the screen;
- unsuccessfully applied film or protective glass;
- serious pollution.
Options for software failures:
- overloading the operating system with a large number of applications;
- incorrect operation of some programs;
- changing smartphone settings;
- incorrect recognition of touches by the sensor;
- inappropriate or unstable firmware.
How to fix if your device is physically damaged
Next, we will look at ways to test the screen and restore it.
TSP Dot Mode and TSP Grid Mode tests
To conduct this testing, you need to get into the engineering menu. To do this, dial the service code. It may be different for different phone manufacturers and models, try these options:
- *#*#3646633#*#*
- *#*#4636#*#*
- *#15963#*
In the engineering menu, find two positions:
- TSP Dot Mode - allows you to check the screen in “dot mode”. There should be a cross in the place where you touch the display.
- TSP Grid Mode - testing takes place in “grid mode”. The screen is divided into several rectangular parts. When a particular rectangle responds to touch, its color will change.
This testing will tell you where the problem is on the screen.
The developers do not recommend trying to repair the phone yourself, as this requires certain knowledge and experience.
"Tapping" along the perimeter of the screen
This is the easiest way to test the display, which does not require installing programs or other complex manipulations. Simply press your finger gently across the entire surface of the display, especially in problem areas. Start with light pressure and gradually increase. Then gradually reduce the pressure.
Launch the keyboard and press each key. Try moving application shortcuts across the entire screen. At the same time, pay attention to the sensitivity of each section of the display. Linger on the corners of the display, focusing on the bottom. Such testing will give you all the information about the sensitivity of the touchscreen.
Dry after exposure to moisture
If your smartphone gets wet, follow these instructions:
- turn off the power;
- remove the battery (for devices with a removable battery);
- remove the SIM card and flash drive;
- wipe the device with paper napkins or a cloth that absorbs moisture well;
- remove headphones, cases, film or glass from the screen;
- place the smartphone in a bag filled with rice. Leave the device in this position for 12 hours. During this time, the cereal will draw out all the liquid from the phone.
If the rice procedure does not give the desired effect, contact the service center.
Check the cables
A problem with the cable can be determined even without disassembling the phone. Sensor malfunctions are one of the signs of such a problem. Pay attention to the following signs:
- the smartphone began to “slow down” during operation;
- the device turns off when you unlock it;
- The camera malfunctioned.
If, in addition to the problems with the sensor, the above problems also appear, then there is definitely a problem with the cable. But you shouldn’t repair it yourself, since this requires a good understanding of the smartphone’s structure.
Replacing the sensor
If your smartphone does not use OGS technology, you can try replacing the sensor yourself. To do this you will need the following tools and devices:
- a set of small shaped screwdrivers (available on sale especially for smartphones);
- mediator, spatula, plastic card;
- silicone suction cup with ring or loop;
- regular hair dryer;
- glue B-7000 or equivalent;
- thin rubber gloves.
Operating procedure:
- Disassemble your smartphone.
- Warm up the display with a hairdryer around the entire perimeter to a temperature of about 70-80 degrees. Use a suction cup to pick up the heated screen and pull it off the body.
- Install a new sensor. Prepare it by removing the protective film from the inside. Apply a thin layer of glue over the entire area of the seating surface. Place the sensor in place and press it gently. You can place a small, flat object weighing no more than 300 g on top of the screen so that it sticks better.
- You can collect the phone. Connect the cables, fix the internal threaded connections and install the external parts of the housing.
If you are not sure that you can cope with replacing the sensor yourself, take the phone to a service center. Repairing the device yourself will void the smartphone warranty.
How to save data when the display is not working
If the smartphone screen has completely stopped working and you want to save the files on the phone, you will have to use a regular PC and a special program.
Broken Android Data Extraction
iSkysoft have developed a program that allows you to save or restore necessary information from broken phones. To do this, install the Android Data Extraction application on your computer and follow the instructions.
Instructions
- Connect your smartphone to your computer using a wire.
- Open the program, section “Data extraction” (Damaged devices).
- Select the file type to recover.
- Indicate the current state of the smartphone: a) “Sensor does not work”; b) “Black/broken display.”
- Enter the smartphone name and model. Then click "Next" and "Confirm".
- Turn off your smartphone.
- Continue the process of saving data on your computer.
The touch screen of modern smartphones is quite fragile, so it can easily malfunction. You can always try to restore the touchscreen yourself or send it in for repair if the breakdown turns out to be complex.
Solutions to the problem
Cleaning apps
When the phone starts to slow down a lot due to power-hungry applications and background processes, then to correct the situation you need to:
- hold down the menu button, a list of recently launched applications will open, select “Delete all”;
- in the Application Manager, view the list of running ones (opposite each one the operating time and the amount of RAM it occupies are indicated) and forcefully stop each one that is not needed at the moment;
- Additionally, you can remove live wallpapers and widgets, which also greatly affect the productivity of the device;
- It is better to remove applications that the owner of the gadget does not use altogether in order to avoid running their processes in the background in advance.
Rolling back an update
Why does my device slow down after the update? The fact is that over time, any smartphone or tablet becomes outdated, and each new version of software or Android with its additions requires more and more powerful hardware.
- Via Recovery. First you need to download the required firmware version to your phone and save it on your memory card. Then enter Recovery (usually using a combination of the power button and the volume rocker down). Next, install the downloaded update and reboot the phone.
- Through a computer. To do this, you need to download the installation file from the manufacturer’s official website and, using the software supplied with the phone (usually on a disk), install it on a gadget connected to a PC.
After this, it is advisable to disable the automatic system update function on your phone so that you do not have to repeat the procedure. You should also remember that after flashing the phone, all data may be lost, so it is better to make a backup first.