About a month ago, I purchased a Tenda AC6 1200 WiFi router from Aliexpress. For me, this is a landmark model, on the success of which the future of not only Chinese, but also all other entry-level SoHo-level routers largely depends. Why? Yes, if only because the AC6 is a dual-band unit for 1,600 rubles - find it cheaper! At the time of writing this article, it is the only one on the market; everything else is at least 50% more expensive. At the same time, it has 5 dBi antennas and a slightly more powerful transmitter. Of course, if you compare it with Keenetic Giga, then the coverage area is a third smaller, but the compared model is 4 times more expensive. Therefore, I think that for this price the WiFi coverage area is more than good.
By the way, there were rumors that Tenda AC6 had too much power and was banned in Russia. This is wrong! The level of radiation is within acceptable limits and harm from the device will not be greater than from others. The second distinctive feature of the model is support for IPTV, including with separate Vlan IDs. That is, Tenda AC6 1200 is the first router in Tenda’s lineup that works with digital TV from various Russian providers, including Rostelecom.
What’s noteworthy is that the developers chose a method that was simpler for themselves and for their clients, without any further ado by virtually separating one of the LAN ports for the set-top box. They allocated the port in hardware. Accordingly, setting up IPTV on Tenda AC6 is not particularly difficult.
To connect other devices, the Chinese left 2 more LAN ports. This trend was started by Xiaomi, and other Chinese designers began to repeat it. Indeed, practice shows that in 8 cases out of 10, users use a maximum of one router port to connect a printer or an old computer, and prefer to connect everything else via WiFi.
The Tenda AC6 is also fine with cooling. Firstly, the chip is not the most productive, which means it won’t get very hot. And secondly, due to the large antennas, the router case had to be made large too. As a result, the device’s board itself takes up about a third of its body. In my opinion, it would be better if the layer of plastic on the bottom was thicker for stability, but the router itself would be more compact. Now it takes up more space than the same Giga.
I couldn’t help but tell you about an interesting feature that I haven’t seen in others. This is disabling the diode indicators - manually follow the schedule. They are actually quite bright and if you place the device in the living room, it will interfere with sleep. There is obvious concern for the consumer!
Features and Specifications
Main characteristics of TP-Link Tenda AC6:
- Wi-Fi network standards: 802.11 n/b/g (2.4 GHz) and 802.11ac/n/a (5 GHz);
- number of ports: 3 x LAN (RJ45), 1 x WAN (RJ45);
- LAN port speed: up to 100 Mbit/s;
- WAN port speed: up to 100 Mbit/s;
- Wi-Fi speed: up to 300 Mbit/s (2.4 GHz), up to 867 Mbit/s (5 GHz);
- number of antennas: 3;
- dimensions: 220 x 141 x 49 mm;
- price: 2100 to 1500 rub.
The Tenda AC6 wireless router is capable of providing fast and reliable operation thanks to its high-speed processor. Four antennas, each with its own signal amplifier, allow the Wi-Fi signal to effectively overcome obstacles (such as walls).
Another feature of this device is the Wi-Fi scheduling feature. To use it, you just need to set the time, and the router will turn off or, if necessary, turn on the wireless network.
All about local networks and network equipment
- Forum
- Blogs
- Contacts
A wireless router has become an integral part of an active life both at home and at work. Modern devices are highly functional and affordable, offering gigabit Ethernet ports and dual-band wireless Internet access. The heroes of this article are Tenda routers. Let's take a closer look at how to configure the Tenda AC 1200 router, as well as what characteristics the AC6 and AC9 models have.
Tenda AC6 and Tenda AC6 (ac1200) - what is the difference
Versions AC6 and AC1200 are built on different chips. The first devices were made based on Broadcom BCM53573 and were produced from 2016 to 2017. This chip was built using 40 nm technology and operated at a frequency of 900 MHz. Now all Tenda AC6 routers use the Realtek RTL8197FN chip. They have a gate length of 26 nm and a frequency of 1000 MHz. Thanks to this, productivity has increased and energy consumption has decreased.
Externally they are the same. You can distinguish one model from another by looking at the characteristics of the power supply. In the first model it is designed for 12V, and in the newer one for 9V.
Blog about modems, routers and gpon ont terminals.
About a month ago, I purchased a Tenda AC6 1200 WiFi router from Aliexpress. For me, this is a landmark model, on the success of which the future of not only Chinese, but also all other entry-level SoHo-level routers largely depends. Why? Yes, if only because the AC6 is a dual-band unit for 1,600 rubles - find it cheaper! At the time of writing this article, it is the only one on the market; everything else is at least 50% more expensive. At the same time, it has 5 dBi antennas and a slightly more powerful transmitter. Of course, if you compare it with Keenetic Giga, then the coverage area is a third smaller, but the compared model is 4 times more expensive. Therefore, I think that for this price the WiFi coverage area is more than good.
What’s noteworthy is that the developers chose a method that was simpler for themselves and for their clients, without any further ado by virtually separating one of the LAN ports for the set-top box. They allocated the port in hardware. Accordingly, setting up IPTV on Tenda AC6 is not particularly difficult.
To connect other devices, the Chinese left 2 more LAN ports. This trend was started by Xiaomi, and other Chinese designers began to repeat it. Indeed, practice shows that in 8 cases out of 10, users use a maximum of one router port to connect a printer or an old computer, and prefer to connect everything else via WiFi.
The Tenda AC6 is also fine with cooling. Firstly, the chip is not the most productive, which means it won’t get very hot. And secondly, due to the large antennas, the router case had to be made large too. As a result, the device’s board itself takes up about a third of its body. In my opinion, it would be better if the layer of plastic on the bottom was thicker for stability, but the router itself would be more compact. Now it takes up more space than the same Giga.
I couldn’t help but tell you about an interesting feature that I haven’t seen in others. This is disabling the diode indicators - manually follow the schedule. They are actually quite bright and if you place the device in the living room, it will interfere with sleep. There is obvious concern for the consumer!
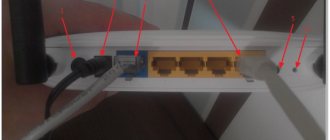
Indicators and connectors
The front panel of the Tenda AC6 router contains the following indicators:
- SYS – if it blinks, it means the router is working properly;
- two Wi-Fi network indicators, for the 2.4 and 5 GHz bands, blink when the access point is operating in the corresponding band;
- then there are 3 indicators of LAN ports and one WAN, they light up when a network cable is connected to them, and blink during data transfer;
- The WPS indicator turns on when the gadget is successfully connected to the network (goes off after 2 ... 5 s), flashes when the connection is established.
The rear panel contains the following items:
- 3/IPTV – if the IPTV function is enabled, the port is used only to access the IPTV service, otherwise it is a regular LAN port;
- 3 Ethtrnet ports, used to connect a local network cable;
- Internet (WAN) port is required to connect the provider cable;
- POWER socket, used to connect a power source;
- Wi-Fi – This button is used to enable or disable the Wi-Fi function.
- RST/WPS - Used to restore the router to factory default settings or enable the router's WPS function.
"Localka" and DHCP server
If fine tuning of the local network is required, do the following:
- In configurations, LAN is selected;
- IP changes if necessary;
- It is mandatory to enable the DHCP server and set the range of addresses available for issuance;
- Go to the “DHCP Reserve” tab, where you can configure the issuance of a static address to certain users;
- Complete the setup by saving all changes and restarting the router.
Automatic setup
In the automatic router configuration window, you will be asked to choose one of the methods for connecting to the Internet; you need to select one of them. There are the following options: dynamic IP address, static IP address, PPPoE, Russia PPTP, Russia L2TP, Russia PPPoE.
Which one to choose (as well as other connection parameters) must be checked with your provider. After this, you need to enter additional information about the connection: which information depends on the selected connection type. For example, if you select the most common type of PPPoE, you will need to enter a username and password, which must be provided by the provider.
On the next page you need to configure your Wi-Fi settings. Here you can select the transmit power, SSID, password and set a password to log into the admin panel. You can also o if a password is not needed.
Connecting the Tenda router and entering the settings wizard 192.168.0.1
For those who picked up Tenda for the first time in their life, I would recommend starting work with the router through the step-by-step wizard. Having connected my computer to the Tenda router and accessed its IP address (192.168.0.1) or the tendawifi.com web address, I discovered a pleasant surprise - new admin firmware. Its interface has become both more pleasing to the eye and easier to configure, especially for beginners. You know, when you once again take a router from the same manufacturer and see the same admin panel, which differs from the previous model only in the presence or absence of certain menu items, it becomes a little boring. And I don’t want to describe them in detail every time - we noted a couple of features, and that’s enough. Here my eyes really lit up and I wanted to share in detail what I saw with you!
What is your opinion: is WiFi harmful?
Yes
22.91%
No
77.09%
Voted: 36474
First of all, when you first log in, you immediately set a password (later you can change it) - both for the WiFi network and for access to the admin panel - this is great, since, for example, it annoys me when you put the router in a place pre-designated for it , connect and hide all the wires, and then bam - and here you are, in order to set it up you need to go look at the sticker on the case with the authorization data. Here you configure everything yourself right away - it’s convenient!
Before connecting the router, I recommend resetting the Tenda settings to avoid problems with the initial system configuration.
The main page of the admin panel displays current information about operating networks, connected devices and speed.
Setting up via mobile application
To make router settings easier, you can use the Tenda App mobile application. It can work on iOS and Android smartphones and tablets.
To install it, you need to go to the “Advanced Settings” menu and click on the “Tenda App” icon. In the new window, scan the QR code, follow it and install the application. After that, register the program.
To control the router from a smartphone, you need to connect to a wireless network and run the installed program.
Switching to repeater mode
If the router was purchased with the purpose of using it as a repeater, that is, a repeater, it needs to be configured as follows:
- Go to settings and find the tab “Wifi Settings” - “Wireless Relay”;
- Activate the appropriate mode. This will open several functions: WISP - wireless bridge or “Client + access point” type;
- In both of these cases, the main network is selected, the signal of which will be transmitted further, the password for this network is entered and the changes are saved;
- The device will reboot and start operating in the selected and configured mode.
Wi-Fi connection and settings
To enter the Wi-Fi connection settings, you need to enter the “Wi-Fi Settings” menu and click on “Wi-Fi name, password”. After this, for each of the bands (2.4 and 5 GHz), you need to select the name of the wireless network, the encryption mode and enter the password.
The router offers three security modes: WPA-PSK, WPA2-PSK and WPA/WPA2-PSK. You can choose the one you need. Or "No" to connect to Wi-Fi without asking for a password.
How to connect wifi
There are two ways to configure Wi-Fi on the router of this model:
- via WEB interface;
via WPS.
The device has an integrated AP access point and, accordingly, supports the simplified WPS settings mode.
It is more convenient to configure wireless access in the first way, using the WEB interface:
- First, go to the Wireless Setup page. Select “Basic wireless network settings”;
find the “Power on” button and check the box next to it;
Almost all users would like to assign their own name instead of the standard one. This is done as follows: you need to find the “Primary SSID” column, delete the existing name and enter a new one;
To enhance security, you can also use the SSID Broadcast button. Usually it is turned on. If you turn it off, only the user who knows its SSID will be able to connect to your Wi-Fi;
There is also an additional feature in the control panel called "AP Isolation". What does it give? With its help, you can exchange any files and data online with other users who also have a similar router installed, as well as gain access to all intranet services. This is not very convenient, and therefore it is not profitable to turn it off. This is done only when there really is a need to establish a ban on communication between users and isolate them;
The Wi-Fi installation for the Tenda N3 model router can be considered completely completed after you set a password on it to protect your network. It is no secret that with an open network, anyone can connect to it and use Internet services for free. Even if the unknown neighbor is not up to anything bad, it is still an unpleasant fact, so it is better to protect yourself from unwanted intrusion.
Moreover, this is done literally in three clicks:
- again go to the “Installing a wireless network” page;
in the “Security” item, from the proposed options you need to select the following: “WPA2-PSK security mode” - this is the maximum level of protection that you can provide on this device;
Now all that remains is to come up with a password, which should consist of no more than eight characters, and enter it in the appropriate column. Share this password only with those who will have the right to access your device;
don't forget to save all changes.
To set the maximum level of protection, enter the required data in the appropriate fields.
That's all - you have made all the necessary settings for your router yourself and protected yourself from illegal penetration of unauthorized users onto the Internet through your network. Would you like to know more about your router's features?
Setting up IP TV
The wireless router supports IPTV function. To use it, you need to enter the router’s user interface and select the “Advanced settings” line in the left menu, then click on the “IPTV” icon.
In the window that appears, activate the IPTV switch, select “Configure a virtual local network” in the “VLAN” drop-down menu and enter the data provided by the provider.
Setting up the Internet on the router
The first priority is to set the AC6 to the correct data transfer standard. Let's look at the 4 most common ones. You can find out what standard you have either from the provider’s technical support or from an agreement with the company for the provision of digital services.
L2TP and PPTP standards
Their setup process is the same:
- Expand the list with connection types. Highlight L2TP and PPTP.
- In the domain name, enter the VPN address of your operator - it can consist of both letters and numbers. You will find everything in your agreement - the provider must make sure that its subscriber has all the setup data. If they are not there, feel free to contact technical support - they will help you and tell you everything.
- We write a login and code from the network. We set the IP to be received automatically. Or select a static option (if you purchased a separate service).
- If necessary, manually enter the DNS servers that are convenient for you. Click on “Connect”.
Set the connection type to PPTP or L2TP
PPPoE standard
If it turns out that you have a PPPoE connection, follow these instructions:
- We put PPPoE in the expanded menu with a mention of Russia.
- We write the login and code of your Internet provider.
- We determine the type of IP - automatic or statistical (usually this is the first type). Not everyone purchases separate addresses for their networks.
- Click on “Connect”.
In the PPPoE standard, you need to enter data for authorization on the network
Static or dynamic IP
These two types are easy to set up. If you have dynamic IP acquisition set, simply select the appropriate value in the drop-down menu. If necessary, manually specify a couple of addresses for DNS servers. After this, save.
In dynamic IP, you can only configure manual DNS entry
If you have a specific IP in the contract, put a static value in the drop-down menu and very carefully enter all the data from the agreement with the provider.
In the static address you need to enter the IP address itself and related data from the contract
Change Password
To change the login password to the administrative panel, you need to select “System settings” in the left menu and click on the “Enter password” icon. In the new window, do the following:
- enter the old password;
- enter a new password to log in;
- enter it again;
- click "Save".
After successful setup, you need to log in to the user interface again with a new username and password.
Detailed debugging for further work
In order for the Tenda N301 router to be configured correctly, you first need to install it correctly and make sure it is working.
Device installation
There is nothing complicated at this stage. The main thing is not to lose anything from the delivery set. First, we look for a suitable place for the device, because this stage always lacks attention. The place should be equally distant from all points of the house so that the connection is the same everywhere. It’s good if you have a laptop for initial debugging; if you don’t have one, then the place should be near a desktop computer, or you need to find a laptop PC from friends, or you need a long local cable. There are enough options.
The place where you are going to install the device must be connected to a WAN cable with the Internet, which is provided by your provider. And lastly, there should be an outlet or a carrier nearby. Now you need to connect all the cables to the router, namely:
- Power supply to the outlet;
- Network cable to computer;
- WAN internet cable.
There is no need to talk in detail about how to connect, so let’s move on to the next step.
Checking the connection
- We check whether our cords are in place, if so, then we proceed according to the following scheme:
- We find our local network connection by changing the adapter parameters.
- Click properties.
- The Internet 4 protocol needs to be changed.
- There we select everything automatic, as in the screenshot, click “ready”.
Before you go into the settings of the Tenda router, you need to restart your PC and device.
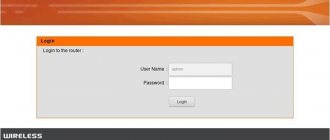
Login to the control panel
We must be sure of the correct connection. Now you need to enter the menu of the Tenda N301 router. On the back of our device there is all the necessary information. Or simply go to any browser and go to the control panel address – 192.168.0.1.
The default password on the Tenda router is admin, the same as the login. Afterwards, we recommend changing the password for the control menu for your own safety. This can be done in the system tool.
Setting up an Internet connection
Before setting up the Internet on a wi-fi router, find out your connection type from your provider. This will most likely be in the contract. If not, we will find out from the support service. The Tenda N301 setup differs further only in the type of connection.
The most popular type today is PPPoE. It is used by such providers as Rostelecom, TTK, DOM and others. Click on additional installation at the top of the screen.
Then install the WAN port. The regime in the first line must correspond to what is specified in the contract. We register the login that is indicated in the same document. It's the same with the password. Click “ok” or “clarification” below.
The same configuration of the Tenda N301 router for L2TP. It differs only in two more important fields:
- Server address;
- Account (your account number).
This data must also be specified in the contract or provided by the support service. After these machinations, the Internet via the local network should already appear.
Wireless network
In Tenda, setting up a router ends with the stage of debugging the wireless network. In the top menu, select wireless network installation. Then click on the main network settings of the tend router. We proceed as indicated in the screenshot. SSID is the name of the wireless network, you can use your imagination here. We write everything else as in the picture.
Click “clarification” and go to wireless network security, also in the top menu. We configure the security mode, select WPA2-PSK there. The key, also known as the password on the Tenda router, needs to be more difficult to come up with than from 1 to 9.
Before you set your password, write it down on a piece of paper or in a notepad so you don’t forget. Otherwise you will have to change your password.
Click on @clarification. We reboot everything. For Tenda N301, the setup is complete, you can safely enjoy the absence of a bunch of cords.
Additional feature
We have already advised you to change your passwords. There is another good point. You can control users using MAC addresses. We add uninvited guests to the blacklist and that’s it. This disables the ability to connect to your Wi-Fi network.
Video on the topic:
Happy Internet to you!
Repeater mode
Before connecting Tenda AC6 in repeater mode, you need to check whether the DHCP server is configured on the router to which you will connect. If disabled, you need to enable it. After that, write down the WiFi name and password set on this router.
After this, you can start setting up Tenda AC6:
- Login to the router's user interface and click on "Wi-Fi Settings" -> "Wi-Fi Relay". Click the Wireless Repeating button to enable this feature.
- In the "Base Station Wi-Fi Name" drop-down menu, find the name of the router you want to connect to.
- Enter the password for this router and click “Save”.
After the router automatically reboots, enter the user interface and click “Internet connection status”. If "Connected!" is displayed, everything is configured correctly.
conclusions
New technologies, such as support for the 802.11ac Wave 2.0 standard and Beamforming, have a positive effect on consumer properties - Wi-Fi speeds become higher and the coverage area is larger.
Net positive for Tenda AC1200:
— gigabit ports and the ability to work with high-speed gigabit Internet
- large coverage area and excellent Wi-Fi speed
— easy setup and management, including using a mobile application
- advanced parental control features
- a small number of LAN ports (three in total)
Since I had the opportunity to review the Tenda AC6, I decided to write instructions for setting up this router. Setting up Tenda AC6 is not at all difficult. In the box with the router you will find detailed instructions. In the settings you can select Russian or Ukrainian language. And the web interface itself (the settings page) is very simple and understandable. We only need to connect the router, then connect to it from a computer or mobile device and configure it.
In addition to the usual, I would even say mandatory settings (Internet connection, Wi-Fi network), we will also look at the process of setting up IPTV and Tenda AC6 firmware. It is unlikely that it will be possible to understand how to configure all the functions available in this router within the framework of one article. Therefore, if you encounter any problems during the setup process, ask questions in the comments. There we always discuss and solve some non-standard problems, and often there is more useful information in the comments than in the article itself.
First you need to install the router and connect everything. We connect the power adapter to the Tenda AC6 and plug it into a power outlet. The Internet (cable from the provider, or from the modem) must be connected to a port that is signed by WAN. If you have a computer/laptop, then using a network cable (it comes with the router) we connect it to the router (to the LAN port, which is numbered 1 or 2).
Perhaps you don't have a PC or laptop. Or a laptop without a LAN, which is not uncommon these days. In this case, connect to Tenda AC6 via Wi-Fi. The factory name of the Wi-Fi network (signed as SSID) and the password for connecting to this network can be found on the sticker on the bottom of the router. If you set up via a tablet or phone, it may be easier for you to set up through the special proprietary application “Tenda WiFi”. It can be installed from the App Store or Google Play. But you can configure everything through a browser (web interface).
Firmware update
In order to install new firmware, you need to click on “System Settings” in the left menu and select “Software Update”.
The Tenda AC6 router supports two update modes:
- online update;
- local update.
If you have chosen the online update mode, then you just need to click the “Update” button, and the software will download and install itself.
Or you can download the latest firmware from the manufacturer's website.
In local update mode, you need to click on the “Select file” button and specify the path to the file with the new firmware previously downloaded from the Internet. Click the “Update” button.
How to open a port
A nick generator
If a server or video surveillance system is installed on the network, it is necessary to perform port forwarding. To do this you need:
- Go to the router settings;
- Find the “Advanced Settings” tab and go from there to the Virtual Server“;
- Register the IP address for which you want to open the port and indicate the number of this port;
- Select the protocol used;
- Click “Add” to add a rule.
Sberbank offers for investors
Sberbank unites about 200 thousand investors from different regions of Russia in the desire to carry out safe transactions with securities, not risk capital in vain and save their time. Minimizing risks, obtaining short-term and long-term profits is what every investor expects.
Sberbank offers time-tested experience and the latest technologies for conducting financial business. For its clients who are interested in investments, they offer online transactions, regardless of the country of residence. A special Internet resource in investment matters allows you to achieve high results in effective remote work between the bank and the client.
While improving the corporate investment business online, Sberbank maintains a high level of service in each of its representative offices. Qualified employees of branches and offices create the best conditions for the prosperity of financial market participants.
Basic setup of the Tenda W316R router.
The IP address of the router on the local network is 192.168.0.1, the web interface address is https://192.168.0.1, the login is admin, the password is left blank. In the Web interface we see this quick configuration wizard, used for quick basic configuration of the Tenda W316R router:
The wizard is a single page of the web interface, on which the main parameters are displayed - the Chinese clearly did not think twice about it. All you need to do is select the connection type, enter your login and password for authorization, the wireless network key and click OK. The connection type - Access Method - may be somewhat confusing to an unprepared user. By the way, there is no explicit PPPoE option. But there is ADSL Dial-up - this is actually PPPoE. Select this item to configure the connection to Rostelecom, TTK and Dom.ru. If you have Beeline, you need to select the L2TP option. In the future, you will also need to register the access server. Note: If you come across a firmware version with only two types - ADSL Dial-up and DHCP - just select the first. We will set the rest in the advanced settings - Advanced Setup. If your ISP uses a hard binding by MAC address, click the Clone MAC button and the router will clone your MAC address of the network card. All that remains is to enter the security key for the WiFi wireless network in the Wireless Password field and click OK - we get a configured and ready-to-use router.
Now let's look at the advanced settings of the Tenda W316R router. To do this, click on the Advanced Settings link in the upper right corner of the screen.