Computer users fall into two categories: perfectionists and those who do not care at all about the appearance and contents of their desktop. People in the first category may have a question about how to remove arrows from shortcuts in Windows 10, which are such an eyesore and do not provide any benefit. By default, Windows sets an arrow to all shortcuts, separating them from the original exe files, but this behavior can be changed. Next we will talk about the three best ways to remove this arrow in Windows.
What do Windows developers say?
The arrows have a certain purpose - they indicate that these elements are not independent, but are directly related to other executable files. To put it simply, this is just a link to the actual application file. After its removal, the program will continue to work without any changes, and the links themselves can be made in any number. If you uninstall an application or delete an exe file, they immediately become inoperative.
Does it make sense to have arrows if users already know that only shortcuts are placed on the desktop? Not really, because the semantic meaning of the arrows is obvious. And yet, developers want to play it safe, so they always put such designations.
A completely logical question about the possibility of removing arrows was repeatedly asked to the developers on their official forum. Instead of the expected decision, the administration noted that this designation is standard, so it is not possible to change it.
Determined users have independently found ways to remove arrows from shortcuts in Windows 7, 8 and 10. There are even special utilities that allow you to change the standard designation of shortcuts. It is possible to achieve this goal manually, but to do this you need to perform several manipulations with the registry editor.
List of the most effective and safe utilities
Often people resort to using special programs. They are not only easy to use, but also no less effective than the previously mentioned methods. The only negative is that some of the utilities may contain viruses. Therefore, in order not to take unnecessary risks, it is recommended to use only proven and at the same time popular programs.
AeroTweak
This utility is distinguished by the presence of the Russian language and the lack of installation. It allows you to simplify and speed up the process of setting up the operating system. It also helps solve this problem.
First you need to open the archive, then launch the utility by double-clicking on the shortcut. After this, a window will open that looks like this:
Sections are located on the left. Having opened the second of them, you can immediately notice the desired item in the top of the window. After checking the box, remember to click “Apply”.
Winaero Tweaker
This application is only available in English. Despite this, it is no less popular. The reason is that this program allows for very flexible configuration of the OS. You can download the utility from its official page.
There will be many sections in the utility on the left. You need to find the item indicated in the screenshot:
When you click on it, options will appear on the right. The program allows you not only to remove (option “No”) an image, but also to put your own (denoted as “Custom”). After making any changes, the utility will prompt you to immediately restart the process.
Method No. 1. Using the program
The easiest way to remove arrows from icons is to use applications. After launching them, you will only have to choose whether to indicate the shortcut icon or not.
Windows 7 Manager utility
This program helps you remove the blue arrow in Windows 7 in a few clicks. By the way, there is an application for the tenth version - Windows 10 Manager. Both are produced by the same developer and are paid. Thanks to the 20-day demo version, you don’t have to buy the program.
How to disable the arrow:
- Download (or).
- Go to the “Settings” tab.
- Click on the “System Settings” button.
- Go to the “Desktop” section.
- Check the box next to “Remove arrow from common shortcuts” and “Save”.
Important! A working analogue of applications in Windows Vista, XP, 7 and 10 is Vista Shortcut Manager. The advantage of the utility is its ease of setup - immediately after launch, a window with “Arrow” and “No arrow” is shown. Select the second option, which will eliminate the arrow.
Remove arrows from shortcuts using Aero Tweak
This is a popular application that is available for free. It is distributed by numerous sites on the Internet, but the official page is located. The second advantage, in addition to free distribution, is that the utility does not require installation.
Instructions:
- Download the program from and run it.
- Select “Windows Explorer” from the menu on the left.
- In the list of actions that appears, activate the “Do not show arrows on labels” option.
- Save changes and exit the application.
- To restart a computer.
Use the Windows Shortcut Arrow Editor program
This is a specialized application for removing arrows. Its second purpose is the ability to replace the standard shortcut icon with your own. The utility can’t do anything else, but it does the minimum required quickly and without unnecessary difficulties.
Algorithm of actions:
- Download the program via .
- Launch the application.
- Select the “No Arrow” option and apply the change.
To set your own icon, you need to select the last item “Custom” and specify the path to the image file.
Important! The program works on all Windows, starting with Vista.
How to remove arrows from shortcuts on Windows 10
Arrows are used only to identify the type of icon - label. This is not the utility file itself, but only a link to its executable file that launches the program. The file itself usually has a different location. Shortcuts are most often located on the “Desktop” and in the “Start” menu. You can remove arrows using standard methods (using the Registry Editor), as well as using third-party applications.
Due to the "Registry Editor"
There are several methods you can use in the Registry Editor window. The first of them does not involve downloading any additional files from the Internet - everything happens using standard Windows tools.
- We hold down two buttons on the keyboard: Win and R. This combination will launch a small “Run” window, which is used for various Windows commands. In a single line we type regedit so that the “Registry Editor” we need appears on the screen.
Enter the command regedit in the "Open" field - Click “Yes” to allow the utility to make changes on the computer.
Click on the “Yes” button to allow Registry Editor to make changes to your computer - In the first part of the window, open the third main branch called HKEY_LOCAL_MACHINE.
Open the third main folder HKEY_LOCAL_MACHINE on the left side of the window - Now we sequentially open the following blocks: SOFTWARE - Microsoft - Windows - CurrentVersion - Explorer.
Open the Explorer folder on the left side of the window - There should be a Shell Icons block in the last Explorer folder. See if it's there.
See if there is a Shell Icons section in the Explorer folder - If it is not there, right-click on the Explorer folder, and then in the list of options select the second item “Create”, and then the first item “Partition”. Let's call it Shell Icons. Open an existing or newly created section.
In the context menu of the Explorer folder, create a Shell Icons section if it does not exist - On the right side, right-click on a field free of entries. Select the “Create” option, and then “String parameter”.
Create a string parameter via the context menu on the right side of the window - Type the number 29 as the name for the created entry.
- Double-click on it and insert one of the two suggested values: %windir%\System32\shell32.dll,-50 or %windir%\System32\imageres.dll,-17. This will indicate the path to a standard Windows image called imageres.dll.
Insert the value %windir%\System32\shell32.dll,-50 or %windir%\System32\imageres.dll,-17 in parameter "29" - If you have Windows 10 version 1703 (Creators Update) and higher, then you do not need to insert the value. In this case, only an empty string will work.
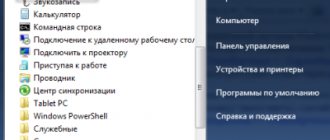
- For all changes to take effect, you must restart your PC. Instead, you can also restart the Explorer.exe process itself, which is responsible for running Windows Explorer. To do this, right-click on the “Taskbar” and select “Task Manager”.
- In the very first “Processes” tab, find the “Explorer” item in the “Windows Processes” section of the list.
Select "Task Manager" from the "Taskbar" context menu - Select the item with the left mouse button and click on the “End task” button, which is located at the bottom right corner of the window.
In the “Processes” tab, remove the task from “Explorer” - Now simply launch Windows Explorer by double-clicking on the “This PC” shortcut.
The disadvantage of the described method is that when the arrows disappear, transparent squares with a frame usually appear. You can also solve this problem in the Registry Editor. In particular, it is necessary to set the value of parameter “29” to an empty blanc.ico icon, specially downloaded from the Internet, instead of the imageres.dll image from the standard system library. So, what exactly needs to be done to correct the situation?
- In any search engine, for example, Yandex or Google, type the request blanc.ico. Select a safe third-party site from the search results. It should be secure so that you don't download malware along with the icon. As a rule, safe pages indicate that the file has been scanned by an antivirus. Choose exactly these. You can also create this empty icon yourself: in an online icon editor.
- We launch the “Registry Editor” on the screen again, using the previous instructions, that is, through the “Run” window. Find the created registry entry “29” in the Shell Icons folder. If you haven't created one, use the method described above. Click on it twice.
Open option "29" by double clicking - In the “Value” line you must specify the path to the downloaded icon file. We recommend moving it to the Windows folder on the system drive “C:”. In this case, the value of parameter "29" will be as follows: C:\Windows\Blank.ico,0. Click on OK.
Paste into the "Value" field C:\Windows\Blank.ico,0 - Restart your device or the Explorer.exe process using the instructions above. As a result, both arrows and frames will disappear from the labels.
Via the IsShortcut parameter
Another way to remove arrows using the Registry Editor, but faster, is to rename the IsShortCut parameter, which is very easy to find.
- We open the “Registry Editor” window on the screen via “Run”, using the instructions from the previous section of this article.
- We launch the very first main branch on the left side called HKEY_CLASSES_ROOT.
Open the first branch HKEY_CLASSES_ROOT - You need to find one section in it - the lnkfile folder.
Open the lnkfile folder in the HKEY_CLASSES_ROOT branch - In the list we find the IsShortcut key. Click on it once with the right mouse button. From the list of available options, select “Rename”.
Right-click on the IsShortcut key and select “Rename” - Before Is we add the English word Not. The result is the name IsNotShortcut.
Rename the IsShortcut parameter to IsNotShortcut - Close the Registry Editor window. For the changes to take effect, we restart either the device or the “Explorer” process in the “Task Manager”.
Video: how to quickly remove arrows from labels
Using the remove_arrow.zip archive
You can remove arrows from labels using an archive called remove_arrow.zip. It contains the necessary files with the reg extension, that is, the standard Registry Editor application. Removal consists of simply running the archive file. In this case, the Registry Editor window itself will not open: you will not need to launch an infinite number of folders in its left side one by one. Let's get down to business:
- Download the remove_arrow.zip archive from the Internet. To do this you will have to use third-party sites. To find a resource where the archive is available for download, enter the appropriate query in the field of any search engine.
- Launch the downloaded archive folder. It will contain three files.
The remove_arrow.zip archive contains three files for adding and returning arrows to icons - Let's start removing arrows from the first file Blanc.ico. We already met him in the second instruction in the section “At the expense of the Registry Editor”. Select it with the left mouse button and click on the “Extract” button. Select the Windows folder on the system drive.
Extract the Blanc.ico file to the Windows folder on your system drive - Let's return to the archive. Double-click the Registry Editor file RemoveArrow.reg.
- Forcefully open the file using the “Run” button.
Click on the "Run" button - Click “Yes” to allow Registry Editor to make changes to the device.
Click “Yes” to allow the standard program to make changes on your computer - Click “Yes” again to confirm making changes to the registry value.
Click on "Yes" to allow the file to make changes to the registry - After this, a small window will appear indicating that the sections and values contained in the file have been successfully added to the registry.
The system will inform you that the file has successfully made changes to the registry - To get the arrows back, all you have to do is open the archive again and run the RestoreArrow.reg file.
Using third party utilities
Today, a large number of applications are available for download on the Internet that help you customize the Windows operating system, including removing arrows from shortcuts. At the same time, the utilities save you from having to go to the “Registry Editor” to make changes: you don’t need to “dig” through a large number of folders and look for the necessary keys (registry entries). For example, let's look at two of the most popular programs: Winaero Tweaker and AeroTweak.
Winaero Tweaker: an application for fine-tuning Windows in English
The application for fine-tuning Windows Winaero Tweaker from the developer of the same name allows you to easily change the values of many system parameters: from appearance to turning automatic system updates on and off. The program is suitable for Windows versions higher than “seven”. The downside of the utility is that its interface is not translated into Russian.
To remove arrows from labels, follow these simple instructions:
- Go to the official page to download the utility installer. Find the blue link Download Winaero Tweaker and click on it.
Click on the link Download Winaero Tweaker - Launch the downloaded archive and double-click to open the single file. Follow the simple prompts in the application's "Setup Wizard".
Run the Winaero Tweaker file in the archive - Open the installed utility. In the first part of the window with sections, we look for a block called Shortcuts. In it, immediately click on the Shortcut Arrow item.
Open the Shortcut Arrow option under Shortcuts - Let's turn our attention to the right side of the window. Here we set the value to No Arrow. A notification will immediately appear at the bottom of the window that you need to restart the Explorer process. If you want the same arrows to disappear from your shortcuts, click on Restart Explorer.
Set Shortcut Arrow to No Arrow - If there is no urgency, click on I'll do it myself later. After the next reboot of the device, the arrows will disappear from the icons.
- When you want arrows to appear on shortcuts again, set the value to Classic Arrow or Windows Default. Then you will also need to restart Explorer.
AeroTweak: a small Russian utility that does not require installation
AeroTweak is a miniature utility for tuning your Windows system with the ability to change more than 50 settings for the appearance, security and performance of your PC. It was developed by user Ilham Z. Its advantage is that it does not require installation: you just need to open the file in the downloaded archive and use it calmly. In the program window you can change the interface language: the Russian version is available. Where can I download it from and how to use it?
- You will have to download the archive with the utility from a third-party resource, since it does not have an official website. Choose reliable sites that indicate that the file has been scanned by an antivirus.
- Run the downloaded archive and double-click the left mouse button to open the AeroTweak.exe file.
Run the AeroTweak.exe file in the downloaded archive - A utility window will immediately appear on your screen. In the left column we find the Windows Explorer block and click on it. In the list we find the second item “Do not show arrows on labels”.
In the Windows Explorer section, look for the option “Do not show arrows on shortcuts” - Click on it once to check the box to the left of the parameter. The “Apply” button will become active at the bottom right corner. Let's click on it right away. After this, reboot the PC.
- If you want to return the arrows, simply uncheck the item and click “Apply” again.
Video: using three methods to remove arrows from labels
Method No. 2. Modifying the Registry Using REG Files
The second method involves working with the Windows registry, but the user does not have to interact directly. There is a special file with the reg extension, which contains commands for removing the arrow. The file was created by an experienced programmer, so no additional manipulations with it are required. You just need to replace the original Windows icon and run the file.
Step-by-step instruction:
- Download the file in a ZIP archive from .
- Unpack the contents to any convenient place.
- Copy the Blank.ico file to the Windows system folder, and if necessary, replace the old file.
- Run the second archive element RemoveArrow.reg.
- Confirm the action in the system warning window.
How to Remove Shortcut Arrows Using Third-Party Apps
There are a large number of different programs that allow you to customize the operating system at your discretion. Often, these applications take care of all the work of changing the operating system registry, so you don’t have to go into the registry yourself and search for and edit the necessary keys. If you don’t want to take unnecessary risks, we can recommend that you use the WinAero Tweaker - a real treasure trove for customization lovers.
- winaero.com.
- Install the application on your computer and launch it.
- In the left side menu, find the File Explorer , and then click on the bottom item Shortcuts Arrows .
- On the right side of the window, select the option you need. Here you can install classic arrows originally from Windows XP ( Classic Arrow), install custom icons (Custom) or delete them completely (No arrow).
- After selecting the option you need, the application will inform you that you need to restart Explorer. Agree and click Restart Explorer, after which the changes will take effect immediately.
- You can return the arrows back in exactly the same way, only instead of No Arrow , select Windows Default or Classic Arrow . After that, restart Explorer in the same way.
There are thousands more different settings in WinAero Tweaker, but in this article we only focused on how to remove shortcut arrows.
Method number 3. Manual work
The last option has similar results to the previous one, but you will have to edit the registry yourself. It's a little longer and more difficult, but it allows you to gain OS skills that may come in handy in the future.
How to remove arrows from shortcuts using Registry Editor?
In the Windows library there is a special section “Shell Icons”, and in it the parameter is 29. It is responsible for displaying the arrow. If you set the value to empty, the standard designation from the label will disappear.
Don't forget! It is recommended that you create a restore point before making changes to the registry. This is a potentially dangerous procedure, as is any editing of this section. If something goes wrong, a backup will help restore Windows functionality.
How to restore arrows when a value in the registry is changed
If the very first method was used, then returning the icons will not be so easy. To do this, you need to find the created or modified parameter again (called “29”). Afterwards, you need to click LMB on it twice.
In the window that appears, you will have to change the value once again, but now to the original image. To do this, you need to write “%windir%\System32\shell32.dll,-30”. Also, if you wish, you can simply delete the specified parameter, since this will not cause any damage to the OS.
There are a huge number of methods that allow you to remove arrows on labels that are not too pleasing to the eye. However, some of them cannot be called effective or simple. Therefore, people who do not have experience in handling a computer are recommended to use an archive or special utilities.
Quick access to applications
How to quickly launch programs if the desktop is empty? Before cleaning you can:
Option #1
In the first case, open the object's context menu and select "Pin to Start."
Option No. 2
1. Place the shortcuts in a separate directory.
2. Open the context menu of the toolbar, select “Panels” - “Create...”;
3. Specify a folder with shortcuts and open it.
If the desktop content is not visible, the Desktop directory in the %UserProfile% folder can be used as a source to create a new panel.
In subdirectories you can create folders to group icons by category: Internet, office programs, etc.
How to use Winaero Tweaker
Winaero Tweaker was created specifically for users who do not even like to open the Registry Editor. The program allows you to enable and disable many settings. The downside of the program is the English interface, although it is intuitive and understandable thanks to the icons next to each inscription.
- Download the Winaero Tweaker from the official website: winaero.com.
- Next, install and run the program (you can select a portable version during the installation process).
- In the program, go to the Shortcuts and select the Shortcut Arrow item.
- In the right window of the program, select the item No arrow and press the button Restart Explorer.
Winaero Tweaker
You need to go to the official website and download this tweaker. Then you should unpack it and install it. We will have a program with an elementary design and the language is English. But this is not a problem.
- In the left tab you need to open the Shortcuts menu;
- Then select the Shortcut Arrow section;
- On the right you need to select the No Arrow command.
At the bottom of the window a notification appears that it is necessary to restart Explorer for the desired changes to occur. Click on Restart Explorer. Or just reboot the computer.
How to get arrows back on labels
If you deleted arrows using Registry Editor, use the following instructions to get them back. If you downloaded a third-party utility for this purpose, make changes directly in its interface.
- Launch the Registry Editor window and open the Shell Icons folder in the third main branch, using the instructions in the first section of this article.
- Now you need to change the value of the “29” key you created earlier. Double-click on it to open a small gray window on top of the main editor window.
- Change its current value to the following: %windir%System32shell32.dll,-30. Click on OK. The first part of the value before the comma is the path to the standard Windows shortcut arrow. Changing the parameter is advisable if you are going to remove them again in the future. Set %windir%System32shell32.dll,-30 to "29"
- If you no longer want to remove arrows from icons, simply get rid of the "29" option. There will be no consequences for the system in the form of crashes or PC slowdown, since you created this parameter yourself. We right-click on the parameter and select “Delete” from the small list of options. Click on the “Delete” option in the context menu of parameter “29”
- Confirm deleting the key: click “Yes”.
The fastest methods for getting rid of arrows on shortcuts are the third-party Aero Tweak application and renaming the IsShortcut parameter in the Registry Editor. Removal is also possible by creating a new key in the editor. As its value, you can use the path to the standard Windows image or to the downloaded blank Blanc.ico icon.
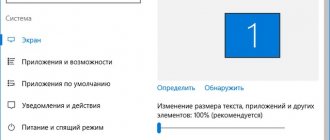
Sometimes green checkmarks appear on the Windows 10 shortcuts on the desktop, indicating that the synchronization of these files was successful. These checkboxes can be disabled, but first you need to open the Control Panel by clicking on the Start button - Windows System Tools - Control Panel. In the Control Panel , go to the Appearance and Personalization and there find and click on the item Show hidden files and folders .
Disable sync provider notification display
A window called File Explorer Options will open. In this window, you need to go to the View and find there the line Show synchronization provider notifications . Uncheck this item and click OK or Apply.
In Windows 10, the check mark on shortcuts is removed through Settings
After that, open Settings through the Start button. In Settings , go to the Personalization , which will be divided into left and right parts. On the left side of the window, find and click on Themes , and on the right side, find and click on Desktop Icon Settings .
How to remove a check mark from a Windows 10 shortcut
A window will open in which you need to uncheck Allow themes to change desktop icons and click OK or Apply.
Restart Explorer in Task Manager
After completing the settings, you need to restart the computer or open the Task Manager and on the Processes , find and click on Explorer and on Restart . After rebooting Windows 10, the checkmarks on the shortcuts will not appear.
Context menu - remove all icons
The easiest way to make your desktop crystal clear is to hide icons and other content. Shortcuts and directories with files will not disappear; they will no longer be displayed.
You can see the contents of the Desktop directory at % UserProfile%\Desktop or shell:desktop in Explorer.
Some icons displayed on the desktop may not be in the catalog. These are icons that are shown for all operating system accounts. They are located in the %Public%/Desktop directory.
Removing arrows using the registry
The most acceptable method is to create a parameter in the registry that will remove the arrow from the icon. This method is safe, of course, if you can do everything exactly:
- In the Windows search bar, enter the word regedit to launch the registry, then click on the element that appears;
- Our system registry opens. In it we need to go to the address: HKEY_LOCAL_MACHINE\SOFTWARE\Microsoft\Windows\CurrentVersion\Explorer
- Now we need to see if the Shell icons folder exists inside the Explorer directory. I personally don’t have it, so all that remains is to create it. To do this, you need to right-click on the Explorer folder and select the “New Section” tab from the drop-down menu. Let's call the section Shell icons;
- After this operation, enter the created Shell icons folder, and right-click on the empty space in the right window. We have a drop-down menu where we must click on the “Create” tab, and then on the next drop-down menu “String Parameter”. Let's call the created element 29;
- Now we just have to click on the created string parameter LMB and a new window appears. In the free line you need to insert the following combination: %windir%\System32\shell32.dll,-50
Remember: if you have a version of Windows 10 from 1703, and this is most likely the case because the current version is 20H2 , then you should not insert anything into this line, it should be left empty.
After the operation is completed, you need to close the registry. You will see arrows on the icons for now. But, as soon as you reboot the OS, they will disappear. In addition, it is enough to restart Explorer using the Task Manager, and the arrows will also disappear.
This method has its drawbacks. There may be empty squares in place of the arrows. But this problem can also be solved by choosing an empty picture instead of an arrow. To do this, add an element that has the .ICO extension from the official website and everything will be OK! But, if you have an updated system, then no empty squares will appear, like mine!
If you have empty squares, then you need to download the element you like from this site, indicate its address in the “Value” line of element 29, for example E :\Dlank.ico,0 . Then put a comma followed by a zero. It turns out that you have placed an empty shortcut, and it will not be displayed. In other words, no one will see him. In addition, you can simply replace the icon with any other shortcut.
If you don’t like looking at shortcuts without arrows, because you don’t understand where the shortcut is and where the boot file is, then just delete line parameter 29 and the arrows will return!
Why do you need to change folder icons in Windows 10?
Changing the appearance of folders in the operating system is a useful feature that is often underestimated. After all, it allows:
- increase the speed of work - visual perception reacts much faster to individual drawings rather than to text. Therefore, choosing the right folder is much easier when it looks special;
- ensure a pleasant appearance of folders - you can choose the icons you like. This gives enormous scope for creativity in creating a cozy working environment;
- create visual cues for other users - drawings can be not only individual, but also useful. Usually the drawing is selected to match the contents of the folder. So, for example, you can hang a wrench on a folder with technical documentation. This will allow people new to your computer to quickly find what they need.
Typically, folder icons are stored in the Windows/Icons path. But to find all the folder icons on your computer, just enter the query .ico into the search engine.
In the case of programs, folder and file icons are usually encrypted inside dll files and their recovery is extremely difficult.