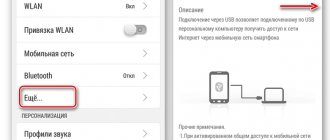
There are two types of Internet connection: direct via an Ethernet cable and wireless from a router. The second is becoming more popular every year, because it is more practical and mobile, which is especially important for owners of laptops and tablet PCs. However, sometimes users may experience a problem with connecting to the Internet, and to solve it, they run a network troubleshooting tool, which, although it can detect a problem, is unlikely to fix it.
What to do if the connection is lost
Do you regularly pay for a dedicated Internet connection, but at some point it just disappears? The first step is to identify the source of the problem. They can be called by the provider, the router/adapter, or the computer itself. To rule out problems on the part of the service company, call the service center and find out if any technical work is currently underway, if there are any accidents on the line or other unpleasant “surprises”.
If you can’t make a call, the router itself will help identify the source of the problem. The device is connected, the WLAN indicator is on, but the WAN/DSL light is not? This means that the device works, but cannot receive a signal from the provider. Disconnect the router from the power supply, wait five to ten minutes and turn it on again. The Internet never appeared? This means that the fault is on the side of the service company. You just have to wait for her to deal with them.
If the provider is not to blame for the missing connection, insert the cable directly into the network connector of the computer/laptop (bypassing the router and adapter). Next, we look at the results of the check.
Problems with the router
For people who are comfortable with technology, problems often arise because they simply forget to turn on the device. If the device is working but the WLAN indicator is not on, check the wires for integrity and make sure that they are plugged in all the way.
If the router (externally) works properly, the problem is most likely due to an incorrect device configuration. This is expressed as follows: the Wi-Fi connection indicator is active when the cable is connected directly to the receiving PC, the network connection is working, but during a wireless connection it is not. The problem is solved as follows:
We launch a web browser and enter the address of the router’s administrative panel in the top line. To find out this set of numbers, study the accompanying documentation for the device or the sticker on it. Can't find the information you need? Take advantage of Internet search engines by specifying the device model and the question regarding the parameters of interest in the search bar.
- Log in by entering the “username-password” combination in the window that appears. You can also find them out from the accompanying documentation for the device.
- When the router settings menu opens, select the General Setup tab or something similar in meaning (since different companies will have different administrative panel interfaces).
- We check that all indicators are set to the values specified in the instructions. Some of them can be found in your agreement with the service provider. If you do not have access to the papers, call the service center and the operator will dictate these values to you.
When entering values, pay special attention to the “network key” number. If you enter it incorrectly, even if you enter the correct password, you will not be able to connect to the wireless access point. In this case, the system will assure that the password is incorrect and ask you to enter it again.
Problems with WiFi adapter
Reboot didn't help? Other devices (phones, tablets) connect without problems via wi-fi, but the computer only when connected directly to the network cable? It's time to check the functionality of the wi-fi adapter. To do this:
- Click on the “My Computer” icon located on the desktop, or on the section of the same name in the “Start” menu, open the “Properties” subsection.
- In the window that appears, find the “Device Manager” item.
- A list of devices opens, in which we are interested in “network adapters”.
- Select the one you want from those offered and delete it.
- We click on the “update configuration” icon, and the remote adapter appears again in the list of available devices, but with correctly working drivers.
When everything is done, go one by one: “Start” - “Control Panel” - “Network Connections” - “Network Sharing Center...”. In the left menu we find the section “Changing adapter settings”. In the window that opens, find the connection icon, decorated with a red cross in the corner, and double-click on it. Now we are interested in the “TCP/IPv4” item (namely “4”, not “6”). Open the protocol properties and in both windows offered for filling, select “Receive... automatically”. We save the changes, reboot and try to connect again.
If the above steps do not help, check whether the computer can see other networks. If yes, the problem is in the settings of a specific network; if not, you need to check the computer itself.
Computer problems
If both the Internet adapter and the wireless access point are working normally, and there are no messages from the provider serving your home about a signal break, the cause of the problem should be looked for on the computer side. First of all, we check whether the device is infected with viruses. In 85% of cases, it is malware that prevents access to the Internet, slows down the speed, or (like “miners”) hangs up the system. Before scanning, be sure to update your antivirus databases to the latest ones and check to see if any “miner” or “worm” has been added to the exclusion list without permission.
If the computer is clean, check for messages from the firewall (a firewall responsible for filtering passing traffic). Perhaps the wireless connection for some reason seems unreliable to the program, and it completely blocks it. In this case, a system notification should pop up describing the next steps.
Another option is a network conflict. This happens when you first worked from one wi-fi network, and then connected to another, remaining within the coverage area of the first. To troubleshoot:
- Click on the wireless connection icon, which can be found in the bottom panel.
- In the proposed list, select the old network and open its “Properties”.
- In the window that loads, switch to the “Connection” tab, uncheck the “Connect automatically” option, and then save the changes made by clicking the “Ok” button.
If the manipulations performed did not bring any benefit, open the “Network and Sharing Center” and select the “Troubleshoot” function. As a rule, after this step, the computer either resolves the problem on its own or tells the user in which direction to look for a solution.
Not fixed - what to do if you can't solve the wireless adapter problem
If none of the solutions fix the problem, there may be a hardware malfunction - a broken network adapter. This can be evidenced by the fact that the connection works stably on other devices.
But if there is no access on all devices connected to the same wireless network, it may be worth checking the balance of your personal account, because it happens that users simply forget to top it up on time, and the network operator limits the connection.
Additionally, you can call the support service of your provider, where you will be informed about the current state of the network, because it may well be that technical work is currently being carried out, which is why access to the Internet is temporarily limited.
Often, a faulty network adapter can be resolved by simply rebooting the computer, router, or reconnecting to the access point. But if simple steps do not bring results, it is worth trying to follow the steps described above to effectively solve the problem, unless, of course, the latter is caused by a physical breakdown of the equipment.
Problems with IP Address Resolution that Never Resolves
Often, users of a wireless connection are faced with a situation where the message “Obtaining a network address” constantly appears on the screen of their working device. The device tries to obtain an IP address in the selected wifi network, but for some unknown reason it is unable to do this. After a few seconds of waiting, the gadget automatically disconnects and tries to connect again. And so on ad infinitum.
This problem can be caused by various faults. The main ones:
- The DHCP client responsible for registering and updating IP addresses and DNS records is disabled
To activate it, click “Start” and open “Control Panel”. In viewing mode, select “Small Icons” and click on the “Administration” tab. In the window that opens, find the “Services” shortcut and double-click with the left mouse button. Another window opens, where we are interested in the DHCP client line. If it is turned off, double-click to turn it on. In order not to repeat this procedure every time after turning on the computer, right-click on the line and select “Properties”. Among the proposed startup types, select “Automatic” and save the changes.
- Router/working device failure
Reboot the device and try to connect. If the problem persists, roll back the router to factory settings and manually re-enter all the values.
- Incorrect password entry
“Invalid password” is the most common error when trying to connect to the Internet. If you encounter it, make sure that when you type:
- Enter the specified combination of letters and/or numbers correctly.
- Use the correct keyboard layout.
- The CapsLock button is disabled.
- Do not enter lowercase letters instead of capital letters (and vice versa).
Driver Questions
The problem with the wireless network adapter or access point may be due to the fact that the device drivers are outdated or crashed.
Enter the "Task Manager", find the device you are looking for and use the driver update option from the RMB menu or when going to properties on the driver tab. If this does not work, completely remove the Wi-Fi adapter from the system, and then install the drivers again. You should not rely on Windows, since the system, after removing the driver or upon reboot, will still offer to install the most suitable software from its own database, and for some non-standard devices it may not be in the catalog. It is better to use the original driver disk, if available, or install the control software using programs like DriverPack Solution.
Weak or unstable signal
If your Wi-Fi router's signal is weak and unstable, your network connection may drop out at any time. Sometimes the cause of this is the device itself, and only contacting a service center will help fix the problem. However, often a weak signal is due to:
- Incorrect antenna direction
If the device is equipped with one antenna, manufacturers advise installing it perpendicular to the device. If there are two - at an angle of 45°, if there are three, the lateral tilts are at an angle of 45°, the middle one is vertical. However, this does not work for all devices. Therefore, if the proposed option does not work, try tilting the antenna differently until the signal level reaches normal.
- Communication channel overload
To solve the problem, select a frequency range with minimal congestion. For this:
- Open the router's administrative panel by entering 192.168.0.1 or 192.168.1.1 into the search bar.
- Log in (the login-password combination is indicated in the accompanying documentation for the device or on the box).
- In the Wireless Settings section, specify your preferred channel number.
Since not all devices operate on channels above 11, in the third step, select a value from 1 to 10.
- Outdated or crooked firmware
You can find the latest version of the router firmware on the manufacturer’s official website. For the update to be successful, first:
- Reset the device settings to factory settings.
- Disconnect all devices from the router (except the computer from which you will update the system).
- Connect both devices to an uninterruptible power supply to ensure that an unscheduled power outage does not prevent the installation from being completed.
Make sure that the updated version is compatible with your router model (the relevant information is listed on the website or provided by the manufacturer’s technical support).
- Insufficient power of the device itself
If you bought a budget router designed for a home network and plan to cover a multi-story building with it, the signal will be expected to be weak and unstable. Wi-Fi repeaters, high-power antennas and other equipment designed to strengthen/expand the signal will help solve the problem. However, such “savings” often cost a pretty penny.
Checking TCP/IP protocol settings
Finally, another solution to the question of how to fix the problem of the wireless network adapter or access point is to check the IPv4 protocol settings in the properties of the connection you are using.
All parameters must be set to receive addresses automatically. If this is the case, but the network still does not work, you can use manually set DNS server addresses. As an optimal option, many advise entering free Google combinations, which are sequences of fours and eights (less often, sevens).
Please note that in some cases, when the sixth version of the protocol is also activated along with the fourth version of the protocol, it must be completely disabled (it is quite possible that the provider does not use the DHCP server of the sixth version, and the active IPv6 protocol causes conflicts in the system).
Error "No Internet access"
A yellow triangle with a “!” appeared next to the Internet connection icon. inside? Call your provider and find out if there are any repairs going on in your coverage area and if you have a debt for the Internet. If no restrictions or problems are identified by the company, try the following recommendations:
- Reboot your router and receiving device.
- Make sure that the network cable (provided by your provider) is installed in the WAN connector (not the LAN) and is inserted all the way.
- Check your router settings by going to the device's administrative panel (see above for how to do this).
If none of the above helps, connect the network cable directly to the computer. If the connection appears, the problem is most likely with the router. If not, on the computer. In the first case, calling a technician or contacting a service center will help. In the second, changing the network connection settings.
Wi-Fi diagnostics
The reasons for the lack of an Internet connection are not always computer problems. Before you start diagnosing your laptop, it won’t hurt to do the following:
- Try connecting to the Wi-Fi network from another wireless device - a phone or tablet. If it works, the problem is probably with the laptop.
- On the case (next to the keyboard or on the side) of some ASUS laptop models there is a special button that allows you to enable or disable the on-board Wi-Fi transceiver by hardware. The button may have been accidentally pressed, causing the wireless connection to disconnect.
- Call your internet provider's technical support. Accidents on trunk communication lines cannot be ruled out (especially important in windy weather and during thunderstorms).
If none of this helps, move on.
If the messenger loads, but the sites don’t
After the “war” declared by Roskomnadzor on Telegram, users were faced with a situation where there was an Internet connection, the messenger itself was working, but the sites completely did not open. The reason for this was the blocking of millions of network IP addresses by employees of the federal service.
However, the reason for restricting access may also be hidden on the client side. If the DNS is not registered, is specified incorrectly, or is unavailable, the browser will not load pages, although instant messengers will continue to work. The computer simply will not know where exactly on the network to look for the requested resource.
To make sure that the cause of the problem is DNS, click the “Start” button and write “cmd” (without quotes) in the search bar. In the command line that opens, enter the following phrase: “ping google.com” (without quotes) and press the Enter key. If a message appears on the screen asking you to try again, the source of the problem has been identified, and it is DNS.
To fix the problem, in “Network Connections” click on the “Local Area Connection” icon. Then select the “TCP/IPv4” item and enter the available DNS. If this does not help, call the provider.
Changing the connection type
In some cases, even after resetting the settings, the problem with the wireless network adapter or access point does not resolve. In this case, use the router settings again, and in the established channel line, enter the values 5, 6 or 11.
You can also try changing the connection type to mixed (b/g/n) in the wireless connection section.
Checking the network using the NetAdapter Repair utility
Want to reduce the time spent identifying and fixing network problems? The NetAdapter Repair utility allows you to perform most of the operations described in the article in literally one click. Program features include:
- Reconnecting the device to the DHCP server.
- Viewing the hosts file, editing and cleaning it.
- Disabling a static IP address, setting the permission to “obtain an IP address automatically.”
- Changing the current DNS to Google Public DNS.
- Removing DNS cache and clearing SSL.
- Reboot NetBIOS.
- Enabling network and Wi-Fi adapters.
- Reset browser security settings and system network services to basic values.
- Other features added in new versions.
Although the utility does not require installation on your computer, you should run it as an administrator. And to protect against malware and unauthorized entry into the system, download only from the developer’s website or trusted Internet resources.
Did the tips described in the article help you? Are you facing a problem for which the solution is not described here? Want to thank for your help or ask for advice? Leave comments and let's discuss.
Reasons why the Internet does not work in Bluestacks
If you installed the program and noticed that Bluestacks is without the Internet, that is, through the emulator you cannot go to any Internet page or visit a store, you should pay attention to the settings of your firewall and antivirus. In this case, you should understand that many security program developers try to protect the user’s personal files as much as possible from undue influence from ill-wishers
They perceive Bluestacks as malicious software, since the program can use the user’s personal information stored on the hard drive and the global network to view and download various files in emulation mode.
Another reason why the “Loading Channels” error or the problem of the Internet missing in the emulator may occur is the settings of the DNS servers. This problem only occurs with some Internet service providers. In this regard, it can be considered a rather rare cause of missing Internet. Basically, the antivirus and firewall are to blame for everything.
Service restoration
Another reason that leads to failure 0x00000bcb is file corruption, which leads to disruption of print spooler components. Therefore, you will not be able to connect to any printer.
In the system search bar, type “cmd” and under the result found, click on “Run as administrator” or press the Win + X combination and select Command Prompt (Administrator).
In the console, run the following command to navigate to the location of the spooling service: cd \Windows\System32\spool
After checking that you are in the specified directory, run the command:
cacls.exe PRINTERS /E /G administrator:C
Once completed, restart your PC and check if the fix was successful.
List of Best WiFi Analyzer Alternatives to Detect Failures on My Local Network
Currently, there are many programs for computers and mobile devices that are capable of auditing wireless networks and therefore know what failures are in the local network. One of the most important and popular today is the WiFi Analyzer, which we have already mentioned and explained earlier.
Considering all this, here we will show you the main alternatives to this application and those who are currently the best to complete this process and improve the performance of your Internet connection
Special utilities for troubleshooting problems
Finally, we take a final look at the wireless network connection. No connection after trying to fix the problem using all the methods described above? Alternatively, you can use special programs.
For example, one of the most popular utilities is still the small Microsoft Fix It program. The application, as is already clear, is designed specifically to eliminate errors in Windows systems, including eliminating problems with network connections. In principle, you can still find quite a large number of similar programs from third-party developers on the Internet, so you can eliminate errors and connection failures with their help.
Enable Print Spooler service
This instruction will help if the system displays the error “Windows cannot connect to the printer. The local printing subsystem is not running." In Windows 7, 10 and other popular versions, this local subsystem is represented by the Print Spooler service. It can be disabled by user actions, as a result of programs or virus activity. Once the service is re-enabled, the error will no longer appear.
Enabling Print Spooler via Control Panel:
- Click “Start”, select “Control Panel”.
- Go to the "Administration" section, then open the "Services" tab. You should open the Services tab, not Local Services, as many users do by mistake.
- The list that opens needs to be scrolled until the “Print Manager” service is found. In older versions of Windows, including Windows XP, the service is called Print Spooler.
- Open the service by double-clicking the left mouse button.
In the window that opens, in the “Status” item there should be a choice Automatic. If this is not the case, this value should be set. Just below, the “Run” button should NOT be active. Disconnect, Suspend, or Continue may work. If the Start button is active, you must click it to start the service because it is disabled. After this, you need to click “Apply” and “Ok” to save all the settings.
After completing these steps, the settings window can be closed. The service must be enabled, and in the general list of services the Print Spooler status must be in the Running status. The startup type should be set to Automatic.
If the problem was only in the service, then after performing these steps, the window with the message “The local printing subsystem is not running” will no longer bother you. If the operation of other components was also disrupted, the enabled service will turn off after a few seconds, and the error will continue to appear. You should try other methods to solve the problem, and then enable the service again.