Ports allow network and Internet-connected devices to communicate through specified channels. Although servers with assigned IP addresses can connect directly to the Internet and make ports publicly accessible, the system behind the router on the local network may not be accessible from the Internet. Port forwarding technology allows you to overcome this limitation and make devices publicly available.
Network services and applications running on various devices use ports with specific numbers to initiate connections and organize communications. Different ports can be used simultaneously to separate traffic types and requests. Typically ports are associated with specific services so that a client can connect to a server on a specific port and the server can accept the connection and respond accordingly.
Below are the most common ports:
- 21: FTP
(File Transfer Protocol) - 22: SSH
(Secure Shell; Secure Shell) - 23: Telnet
(Teletype Network) - 25: SMTP
(Simple Mail Transfer Protocol) - 80 : HTTP
(Hypertext Transfer Protocol) - 194: IRC
(Internet Relay Chat) - 443: HTTPS
(HTTP with encryption support)
If you are reading this guide online using a web browser, you are probably using the HTTPS protocol running on port 443.
Although ports make it easier to identify and process certain requests, the port numbering convention is a standard, but not a rule. Ports can be used for any purpose, provided that the connection between the client and server on the specified port uses the appropriate protocol.
In web browsers, non-standard HTTP ports may be specified after a colon at the end of the IP address or URL in order to load content through that port. If the web server is running locally on port 8080 rather than the more common port 80, it is possible to access the server by typing localhost:8080 or 127.0.0.1:8080 into your browser. If you enter one of the above addresses without the suffix “:8080”, the same page will not load.
localhost:8080
Although any open port must allow connection attempts, the client must have network access to the target device for those attempts to succeed. In the case of a server connected directly to the Internet, or when connecting via a local network, difficulties usually do not arise. The problem appears when we try to connect to a port on a device located behind a router or firewall.
Most home or office networks are connected to the Internet through a router, which regulates access and accumulates traffic on one IP address. All requests and packets are sent through the router before responses are returned to the appropriate devices that made the original requests. By default, routers do not process incoming requests on certain ports. If someone tries to connect to the router via SSH, the router will not be able to process the request nor forward the request further down the chain because it does not know the destination. This problem is precisely solved by setting up port forwarding inside the router.
Step 1. Finding out the router's IP address
C:\> ipconfig/all Windows IP Configuration Host Name .
. . . . . . . . . . . : █████████ Primary Dns Suffix . . . . . . . : █████████ Node Type. . . . . . . . . . . . : █████████ IP Routing Enabled. . . . . . . : █████████ WINS Proxy Enabled. . . . . . . : █████████ Ethernet adapter Ethernet: Connection-specific DNS Suffix . : █████████ Description . . . . . . . . . . . : Intel(R) PRO/1000 MT Desktop Adapter Physical Address. . . . . . . . : █████████ DHCP Enabled. . . . . . . . . . : Yes Autoconfiguration Enabled. . . . : Yes Link-local IPv6 Address . . . . . : █████████ IPv4 Address . . . . . . . . . . : █████████ Subnet Mask . . . . . . . . . . . : 255.255.255.0 Lease Obtained . . . . . . . . . : █████████ Lease Expires . . . . . . . . . . : █████████ Default Gateway. . . . . . . . . : 192.168.0.1 DHCP Server. . . . . . . . . . . : 192.168.0.1 DHCPv6 IAID. . . . . . . . . . . : █████████ Typically, routers have an administrative panel available via HTTP (port 80). In most cases, the local IP address of the router (192.168.0.1 or 192.168.1.1) is used for access. On Microsoft Windows, a connected router (or default gateway) can be easily discovered using the ipconfig / all .
In Linux, the same problem is solved using the netstat utility. Open a terminal and enter the following command to find out the IP address of the connected router.
~$ netstat -rn Kernel IP routing table Destination Gateway Genmask Flags MSS Window irtt Iface 0.0.0.0 192.168.0.1 0.0.0.0 UG 0 0 0 enp0s25 █████████ ██████ ████ ██ █████████ ███ ██████ ████████████ ███████ ██ █████████ ███ █████████ ███ ██████ ████████████ On macOS the same command is used: ~% netstat -rn Routing tables Internet : Destination Gateway Flags Netif Expire default 192.168.0.1 UGSc en0 █████████ █████████ █████████ ███ ████ █████ ████ █████████ █████████ ███ ████ █████████ █ ████████ ███ ██████ ███ ████ █████████ █████████ ████████ █ ███ ████ ███ ██████ █████████ █████████ ███ ████ ████████ █ █████████ █ ████████ ███ ████
Step 2. Access to the router configuration panel
After finding out the local IP address of the router, you can access the configuration panel if you enter the address in the browser, as in the case of a regular URL (some routers, for example, have a mobile application, and the task is simplified).
Figure 2: Router configuration panel authorization form
After downloading the control panel, you must log in. The username and password can be set by the manufacturer or Internet service provider, or by you. This information can be found in the documentation for the router or on the case.
Although the control panel may differ for different routers, in general the setup procedure is approximately the same. After authorization, go to the “Advanced” section or find where the “Port Forwarding” section is located. In our case, the corresponding section is called “Advanced Port Forwarding Rules”.
Figure 3: Section with port forwarding settings
Step 3. Configuring port forwarding rules
To demonstrate the rules for port forwarding, let's consider the simplest case when a user has a Raspberry Pi device connected to a home network router. The Pi runs an SSH service that allows you to log in to the device if you have the correct username and password. The current IP address of the Raspberry Pi device is 192.168.0.105.
- The rule was named "RBPi SSH" in order to make identification easier in the future. In general, the name of the rule is entirely up to your personal preference and does not affect the ports used.
- The range of the Public Port (sometimes referred to as Source Port) parameter is set to 22 to 22 (the standard SSH protocol port). The router will make this port accessible via the Internet. The user will connect to the Raspberry Pi through the same port.
- The Private Port (sometimes referred to as Destination Port) is set to 22 because the SSH daemon on the Pi runs on port 22.
- The Traffic Type parameter is set to TCP, since TCP traffic is transmitted over the SSH protocol.
- The IP Address parameter corresponds to the IP address of the Pi device on the local network (192.168.0.105).
- Finally, the checkbox to the left of the rule is checked to make the rule active.
The interface of your router may be different, but in general the essence of the settings remains the same.
Figure 4: Port forwarding rule settings for authorization via
SSH
The above rule means that the user can connect to the router’s IP address via SSH via the Internet and will subsequently be redirected to the Raspberry Pi device server. This scheme can be used to create a web server running on port 80, or, for example, to attach a video game server to a specified port. Please note that some providers have rules regarding hosting and other content that must be taken into account before making the server accessible from the local network.
Step 4: Protect against port scanning and attacks
One of the problems that arises when opening ports on the Internet using forwarding is that the ports become available for scanning. Attackers on the Internet can use automated tools to scan IP address ranges or utilities like Shodan to find potentially vulnerable devices with specific active ports. SSH protocol ports are a prime target because they provide access to a shell that can be used to steal data or install a malicious application.
In case of port forwarding to protect against scanning, it may be useful to change the public or source port in the router settings. Instead of the common port 22, which all scanners are configured for, you can specify a non-standard port (for example, 9022).
Figure 5: Configuring
SSH on a non-standard port
After changing the port, the client, when connecting to devices via SSH from the Internet, will have to specify port 9022. An attempt to connect to port 22 from the outside will be unsuccessful, since the forwarding will come from port 9022, and not from port 22.
You can also use a service like Fail2ban (a framework for protecting against external intrusions), designed to protect the network from brute force attacks after an attacker finds an active port. Utilities like Fail2ban limit the number of authorization attempts made from an external network.
About port forwarding
A local network (LAN) is organized in such a way that devices located on it have access to an external network (WAN), while it is not possible to access the local network from the global network.
Often you need to open access to devices located on the local network. For example, if you have an FTP server and you need your friends to be able to connect to it, download and update files. In order to access the files stored on it, you need to open the ports. In this case, make sure that packets arriving on port 21 of the router (standard FTP port) are redirected to port 21 of a computer located on the local network on which the FTP server is running.
It is not necessary that the open port number on the router be the same as on the server.
After port forwarding, TCP and (or) UDP packets arriving at the specified port of the router will be redirected to the desired port of the device located on the local network . To do this, you need the router's IP address to be white (static external IP address). White and gray IP addresses will be discussed below.
Here's another example - there are several video cameras on a local network, each of them has its own IP address. Using a remote control program, you can connect to devices using a specific port. Video cameras can be installed on the local network of one object. If we want to access them via the Internet, this can be done using port forwarding.
In all this, special attention should be paid to safety. After all, by opening local network resources via the Internet, attackers may try to take advantage of them.
Now let’s look point by point at how this should all be arranged and what you should pay attention to.
Why do you open ports on a router?
The Internet channel between the provider and the user can be imagined as a pair of apartment buildings at different ends of the street. The apartment is a user application, and the floor of the house is a port. Application data (packets) is carried by a virtual mailman. In the connection option without a router, when the provider's cable is directly connected to the network port of your computer, there are no problems with the ports: the package from the sender's fifth floor is easily transferred by the postman to the recipient's fifth floor.
Since even the most undemanding user at home has several devices that need an Internet connection, a router appears on the scene. And in this case, the pattern of packet movement changes. In the settings of any router that uses NAT (network address translation), all outgoing requests on any ports are closed by default. That is, if special settings are not made, the postman with a package will be able to enter the house, but the elevator will not open the doors on the desired floor.
The simplest network diagram with address translation (NAT)
Therefore, for the operation of video conferencing systems, torrent downloads, online games, FTP and web servers, it is necessary to configure and open the appropriate ports, which will be discussed below.
External IP address
The IP address can be:
- An external static IP address assigned to your router. Usually issued by the provider for an additional fee, in some cases it is provided for an additional subscription fee.
- Intranet static . In this case, you can only be connected within the provider’s network. This IP address will not be visible from the outside.
- External dynamic . This option is often found if you access the Internet via a 3G/4G router. You are given a free IP address, but after some time it may change, for example, after rebooting the router.
- Intranet dynamic . The IP address will not be visible from the Internet, and it may change over time.
In order to connect to your local network from the outside, it must have an external static IP address configured. Of course, you can use dynamic, but if you change it, everything will stop working. You can check with your Internet provider about the IP address.
External IP addresses are called white, while internal IP addresses that cannot be accessed from the global network are called gray..
You can find out your IP address using various services, for example, 2ip.ru, myip.ru, myip.com.
Safety
Since port forwarding will open access to devices located inside your local network, special attention should be paid to security:
- A strong password must be used to connect to the device;
- If confidential information is transmitted, it must be encrypted.
Particular attention should be paid when transferring remote access to a computer.
In this case, the attacker can:
- Install your programs on your computer;
- Reconfigure the local network;
- Monitor and influence data exchange over the local network.
Connection
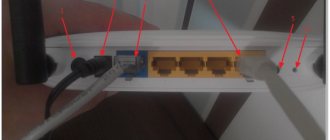
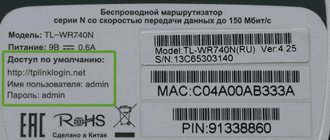
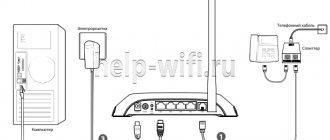
Before setting up port forwarding, you should connect to the router. The router usually has a default IP address of 192.168.0.1 or 192.168.1.1. The default login is admin, and the password can also be admin, sometimes 1234. The default settings of the router are indicated on a sticker on the back.
Enter the router address in the browser. In the photo above it is 192.168.1.1; when prompted for a username and password, fill in the appropriate fields. After this we get to the main menu of the router.
Change or add
Not everyone knows why port 22 is open on the router. Each port has its own purpose. Therefore, before changing anything, you need to understand this system.
Any new settings are saved and displayed in the router settings.
To add a specific port, you need:
- Open a browser and enter the router’s IP in its address bar.
- Enter name and password (admin/admin).
- Select “Forwarding” from the menu and open “Virtual Servers” in it. After this, a window should open with a list of ports that are active. At each level there are buttons “Delete” and “Change”.
- Click “Add New”, then enter the required information and confirm the parameters.
When changing data and making new additions, you need to be careful not to enter the same numbers. The system will allow you to do this. However, the entries will not function in the future.
Setting static addresses
Equipment that needs to be given access from an external network may have addresses on the local network:
- Static, that is, set manually on each device;
- Dynamic, distributed by a DHCP server from a pool of addresses.
When using a DHCP server, if devices have static IP addresses, you should make sure that they are not from the range of those distributed dynamically. This is to ensure that a new device connected to the network does not accidentally receive the same IP address.
If the IP address is obtained dynamically, then it should be assigned to the device by MAC address. This is done in the DHCP server settings. The figure below shows an example of address reservation. After the backup, you should reboot the router.
Setting up port forwarding
Once everything is prepared, you can configure port forwarding on the router. This is done by filling out a table indicating:
- Router port;
- IP devices;
- Device port.
The router will check all incoming packets. IP packets arriving on the specified port of the router will be redirected to the configured port of the device .
In the forwarding settings, add a new virtual server.
The recording is configured as follows:
- The service port is exactly the port through which connections will be made from the Internet;
- An internal port is a device port that needs to be accessed;
- IP address is the address of the device on the local network
- Protocol - here you can select the TCP or UDP protocol. You can select “ALL”, then both protocols will be redirected.
- Status - here we select “enabled”. If not necessary, you can disable forwarding without deleting the entry.
The “standard service port” item is intended only to simplify the selection of ports. When selecting the desired service, their numbers are simply inserted into the “service port” and “internal port” fields. The main services will be discussed below.
After all settings have been made, you should save them.
Port numbers
Please note that port numbers can be set in the range from 0 to 65536.
On a computer, these ports are divided into the following groups:
- System (from 0 to 1023);
- Custom (from 1024 to 49151);
- Dynamic (from 49152 to 65535).
If for port forwarding you need to select any port that will be open on the router, then it is advisable not to use the system range unless absolutely necessary. In this case, it is best to open ports on the router from the dynamic range.
Standard services
To organize access to services, some routers help you select the correct port number automatically. Thus, it is possible to make sure that when accessing an FTP port from the Internet, the request is redirected to an FTP service running on one of the local computers. Let's look at the main ones:
| Service | Port | Explanation |
| DNS | 53 | Converting a symbolic name to an IP address |
| FTP | 21 | File storage and transfer |
| GOPHTER | 70 | Storage and transmission of documents |
| HTTP | 80 | Obtaining information from sites |
| NNTP | 119 | News server |
| POP3 | 110 | Receiving mail |
| PPTP | 1723 | Secure connection |
| SMTP | 25 | Reception and transmission of mail |
| SOCK | 1080 | Transfer bypassing the firewall |
| TELNET | 23 | Text control |
Other models
Let's briefly look at how to register ports on routers from other manufacturers.
D-Link
The process for D-Link devices is not much different.
- In the device settings, go to “Firewall” – “Virtual servers”.
- Choose a custom template.
- Enter its name.
- In most cases, we do not touch the protocol and interface.
- As the value of internal and external ports, we write down the number of the required one everywhere.
- Internal IP is the address of the computer for which we are forwarding.
Asus
Video instructions are available here:
I’ll tell you how to configure ports for this manufacturer:
- In the “Internet” section, go to the “Forwarding” section, then click “Virtual Server”.
- Enter the name of the service.
- In the “Port range” and “Local port” fields, enter the same value.
- In “Local Address” we indicate the IP of the target computer.
- “Protocol” – select the connections for which the rule will apply.
- Save the configuration and reboot the device.
Zyxel
- To reserve an IP, go to “Home Network” – “Devices” and select the one you need or add a new one.
- In the pop-up window we indicate (when adding a new one):
- his name;
- MAC;
- assigned static IP.
Let's move on directly to forwarding.
- In the “Security” section, go to the “Network Address Translation” tab.
- Click “Add Rule” and fill in the fields:
- “Interface” – indicate “Broadband connection” or The first one is used if the provider does not use authorization. During forwarding of its Internet, PPPoE is set.
- “Packets to address” – remains unchanged, if external Internet is not used – indicate the one used.
- We indicate the port and IP address of the device for which it is forwarded.
- Save the configuration.
Firewall
After setting up port forwarding on the router, everything should work. But what should you do if you still can’t connect? In this case, you should check the antivirus and Windows firewall settings on the computer to which you are connecting. Perhaps they consider the connections suspicious and do not allow access. In this case, you should set up a rule in the firewall that allows connections to the specified port .
The easiest way to access the firewall settings is in two ways:
- Write “Windows Defender Firewall” in the search bar. After entering the first few letters, the desired application is found.
- Execute "firewall.cpl". To do this, press the + key combination at the same time, write the command in the open field and press “OK”.
In additional settings, select rules for incoming connections. There we create a new rule. Let's look at this in detail.
The main firewall settings window is shown here. Select additional options.
Double-click on the “Rules for incoming connections” item. After that, in the right column, which is called “Actions”, click on “Create a rule...”.
Select the rule type “For port” and click next.
Select the required protocol. In most cases this is TCP. We indicate the local port for which we previously configured port forwarding on the router. You can specify several ports at once separated by commas or a range separated by “-“.
From a security point of view, it is important to select not all local ports, but to specify the one you need.
Select “Allow connection”.
Check the profiles.
We write our name for the rule. It is advisable to choose a name so that it will be easy to find later if you decide to disable this rule or modify it. You can leave a note for yourself in the form of a description, so that later it will be easier to understand why this rule was created.
After the parameters have been configured, click the “Finish” button. The created rule will automatically be added to the list of rules for incoming connections and activated. If necessary, it can be edited, disabled or deleted.
What to do if a certain port cannot be opened
In some situations, the instructions proposed above do not help solve the problem. Sometimes the provider itself limits the user's capabilities. This phenomenon may be related to the network infrastructure or tariff plan. A similar problem is more often encountered by those who live in apartment buildings.
To reduce network installation costs, some suppliers provide cheap routers. For correct operation, certain restrictions are set in the device settings. This is why users may have fewer options.
Ports of torrent trackers are often blocked. To remove the blocking, you may need to configure a common router that is installed at the entrance. It's almost impossible to do this. The best solution is to change the tariff plan to a more expensive one. In this case, there will be no restrictions or you will be able to configure the ports yourself.
It is also worth checking antivirus applications and firewalls on client PCs. They protect the connection and can block ports. You can solve the problem by making adjustments to the settings of such software or even by temporarily disabling it while port forwarding.