Synchronizing data with a Google account is a useful feature that almost every Android smartphone has (not counting devices aimed at the Chinese market). Thanks to this feature, you don't have to worry about the safety of the contents of your address book, email, notes, calendar entries, and other branded applications. Moreover, if the data is synchronized, then you can access it from any device, you just need to log in to your Google account on it.
What is synchronization and how does it work
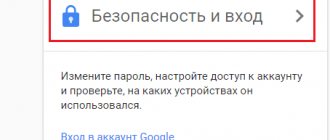
To use this function, you must first create and log in to a Google account on your phone.
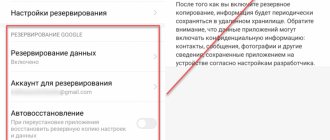
To activate the function, you need to go to your phone settings and select the appropriate section. When you turn on synchronization, you can make additional settings. The setting allows you to choose what exactly will be synchronized and how often the synchronization procedure will occur.
After activation, synchronization will occur automatically regularly as long as there is an Internet connection. You can change settings or disable a feature at any time by simply going to Settings.
You can also save application and game data by creating backup copies. You can synchronize both game progress and application data. Having a copy of the information will allow you to restore it on any device in order to continue using the application with saves or play the game from the right place.
Shutdown
Naturally, for a number of reasons it may be necessary for Yandex Browser synchronization to be disabled.
Disabling a service is as simple as all other operations. According to the standard scheme, open the settings:
Open the Yandex browser page -> Go to the menu -> Section “Settings” -> “Synchronization”. Just click the “Disconnect” button and the device will be disabled from the ability to synchronize with others:
What data is synchronized
Synchronization creates backup copies of the following data:
- contacts;
- notes;
- browser bookmarks;
- calendar;
- information from individual applications;
- mail.
When setting up, you can choose what exactly should be synchronized and how often the procedure should be carried out.
Saving your smartphone's address book data allows you to create a backup copy of all numbers and other information about each contact. Calendar synchronization allows you to save all marked dates, as well as notes for any events. Browser synchronization saves notes, links, passwords and browsing history of any Internet resources.
You can restore data at any time, as long as you have an internet connection and are logged into the correct Google account. You can also restore it on another device, for example, when replacing a smartphone.
Conclusion
The article describes in detail what synchronization is, where and how it is used, as well as how it is activated on various devices. The process of synchronizing processes and data is becoming the norm. Thanks to copies in remote storage, important information is not lost and is easily restored. Therefore, large companies and developers are gradually introducing the synchronization function into various devices to facilitate and automate everyday tasks.
How do you feel about synchronization? Are you ready to trust the storage of personal data in remote storage? Share your opinion in the comments.
How to enable synchronization on Android
To enable the feature, you need to do the following:
- Go to your phone settings.
- Find the section related to accounts.
- Log in to your Google account. If you have not yet created an account, you will need to register one. You should remember your email and password.
- Enable synchronization.
On some devices, synchronization can be carried out through third-party accounts (for example, on Meizu phones, synchronization is performed through Meizu Accounts). To increase security, you can create backups on several different accounts at once.
It is recommended to enable the function immediately after purchasing the phone. If you have previously used a smartphone running Android, then you need to log in to your existing account. This will allow you to quickly restore all contacts and other important information from your old device.
Enable the backup function
Some users by synchronization mean data backup, that is, copying information from Google branded applications to cloud storage. If your task is to create a backup copy of application data, address book, messages, photos, videos and settings, then follow these steps:
- Open the “Settings” of your gadget and go to the “System” section. On mobile devices running Android 7 and below, you will first need to select “About phone” or “About tablet”, depending on what you are using.
Find the item “Backup” (may also be called “Restore and reset”) and go to it.
Note: On mobile devices with older versions of Android, the “Backup” and/or “Restore and Reset” may be located directly in the general settings section.
Set the “Upload to Google Drive” switch to the active position or check the boxes next to the “Data backup” and “Auto recovery” items. The first is typical for smartphones and tablets on the latest OS version, the second - for earlier ones.
After completing these simple steps, your data will not only be synchronized with your Google account, but also saved to cloud storage, from where it can always be restored.
Common problems and solutions
In some cases, syncing data with your Google account stops working. There are several reasons for this problem, fortunately, they are quite easy to identify and eliminate.
- How to sync Android phone contacts to Google Gmail? Instructions
Network connection problems
Check the quality and stability of your Internet connection. Obviously, if the mobile device does not have access to the network, the function we are considering will not work. Check your connection and, if necessary, connect to stable Wi-Fi or find an area with better cellular coverage.
Is it possible to synchronize a separate application on Android?
A list of all available synchronization applications is located in the “Account” section. The ability to save data from a third-party application to a Google account depends on whether the developers of a particular application have added such a feature. Often, the list of available synchronization utilities includes only services and applications from Google.
To be able to create backup copies of third-party applications, you may need to use a specialized utility or add other accounts. If you need to save progress in a game or data from an important application, and there is no required item in the synchronization section, you will need to use separate specialized programs.
How to transfer applications
Programs installed through the Play Market can be transferred to a new Android phone, since all data is saved in the service cloud. To do this, you can use the following utilities:
- ES Explorer – to transfer applications, you need to install the applications on two mobile devices and enable the Bluetooth option. On two gadgets you will need to click on the “Apps” button and hold your finger on the desired image. After this, you need to select the “Send” option, and on the second gadget click on the “Accept” button;
- APK Extracto – after installing the application, you must enable the Bluetooth option and select programs from the list. Then on one phone you need to click on the “Send” button, and on the second “Accept”.
How to sync your account manually
To activate synchronization of only the required data, you must perform the following procedure:
- Go to phone settings.
- Find the “Account” section.
- Select the desired Google account.
- Check the boxes next to the information that you want to synchronize regularly.
If synchronization is already enabled, the date of the last synchronization will be indicated under each item. Thanks to manual settings, you can activate automatic sending of information, manually update data and disable individual items.
Manual configuration can be done at any convenient time. It can also be done to save important data that has been downloaded to the phone (a new contact or note has been created). Once the information is on the server, it can be downloaded at any time via the Internet.
Account creation
The main condition for setting up synchronization and saving your data is an active user account. If there is one, you can skip this settings item. Otherwise, if you have not set up your own account up to this point, you will need to register with Yandex services:
Method 1 (via browser menu):
- Open the browser and go to the program menu;
- In the pop-up window, find the “Settings” section and go to it;
- Click the “Set up synchronization” button.
The user authorization/registration page will open in the browser window. We need to select the “Create an account” option:
Method 2 (via direct link):
Follow the direct link: https://passport.yandex.ru/registration-new?mode=register
In both the first and second cases, a standard user registration window will open. Here you need to enter your data, then click “Register”:
Congratulations, you now have a single account for all services from Yandex. Now you can proceed to setting up data synchronization. Write down or remember your password. We'll still need it.
How to disable auto-sync
Auto-sync can also be disabled in your account settings. On some devices it is possible to disable synchronization by pressing one button, on others you need to individually uncheck the required items.
Once synchronization is turned off, application, contact, calendar, or bookmark data will no longer be updated. If you need to restore information, the latest saves will be loaded.
Disabling synchronization is necessary if the data of an application does not need to be saved. Old saves are available for loading until they are overwritten by new data. Moreover, if an account is also created on any other device and synchronization is enabled, then the data can be overwritten through it.
Settings
In order to go to the above section from the browser, we will use the standard program menu -> Settings -> Synchronization. The information on the page will indicate that your program is synchronized with your account:
When we click on the “Show parameters” button, we will see a list of available items for editing. Select and save.
The developer has provided the ability to delete outdated or irrelevant synchronization data. To do this, in the “Show parameters” section you need to click on the small “Delete” button:
As a warning, the user will see a pop-up window with information. If you clicked this button by accident, you can always refuse.
Synchronization problems
Problems rarely arise during synchronization, since this function is well thought out by the developers and does not require control by the smartphone user. Only in some situations it does not work as it should.
Vyacheslav
For several years he worked in mobile phone stores of two large operators. I understand tariffs well and see all the pitfalls. I love gadgets, especially Android ones.
Ask a Question
Problems and solutions
No internet connection
Connect to a Wi-Fi network or turn on mobile data (it only takes 10-15 seconds to sync)
Auto-sync disabled
Go to settings and enable synchronization
There was an error logging into your account
Try logging into your account again (change your password if necessary)
Firmware update required
If a new version of the Android system has been released, then you need to install it (to do this, go to Settings-Update-Check for updates)
Incorrect date and time
Set the correct time zone, and also enable time synchronization via the Internet
The successful operation of auto-sync can be checked by examining the information about the last synchronization date, which is indicated under each item in the settings.
If you cannot configure this function, you can seek help from specialists. Smartphone customizers will be able to help both with registering an account and setting up auto-sync.
Using proprietary utilities
Additional applications and programs can be used.
Autosync for Google Drive
Autosync for Google Drive is full two-way synchronization between all connected devices.
Not only photos, videos and program backups are transferred to Google Drive, but also smartphone settings. The user has access to manual and automatic data transfer with an adjustable time period. Advanced options are available in the paid version:
- uploading files from 10 MB;
- detection of changes in the archive;
- simultaneous transfer of several folders;
- no advertising.
MyPhoneExplorer
MyPhoneExplorer exchanges information between your phone and PC remotely.
The free utility provides access to your organizer, messages and contacts, and helps synchronize multiple Android devices. The device is connected to the computer using a USB cable, via Wi-Fi or Bluetooth. After establishing a connection, select the desired gadget from the list and export (import) the data to your hard drive.
CLONEit
If you need to transfer information between two smartphones without intermediaries in the form of a PC, then it is better to use CLONEit.
The utility is installed on two Androids and launched simultaneously. The old device is selected as the sender, and the new device as the recipient. Create a connection via a Wi-Fi access point, check the boxes for the type of files to transfer and press the “Start” button.
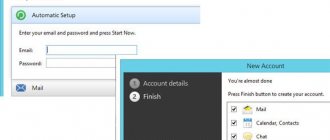
How to create an account for synchronization
To create a Google account, you must follow these steps:
- When logging in, select the “Create a Google Account” option.
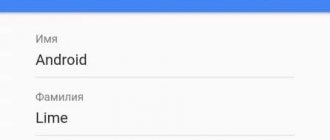
- Fill in your personal information and create a password. Personal information requires you to indicate your real name or nickname.
- Complete registration.
A mobile phone number may be required to create. You can omit it if you wish. To protect your account, we recommend enabling two-step verification, which associates your account with a specific phone number. If authentication is enabled, an SMS message will be sent to the specified number before each login to your account. The code will need to be entered for successful login. This method allows you to reliably protect your account from hacking. This in turn affects the security of personal data.
After creating an account, you need to log in to it. To do this, you need to specify a phone or email address as a login, as well as a password. After logging in, you should enable auto-sync, after which backups will be created automatically.
Step-by-step instruction
There are many arguments in favor of data synchronization. All that's left to do is take the device you are using and enable this function. This is very easy to do; all you need is a smartphone and five to ten minutes of free time.
Google account activation
Those who have an authorized Google account can safely skip this item. The rest will first have to start it, which can be easily done in a few steps:
- In the main menu of your device, find and launch the “Settings” item. In the list that opens, scroll to the “Accounts” section and, if there is one, select “Other accounts”, which will open a list of those already connected.
- If you've never had a Google account on your device before, you'll need to add it manually. To do this, select “Add account” and click on Google in the list that opens.
- In the window that appears, you will be asked to either create a new Gmail account, or enter the details of an existing one - email address or phone number. After selecting the desired item, all you have to do is follow the instructions.
Your Google account is authorized and ready for further use. Now you can proceed directly to synchronizing your contacts.
Start synchronization
In order to synchronize contacts with Google, simply creating a Gmail account is not enough: you need to enable this feature and configure it. You can do it this way:
- Open the settings of your smartphone or other device and go to the list of available accounts.
- Select the Google menu item there, and then the account you are using.
- Under the selected account there will be a list of sections for subsequent synchronization. You need to make sure that there is a checkmark next to the “Contacts” item and check it if this section has not been selected before.
- In the bottom corner of the screen there is a “More” button. You need to press it, and then select the “Synchronization” menu item. In some devices, this item is immediately highlighted with a separate button, which simplifies the task even more.
All you have to do is wait until Android completes the running process: it is displayed using an icon in the form of rotating arrows next to the menu sections.
Displaying contacts
Usually, to synchronize on a new device, it is enough to do the standard steps, but sometimes this is not enough. In this case, you will probably need to set the display of contacts manually, and to do this you need to do the following :
- Enter the “Contacts” section and launch the context menu. For this purpose, there is a separate hardware button on the device body or, if it does not exist, a button in the interface of the smartphone or tablet.
- In the menu that opens, select “Show contacts”. This will open a list of all possible sources from which you can copy contacts.
- In the drop-down list, you need to select the Gmail account you are using.
If everything is done correctly, the necessary data will be transferred to the device’s phone book.
Data editing
Editing contacts using a Google account works like this:
- Through a personal computer or other device, you need to go to your Gmail mailbox and select the “Contacts” menu item.
- To the right of the dropped contacts there will be pencil icons. You need to choose the one that is opposite the desired number.
- A window will open allowing you to change or enter new data. After making changes, you must remember to save using the button of the same name.
- Removing unnecessary numbers occurs through the context menu, called up using a special button on the right. After clicking it, all you have to do is select “Delete” in the drop-down list.
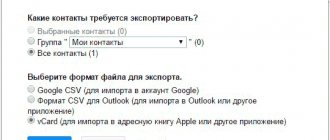
Import and export
Sometimes, for some reason, contacts need to be transferred to a SIM card or even to another medium - for example, to create a backup copy before any manipulations in the system. This is an important function that will allow you to save data, and for its implementation there is the following scheme:
- Open the “Contacts” menu item.
- Select the menu or “Options” item.
- Select “Import/Export”. This will open a list of possible actions.
- You need to select the item from which contacts will be imported.
- Now we need to determine where exactly the data will be saved. A Google account is the best option here.
- From the list that opens, you need to select those items that you want to save. They will be copied to the specified location.
Benefits of using auto-sync
Among the advantages that can be obtained when using auto-synchronization are:
- the ability to always restore contacts and notes, even if the phone is lost or broken;
- the possibility of returning deleted information by mistake;
- the ability to recreate contacts or bookmarks from the browser on another device running the Android operating system.
Another advantage is the simple setup and no need to control the synchronization process. That is why all owners of Android smartphones are recommended to enable this function immediately after purchasing the phone.
Auto-synchronization for uploading and downloading data does not require a large amount of Internet traffic. Even a large amount of information related to contacts, bookmarks, calendar and notes takes up no more than 2-3 MB in cloud storage.
How to recover data on a new device
To import contacts and other information from your old device to your new one, you need to log into your Google account and then click on the synchronization button. After completing these simple steps, contacts and other information will be downloaded from the Internet. You can log in using one account on several devices, including those running other operating systems (for example, bookmarks in the browser can be synchronized between a laptop, PC, tablet and phone).
It is recommended to leave the auto-sync feature turned on so that up-to-date information about contacts or other personal data is always available across multiple devices.
Can passwords be saved via synchronization?
When using the Google Chrome browser, when you enter passwords on various resources, they are also saved in the system and synchronized on your account. In the future, this allows you to restore access to any site even after losing your phone or deleting information from it.
You can delete important information by disabling auto-sync and erasing personal data from your account. Before you start saving important passwords (for example, from your bank account), it is recommended to set up two-step authentication on your account.
Enabling synchronization on an Android smartphone is a simple procedure. The function is extremely useful, so it is recommended to use it even if you do not plan to save important data on the phone. With its help, in force majeure situations, you can easily restore lost information and continue using your smartphone in standard mode.
4.5/5 — (33 votes)
Why is this necessary?
The entire operation of an Android device is based on synchronizing the phone with a Google account - this is logical and natural. It will not be possible to work normally with the device without a user account, so creating one is the first stage of setup.
There is a user profile, it is entered into the system, and you actively use the device. But synchronizing your Google account with Android will help make your work as comfortable as possible. Why is it needed?
This function ensures simultaneous access and timely updating of information - user data will be promptly uploaded to cloud-based reliable storage. What parameters will be synchronized?
- Contacts;
- Calendar;
- Mailbox contents;
- Application data;
- Documentation;
- Bookmarks and browser settings.
The purpose of these manipulations has become clear - and now let’s talk about how to enable synchronization of your Google account with Android!