Modern routers have their own configurator with a web interface for simple and convenient configuration. For Keenetic routers, this is implemented through the My Keenetic Net personal account. It has a quick setup wizard that simplifies the process of connecting the device. There are also various options and functions for managing your Internet connection and local network. Today Keenetic (kinetic) is an independent brand of network devices. In the past, this was a series of routers from Zyxel, a reliable manufacturer in the Internet technology market. And today these devices continue to set the bar for quality and ease of use.
Standard way to enter Keenetic settings
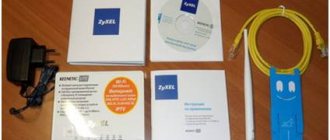
Let's get to work! We have a Wi-Fi router from the Kinetic family in front of us and the task is to get into its web interface. We connect it to the computer’s network card using the supplied Ethernet cable.
In principle, you can connect via WiFi. To do this, the sticker on the device body indicates the default network name (SSID) and password for connecting to it:
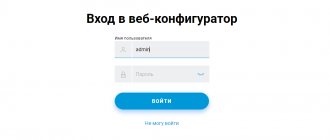
It’s not worth choosing for a long time which address to use to log into the Keenetic router page! If the network is configured correctly, then both addresses will work without problems. It’s just that the symbolic version is simpler and will work even if the device’s IP address in the local area was previously changed for some purpose. The router itself “on the fly” converts the hostname into an IP address and redirects the browser to the correct address. The result should be the web configurator authorization page:
At this stage, you will be required to enter a login and password to access the router configuration parameters.
By default, on Kinetics (as previously on devices from Zyxel), the following authentication parameters are used: admin - username with Administrator rights by default 1234 - default password
Note: I would like to note that on the latest Keentic firmware starting from version 3.1, the password for not installed by default. During the initial configuration, the router will ask you to change it to something of your own. If this is not done, the web interface will be fully accessible to all devices connected to its local network.
After you have entered the settings of the Keenetic or Zyxel router (which is practically the same thing), you can perform the actions that you wanted. As you can see, everything is not so complicated! But if you have problems accessing the router’s website, read the last section of this article!
- Changing the Password on the Zyxel Keenetic WiFi Router - How to Set Yours as Default via My.Keenetic.Net?
Password
When logging into the network administrator page using an IP address, the manufacturer and experienced users recommend that everyone change the default password to prevent unwanted intrusion or third-party use of Internet access.
To do this you need:
- open the “system” tab, “users” section;
- select the “password” option;
- In the “new password” line, indicate the updated code;
- duplicate the new password and click on the “apply” or “save” option.
The system will save the new data, and thus the login parameters on the administrator page will change.
How to reset?
You can learn how to reset any router from the following video:
There are several methods to reset the factory settings:
- using the “Reset” or “Reset” button on the case;
- via the web interface using the “System” menu or the “Settings” section.
To reset the button, you need to push it down, for example, with a paperclip, and hold it in this position for about 10 seconds. During the reset, the LEDs on the front side will flash simultaneously and then go off. After this, you can try to connect to the device.
To connect the router to a computer or laptop via cable, you must:
- Connect both devices using a power cord (RJ45 patch cord is usually included).
- Enter the address 192.168.1.1 in your Internet browser, use the login/password combination to go to the settings and set a new password.
Resetting settings via the web interface is performed as follows (using the example of ZyXEL Keenetic Lite III):
- Go to the “System” menu and go to the “Parameters” tab.
- Scroll to the bottom of the page and select “Restore factory settings.”
After this, the connection with the device will be lost for some time and the router web interface page will be unavailable. At this point, to return to the settings, you need to try updating the pages manually or automatically (depending on the browser and settings).
There is another option for gaining access to the router - without a cable. To do this, you will need a laptop or computer with a Wi-Fi module. The Wi-Fi network preconfigured by the manufacturer will be used here.
The parameters for connecting via Wi-Fi are indicated on the back of the device itself - GUI Access (IP address for web access), Username (login) and Password (password).
These settings will remain in effect until they are changed during configuration.
In the following video you will learn how to set up a Wi-Fi network on a ZyXEL router:
- How to enter the settings of the ZyXEL router? Login to the web configurator my.keenetic.net
Manually changing parameters
If the Internet does not work or you want to change the factory WiFi security settings, after completing the quick setup, click the “Web Configurator” button. A menu will open with all possible parameters divided into 5 categories, and a tab with information about the network status. On the latter you can find out whether data packets are being received and transmitted and whether connection parameters need to be changed, or whether the Internet is not working for reasons unrelated to the router.
Internet connection
To change your Internet connection settings, you need to open the “Internet” tab by clicking the planet icon at the bottom of the interface. A window will open with several settings sections. In the first of them you can see all the created connections - functioning ones are marked with a green checkmark, and a red cross is placed next to non-working ones.
This menu is useful when you only need to change some of the settings. One common case is the need to set a static IP address; in such a situation, the connection created during quick setup will not work. Using a ZyXEL WiFi router, you can change the IP receiving mode as follows:
- Click on an inactive connection.
- Select manual IP address setting in the appropriate column.
- Enter the IP address, gateway and subnet mask received from your provider.
Here you can also select the Internet protocol (PPPoE, PPTP or L2TP), specify the MAC address, etc. It is important to make sure that the “Enable” and “Use to access the Internet” checkboxes for the connection are active. After making changes, you need to click the “Apply” button and reboot the router.
The second useful section on the Internet tab is PPPoE/VPN. Here you can create a new connection from scratch, specifying the login and password for access, the connection protocol, the mode for obtaining an IP address and other parameters. This should be done if the Quick Setup Wizard cannot find the optimal settings.
Wireless access point
In order for the router to distribute wireless Internet, you need to activate and configure the access point. This is done on the “Wi-Fi Network” tab. It has 5 sections, 3 of them are the most useful:
- WPS;
- "Compound";
- "Safety".
In the first one, you can activate WPS (Wi-Fi Protected Setup) technology. It allows you to quickly transfer secure network settings to your mobile device without having to manually enter a password. For the technology to work, at the moment of connection you need to press the arrow button on the back wall of the router. Through the parameters, you can make it so that instead of a password, the network requires entering a short PIN code to connect.
In the second section, you can change the standard name of the network being created and change the data transfer standard. In addition, here you need to check the Wi-Fi activation checkbox if it was not selected by default. It is not recommended to change other parameters.
In the “Security” section, you set the type of network protection - it is best to select WPA2-PSK technology and a password. By default, the combination written on the sticker on the router body is installed; This password is easy to guess, so you need to change it the first time you start the device. You cannot select an encryption technology when setting up ZyXEL Keenetic Lite III.
Setting up and enabling Wi-Fi
To set up a wireless data network using the Zixel router, you need to check the operation of the wi-fi module. To do this, go to the “Start” tab in the taskbar and type “device manager” in the search bar. After which the user must select the appropriate line, and a new window will open in which a list of functioning equipment will be indicated.
In a new window, select the line “network adapters” and expand the hierarchy of the line by opening the “+” icon. Below you will see lines with connected network devices, the name of one of which will contain “wirelessnetworkadapter”. The line icon should not contain additional marks in the form of an arrow in the background of the label itself. But if the mark is still there, then point the mouse cursor at the line of this device and press the right mouse button, select the “enable” option.
No further configuration is required, because The Wi-Fi connection was configured automatically when creating the basic Internet connection setup.
PPPoE for Rostelecom
Rostelecom is a company that uses the most popular and reliable PPPOe connection technology. This type of connection is easy to set up and use, and is also time-tested.
To connect your Zyxel Keenetic Omni router to this provider, you must:
- go to the router home page by entering your username and password;
- on the updated page, click on the “Internet” tab;
- in the new window, select the “authorization” option;
- in the updated window, select the following options:
- protocol type (PPPOe);
- username and password (data specified in the agreement with the provider);
- setting IP parameters (automatic);
- authentication method (Auto);
- save the settings by clicking on the “apply” option.
After this, the device will independently take the remaining data for connecting to the Internet and automatically add the necessary data from the network so that the connection appears.
Possible problems and their solutions
Zyxel routers are relatively easy to manage and configure, so most software-level problems are still at the stage of entering these same settings. Let's look at the most typical problem cases.
I can't access the site itself
Sometimes it is not possible to enter the settings of the Zyxel router at all; even the login and password entry window does not load.
- Check the connections between the router and computer. Make sure the network indicator is active.
- Make sure the network cable (patch cord) is in the LAN (not WAN) port.
- Make sure you have entered the correct address in your browser.
- Try logging in from another device (there may be a problem with the computer’s network card).
- Try wired and wireless connections.
Important! Make sure you enter your login address in the address bar and not in the search bar.
Login or password does not work
If the page loads, but you do not know the administrator login and password:
- Look on the router itself. The sticker usually contains login information for the control center.
- If the standard login and password pair does not work, it means that someone has already set up and used the router and changed the data. First, ask the person who set it up before for the password, if possible. Otherwise you will have to do a hard reset.
- Check your keyboard layout. It often happens that users type an English password on the Cyrillic layout.
- Check if CAPS LOCK is enabled.
If the standard login and password pair does not work, perhaps some wizard (who set up and connected the Internet) changed the login information and rewrote it somewhere on the card. Try to remember where the data might be recorded. This is done for security reasons.
Almost all pests know the standard router admin data. If they got into the network somehow, for example, by guessing the password, they will have full access to the entire device. In this case, you will have to do a complete hard reset.
Factory reset
If the used router and the admin panel data are unknown and none of the above helps, then you will have to do a hard reset.
This is done by pressing the button on the rear panel for several seconds (10-15 seconds). If the button is recessed into the housing (to protect against unwanted reset), you will need a thin object (a paper clip works best). After this, the admin panel and all data will be restored to the original factory settings. We take the information from the sticker on the device itself, and now getting into the control panel of the Keenetic router will not be difficult. Enter the address, enter the administrator information and you're done.
Connection
Before software configuration, you should perform hardware configuration (as for routers from other manufacturers). This means physically connecting the device to power, connecting network wires, etc. You can enter the settings of the Zyxel router using a wired or wireless connection.
- Step-by-step instructions for changing the Wi-Fi password for D-Link, TP-Link, Rostelecom, ByFly, Huawei, ASUS, ZyXEL, Tenda, Mikrotik and Ubiquiti
Wired
For initial setup, it is recommended (both by the manufacturer and by experienced professionals) to use a wired connection and a personal computer or laptop:
- Plug in the power supply and connect it to the power socket of the router.
- Using a LAN cable, connect the computer and the router by connecting the wire to the LAN port.
- Make sure the LAN light on your router is active and blinking.
- On the computer, the LAN connector should be illuminated (on laptops, the indication is not present in all models).
Wired connection of the router to the computer:
Via Wi-Fi
If you decide to set up Zixel Kinetic and go into the router settings via a Wi-Fi connection, then follow these steps:
- Turn on the router (connect to the power supply).
- We use any device with a Wi-Fi adapter (computer, laptop, phone). We are looking for our network. It may bear a name with the name of the manufacturer.
- If you don’t know the name, or worse, the network password, and the standard factory one doesn’t work (you can see it on the device sticker at the bottom), then you should press the WPS button and within 2 minutes you can connect devices without a password.
Approximate wireless network data:
Turning on the router for the first time
Setting up the ZYXEL KEENETIC LITE 2 router for dummies begins with the user having to connect all the wires and the device itself in the correct sequence. To do this, the user must first connect the power supply to the mains. Next, you need to connect the Internet cable to the router. After which the user must connect the second cable included in the kit to the computer.
If everything is done correctly, a signal in the form of a round icon with a partially crossed out circle should light up on the case. It means that the device is powered from the mains.
The second signal in the form of a ball with a net should also light up.
This signal means that the user can begin setting up the router.
Video: Setting up the ZYXEL KEENETIC LITE 2 router
Hardware connection
There are many videos on the Internet “how to configure the ZYXEL KEENETIC LITE 2 router”. But you can do everything yourself and without outside help. Connecting the network kit occurs in several stages:
checking the operation of the network card on the computer; connecting the router to the Internet cable and computer; setting up a local network and Internet connection.
Checking the functionality of the network card when connecting a router is as follows:
- go to “start” and select the “control panel” tab;
- select the “Network and Sharing Center” shortcut or the “Network and Internet” tab and “Network and Sharing Center”;
- open the option “change adapter settings”;
- right-click on the “Local Area Connection” shortcut;
- if the connection is not connected, then connect;
- in the connection properties, select the “Protocol…” line and click on the “properties” option;
- in the window that appears, check the automatic configuration of IP and DNS addresses;
- repeat the last operation with “Protocol...4”.
If the user has done everything correctly, a monitor icon with a yellow triangle and an exclamation mark will appear on the panel in the lower right corner of the desktop. This means that the computer and router are connected to the network and you can proceed to the next step of setting up the router to create an Internet connection.
my.keenetic.net - how to enter the settings of the Keenetic router
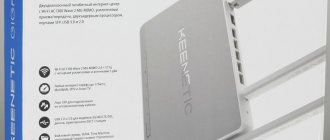
In this instruction, I want to tell you in detail how to log in to the Keenetic router setup . Not so long ago, these devices were produced under the Zyxel brand, but more recently they have become a separate brand. Since the firmware for all models is the same, the user’s personal account is practically no different. Therefore, this instruction will be relevant for WiFi routers Keenetic Start, Keenetic Lite, Keenetic City, Keenetic Air, Keenetic Giga KN-1010, Keenetic Ultra KN-1810 and others.
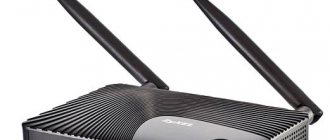
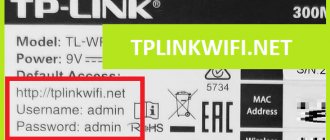
If you turn the device upside down, you will see a sticker on its bottom cover. It will contain the line: Settings - my.keenetic.net . That is, if you want to go into the router settings, enter this address in the address bar of your browser. In the same way as you enter Internet site addresses there. In response to this, the router's web configurator should open. It is also often called the web interface or personal account of the Kinetic router. At their core, all three names represent the same thing - a set of device settings presented in the form of a website. That’s why beginners call the web configurator “router site.”
If you pick up some old Zixel Kinetic, one of the first models, then the sticker will say IP 192.168.1.1. Why now they write the symbolic address my.keenetic.net instead of it?! I’ll tell you a little secret - both options are correct! It’s just that recently, for the convenience of users, manufacturers have begun to universally implement logging into router settings not by IP, but through a symbolic name. This is simpler and clearer for an unprepared person.
Entering the Kinetic router settings
In order to enter the Keenetic router setup wizard, you need to connect to it using a LAN cable or via a WiFi wireless network. The latter is very convenient if you want to configure the router from a tablet, phone or laptop. Although, if problems arise with access, you will still have to connect via cable.
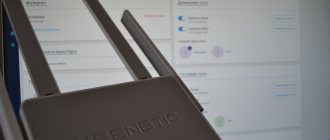
Open any web browser and enter the address: my.keenetic.net into the search bar.
If there are no problems with the settings and operation of the device or computer, then a page with fields for entering your login and password should open.
By the way, if you notice that the address has changed to keenetic.io, don’t be surprised, this is normal. Next, you need to enter your username and password for authorization.
How to connect to a Keenetic router
There are two ways to connect to the Kinetic WiFi router - via cable and via a wireless network. Let's consider both options.
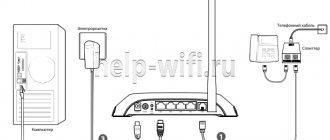
Connecting Kinetics via cable
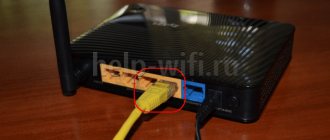
Any WiFi router comes with an Ethernet cable. With it, you can connect the device to a computer or laptop via a LAN port. To do this, you need to plug one end of the cable into any of the yellow Kinetics connectors labeled “Home Network”:
Connect the other end of the cable to the LAN port of the computer's network card. As a rule, all modern PCs and laptops have a network controller built into the motherboard, so you shouldn’t have any problems!
WiFi connection
You can also access your router settings via my.keenetic.net via a wireless network. To do this, you need to know the name of this network (WiFi SSID) and the password to connect to it. If you have not previously changed anything in the device configuration, then you can find out these parameters simply by turning Kinetic upside down.
There will be a sticker in which in the “Wi-Fi Network” field there will be the name of the wireless network, and in the “Wi-Fi Password” field, accordingly, the security key.
If you want to log into my.keenetic.net from a tablet or phone (Android or Apple iOS), then you can read the necessary data by scanning the QR code. By the way, you will need it if you want to use a proprietary application from the developers - My.Keenetic or Keenetic Cloud . In my opinion, setting up a Kinetic router from your phone via a mobile application is much easier and more convenient.
Using WPS on Keenetic
Don’t forget about this rather old way to connect to Kinetic via WiFi, how to use the WPS function. It will allow you to connect your router and laptop (tablet, phone) with a simple press of a button. First, press the WPS button on the Keenetic router - here it is:
Then within a minute we do the same on the gadget from which we want to connect. On tablets and phones, the WPS button is usually software and is located in the wireless network settings section.
Filter settings
Using the SkyDNS service, you can restrict access to unwanted resources and portals. To carry out this procedure, you must create an account on the official website of the service.
After creating an account, you need to go to “Personal Account”. Here select the “Filters” section. In this section, you can select those categories of sites that will be prohibited from viewing. There is a red icon next to them, and a green icon next to the allowed ones. In the “Exceptions” section, you can configure access to sites more precisely. For example, “Filter” prohibits access to Social Networks, and the Odnoklassniki.ru website is added to “Exceptions.” Now, despite the access being blocked by the “Filter”, this site will open.
After registering and introducing restrictions on the SkyDNS service, you need to configure the router through the built-in web configurator. To do this, the SkyDNS service must be installed in the configurator.
After the service is installed, it will appear in the “Security” tab in the router settings. Here you need to specify your SkyDNS account information. Next follow the instructions:
- Go to the “Home Network” section, then switch to the “Devices” tab.
- Next to the “Permanent IP address” field, check the box, then click “Register”. The device now has a permanent IP address.
- Go back to the “Security” tab, then go to SkyDNS.
- In this section you need to find “Filtering Profiles”.
- Make sure that in the line for other home network devices the “Primary” mode is selected.
- Apply the settings.
Now the SkyDNS service will filter sites that you do not want.
Correct connection of the router
Connecting a ZyXEL router is quite simple. All ports are labeled on the back panel of the case.
- To connect your computer to the router using a cable, they are marked in yellow;
- To connect the Internet cable, use the blue port;
- Insert the power cable into the port between the “Power” button and the Internet cable port;
- The reset button is located near the antenna. Rear panel of the ZyXEL Keenetic router case
The button layout may vary slightly depending on the model. But they are always signed. So you won't get confused. When all wires are connected, press the power button.
Login to the ZyXEL router settings
Each router comes with instructions and a driver. It is necessary so that your computer correctly identifies the device and knows how to handle it. Be sure to use it. Insert the disc into the PC drive and start the software installation. After it is installed, you should find an icon on the desktop to enter the device settings. You can also get here using a regular web browser (any). Let's consider a more universal configuration option using an Internet browser.
- Launch the browser installed on your computer;
- In the address entry window, write: “192.168.1.1”;
- You will see a form for entering your login and password. Enter the default login “Admin”; Requesting a login and password from the ZyXEL Keenetic router
- In most versions of ZyXEL Keenetic, the default password is “1234”.
But if the router was previously configured by another user or service worker, then it can be changed. Often, adjusters change the password to the router's serial number. If "1234" doesn't work, look at the number on the box and enter it in the password line. If it has a lot of characters, try using only the first or last 4. If none of the passwords work, try doing a factory reset.
Sources used:
- https://192-168-0-1.info/my-keenetic-net-vhod-nastrojka-routera-keenetic/
- https://wifigid.ru/zyxel/keenetic-parol-po-umolchaniu
- https://compsch.com/setevoe-okruzhenie/poshagovaya-nastrojka-routera-zyxel-keenetic-lite-2.html
- https://help-wifi.ru/tekh-podderzhka/vhod-v-router-zyxel/
- https://192-168-1-1.su/setup-my-keenetic-router/
- https://rusadmin.biz/soveti/parol-po-umolchaniyu-zyxel-keenetic/
Port forwarding to zyxel keenetic II, Start, Lite, 4G, Omni, Viva, DSL:
Good afternoon created tnc udp ports (for a server that I can log into, but others can’t, due to a disabled port) both in kenetics (zyxel keenetic lite ll) and in the firewall, I enter everything correctly, turn off the firewall, turn off the antivirus, and that’s it still doesn’t find the port (it says it’s closed), I tried it through a torrent (in the torrent it says open, but on sites and in programs, for example, in port forward network, 2ip, it says closed), I tried to overwrite everything (to no avail), on the Internet some What did I catch about some kind of “direct connection” so that the ports could be opened, but I couldn’t find it on zyxel, maybe you can help?
kek - to completely eliminate problems with forwarding, you can try to turn on the computer directly and raise the connection. It will immediately become clear whether the router is to blame or not.
I can’t set up a RDP connection to Kinetic Omni, how can I create a DMZ or port forwarding for 1C?
An example of port forwarding is in the article above. For the DMZ, you need to create a rule for IP without specifying the port number.
Good afternoon. I see the branch is still alive)) Please tell me about this case. I have an IPSec VPN tunnel up. And I want the port to be forwarded into this tunnel as in the picture (only instead of the kerio inscription it is also zyxel) / Regular NAT with port fording does not work. Although the server to which I do the port transfer pings from Kinetics. I know from experience that you need a masquerade with a specific gateway address (as I did, for example, in Kerio - uploads.ru/4pPbG.jpg). How to do this in Kinetics?
Yuri - I can’t give you any advice here, I don’t have anything to assemble such a circuit with. I think it’s better for you to ask this question to Zixel technical support.