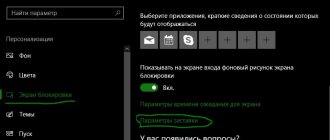
When installing Windows on a laptop, there are just a few problems that beginners face. And one of them is setting up the BIOS to install Windows from a flash drive. This is the first step where it all begins, and this is where almost everyone stumbles.
The problem is that there are different versions of BIOS. And, having studied the instructions on how to enable booting from a flash drive in the BIOS, a beginner may still not be able to cope. And all because it simply has the wrong BIOS version, there is no such line as in the screenshot and, accordingly, nothing works.
It doesn't matter what brand of laptop or computer you have. The version of the operating system (Windows 10, 8, 7 or XP) also does not matter. Only the BIOS version is important. And the easiest way to find out about this is by running it.
How to enter BIOS settings
Before entering the BIOS settings, you need to insert a bootable USB flash drive with the installation image into the USB port. The main thing here is to write it down correctly. Otherwise it simply won't load.
I recommend to read:
How to burn Windows to a USB flash drive using Rufus?
How to create a bootable USB flash drive in UltraISO?
After that, restart your PC or laptop and continuously click the Delete or F2 button until the BIOS window opens. The button may differ depending on the brand of laptop or motherboard on the computer, so see the hint on the first black screen.
For detailed instructions that describe all possible methods, see here: How to enter the BIOS on a laptop or computer?
Then the BIOS is configured.
How to boot a Packard Bell laptop from a flash drive
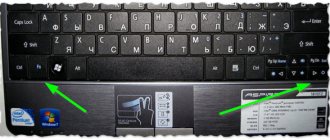
When loading, press the F2 key, or less often F6, and get into the UEFI BIOS of the laptop, here we go to the Boot tab. If you connected a flash drive to it before turning on the laptop, it may not be detected immediately in this menu. Set the Boot Mode option to Legacy BIOS. And set the Secure Boot option to Disabled. Next, press the F10 key, this saves the settings we made in the BIOS of the Packard Bell laptop, then we reboot, press the F2 key when loading and enter the BIOS again. Now the flash drive should be detected. Place the flash drive in the first position, save the settings and reboot. If the bootable flash drive is made according to our articles, then the download will be successful.
If you have questions, write in the comments.
You can also join the Telegram channel, VK or subscribe to Twitter. Links in page headers. Thanks in advance everyone!!!
Award BIOS setup
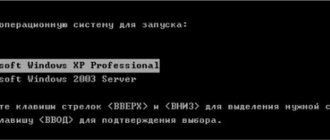
How can you tell if you have an Award BIOS? From the screenshot below:
If you have the same blue screen, then this is Award. This option is most often found on PCs.
Control in the BIOS is carried out only using the keyboard - arrows and corresponding buttons (their list is usually indicated at the bottom of the screen).
Before you set the BIOS to boot from USB, you need to check that it is enabled (otherwise the USB flash drive simply will not appear). For this:
- Use the arrows to select the 3rd item “Integrated...” and press Enter.
- Make sure that “Enabled” is written in the “USB-controller” item.
- Otherwise, highlight it, press Enter and select the appropriate option from the list.
The instructions are as follows:
- Select the 2nd item “Advanced...”.
- Click on the line “Hard Disk Boot Priority”.
- It is in this window that the BIOS is configured for installing Windows.
In the screenshot above, the HDD drive is in 1st place, and the USB flash drive is in second place. She needs to be lifted upstairs. As you can see from the prompts at the bottom of the screen, you can set the boot priority in the BIOS using the + and – buttons (plus and minus). Select the USB flash drive and press the plus sign - it should move to the first line. Next, press Esc to go back.
Then highlight the “First Boot Device” item, press Enter and select “USB-HDD”. Press the Esc button again. To exit the BIOS, click the F10 button and then Esc (Save and Exit).
We choose to load the flash drive first
The laptop or PC will reboot and the Windows installation should start. If this does not happen, then there are 2 options - either you wrote the flash drive incorrectly, or you forgot to save the settings in the BIOS. Read more about this here: Why doesn’t the BIOS see the flash drive?
Setting up booting from a USB drive on an old AMIBIOS computer
Let's consider launching a flash drive on a PC running AMI BIOS. AMIBIOS was developed by the American company American Megatrends Incorporated, hence the abbreviation AMI in its name. This BIOS is known to many PC users because of the start logo when the system starts.
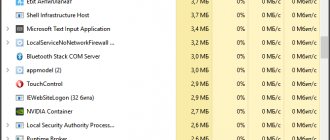
Turn on the computer and go to the AMIBIOS using the Del key. In the BIOS window we need to go to the “ Load Optimized Defaults ” settings item.
In these options you need to find the “ Quick Boot ” link and go to it.
After these steps, settings will open that allow you to set the priority of drives at system startup, including flash drives.
In the same way, you can install and run a flash drive on most computers running AMIBIOS.
Setting up AMI BIOS
AMI BIOS looks like this:
And most often it is found on laptops. Again, you first need to make sure that the USB controller is enabled. For this:
- Go to the “Advanced” tab (it's at the top).
- Select the “USB Configuration” item.
- Check that “USB Function” and “USB 2.0 Controller” say “Enabled”. Otherwise, press Enter and select the desired values.
Check that all USB devices are enabled in the BIOS.
Now let's look at how to boot a flash drive through the BIOS on a laptop:
- Go to the “Boot” tab (in the top menu) and select “Hard Disk Drives”.
- Highlight the 1st line, press Enter and select your flash drive.
- Press Esc to go back.
- Go to “Boot Priority Device”. This is where you can set the priority of loading from a flash drive.
- Set the parameters so that the first item in the list (“1st Boot Device”) is a USB flash drive.
Select the flash drive in the “1st Boot Device” item - Click Esc and then F10 to exit the BIOS.
Next, the laptop will reboot and the OS installation should begin.
Sometimes, to change the boot priority of devices (put the flash drive in 1st place), you need to press other buttons. This can be not only + and - (plus/minus), but also F6/F7, etc. Focus on the tooltips, where it is written what a specific button does (this small instruction is always located either on the right or at the bottom).
Lenovo S920 smartphone, characteristics of the fast IdeaPhone
Another interesting solution from Lenovo is the Lenovo IdeaPhone S920 smartphone.
- screen: IPS 5.3″, 16 million colors, 1280×720, touch, capacitive, multi-touch;
- Processor: 4-core MTK 6589, 1.2 GHz, PowerVR Series5XT video;
- memory: 1 GB RAM, 4 GB built-in + 32 GB microSDHC, microSD;
- phone type: monoblock, 159 g, 154×77.7×7.9 mm;
- phone charging connector: micro-USB;
- communication type: GSM 900/1800/1900, 3G;
- navigation: GPS, A-GPS;
- interfaces: Wi-Fi, Bluetooth, USB;
- platform: Andro >IdeaPhone S920 boasts two SIM cards, but it is equipped with one radio module, which, for example, does not allow it to download a file on the Internet during a telephone conversation.
The S920's photo quality is very good, but the ideaDesktop doesn't shine with its design. The battery allows the smartphone to work intensively for a day on one charge, which is a very good indicator. The speaker of the phone is high quality and loud.
The Lenovo IdeaPhone S920 isn't an outright bestseller, but it's a good choice for an all-in-one device, highlighted by its good camera, long battery life, and dual-SIM capabilities.
Video - How to boot from a flash drive or disk on a Lenovo laptop
Did you like the article? Save so you don't lose!
- 571
- Author: admin
- Date: 06/28/2013
- How to boot a laptop from a flash drive without changing BIOS settings? Almost all laptops have hotkeys that allow you to access a special boot menu and then select a device to boot your computer, be it a flash drive or a CD. I have two Acer and Samsung laptops at home and on neither of them can I get into this boot menu to reinstall the system. Although, I know for sure that on an Acer laptop the F12 key is responsible for this at boot, and on a Sony laptop the F11 key is responsible, but for some reason they don’t work. You can, of course, enter the BIOS and change the boot device priority there, but this is the last thing I want to do, since I don’t understand it well. I use your resource as a reference, could you consider this issue in detail on your website, giving examples with devices from different manufacturers.
- Admin, why can’t I boot an
ASUS laptop with UEFI BIOS from a flash drive? I connect the flash drive, press F8 when loading and instead of the boot menu I get into safe mode. I wanted to change the boot device priority directly in the BIOS, I entered the Boot Device Priority option, but my flash drive was not there, there was only a hard drive. - Tell me how to boot a Sony laptop from a flash drive, I can’t get into the boot menu (F11 when booting), then I go to the BIOS in the Boot tab and don’t find my flash drive there, although it is connected to the laptop.
Setting up Phoenix-Award BIOS
Phoenix-Award looks like this:
This is a rare (more precisely, old) version, but for the full picture, let’s look at it through the Phoenix-Award BIOS.
First, go to the “Peripherals” tab and make sure that the first two items are set to “Enabled”. If necessary, set what you need.
Next, go to the “Advanced” tab and make sure that the USB flash drive is selected in the “First Boot Device” item.
After that, go to the “Exit” tab (in the top menu) and select the “Save & Exit” line to exit the BIOS.
Setting up BIOS UEFI
BIOS UEFI is a new and improved version of the old BIOS. It has a user-friendly interface, so setting up the BIOS to install Windows is very simple here.
All you need is to find the USB device icon, use the mouse to move it to the 1st place, and then click the “Exit” item (in the right corner) with the mouse. And don't forget to save your settings!
This is how you can boot from a flash drive via UEFI BIOS in a simple way. Undoubtedly, this method is the simplest and most understandable. Actually, this is exactly why the new graphical interface was developed.
Is it possible to boot from a flash drive without BIOS? Yes, but only on new PCs and laptops. To do this you need to go to the Boot Menu. More information about this is written here: How to enter the Boot Menu?
Selecting a system partition
If there are no problems installing Windows on a new computer, then you should be especially careful when reinstalling it. After all, choosing the wrong system partition can delete all your personal data. Therefore, before installing the operating system, go to Disk Management and see which partition is used as the system partition.
To do this, enter the word “partition” in the search bar of the operating system and look for “Creating and formatting hard disk partitions” in the matches. Remember which partition your current operating system is located in (in ours, and in most other cases, this is disk 0 (C)).
Now you can proceed directly to installing Windows.
One useful tip
When your PC or laptop reboots for the first time during the Windows installation process, you need to go into the BIOS again and restore the previous settings. That is, put the HDD drive in first place, and lower the flash drive into second or third.
Or when after a reboot a black screen appears with the line “Press any key...” (“Press any button”) - do nothing.
Otherwise, Windows will start installing from the very beginning. And you can walk in circles like this for hours.
Once again: during the installation process, after the first reboot, either go into the BIOS and return all the previous settings, or simply do not press anything. Alternatively, you can simply remove the flash drive from the USB port (but only when the PC or laptop reboots).
Types of input/output systems
To avoid any confusion about the BIOS, here are some clarifications.
BIOS is the first stage of starting a computer. Such a program was released a long time ago, and motherboard developers mainly used three types of BIOS: Award, AMI and Phoenix-Award. Now the BIOS is outdated, as it was designed for the x86 microarchitecture. With the transition to x64, it's time to change the Bios itself.
And it was changed to UEFI. In the old fashioned way, everyone also calls it Bios, meaning the interface between the system and firmware. UEFI has become more than just an input/output system. It has many useful functions, it is more convenient due to the ability to work with the mouse and is better visually perceived. You can think of it as the initial operating system that helps you download and install the main OS. In addition, hardware with “UEFI” works perfectly with Windows 10.
To avoid copying each other, motherboard developers use their own GUI for UEFI. For example, the feature you are looking for on an ASRock motherboard will be in a completely different location when compared to an MSI motherboard.