Turn off adaptive brightness in Windows 10
You need to open the power settings, to do this, right-click on the “Start” menu and select “Power Options”
Next to the current scheme, click “Configure power supply scheme”
And then go to “Change advanced power settings”
Next, open the “Screen” subsection and in the “Enable adaptive brightness control” item, set the switches to the “Off” position for mains power and battery power:
Also, the brightness itself can change when connected to the network or when powered by a battery and the charge decreases to the designated level. The screenshot shows that the value is set in reduced brightness mode - 50%. We put 100% everywhere.
Eliminate automatic monitor brightness changes
1) Disable adaptive brightness control
This is the first thing to do. This option is available in Windows 8, 8.1, 10. Those who have Windows 7 can omit this part of the article.
You need to open the power settings section:
powercfg.cpl - open power settings
In the power settings: follow the link “Setting the power plan” in the selected mode (in the screen below, this is a balanced mode. The selected mode is marked in bold black).
Power plan settings
Next, open the “Change advanced power settings” link (screen below).
Change advanced power settings
Now find the “Display” tab among the settings and expand it. Here in the tab there are 3 key settings:
Power supply - turn off adaptive control and set the brightness to the same
Now save the settings and try to look at light and dark pictures (for example) to evaluate whether the brightness changes. As a rule, such settings completely eliminate this problem...
Problem with Intel video cards
If your laptop has a built-in Intel 4000/530 or other video adapter, and the first method did not help, then do the following. Right-click on the desktop and select “Graphics characteristics”
The Intel HD Graphics Driver Control Panel will open. If this is not the case, then write “intel” in the search bar of the Start menu and select “Intel(R) Graphics and Media” from the results.
In the driver panel, select “Power Options”:
Next, turn off the display energy saving technology and set it to maximum quality:
The second option is to disable “Extended battery life for gaming applications”. Surprisingly, this can affect the floating brightness on the desktop.
Automatic driver update
New versions of graphics software may cause conflicts. To prevent this from happening, you need to turn off the automatic driver update function:
- Using the search bar, open Control Panel and launch the “System” section.
- In the new window, find the “Change settings” function. It is located in the computer name subsection.
- Go to the hardware tab and from there go to “Device installation options”.
Choosing the correct screen brightness level is very important, since it affects not only the quality of the displayed image, but also the strain on the eyes. A screen that is too dark will cause your eyes to get tired quickly trying to see the image, and a monitor that is too bright will cause a lot of glare. Therefore, there are several ways to select the optimal brightness level for your conditions.
If all else fails
If you don’t play 3D games, then you can take an extreme measure - change the video card driver to the built-in one in Windows. The method is NOT only suitable for Intel.
Open Device Manager (right-click on the Start menu), select “Video adapters”. Here you will have Intel, AMD or whatever. Right-click on the adapter and “Update drivers...”
In the window that appears, click “Search for drivers on this computer”, then “Select a driver from the list of already installed drivers”
In the list you need to select “Basic video adapter (Microsoft)”
While changing the driver, the screen may blink. The laptop will not reboot automatically, but it is better to do it manually. In this simple way, we turned off all the “tricks” from the manufacturer, but also lost technological advantages. In fact, now the video card can only draw the desktop and video.
To return everything back, you need to do the same thing, but select the old driver in the last step. Or restore to a system restore point.
Source
How to disable auto brightness in Windows 10
To disable the function you need to:
By disabling a useful, but at the same time not the most convenient function, the computer owner will no longer encounter the problem of monitor fading. And if it is not possible to find the corresponding item, you need to turn to alternative methods of deactivating the option.
Registry Editor
Sometimes dimming is activated not for the entire screen, but for a separate part of it. For example, when a user runs a program. At this point, the rest of the display dims its brightness. This is not caused by the auto-brightness function. To solve the problem you need:
After saving the settings, the application will work without dimming. If necessary, the user can always remove changes by setting the value back to “1”.
Disabling "Display Power Saving Technology"
On some computers, the monitor changes brightness on its own due to the use of energy-saving mode. As a rule, it is present on a laptop. To prevent the screen from darkening, you need to disable the “saving” function:
The brightness level will no longer be automatically lowered when the computer tries to save power. If the problem continues to make itself felt, consider a few more options.
Disabling Vari-Bright
Unlike the previous method of solving the problem, this method is suitable for computers with Radeon video cards. Their software has an automatic feature that dims the screen for a similar purpose - saving energy. To disable the feature you will need:
If the video card settings interface is not translated into Russian, the user needs to start from the “Preferences” section. Otherwise, the instructions will be the same, and eventually the auto-dimming technology will be disabled.
Disabling contrast enhancement and movie mode selection
Another solution to the problem for those whose screen darkens randomly on a computer with an Intel GPU. Not only does the video adapter settings have an energy-saving function that reduces brightness, but it also contains contrast enhancement technology. Sometimes it incorrectly recognizes the parameters of the current brightness level, which causes erroneous darkening of certain areas of the display.
To disable contrast enhancement, follow the instructions:
Sometimes you need to restart your computer for new settings to take effect. Be sure to do this, and only then check your computer for problems related to auto brightness.
Disabling the sensor monitoring service
Sometimes errors with ambient light level detection appear on certain devices. Thus, Surface 4 users note that their brightness decreases if sensor monitoring services are activated. Accordingly, to solve the problem, you need to abandon the use of this process. The operation is performed as follows:
It is possible that similar instructions will be useful not only to users of branded Microsoft laptops, but also to owners of devices from other manufacturers. Still, the service works on all computers, and the absence of complaints about sensor monitoring is not yet a reason not to try this method of fixing the auto-brightness error.
Re-enabling the integrated card
Finally, involuntary changes in the brightness level can be associated with problems with the integrated video card. In this case, we are talking about Intel graphics adapters, which often fail. Experienced users suggest that the problem can be solved by restarting the card.
You must act in strict accordance with the requirements of the instructions:
Advice. It is also recommended to update your video card drivers. The action is also carried out through the Device Manager, where, instead of the “Disable device” button, you need to click “Update driver”. If updates are not available, download the software yourself from the official website of the developers.
Now the video card should work as usual, and you are unlikely to encounter dimming of the display unless you forcefully activate the auto-brightness function. In any case, it is recommended to double-check all settings to ensure that the correct parameters are set for the correct display of content.
Source
Reason 1: Incorrect brightness settings
The most commonly considered failure is software, and consists of incorrectly adjusted display brightness. The solution steps are as follows:
Move the point on the strip to the far right position.
In older versions of “tens”, you will need to open “Settings”: use the combination Win + I, then select “System”.
Here, click on the “Display” position, and the element you are looking for will be on the right side of the window.
Open the “Screen” item and check how the brightness is set - if it is at a minimum, this is the cause of the problem.
Disabled "Generic PnP Monitor"
This option for the reason that the brightness does not work (there are no adjustments in the notification area and the brightness change in the screen settings is inactive, see the screenshot above) is more common than others (although it seems illogical to me), so let’s start with it.
- Launch Device Manager. To do this, right-click on the “Start” button and select the appropriate context menu item.
- In the "Monitors" section, pay attention to the "Universal PnP Monitor" (and possibly some other one).
- If you see a small arrow next to the monitor icon, it means the device is disabled. Right-click on it and select “Engage”.
- Restart your computer and then check whether you can adjust the screen brightness.
This version of the problem is often found on Lenovo and HP Pavilion laptops, but I’m sure the list is not limited to them.
Reason 2: Incorrect Intel driver parameters
In some situations, the source of the problem is the settings of the Intel HD Graphics driver, which is installed in most laptops as an energy-efficient video core. It is the same by default and works when using the system and the vast majority of applications. To fix the problem, the driver will need to be configured.
As a last resort, you can open “Search” and enter the query intel into it - the result we need is called “Intel Graphics Control Center” or something similar in meaning.
If the changes made do not bring any effect, try restarting the laptop - when you log in, it should pick up the new settings.
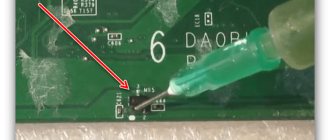
Reason 3: Problems with the lid close sensor
A more serious case of a dim screen lies in problems with the matrix itself. The first thing to check is the operation of the laptop lid switch: perhaps the sensor has failed and is causing the system to think that it is closed. For these purposes, use a magnet: bring it to the frame around the screen and move it along it - some place should become magnetic. Next, find the corresponding position on the panel of the laptop with the board and keyboard and place the magnet there. If the device reacts to it (the brightness has increased), this is a sign of sensor failure. This procedure requires some specific skills, so it will be better if it is performed by professionals from a laptop repair center.
Mobility Center
The next option is to change the screen brightness. To complete it, follow the simple instructions below:
- Find the Windows icon on the taskbar and right-click on it;
- in the list that opens, activate the second line labeled “Security Center”;
- After this, a window will appear, one of the cells of which will be reserved for screen brightness settings in Windows 10 - use the slider to set the required level.
Now it’s time to move on to solving problems with brightness that arise when the computer is running. The first one to study is the one in which the screen brightness changes without your participation.
Reason 4: Loop defects
Sometimes the culprit is the cable that connects the motherboard and the screen matrix. In some laptop models, it is not located very well, and during active use it can fray. The latter causes a number of symptoms, and low brightness is just one of them. To check, try closing and opening the lid several times, and locking it in different positions. If the problem of a dim screen disappears in any of the positions, the problem is definitely in the cable, and it needs to be replaced. You can do this yourself, but we still recommend contacting a service center.
Reason 5: Backlight problems
The backlighting of the display of almost any laptop is carried out using LED strips, which are powered and controlled by an inverter. The last element is also prone to breakdowns, albeit quite rarely, compared to other components. In the event of such a failure, it is impossible to fix it yourself, since the inverter is connected to the system board, so the only solution is a visit to the workshop. Similarly, burnout of backlight LEDs can be eliminated.
Why doesn't adjusting screen brightness work in Windows 10?
There are several possible causes for this problem. Before you fix the problem, you need to find out why exactly the brightness control stopped working. You can change the situation yourself by using the capabilities of Windows 10.
Common reasons for deactivating the brightness control:
All sorts of problems with the monitor's color adjuster usually arise after a clean installation of Win 10 or updating the old OS to the latest version. If users notice that when they press the “Fn” + “F11” (“F12”) keys, the brightness of the monitor does not decrease or increase, and there is no adjustment slider in the Windows “Options” “Display”, then reinstalling Windows led to some kind of internal failure.
If a problem occurs, first of all, you need to check the monitor and video card drivers through Device Manager. You can adjust the color of the display through the power options or the Graphics Control Panel. As a last resort, you can activate the disabled adjustment by rolling back Windows to the previous version.
Method 2 - how to change using the control panel:
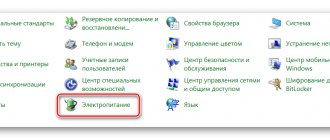
- The old, and, one might say, more familiar interface also allows you to change the monitor interface. First step: go through the menu to the control panel and look for “Screen”. If you have trouble finding it, use the search bar.
- The list on the left gives several items - we need “Screen resolution settings”. We indicate the required data.
- Click the “Apply” button. And just like in the previous method, the settings can be canceled and saved.
Resolution is not that difficult. But what if the screen brightness is not bright enough for work? This brings up the next question: “How to increase brightness?” After all, with such a function some difficulties arise - these are shortcomings of the Windows company.
Changing the screen brightness on OS 10 is identical to the eighth version of Windows. To do this, open the power panel using the Win + X key combination. Or you can simply click the “Start” button, then “Power Management”. In the panel that opens, select the slider that adjusts “Screen brightness”. Now you can adjust the backlight to suit you by moving the slider.
Some laptops on the tenth operating system allow you to increase or decrease the brightness and clarity of the display by pressing the following keys: Fn + -> or Fn +
5 Ways to Adjust Screen Brightness in Windows 10:
Laptop users constantly adjust their screen brightness settings according to the type of environment in which they work. For example, if you're outside in direct sunlight, you may need to increase the screen brightness to 90% or even 100% to see your screen properly, and if you're working inside your home, you'll likely need to dim the display to prevent this from happening. will harm your eyes. Additionally, Windows 10 automatically adjusts screen brightness, but most users have turned off adaptive screen brightness settings to manually adjust brightness levels.
Even though you've turned off adaptive screen brightness, Windows may still automatically change it based on whether you're plugged into a charger, you're in battery saving mode, or how much battery is left, etc. If Screen brightness settings don't match, you may need to update your display driver. Anyway, Windows 10 offers quite a few ways to quickly adjust screen brightness, so without wasting any time, let's see how to adjust screen brightness in Windows 10 using the guide below.