Hi all! Today we are looking at another question, how to increase or decrease the brightness of the monitor on a PC (or laptop screen) on Windows 10. First of all, you need to understand what kind of device you have - a computer or a laptop. This is very important, since this will radically change the actions themselves. If you have a desktop computer with a monitor connected to it, then see the last chapter of this article or method number 7.
If you have a laptop, then you can look at all the options presented. In fact, the initial methods work for some PCs, but not in all cases. Therefore, it’s easier to do everything through direct monitor settings or the video card panel. If something doesn’t work out, or you have any questions, write in the comments.
Hotkeys
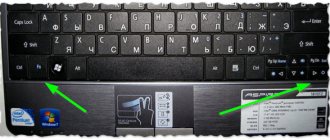
You can change the brightness on a laptop using special keys located in the F-row. As a rule, these are the “F1” and “F2” buttons, but there are rare exceptions. The first key is responsible for decreasing, and the second for increasing brightness.
On a note. Next to these keys there is a similar “F3” button, which is responsible for adjusting the keyboard backlight level. However, it all depends on the specific laptop model.
Unfortunately, on a standard computer with a separate monitor, this method of adjusting the brightness is not provided. True, there is an alternative option for changing the indicators in hardware, which will be discussed below.
Why does the computer screen darken?
Developers of individual computer elements try to make the process of using the gadget as convenient as possible. So, a laptop or desktop monitor may have a sensor that analyzes lighting conditions. It works in a similar way as a similar sensor on a smartphone. And thanks to the functionality of Windows 10, the user turns on or off adaptive brightness control (changes in the backlight level depending on the ambient light).
This option is the main cause of the problem when the screen suddenly goes dark. After all, sometimes the sensor incorrectly recognizes the environment, which is why it mistakenly reduces the brightness.
Monitor buttons
The display brightness is also controlled using physical buttons on the monitor body. They are located in several places:
- under the screen;
- on the side of the display;
- at the ends.
Take a close look at your monitor and determine which button will help make the screen brighter. Most likely, it will have a logo in the form of a sun or an up arrow. Click it and check the final result.
Via "Options"
This is where the physical (hardware) methods for changing brightness end. But don't despair if you haven't been able to brighten your screen. You can adjust brightness using many software tools, one of which is the “Options” menu. There are a bunch of settings here, so in order not to get confused in the variety of submenus and sections, follow the instructions:
- LMB on the “Start” icon and launch “Settings” by clicking on the gear.
- Go to "System" and then "Display".
- Under the "Change Brightness" heading, adjust the settings to your liking.
The settings will be automatically saved without you having to press additional buttons. Despite this, the presented method does not seem to be the most convenient, since a person will have to constantly open “Settings” and look for a specific section. Therefore, also pay attention to alternative options, of which there are many.
A universal way to reduce screen brightness
You can also reduce the screen brightness on your laptop using the keyboard. This method works on most laptops, regardless of the version of Windows. Find the key with the brightness reduction icon on your laptop keyboard. Typically this key is the down arrow. By pressing this key together with the Fn key, you can reduce the brightness by one level.
By holding down these two keys for a while, you can reduce the laptop brightness to minimum.
Lately, I've been getting quite a lot of questions about the brightness of laptop monitors. This is especially true for laptops with built-in IntelHD video cards (very popular recently, especially since they are more than affordable for a large number of users).
The essence of the problem is approximately as follows: when the picture on the laptop is light, the brightness increases, when it becomes dark, the brightness decreases. In some cases this is useful, but in others it greatly interferes with work, the eyes begin to get tired, and work becomes extremely uncomfortable. What can you do about it?
Remark! In general, I had one article devoted to spontaneous changes in monitor brightness:. In this article I will try to supplement it.
Most often, the screen changes its brightness due to non-optimal driver settings. Therefore, it is logical that you need to start with setting them up...
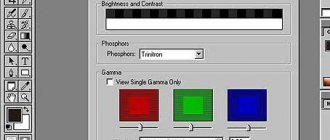
So, the first thing we do is go to the video driver settings (in my case, this is HD graphics from Intel, see Fig. 1). Typically, the video driver icon is located next to the clock, at the bottom right (in the tray). Moreover, it doesn’t matter what kind of video card you have: AMD, Nvidia, IntelHD - the icon is usually always present in the tray (you can also go to the video driver settings through the Windows control panel)
.
Important! If you do not have a video driver (or have universal Windows drivers installed), I recommend updating them using one of these utilities:
- enable maximum performance;
- disable the monitor's energy-saving technology (it is because of it that the brightness changes in most cases);
- Disable the extended battery life feature for gaming applications.
How it looks in the IntelHD control panel is shown in Fig. 2 and 3. By the way, you need to set similar parameters for the laptop to work, both from the network and from the battery.
Rice. 2. Battery power supply
Rice. 3. Mains power supply
By the way, in AMD video cards the required section is called “Power”. The settings are set in the same way:
- you need to enable maximum performance;
- disable Vari-Bright technology (which helps save battery power, including by adjusting brightness).
Power Options in Windows
Rice. 5. Selecting a power plan
Rice. 6. Change advanced settings
The most important thing here is contained in the “Screen” section. You need to set the following parameters in it:
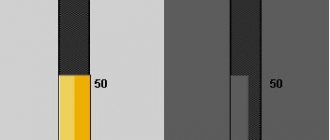
- set the parameters in the screen brightness tab and the screen brightness level in reduced brightness mode to the same (as in Fig. 7: 50% and 56% for example);
- turn off adaptive brightness control of the monitor (both on battery and mains power).
Save the settings and restart your laptop. In most cases, after this the screen begins to work as expected - without automatically changing the brightness.
Sensor monitoring service
Some laptops are equipped with special sensors that help regulate, for example, the brightness of the same screen. Whether this is good or bad is a debatable question, but we will try to disable the service that monitors these sensors (and therefore disable this auto-adjustment).
So, first we open the services. To do this, in the Run line (in Windows 7 - Run line in the START menu, in Windows 8, 10 - press the WIN + R button combination) enter the command services.msc and press ENTER (see Fig. 8).
Rice. 9. Sensor monitoring service (clickable)
After rebooting the laptop, if this was the reason, the problem should disappear :).
Laptop Control Center
Some laptops, for example, the popular VAIO line from SONY, have a separate panel - the VAIO control center. There are quite a few settings in this center, but in this particular case we are interested in the “Image quality” section.
There is one interesting option in this section, namely, determining lighting conditions and setting automatic brightness. To disable its operation, just move the slider to the off position (OFF, see Fig. 10).
By the way, until this option was turned off, other power settings, etc., did not help.
Action Center
Changing the brightness occurs through the “Action Center” or, as it is also called, “Notification Center”. This is a special area of the taskbar located in the lower right corner. It is much easier to access than “Parameters”, and therefore this adjustment option can be considered optimal:
- Click LMB on the “Center” icon.
- Click on the “Expand” inscription.
- A tiled panel will appear in front of you, and a brightness slider will appear at the bottom.
- Adjust according to your needs.
Please note that in older versions of Windows 10, the adjustment is presented as a separate tile with a Sun icon. Its disadvantage is the ability to change values in 25% increments, and therefore the final result is unlikely to satisfy a demanding user.
Power Settings
Another optimal option that allows you to reduce or increase the screen brightness level. Once again we will have to turn to the help of the taskbar, but this time you should not be interested in the “Action Center” icon, but in the icon with the current battery charge (on a laptop):
- Right-click on the battery icon on the taskbar.
- Select "Power Options".
- Mark the circuit you are interested in and click on “Configure power supply circuit”.
- Adjust brightness.
There is another way to access this menu. For example, through the “Control Panel”:
- Hold down the "Win" + "R" keys to launch the "Run" window.
- Enter the query “control” and click on the “OK” button.
- Go to the "Power Options" section.
- Follow steps 3-4 from the previous instructions.
You can also access the “Control Panel” through the “Windows” search bar. This will allow you to lower or increase the display brightness much faster.
Restarting the Generic PnP Monitor
If the screen brightness is no longer adjustable, the problem may have occurred after automatically updating the video card driver. During installation, inconsistencies may occur that will cause the universal PnP monitor to turn off, preventing the user from adjusting brightness. To solve the problem, try restarting it
Open Device Manager with the devmgmt.msc command from the Run window.
Expand the Monitors tab. Right-click on the Generic PnP Monitor and select Disable. Then right-click the menu again and click on “Engage”.
After restarting your laptop, check if Windows 10 adjusts the screen brightness.
Mobility Center
Another built-in tool that allows you to change brightness. By analogy with the “Control Panel”, it can be opened through the Windows search bar. But the standard version looks different:
- Right-click on the “Start” icon.
- Select Mobility Center.
- Change the settings as you wish.
Reference. In addition to brightness, Mobility Center allows you to change the volume of the speakers, as well as the power supply if you own a laptop.
Judge for yourself which option is closer to you. If for some reason none of the previously discussed methods will help you adjust the screen settings, then be sure to read the material to the end. Ahead of you are two alternative methods that work under any circumstances.
PowerShell
Do you want to reduce or increase brightness, but standard methods do not help? Try to force the operation by entering a special query in the PowerShell console.
- Right-click on the Start icon.
- Launch PowerShell with Administrator rights.
- Enter the format request (Get-WmiObject -Namespace root/WMI -ClassWmiMonitorBrightnessMethods).WmiSetBrightness(1,BRIGHTNESS_LEVEL), where instead of "BRIGHTNESS_LEVEL" specify the brightness percentage. For example, "80".
- Press the "Enter" key.
The command will be processed immediately and the screen settings will change. In the future, you can use PowerShell in the same way to increase or decrease the brightness. At the same time, any previously considered options will remain available.
Third party programs
Screen settings are adjusted not only by standard Windows tools, but also by third-party programs. For example, in the parameters of any game there is a section that has a name like “Display”. There are many changeable values here, including brightness. But what to do with games and applications that do not have such a function?
Third-party software comes to the rescue again, but this time we are talking about utilities that specialize in changing screen parameters. As an example, it is worth highlighting Brightness Slider. This is an operating system add-on, which is a small strip for adjusting the brightness with the movement of the mouse. Brightness Slider should be considered as a replacement for standard products, which often refuse to work.
Advice. If the standard adjustment options do not work, try to install all the necessary drivers on your computer, including the monitor software. Most often, the lack of compatible software becomes the main cause of problems with brightness changes.
Of course, Brightness Slider is far from the only application of its kind. We will also highlight RedShiftGUI, Desktop Lighter, CareUEyes. Try each program to choose the optimal software for solving everyday problems.
Eliminate automatic monitor brightness changes
1) Disable adaptive brightness control
This is the first thing to do. This option is available in Windows 8, 8.1, 10. Those who have Windows 7 can omit this part of the article.
You need to open the power settings section:
- or through the following address: Control Panel\Hardware and Sound\Power Options
- or by pressing the Win+R keys and entering the command powercfg.cpl (see screenshot below).
In the power settings: go to the link “Configure power plan”
in the selected mode (in the screenshot below - this is
a balanced mode
. The selected mode is marked in bold black).
Now find the “Display”
and open it. Here in the tab there are 3 key settings:
- screen brightness from battery and network: set the values that suit you;
- screen brightness level in reduced brightness mode: set exactly the same values that you have set in the “Screen Brightness”
; - turn off adaptive brightness control from mains and battery (see screenshot below).
Now save the settings and try to look at light and dark pictures (for example) to evaluate whether the brightness changes. As a rule, such settings completely eliminate this problem.
If you are using Windows 10, pay attention to its control panel (to go to it, press Win+i). In the "System/Display"
there is a special a setting that allows the laptop to change brightness as the ambient light changes. Turn it off too!
2) Setting up the power supply for the video card
The laptop itself can reduce the brightness under certain operating modes. For example, IntelHD video cards support display energy-saving technology and extended runtime in games when running on battery power. Similar technologies are available in both AMD and nVidia.
First, you need to go to the settings of the video card driver (you can do it through - see the screenshot below), or you can do it through the tray icon, next to the clock.
If you do not have a tray icon, and there is also no link to graphics settings in the control panel, most likely you do not have the drivers installed (it is likely that you have a “universal” driver that was installed when you installed Windows). In this case, I recommend programs for updating drivers:
They need to set the following:
- set the energy saving parameter to maximum performance mode;
- disable extended runtime for games on battery power;
- disable display energy saving technology (screenshot below - see arrows).
For example, in video cards from AMD, you need to open the “Power” section, then enable maximum performance, and disable Vari-Bright technology (this is AMD technology that allows you to adjust brightness).
Vari-Bright disabled! (AMD Graphics settings) / Clickable
3) Sensor monitoring service
There is one service in Windows that monitors sensors and adjusts the display lighting, depending on the lighting of the room in which your device is operating.
I can say that sometimes the service does not work correctly and can affect the brightness adjustment, even if you do not have any sensors!
How to disable sensor monitoring services
Open a window with services: the easiest way is to press the Win+R
, enter
services.msc
, press
Enter
. The method works in all versions of Windows.
Next in the list you need to find the service “Sensor Monitoring Service”
, open it.
In the “startup type”
, put [disabled] and stop the service itself so that the status is indicated as
“Stopped”
(see screenshot below).
Then save the settings and restart the laptop.
4) Laptop control center
Certain laptop models have a control center among the software installed along with the drivers. For example, in the line of VAIO laptops from SONY there is a VAIO control center
.
In this control center, for example, you first need to open the “Power Options”
and set high performance, as well as disable the function that extends battery life (see screenshot below).
High Performance // Power // VAIO Control Center
Picture Quality // VAIO Control Center
Actually, it is hardly possible to give a description for each of these centers. The VAIO Center is shown above as an example of such software.
Lenovo laptops also have something similar: various night modes, dynamic changes in brightness, contrast and other things can significantly change the quality of the picture on the screen. It is recommended to disable them all (at least at the time of setup and adjustment).
5) Problems with hardware
A change in screen brightness may be due not only to software settings, but also to faulty hardware. In what cases can you determine that the laptop hardware is to blame:
- if not only the brightness has changed on the screen, but also stripes, ripples, and dots began to run (as in the example below);
- if when you increase/decrease the brightness on the monitor, absolutely nothing happens;
- if the brightness changes even without changing the picture on the screen and without changing the lighting conditions in the room;
- if the brightness in different parts of the screen is different.
If you have stripes and ripples displayed on your monitor, I recommend that you read my other article:
Stripes and ripples on the screen / As an example
The higher the brightness, the less battery life the laptop will run on. Therefore, many users are interested in how to reduce the brightness on a laptop. If you are also interested in this issue, we recommend that you read this article.