Enthusiasts and regular users can boast of having a lot of experience working with Windows 10. Even though years have passed since the first release of Windows 10, owners of some laptop models have encountered an unpleasant feature of Windows 10 - non-adjustable screen brightness.
The first thing you need to do if you cannot adjust the brightness using the system settings or the fn + f11/f12 keys is to check that the installed drivers for your video card are up to date and, if necessary, update them. Generally, this can resolve your laptop's brightness issues and you will be able to adjust the brightness as per your preference as before.
Adjusting brightness based on power settings
The problem can be resolved by changing some settings in the power supply. This method can also be used on Windows 7 and 8.1.
Open the Power Options section by running the powercfg.cpl command from the Run window (Win + R).
Go to the active power plan settings.
Click on the “Change advanced power settings” link.
Find and expand the Display tab. Then expand the screen brightness and adjust the values to your preference. Repeat these steps with the "Screen brightness level in dim mode" option.
Next, make sure that the "Enable Adaptive Brightness" option is turned off. Save the changes by clicking on the “Apply” button.
If the settings listed are missing or the brightness still cannot be adjusted, continue to the next step.
Turning off the monitor
Most often, the monitor turns off due to a system failure. Therefore, the solution to this problem lies in the correct configuration. How can you tell if your monitor has turned off?
When opening the control panel, the user does not find icons for adjusting brightness. Naturally, you immediately need to open the monitor settings menu.
In the screen settings you can find a brightness slider, but you can’t do anything with it. This again suggests that the monitor is disabled or the system does not find it. How then can the user see everything that happens on the screen?
The point here is that physically the display is functioning, but at the driver level it is displayed by the system as inactive. Therefore, all adjustment options are temporarily disabled. This problem doesn't happen often, but it's the easiest to fix.
Changing brightness in graphics settings
The screen brightness can also be adjusted in the video card settings. Let's look at how to do this in the Intel Graphics Control Panel.
Right-click on an empty desktop field and select Graphics Properties.
In the next window, click on advanced mode.
Expand the Display menu and open Color Enhance. Make adjustments by moving the brightness slider until you are satisfied with the result.
If you are using the NVIDIA Control Panel, you can adjust the brightness in the Adjust Desktop Color Settings tab.
Why can't I adjust the brightness on my laptop? How to adjust screen brightness?
Hello.
A fairly common problem on laptops is the problem of screen brightness: it either does not adjust, then changes on its own, then everything is too bright, or the colors are too weak. In general, this is just a “sore topic.”
In this article I will focus on one problem: the inability to adjust brightness. Yes, this happens, I myself periodically encounter similar questions in my work. By the way, some people neglect setting up the monitor, but in vain: if the brightness is too low (or too high), the eyes begin to strain and get tired quickly (I already gave advice about this in this article:).
So where to start solving the problem?
1. Brightness adjustment: several ways.
Many users, having tried one method of adjusting the brightness, come to a clear conclusion - it cannot be adjusted, something has “failed” and needs to be repaired. Meanwhile, there are several ways to do this, besides, once you set up the monitor, you can not touch it for quite a long time, and you won’t even remember that one of the methods is not working for you...
I suggest trying several options; I’ll discuss them below.
1) Function keys
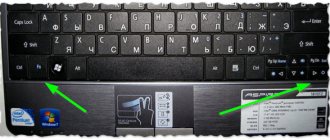
The keyboard of almost every modern laptop has function buttons. They are usually located on the F1, F2, etc. keys. To use them, simply press the FN + F3 , for example (depending on which button you have the brightness icon on. On DELL laptops, these are usually the F11, F12 buttons).
Function buttons: brightness adjustment.
If the screen brightness has not changed and nothing appears on the screen (no control) - move on...
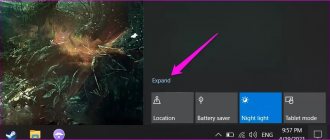
2) Taskbar (for Windows 8, 10)
In Windows 10, you can very quickly adjust the brightness by clicking on the power icon in the taskbar, and then left-clicking on the rectangle with brightness: adjust its optimal value (see screenshot below).
Windows 10 - brightness adjustment from tray.
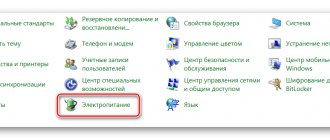
3) Via control panel
First you need to open the Control Panel at: Control Panel\All Control Panel Items\Power Options
Then open the “Configure power plan” link for the active power plan.
Power supply
Next, using the sliders, you can adjust the brightness for running the laptop on battery power and mains power. In general, everything is simple...
Brightness setting
4) Via video card driver
The easiest way to open the video card driver settings is to right-click on the desktop and select graphics characteristics from the context menu (in general, it all depends on the specific driver; sometimes you can go to its settings only through the Windows Control Panel).
Go to video card driver settings
In the color settings, there are usually parameters for setting: saturation, contrast, gamma, brightness, etc. Actually, we find the desired parameter and change it to suit our requirements.
Setting the display color
2. Are the function buttons enabled?
A very common reason why function buttons (Fn+F3, Fn+F11, etc.) do not work on a laptop is the BIOS settings. It is possible that they are simply disabled in the BIOS.
In order not to repeat myself here, I will provide a link to my article on how to enter the BIOS on laptops from different manufacturers:
The choice of section where to enter the BIOS depends on your manufacturer. Here (within the framework of this article) it is unrealistic to give a universal recipe. For example, in HP laptops - check the System Configuration section: see if the Action Keys Mode item is enabled there (if not, switch it to Enabled mode).
Action keys mode. HP laptop BIOS.
On DELL laptops, the functional buttons are configured in the Advanced section: the item is called Function Key Behavior (you can set two operating modes: Function Key and Multimedia Key).
Function buttons - DELL laptop.
3. Lack of key drivers
It is possible that the functional buttons (including those responsible for screen brightness) do not work due to a lack of drivers.
It is impossible to give a universal name for the driver in this matter (which you can download and everything will work) (by the way, there are some on the Internet, I highly recommend not using them)! Depending on the brand (manufacturer) of your laptop, the driver will be called differently, for example: in Samsung it is “Control Center”, in HP it is “HP Quick Launch Buttons”, in Toshiba it is Hotkey utility, in ASUS it is “ATK Hotkey” .
If you cannot find a driver on the official website (or it is not available for your Windows OS), you can use special utilities to search for drivers:
4. Incorrect drivers for the video card. Installing “old” working drivers
If everything worked as it should before, but after updating Windows (by the way, when updating, you usually always install a different video driver) - everything began to work wrong (for example, the brightness adjustment slider moves across the screen, but the brightness does not change) - it makes sense try rolling back the driver.
By the way, an important point: you must have old drivers with which everything worked well for you.
How to do it?
1) Go to the Windows Control Panel and find Device Manager there. You open it.
To find a link to Device Manager, turn on small icons.
Next, find the “Video adapters” tab in the list of devices and expand it. Then right-click on your video card and select “Update drivers...” from the context menu.
Updating the driver in Device Manager
Then select “Browse this computer for driver software.”
Auto-search for “firewood” and search on PC
Next, specify the folder in which you saved the working drivers.
By the way, it is possible that the old driver (especially if you just updated an old version of Windows and did not reinstall it) is already on your PC. To find out, click the button at the bottom of the page: “Select a driver from the list of already installed drivers” (see screenshot below).
Where to look for drivers. Directory selection
Then just point to the old (different) driver and try using it. Very often this solution helped me, because old drivers sometimes turn out to be better than new ones!
List of drivers
5. Windows OS update: 7 -> 10.
By installing, say, Windwows 10 instead of Windows 7, you can get rid of problems with drivers for function buttons (especially if you can’t find them). The fact is that the new Windows OS has built-in standard drivers for function keys.
For example, the screenshot below shows how you can adjust the brightness.
Adjust brightness (Windows 10)
However, I should note that these “built-in” drivers may be less functional than your “native” ones (for example, some unique functions may not be available, such as auto-adjusting contrast depending on external lighting).
By the way, you can read more about choosing a Windows OS in this note: (despite the fact that the article is a bit old, it has some useful thoughts :)).
PS
If you have anything to add on the topic of the article, thank you in advance for your comment on the article. Good luck!
Integrated Graphics Update
The problem is often related to the integrated GPU drivers, so try reinstalling them.
Go to Device Manager using the devmgmt.msc command, launched from the Run window (WIn + R).
Expand the "Video Adapters" tab, right-click on the name of the installed video card and select "Update".
Note: If you are using a laptop, you may see two GPUs. In this case, update your integrated graphics.
Then select automatic search and see if the wizard can find the new version. At this point, Windows must use an internet connection to download it.
If the system is able to find, download and install a new version of the driver for the integrated video card, restart the computer and see if you can adjust the brightness.
If the search determines that the latest driver is already installed, select the second option, and in the next window from the list of already stopped ones.
Select the "Compatible devices only" checkbox, select Standard graphics adapter, and click Next.
After installation, restart your computer and see if the screen brightness is adjusted.
Using buttons
Regardless of who made the gadget, there are special buttons on the keyboard that will help you increase or decrease the brightness on your laptop screen. Traditionally, these buttons are combined with the F function keys; to find the one you need, just look at the symbols. The key that will help make the screen brighter is indicated by an asterisk with a plus, and in order to remove it, you need to find another button with an asterisk and a minus nearby. Pros and cons can be replaced with up/down arrows, but the buttons are always marked with an asterisk.
Sometimes these buttons are not located on functional ones, but are combined with arrows. In particular, on Lenovo laptops you need to press Fn+up to make the backlight larger and Fn+down to make it smaller. For other manufacturers (Acer, HP, Asus) these buttons are located on the top. In any case, you need to find the designation, and it is always the same - an “asterisk” with a plus or minus.
Sometimes it happens that you cannot change the screen brightness using the keys. The brightness buttons may not work because the operating system was reinstalled on the laptop and not all drivers were installed. In this case, the assignment of additional keys on the device's keyboard may change or may not work at all. If the backlight does not change, then you can adjust the screen brightness directly through the operating system.
Restarting the Generic PnP Monitor
If the screen brightness is no longer adjustable, the problem may have occurred after automatically updating the video card driver. During installation, inconsistencies may occur that will cause the universal PnP monitor to turn off, preventing the user from adjusting brightness. To solve the problem, try restarting it
Open Device Manager with the devmgmt.msc command from the Run window.
Expand the Monitors tab. Right-click on the Generic PnP Monitor and select Disable. Then right-click the menu again and click on “Engage”.
After restarting your laptop, check if Windows 10 adjusts the screen brightness.
Active Keys feature
Usually the problem occurs when trying to adjust the brightness using hot keys - for example, the Fn + F5 combination. In this case, you can configure the image display parameters.
If you are using an HP or Lenovo laptop model, then the reason for the failure may be the Active Keys feature, which is enabled by default in the BIOS.
Thanks to this function, the keys from the F1-F12 row operate without the Fn button. However, if the user does not know this, then he presses the Fn+F5 combination, and the brightness does not change. Therefore, the first tip is to try pressing the brightness key without a combination with the Fn button - just F5 and F6.
If it’s hard for you to get used to this type of “hot” keys, then just go to the BIOS and on the “System Configuration” tab set the “Active Keys” parameter to “Disabled”.
On Windows 10, you can adjust the brightness directly from the notification area. Just click on the battery icon to display, among other things, the display brightness value. In this case, no hot keys will be needed. But if you still cannot do without keyboard control, then there is another way to fix the problem.
Updating discrete graphics card drivers
Try updating your discrete graphics card drivers, and then make sure that the universal PnP monitor was not disabled during installation.
Go to the download page of your graphics card manufacturer's website and download the latest software according to your Windows model and version.
Run the downloaded file and follow the installer's on-screen prompts to update your device. After restarting your computer, check that the PnP monitor was not disabled during installation. To do this, expand the Monitors tab in Device Manager and check that it is enabled, otherwise, click “Enable”.
Update drivers manually.
Windows 10 may not be able to automatically get new drivers for your video adapter.
If the brightness slider still doesn't work after updating or reinstalling them, it is recommended that you manually download and install the latest drivers directly from the manufacturer's website. Use the links below to get the latest GPU/display drivers from Intel, NVIDIA, or AMD. Tip: To find out the make and model of your video adapter, type "msinfo32" into the Start menu and press Enter. In the System Information window, expand Components and click Show.
You can also use hardware detection utilities provided by Intel, NVIDIA, and AMD to automatically download and install the latest updates.