Why do you need to customize the screen?
The current reality is that we all spend a significant amount of time on the computer. Regardless of whether we are working or relaxing, our eyes receive a certain load, the magnitude of which depends on many factors: the location of the screen relative to the eyes, room lighting, session duration, etc. But one of the main reasons for tired eyes is incorrect brightness settings , contrast, screen color gamut.
All recent generations of the Windows operating system are equipped with tools for manually adjusting and eliminating too bright/dim lighting and unnatural color rendering of the display. More expensive and modern devices may have adaptive brightness control technology, which can also be configured or disabled as unnecessary. Below we will look at all the ways that will help you “fit” the screen to suit you.
Reason 3: Problems with the lid close sensor
A more serious case of a dim screen lies in problems with the matrix itself. The first thing to check is the operation of the laptop lid switch: perhaps the sensor has failed and is causing the system to think that it is closed. For these purposes, use a magnet: bring it to the frame around the screen and move it along it - some place should become magnetic. Next, find the corresponding position on the panel of the laptop with the board and keyboard and place the magnet there. If the device reacts to it (the brightness has increased), this is a sign of sensor failure. This procedure requires some specific skills, so it will be better if it is performed by professionals from a laptop repair center.
By hot keys
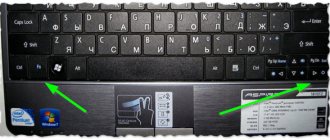
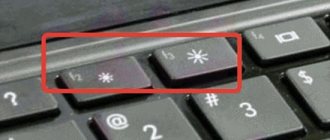
The easiest way to increase (or decrease) the brightness on a laptop is to use a combination of hot keys. To do this, hold down the “Fn” function key in the lower left corner of the keyboard and one of those shown in the screenshot. These can be keys from the top row “F1-F12” or left/right navigation keys. Manufacturers usually leave pictograms on them as a hint, for example, like on “F5” and “F6”, where the sun is depicted in the frame of the screen. The meaning of symbols you do not understand can be found in the device manual, on a thematic forum, or in the user support service.
You can quickly adjust the brightness on a computer running the “Seven” through the “Windows Mobility Center”, called up by the key combination “Win” + “X”.
Increasing the screen brightness on Windows 10 is done by pressing “Win + I/Options/Display”.
On Windows 8, pressing “Win + I” brings up the settings panel with the corresponding slider.
Ways to increase brightness for the Windows 10 operating system
In addition to the mobility center , it is worth noting a very simple option for quick brightness control for Tens owners.
- Move the cursor to the notification panel area and left-click on the battery icon;
- A window will appear in which you can see the charge level and reduce or increase the brightness, the intensity of which can be changed by clicking the mouse by 0, 25, 50, 75 and 100%.
There is another way to adjust the brightness and make the display lighter or dimmer, suitable for both a laptop and a desktop PC.
- Using the touchpad or cursor, find and stop on an unoccupied space on the desktop, then right-click;
- A window will open in front of you in which you should click “Display Settings” (by the way, in versions of Windows from XP to 7, this section is called “Screen Resolution”);
- Look for the item “Adjust brightness level”;
- The last step is to hold down the slider with the left mouse button and you can change the backlight to a level that is comfortable for your eyes (by simply controlling the slider to the left or right);
- There are also standard tools for changing the size of text and application icons.
From the power panel
The second most difficult way to get to the treasured settings slider in a laptop is implemented like this:
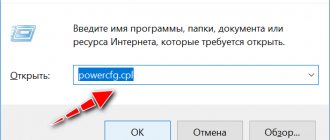
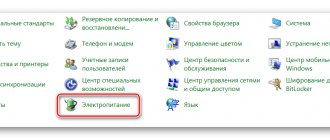
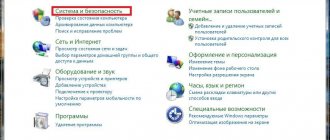
- Go to the “Power Options” menu, located along the path “Start/Control Panel/Security System”.
By default, the user can set one of three system operating modes. Go to the settings of the active nutrition plan using the link in the screenshot.
- In the window that opens, sliders for adjusting screen brightness in Windows 7 appear in front of us. The menu looks similar in older operating systems: “eights” and “tens”.
The slider on the left controls the brightness of the device's display when running offline on battery power. The right one is used when working from the network. To save power and extend battery life, we recommend making the screen dimmer in offline mode than in online mode.
Checking, installing, updating drivers
To check which drivers are installed on your laptop, open the device manager. To do this, press WIN + R (Press the button in the bottom row of the keyboard with the Windows icon and simultaneously press “R”). In the window that appears, enter “devmgmt.msc” without quotes, confirm by pressing “Enter”.
In the manager, double-click on the line “Video adapters”. A list of installed video cards will open. If it only has a standard adapter, then the drivers are not installed. In other cases, the software costs. The correct operation of the devices is indicated by the absence of exclamation marks and other system marks.
Drivers can be installed using the disc included with the laptop. You can also go to the PC manufacturer's website. Go to the “Support” section, find the “Drivers” section, enter the laptop model. It is indicated by a sticker on the underside of the case, or under the battery. Download graphics drivers and install them
.
Another way to install drivers is to go to the free website drp.su, where the instructions will automatically install the drivers on your laptop. The well-known site values its reputation; it is completely free and protected from the dangers of the network.
After installing the graphics drivers, the screen brightness should be adjusted normally. If this does not happen, then a complete reinstallation of Windows or PC repair may be required.
Changes to screen brightness settings are made using operating system tools. For the screen to work correctly, you need video card drivers.
.
Adjustment occurs using the keyboard or graphical interface of the system. It will not be possible to increase it indefinitely
- the backlight has its own operating limits.
Via the color calibration tool
Few people know, but starting from Windows 7 OS, it is equipped with an excellent tool for calibrating the display. It can be used both on desktop computers and laptops, duplicating the functionality of the video driver software. An important advantage of this option is the presence of ClearType text smoothing technology, which optimizes the display of fonts on the monitor used. The simplest color management in Windows 10 and older is also available here.
To get started with the calibration tool:
- Go to the “Color Calibration” menu, located along the path “Control Panel / Hardware and Sound / Screen”.
- After brief introductory information about the principles of setting up the screen, click “Next” several times and move on to the first stage, “Adjusting the gamma.”
Our task is to achieve minimal visibility of the points in the circles using the slider on the left and click “Next”.
- After another “briefing” and several clicks on “Next”, we find ourselves at the second stage “Adjusting brightness”.
There is no adjustment slider, but there is a man in a black jacket and the letter X in the background as a guide for finding balance. You can adjust the brightness using one of the methods described above.
- Next up is “Adjusting Contrast,” a sarcastically smiling man in a white shirt helps us choose the level.
There is no slider again, so we use the video driver program, hot keys or the Power menu.
- “Adjusting color balance” contains three level sliders for red, blue and green.
Here you can adjust the “warmth” of color rendering that is comfortable for the eyes and remove color highlights.
- The last step is to configure the text display with the ClearType tool. If desired, you can disable it by unchecking the last calibration window.
Here your task is to find the clearest and most pleasing sample of text. This completes screen calibration.
Standard Windows interface
This method is suitable for owners of any computer - it is similar on both a laptop and a PC. Here you can configure 2 modes of monitor operation: when working offline and when connected to the network. This is a very useful feature, as it can significantly reduce battery consumption.
To change the brightness using this interface, you need to do a few simple steps:
Via the command console
For ordinary users, the most inconvenient way to change the screen brightness is through the command console. But in some circumstances and in the absence of other adjustment options, it can be useful.
To adjust screen brightness in Windows 10 via the console:
- Open “PowerShell” from the “Start” menu.
- The brightness is changed by the command: “(Get-WmiObject -Namespace root/WMI -Class WmiMonitorBrightnessMethods).WmiSetBrightness(1,brightness percentage)” (without quotes).
For example, to set the screen brightness to 50% you need to enter “(Get-WmiObject -Namespace root/WMI -Class WmiMonitorBrightnessMethods).WmiSetBrightness(1,50)”.
When finished, close the console.
Reason 4: Loop defects
Sometimes the culprit is the cable that connects the motherboard and the screen matrix. In some laptop models, it is not located very well, and during active use it can fray. The latter causes a number of symptoms, and low brightness is just one of them. To check, try closing and opening the lid several times, and locking it in different positions. If the problem of a dim screen disappears in any of the positions, the problem is definitely in the cable, and it needs to be replaced. You can do this yourself, but we still recommend contacting a service center.
Through third party programs
At the moment, there are many programs to eliminate the shortcomings of Windows 7 and 10, in particular, displaying the screen brightness settings in the taskbar or on the desktop. We will look at the simplest screen shading utility, DimScreen.
To install the program:
- Download it from the developer’s website using the link https://barbadosmaney.ru/dimscreen.
- Run “DimScreen.exe” as administrator.
- The utility automatically appears in the tray toolbar.
It does not have an interface as such and is represented only by a context menu with brightness levels in percentage terms.
Other programs may be more functional, but DimScreen is one of the best options for those who want to instantly change the brightness of the display and are not looking for anything extra.
Horror comes in pink
Not all Windows 10 users are aware that they are blessed with another innovation - the “Night Light” function, in which the screen dims the glow and is filled with pink or red color. If this “joy” turns on without the user’s knowledge, panic is guaranteed: after all, a normal screen should glow bright white, and not dull red-pink. Well, it's definitely broken!
Luckily, the fix is as simple as turning up the brightness.
- Open the Notification and Action Center by clicking the far right button on the taskbar.
- Click the Night Light square. If the function is active, this element will be highlighted.
If you like the idea of using a night light, but want to change its intensity, launch the Options utility, go to System - Display and click Night Light Options.
Adjust the intensity of the glow by moving the slider left and right.
In the same window, you can create a schedule for automatically turning on the night light.
Reason 6: Matrix failure
The last source of the problem under consideration is a matrix failure - for example, in your copy it is defective or damaged for other reasons. This is clearly evidenced by the ineffectiveness of attempts to restore performance using the methods described above. The panel cannot be repaired, it can only be replaced.
We are glad that we were able to help you solve the problem. In addition to this article, there are 12,719 more instructions on the site. Add the Lumpics.ru website to your bookmarks (CTRL+D) and we will definitely be useful to you. Thank the author and share the article on social networks.
Describe what didn't work for you. Our specialists will try to answer as quickly as possible.
Reason 5: Backlight problems
The backlighting of the display of almost any laptop is carried out using LED strips, which are powered and controlled by an inverter. The last element is also prone to breakdowns, albeit quite rarely, compared to other components. In the event of such a failure, it is impossible to fix it yourself, since the inverter is connected to the system board, so the only solution is a visit to the workshop. Similarly, burnout of backlight LEDs can be eliminated.