Often, users of the Windows 7 operating system are faced with the problem of adjusting screen brightness . To fix this problem, we will look at all the available ways to adjust display brightness in Windows 7 . Adjusting the screen backlight is a fairly simple process that even a novice user can handle. After familiarizing yourself with the material, you will be able to independently adjust the brightness of your laptop or desktop computer.
Why do you need to customize the screen?
The current reality is that we all spend a significant amount of time on the computer.
Regardless of whether we are working or relaxing, our eyes receive a certain load, the magnitude of which depends on many factors: the location of the screen relative to the eyes, room lighting, session duration, etc. But one of the main reasons for tired eyes is incorrect brightness settings , contrast, screen color gamut. All recent generations of the Windows operating system are equipped with tools for manually adjusting and eliminating too bright/dim lighting and unnatural color rendering of the display. More expensive and modern devices may have adaptive brightness control technology, which can also be configured or disabled as unnecessary. Below we will look at all the ways that will help you “fit” the screen to suit you.
How to reduce screen brightness on Windows 7
Standard Windows tools allow you to quickly change screen brightness settings. For Windows 7, follow these simple steps:
- Control Panel
- system and safety
- Power supply
- Change plan options
Here you will see several parameters and at the very bottom sliders for adjusting the brightness of the plan. They are divided into brightness from the battery and from the mains. Select the desired brightness level. If desired, you can set the display to dim, turn off, and go into sleep mode. After that, click “Save changes” and exit.
Power Settings
Another optimal option that allows you to reduce or increase the screen brightness level. Once again we will have to turn to the help of the taskbar, but this time you should not be interested in the “Action Center” icon, but in the icon with the current battery charge (on a laptop):
- Right-click on the battery icon on the taskbar.
- Select "Power Options".
- Mark the circuit you are interested in and click on “Configure power supply circuit”.
- Adjust brightness.
There is another way to access this menu. For example, through the “Control Panel”:
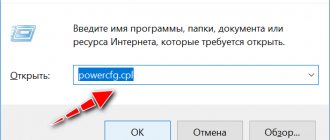
- Hold down the "Win" + "R" keys to launch the "Run" window.
- Enter the query “control” and click on the “OK” button.
- Go to the "Power Options" section.
- Follow steps 3-4 from the previous instructions.
You can also access the “Control Panel” through the “Windows” search bar. This will allow you to lower or increase the display brightness much faster.
Methods to reduce screen brightness on Windows 10
The latest version of Windows has added a huge number of innovations that affect interaction with the operating system. For some parameters, separate sections are displayed or their regulation is carried out through the notification panel. This was also reflected in the brightness settings. The user has the opportunity to use not only function keys on the laptop, but also the same quick methods directly in the OS, eliminating the need to work with the keyboard.
Problems with brightness adjustment are rare, but can affect almost any user. This is often caused by malfunctioning or missing graphics adapter drivers, but other difficulties can arise related to third-party programs or even the OS itself. If you encounter a similar phenomenon, try to fix the problem using the instructions from the following material.
Setting the optimal backlight level through programs
Today, a large number of applications have been developed specifically designed to adjust this screen parameter. The most popular utilities include the following:
- Display Tuner;
- iBrightness Tray;
- Display Resolution Manager.
The utility at the top of the list is capable of working with several profiles and provides quick and convenient switching between them.
Application number two allows you to adjust the display backlight via the tray icon. Additionally, the utility is equipped with functions to turn off the monitor and turn on the screen saver. And the last program in the above list, but by no means the least in terms of the capabilities provided to the user, provides quick access to adjusting the levels of contrast, backlight and gamma, which makes working at the monitor optimal and significantly reduces eye strain.
How to change screen brightness on desktop monitors
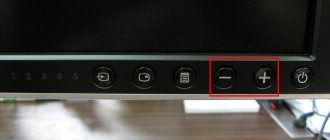
Setting up desktop monitors has the slight advantage of mechanical buttons. Monitor menu buttons are usually located at the bottom, side, or back of the monitor. Using these buttons, you can control brightness settings without calling any functions within the Windows operating system.
There are many options in the brightness settings menu. For example:
- Brightness
- Contrast
- Colors
- Gamma
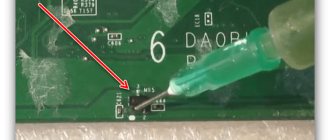
In order to lay a good foundation before adjusting the brightness of your monitor, you need to work on the screen image. Low quality matrices distort the perception of colors. To adjust image quality, use the standard number tool.
If you can clearly see all the numbers, then the screen is configured optimally. Average quality will show the first three numbers. If you see only two or fewer, it means you need to adjust the picture quality.
Contrast also plays an important role. She is responsible for detailing the light areas. Set the contrast to zero and adjust gradually. For example, if you have a light spot where the folds of your shirt are, then you need to lower the level until the folds become detailed.
In addition, adjust the gamma and grayscale. When adjusting the gamma, dark and light colors disappear when you look at the center of the picture. Shades of gray should not contain red, green or blue.
And finally - brightness. There are a lot of pictures on the Internet that are specially created for adjusting brightness. Colors should not blend into the main background. At the same time, the detailing of objects should be clear. Too high a brightness will result in a predominant light tint.
Adjusting Brightness Using the Graphics Driver Control Panel
At the moment, there are two major manufacturers in the video card market: Nvidia and AMD. Along with video cards, these companies release applications for managing the hardware. Using these applications, you can adjust many graphic settings, including screen brightness.
NVIDIA Control Panel
To change the brightness, follow these step-by-step instructions:
- Hover your mouse over a place on the desktop where there is no shortcut or file, then right-click.
- In the menu that opens, select “NVIDIA Control Panel” and confirm the selection with a left click.
Left-click on the line “NVIDIA Control Panel” - Open the “Display” list by clicking on the plus sign, then select the “Adjust desktop color settings” menu.
Open the “Display” list by clicking on the plus sign, then select the “Adjust settings” menu - You need the second list of options “Select a color setting method”. Select “Brightness” in it and move the slider until you adjust the level that is optimal for you.
In the “Brightness” parameter, move the slider to the required brightness level
AMD Control Panel
If your video card is made by AMD, then to adjust the brightness do the following:
- Open the control panel - it's called "AMD Radeon Settings". This is done in the same way as in NVIDIA, that is, by right-clicking on a free area of the desktop (when you click on a file, folder or shortcut, the selection of the graphics driver control panel will not be available).
Right-click on an empty space, then left-click on the line “AMD Radeon Settings” - Open the Graphics Settings tab (in some versions of the program this is the only tab), then select the Color menu.
In the “Graphics Settings” tab, expand the “Color” parameter - The color settings menu will launch, where you can adjust the brightness, as well as gamma, contrast and other graphic parameters. Using the sliders, we adjust the appropriate brightness parameters
Setup procedure using built-in Windows 7 tools
To make adjustments using the default “Seven” means, you must perform the following sequential steps:
- Click “Start” and enter “Control Panel”;
- Next, open the “System and Security” tab;
- Then in the window that appears, click on “Power Options”;
- In the “Screen Brightness” column, by changing the position of the slider, set the optimal level of display brightness for the user’s eyes;
- A similar column for regulating this parameter is located in the “Changing plan parameters” section, where you can additionally set the amount of screen backlight power depending on the type of current power supply.
The process of adjusting the monitor backlight using software from the computer's graphics accelerator.
A convenient method for setting a favorable level of monitor brightness is the PC video accelerator driver. Below is an example of an adjustment technique using Nvidia software. The algorithm of sequential actions consists of the following steps:
- Call up the context menu from the Windows 7 Desktop and then click on the line “NVIDIA Control Panel”;
- Next, enter the “Video” section;
- Then open the subsection “Adjusting color parameters for video”;
- In the window that appears, set o;
- In the color tab, you can not only adjust the backlight, but also the saturation level and hue.
Using Windows Mobility Center
Open the User Tasks menu by right-clicking the Start Menu icon or typing Win + X (press and hold the Windows key and press X).
- Click Mobility Center (or press B).
- In the Mobility Center, adjust the brightness slider.
- Using the Control Panel
- Open Control Panel.
- Click "Configure commonly used mobility settings."
- In the Mobility Center window, adjust the brightness slider.
Change brightness using personalization
“Personalization” is a menu for changing images and sound. With its help, you can not only change the brightness, but also the theme (OS interface elements). But we'll focus on brightness.
- Right-click on an empty area on your desktop, then select Personalize.
Right-click on an empty area on the desktop, then select “Personalization” - In the lower left corner of the window, select "Display" with a left click.
In the lower left corner of the window, select “Screen” with the left mouse click - Select "Adjust Brightness" on the left. At the very bottom of this window there will be a slider that adjusts the brightness.
Select “Brightness Settings” on the left. At the very bottom of this window there will be a slider that adjusts the brightness, move it to the appropriate value
If standard adjustment does not work
- Press Win and R . In the search box that appears, enter " regedit ".
- Press Ctrl and F , then select Find ....
- In search type EnableBrightnessss, confirm your actions.
- Find KMD_EnableBrightnessInterface2 and open a special window to edit it.
- Change the key value to and confirm your actions
- Continue the search using the F3 and changing the values of other keys with the same name.
- Restart your PC.
From the power panel
Go to the “Power Options” menu, located along the path “Start/Control Panel/Security System”.
By default, the user can set one of three system operating modes. Go to the settings of the active nutrition plan using the link in the screenshot.
- In the window that opens, sliders for adjusting screen brightness in Windows 7 appear in front of us. The menu looks similar in older operating systems: “eights” and “tens”.
The slider on the left controls the brightness of the device's display when running offline on battery power. The right one is used when working from the network. To save power and extend battery life, we recommend making the screen dimmer in offline mode than in online mode.
By disabling adaptive control
Modern battery-powered computers automatically monitor energy consumption, trying to save it as much as possible. The display matrix is the main energy consumer, and the laptop automatically reduces its brightness when the battery level is low or the room is dimly lit (if there is a light sensor). Sometimes the technology does not work correctly and inappropriately, which causes irritation for many people during long periods of time in front of the screen.
Adaptive brightness control can be disabled as follows:
- We go the following way: “Start/Control Panel/System and Security/Power Options/Set up power plan/Change advanced power settings.”
- In the “Display” section there is an item “Enable adaptive brightness control”.
We mark the “Off” status everywhere and exit the settings.
- If you do not find such an item, but auto-adjustment is present in the device, then go to “Start” and write “regedit” in the search bar. Launch the found registry editor.
- Go to the directory “HKEY_LOCAL_MACHINE\SYSTEM\CurrentControlSet\Control\Power\PowerSettings”.
We are looking for the parameter responsible for adjusting the screen brightness, which should contain a description as in the screenshot above, and go to its subsection.
- In the subsection we look for a parameter with the same description as in the screenshot below.
- Now we change the value of the “Attributes” parameter (blue) to anything other than one (for example, “0” or “2”). If you already have “0”, change it to “1” or “2”; if you have “2”, change it to “0” or “1”.
After clicking OK, the Auto Brightness option should appear in the Power menu.
Via the command console
For ordinary users, the most inconvenient way to change the screen brightness is through the command console. But in some circumstances and in the absence of other adjustment options, it can be useful.
To adjust screen brightness in Windows 10 via the console:
1.Open “PowerShell” from the “Start” menu.
2. Brightness changes using the command: “(Get-WmiObject -Namespace root/WMI -Class WmiMonitorBrightnessMethods).WmiSetBrightness(1,brightness percentage)” (without quotes).
For example, to set the screen brightness to 50% you need to enter “(Get-WmiObject -Namespace root/WMI -Class WmiMonitorBrightnessMethods).WmiSetBrightness(1,50)”.
When finished, close the console.
Changing brightness using third-party programs
If for some strange reason you were unable to reduce the brightness level in any of the three above methods, then programs that include the functionality you need, in this case adjusting the brightness, will come to your aid.
The general interest of programmatically changing brightness parameters is that they do not depend on the system methods described above. That is, in combination with system settings, you can set a brightness value that will be greater than the maximum or less than the minimum. Let's look at some programs that allow this.
MyMonic is a program with which you can adjust the brightness of your monitor and video card. To implement this feature, do everything as described in the instructions:
Important! You can easily find it yourself by entering a query with the name of this program into any search engine (be it Google, Yandex or others). But the problem is that its installer (installation program) contains only one file with the extension .exe. And you should approach downloading and installing files of this format with extreme caution - it’s easy to catch a virus this way. Therefore, it is recommended to download from the link above - it has been verified and does not contain any malicious files.
- Install MyMonic by left-clicking the downloaded installation file. Installation occurs automatically; you only need to specify the path to the folder where the program files will be installed.
Run the downloaded installation file by left clicking the mouse - Launch the program. After the program is installed, a shortcut will appear on your desktop, by clicking on which you can launch it. If during installation you unchecked the corresponding checkbox for installing a shortcut on the desktop, then you can run the program through the folder that you specified during installation.
Open the MyMonic program - After launch, a software menu for changing parameters with sliders will open. Pay attention to the last slider on the right. It is he who is responsible for brightness. Adjust it as you like by moving this slider.
Move the last slider to the required value
In addition to MyMonic, there are a huge number of other programs with which you can change the brightness settings of the monitor (however, MyMonic is the most convenient to use among all). The process of downloading and installing these programs, as well as their interface and functionality, is similar to that described above, therefore all this does not require separate instructions. Below is a list of programs that you should pay attention to.
- DimScreen;
- Monitor Plus;
- Monitor Bright;
- mControl;
- Desktop Dimmer;
- Display Tuner;
- Sunset Screen.
Note! The f.lux app deserves special mention. Its essence is that it automatically changes the screen brightness depending on the time of day, selecting the most optimal parameters. If you care about your eyes, but don't know what level of brightness you need, then this program is created especially for you.
- Select a location to download the file, for example the “Downloads” folder, click “Save”. Select the folder to download the file, click “Save”
- Go to the “Downloads” folder and double-left-click the mouse to launch the installation file.
Open the “Downloads” folder and double-left-click the mouse to launch the installation file - Click on the “Accept” button.Click on the “Accept” button
- Once installed and launched, it will work automatically. The program will ask you to restart your computer. You can select “Restart Now” or “Late”.
Click “Later” or “Restart Now”
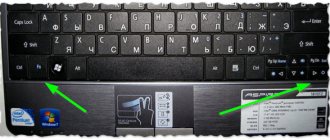
“Sun” + Fn: the easiest way
Did you know that the backlight on laptops is controlled by the sun? Only not the heavenly body, but the keys with its image. There are two of them: one increases the brightness, the second decreases it.
“Suns” are often located in the top row of the keyboard F1-F12, as, for example, on this fragment of an Asus laptop (here they are depicted in “screens” for greater clarity):
They are also located there on Lenovo, Dell, HP devices. And the manufacturer Acer considered that it is more convenient to adjust the brightness using the arrow keys:
However, you won’t be able to find the “sun” on your laptop: they are too noticeable. Press them in combination with the Fn key.
Using video card settings
GPU manufacturers, in addition to the hardware itself, also produce proprietary software.
Its use makes it easier to change the settings not only of the video card, but also of the image on the entire computer. Screen brightness adjustment is included in the NVIDIA GeForce Experience application, as well as in proprietary software for Radeon video cards. You can find it in the corresponding settings section. The installation will work in those programs that, when constructing an image, “load” the selected video card. This setting will not apply to the processor's integrated graphics chip.
This setup method is most convenient for gamers. Typically, brightness settings for games are different from those for surfing the web or watching movies. Using the video card settings, it is possible to create a kind of “game mode”, which is very convenient to use.
Registry Editor
It happens that the brightness setting disappears from the Windows 10 control panel, and you cannot change it even on a laptop.
In this case, you will have to delve into the registry and “force” the system to do as it should. You can launch the registry via “Win + R”, enter “regedit” in the input field and press “Enter”. In the Registry Editor, find the line containing the words “Enablebrightness” (we recommend using the registry search). There will be several such lines, and set the value “0” in each one. In some lines it will already appear, in others you will have to make changes. You can continue the search after making changes using “F3”. After completing the registry changes, restart your PC. Problem solved!
Via the color calibration tool
Few people know, but starting from Windows 7 OS, it is equipped with an excellent tool for calibrating the display. It can be used both on desktop computers and laptops, duplicating the functionality of the video driver software. An important advantage of this option is the presence of ClearType text smoothing technology, which optimizes the display of fonts on the monitor used. The simplest color management in Windows 10 and older is also available here.
To get started with the calibration tool:
- Go to the “Color Calibration” menu, located along the path “Control Panel / Hardware and Sound / Screen”.
- After brief introductory information about the principles of setting up the screen, click “Next” several times and move on to the first stage, “Adjusting the gamma.”
Our task is to achieve minimal visibility of the points in the circles using the slider on the left and click “Next”.
- After another “briefing” and several clicks on “Next”, we find ourselves at the second stage “Adjusting brightness”.
Laptop
When using a laptop, there is a lot of scope in terms of adjusting the brightness of the display. Function keys on the device itself, as well as built-in Windows settings or programs from third-party developers, will help with this. Let's look at two popular versions of operating systems, examining the principles of reducing screen brightness in each.
Changing screen brightness using the Fn+ function keys
On laptops (99% of the time) you can change the screen brightness as follows (regardless of Windows version):
- Take a look at your laptop's keyboard. Find the "Fn" button (usually located in the lower left corner of the laptop keyboard).
Figure 1. Location of the Fn function key on a laptop keyboard.
Find the keys with brightness icons.
Figure 2. Keys to increase/decrease the brightness of the laptop screen.
- When you press one of the brightness buttons and hold down the “Fn” button, you will notice that the screen will become dimmer or, on the contrary, brighter.
How to increase brightness on an Apple laptop
The mechanism for changing brightness on a MacBook is slightly different from the functionality of Windows. However, you can also adjust the screen brightness using several methods.
MacBook shortcuts are much more convenient than Windows shortcuts. To control brightness, use the “F1” and “F2” keys. There is no need to press any more keys, so the method is extremely convenient to use.
You can find the brightness setting in the “System Settings” – “Monitors” section. By dragging the slider, you can change the brightness. There is also an automatic adjustment function.
The battery indicator on an Apple laptop also provides access to power settings, one of which is screen brightness. Once there, you can also quickly change the screen brightness on your laptop.
Sources
- https://pcfaq.info/sistema/nastrojka_yarkosti_ekrana.html
- https://geekon.media/kak-nastroit-jarkost-monitora-sem-sovetov-podskazki/
- https://Lumpics.ru/how-to-reduce-the-brightness-on-pc/
- https://pc-consultant.ru/rabota-na-komp-yutere/kak-ubrat-jarkost-na-kompjutere/
- https://MyComp.su/ustrojstva/kak-umenshit-yarkost-na-noutbuke.html
- https://brit03.ru/ustrojstva/kak-umenshit-yarkost-na-noutbuke.html
- https://MonitorVsem.ru/lajf-hak/yarkost-ekrana
- https://leephone.ru/kak-uvelichit-ili-umenshit-yarkost-ekrana-na-kompyutere-ili-noutbuke-windows-xp-7-88-1-10-nastrojka-yarkosti-monitora-poshagovaya-instrukciya- s-video/
[collapse]
Changing brightness in Windows XP
Since in Windows XP there is no way to adjust the brightness using the OS, you have to use the capabilities of the monitor for rough adjustments or use a special application Adobe Gamma utility , which is available in many graphics programs of this company. In addition, it can be found directly on the official website. Let's take a closer look at these two methods.