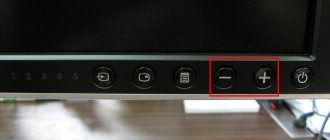
Using buttons
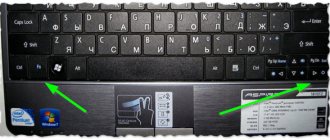
Regardless of who made the gadget, there are special buttons on the keyboard that will help you increase or decrease the brightness on your laptop screen. Traditionally, these buttons are combined with the F function keys; to find the one you need, just look at the symbols. The key that will help make the screen brighter is indicated by an asterisk with a plus, and in order to remove it, you need to find another button with an asterisk and a minus nearby. Pros and cons can be replaced with up/down arrows, but the buttons are always marked with an asterisk.
Sometimes these buttons are not located on functional ones, but are combined with arrows. In particular, on Lenovo laptops you need to press Fn+up to make the backlight larger and Fn+down to make it smaller. For other manufacturers (Acer, HP, Asus) these buttons are located on the top. In any case, you need to find the designation, and it is always the same - an “asterisk” with a plus or minus.
Sometimes it happens that you cannot change the screen brightness using the keys. The brightness buttons may not work because the operating system was reinstalled on the laptop and not all drivers were installed. In this case, the assignment of additional keys on the device's keyboard may change or may not work at all. If the backlight does not change, then you can adjust the screen brightness directly through the operating system.
Setting parameters in the power plan
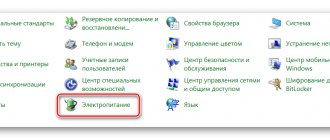
These were, so to speak, the simplest methods. Now let's see how to adjust the screen brightness on Windows 7 using the system's own tools. To do this, you need to use the power section, which is accessed from the standard one. Here you need to select the option to change settings, after which two main plans will be shown (balanced and economy mode).
If for some reason the user is not satisfied with them, they can simply be changed. To do this, use the item for changing additional settings, where the adaptive mode is turned on. You can also change the brightness in the “Screen” section, where the settings are presented in the category of parameters for turning off the display.
Adjustment in Windows
In order to adjust the brightness in the operating system, you need to enter the screen settings. In Windows 7 and 8, to do this, open the “Control Panel” in the “Start” menu and select “Display”. Next, all that remains is to find the brightness slider, which can be adjusted to increase or decrease the brightness.
In Windows 10, you can go to settings by clicking on the notification icon in the tray. Here you need to select “All parameters”, then “System” - “Screen” and change the brightness settings by moving the slider.
On a note! An interesting feature of Windows 8 and 10 is the “night light” mode, which not only dims the screen so that it does not hurt the eyes, but inverts all colors into a yellow tint. It is believed that in the absence of lighting it is the most safe for the eyes. Smartphones have a similar function. The advantage of the mode is the ability to configure it so that it turns on independently at a time specified by the user.
In older operating systems, Windows 7 and XP, there is a brightness adjustment on the laptop in the “Windows Mobility Center” menu. To find it, just right-click in the tray and select the desired item. Several windows will open in which you can not only brighten the screen or lower the backlight, but also select power options, sound volume, and perform other actions.
Another option to increase the brightness on your laptop is to go into the power settings. The slider to make the screen darker is located at the bottom. In the same menu, you can click on “Setting the power supply scheme”, the screen operation menu will open. Depending on whether it is connected to the network or not, below you can see the brightness adjustment on the laptop for both cases. That is, the user can specify that if the gadget is disconnected from the network, the backlight will remain at 100% or decrease to 50% (any convenient option), and when the power is connected, the level should remain unchanged.
Important! You can add brightness through the software that is installed on video cards from AMD and “Nvidia Control Panel” for GeForce.
How to change screen brightness using power settings?
If your computer does not have button combinations to decrease or increase the brightness of the monitor, then you can use the power option in Windows 7. You need to click on the battery icon on the taskbar in the system tray area and then on “Adjust screen brightness”.
If there is no battery icon, you need to go to the “Control Panel”, where you can find the function for displaying small icons. Click on “power supply”.
Next, use the slider to adjust the parameter.
To change it step by step, you need to click “set up power plan”. In the window that appears, set all the sliders to the optimal position for the user, and it is also recommended to configure the sleep mode settings. Having completed all the manipulations, you need to click on “save changes”.
There is another way to configure. To do this, click “advanced power settings”. Open the “screen” tab and then “screen brightness”. Select “from mains”, “from battery” and enter the value as a percentage. When the adjustment is complete, click “OK”.
Why is the brightness not adjustable?
It happens that the user tries to reduce the brightness on the laptop, but it is not adjusted. If it does not change with buttons, then you should check and update the keyboard driver. To make sure this is the problem, you can try adjusting the sound using the keys.
The second option, discussed above, is to use Windows tools. If adding brightness or reducing it did not work in this way, then the problem is in the video card driver. It will also need to be updated.
If the above remedies did not help, and the brightness adjustment still does not work, then the reason may be a hardware problem - this is an unlikely event, but not impossible.
Advice! Before going to the service center, you should try to fix the problem by installing specialized software - Monitor plus or MyMonic. These are simple utilities that allow you to use only the mouse and not call up additional Windows settings. They adjust not only the backlight, but also other screen parameters - contrast and gamma.
If nothing was achieved with their help, then the problem is truly a hardware one, and a trip to the service center is required.
Application of special programs
There are a large number of programs for Windows 7. They are suitable for both desktop computers and laptops. Some of them can help you adjust resolution, background colors, contrast, etc.
Example programs for setting screen parameters:
- Display Resolution Manager
- iBrightnessTray
- Display-Tuner
For example, the easy-to-use application “iBrightnessTray”, you don’t even need to install it. You just need to click on the program icon located on the desktop and use the slider to adjust the brightness. If you click on “Screen Saver” on the monitor, the screen saver will turn on; by clicking on the monitor image, you can turn off the screen to save energy.
Many users, either due to duty or for personal reasons, have to spend quite a lot of time at the computer. And not the least role in the comfort of work is played by the brightness and contrast of the image on the monitor or laptop screen. Oversaturation or poor lighting can cause your eyes to become tired. Let's see how to make the necessary settings using a few simple tools.
Monitor drivers
Without going too far off topic, it’s worth mentioning problems with monitor drivers. This issue is most often faced by those who use specialized equipment that requires drivers.
If you are using a professional or semi-professional screen, it will not be able to work in tandem with the standard software that is included in the Windows distribution. In this case, you will have to find suitable “firewood” that would correct the problem. They can be found on the disk that came with the monitor, or on the device manufacturer’s website.
BIOS setting
There is a feature in the low-level settings of some HP laptops that changes how the function keys work. To get to it, you need to restart the device and, before the OS starts loading, press Esc and then F10.
Then select the System Configuration tab in the menu and change the value of the Active Keys Mode parameter. The Enabled parameter means that you do not need to press fn to use an additional function, Disabled - on the contrary, does not allow functions to work without pressing fn.
Having selected the required parameter, all that remains is to press F10 and confirm saving the changes after exiting.
If none of the above methods gave significant results, then the problem is hardware in nature. For example, the power supply circuits of the motherboard are damaged and the matrix backlight controller does not receive sufficient voltage. Or the lamp inverter itself is not working properly. Such malfunctions require professional intervention.
Services will probably be needed
- Replacement of screen, matrix from 800 rub.
General method for any laptops
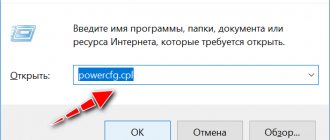
Open the registry. To do this, type “regedit” in the Windows search and click on the Regedit program that appears.
On the left side of the window, click once on the “Computer” section:
Now go to the “Edit” menu and select “Find”:
Enter EnableBrightnessControl in the search bar and click “Find Next”:
When the parameter is found, right-click on it and select “Delete”. Unfortunately, I don’t have this parameter, so I can’t show it in the screenshot. But here, I think, everything is clear... Find and delete.
Now looking for technical support: Official portal of Russian Railways employees
After deleting the parameter, you need to restart the computer and check the result.
If suddenly nothing is found in the registry, it means you don’t have such a parameter and this method will not help, accordingly.
If suddenly the registry does not look for the parameter because it freezes (this happens), then the parameter can be found manually in the registry using the following path:
HKEY_LOCAL_MACHINESYSTEMCurrentControlSetControlClass{4D36E968-E325-11CE-BFC1-08002BE10318}000
The last folder may also be called “0001”. You need to check both here and there.
And below are methods that can help fix the problem in laptops of a certain company.
Method for Samsung laptops
Let's try to find the featuretestcontrol parameter in the registry. I described how to search above.
When the parameter is found, open it by double-clicking on it with the mouse:
Write down somewhere what value you have in the “Value” field in the window that opens! He may demand to return it back if the method does not help.
Replace the value you have with f908 and click OK:
Now restart your computer and check the result.
The parameter can also be found manually along the path indicated above - here.
Turning off the monitor
Most often, the monitor turns off due to a system failure. Therefore, the solution to this problem lies in the correct configuration. How can you tell if your monitor has turned off?
When opening the control panel, the user does not find icons for adjusting brightness. Naturally, you immediately need to open the monitor settings menu.
In the screen settings you can find a brightness slider, but you can’t do anything with it. This again suggests that the monitor is disabled or the system does not find it. How then can the user see everything that happens on the screen?
The point here is that physically the display is functioning, but at the driver level it is displayed by the system as inactive. Therefore, all adjustment options are temporarily disabled. This problem doesn't happen often, but it's the easiest to fix.
Solving the problem with adjusting brightness on a laptop
Now that we have understood the basic principles of brightness adjustment, let's move on to solving problems associated with changing it on a laptop. Let's look at solutions to the two most popular problems that users face.
Method 1: Enable Function Keys
Most laptop owners use a key combination to adjust the brightness value. Sometimes when you click on them, nothing happens, which indicates that the corresponding tool is simply disabled in the BIOS or there are no suitable drivers for it. To solve the problem and activate the function keys, we recommend that you refer to our two articles at the links below. They contain all the necessary information and instructions.
Method 2: Update or rollback video card drivers
The second common malfunction that causes failures when trying to change the brightness on a laptop is incorrect operation of the video driver. This happens when updating/installing the wrong version. We recommend updating or rolling back the software to a previous version. A detailed guide on how to do this can be found in our other materials below.
We advise owners of the Windows 10 operating system to refer to an article from another of our authors, where you will find instructions on how to fix the problem in question in this particular version of the OS.
As you can see, the problem that has arisen is solved quite easily, sometimes you don’t even need to take any action, since another option for adjusting the brightness, which was discussed at the very beginning of the article, may work. We hope that you were able to fix the problem without any difficulties and now the brightness changes correctly.
Source
Disabling automatic driver updates using Windows 10
One method to exclude some system applications from automatically downloaded by Windows 10 is to use a tool to configure device installation in Windows 10. This is done in two ways, and both require administrator privileges.
Method No. 1
1. Call the Win → X menu using the appropriate keyboard shortcut or the Start context menu.
2. Select the “System” item.
3. Click on the “Change settings” link in the frame with the name of the computer, domain, etc.
4. Go to the “Equipment” tab.
5. Follow the link Device installation settings.
Method No. 2
1. Call the Control Panel, for example, via Win → X.
2. Go to the “Devices, Printers” applet.
3. Call the context menu of your PC and select “Device installation options”.
Regardless of the option to open the window, a dialog will appear asking you whether you need to automatically download programs from the hardware manufacturer and custom icons if they are available for your PC hardware.
Move the checkbox to the “No” option and click “Save” (administrator rights are required for this).
After making changes to the registry, the Update Center will not download or install new versions of drivers.
When video card drivers are the culprits
The second most common factor causing difficulties with changing the brightness level in Windows 10, which has become the source of non-working graphic elements and hardware keys for changing brightness, is video adapter drivers.
1. The drivers were installed by Windows 10 itself during its installation process, obtained from a driver pack, using software for updating them (Driver Booster) or from an unofficial source.
The solution to the problem is simple: download the official driver manually, uninstall the unofficial software, for example, using Display Driver Uninstaller, and install it again.
2. It is possible that the system software for Intel Graphics HD is not installed at all, but it is absolutely necessary for the normal operation of the device.
The driver should only be downloaded from the official developer or product support resource.
Such a device is not displayed in the device manager, because it is in the list of hidden ones. To see it, you need to call the “Show hidden devices” command in the “View” main menu item.
3. The video card was turned off in Device Manager (a case similar to the problem with the display).
Using the context menu, we activate the device and reboot.
It is also strongly recommended to visit the monitor settings through the desktop context menu, call the “Screen” menu item, go to its additional options and click on the “Graphics card properties” icon. On the adapter tab, look at its type (first line).
Just in case, it is also recommended to go to the display settings (via the right-click menu on the desktop) → Display → Additional display settings → Graphics adapter properties and see which video adapter is listed on the “Adapter” tab.
If the name of the video card is something like Basic Display Driver, then the reason lies in a disabled device or in the absence of a driver for it. Sometimes such devices are not displayed in the Manager by default, but become visible after activating the “Show hidden devices” option located in the “View” menu item.
Usually, following the instructions given above will solve the problem with changing the brightness level, but there are exceptions. The next chapter is devoted to such special cases.