Users of the Windows 7 operating system often encounter a problem screen brightness settings. To fix this problem, we will look at all the available ways to adjust the display brightness in Windows 7. Adjusting the screen backlight is a fairly simple process that even a novice user can handle. After familiarizing yourself with the material, you will be able adjust the brightness yourself laptop or desktop computer.
Adjusting brightness using standard Windows 7 tools
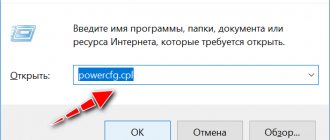
To set the brightness of a laptop or all-in-one PC using standard 7 tools, the first step is to go to Control Panel . You can go to the Control Panel through the Start or type control Run
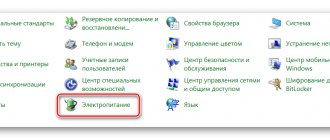
After launching the Control Panel , you need to go to the “ System and Security ” section.
Next, go to the “ Power supply ” section.
You can now increase or decrease the screen backlight.
To do this, set the “ Screen Brightness ” slider to a position that matches your monitor backlight preferences.
You can also go to the power plan and set the brightness at which the laptop will operate on battery power or mains power.
How to adjust monitor brightness
Adjusting the brightness of the monitor directly affects the work at the computer. Setting the parameters incorrectly may affect your vision. Since all visualization occurs through the monitor, it must be configured correctly.
There are several options for adjusting monitor brightness. The most important thing is to consider the screen refresh rate settings. Fast frame changes minimize the negative impact on vision. You can notice the blinking immediately by taking a few steps back and looking at the screen.
How to reduce screen brightness on Windows 7
Standard Windows tools allow you to quickly change screen brightness settings. For Windows 7, follow these simple steps:
- Control Panel
- system and safety
- Power supply
- Change plan options
Here you will see several parameters and at the very bottom sliders for adjusting the brightness of the plan. They are divided into brightness from the battery and from the mains. Select the desired brightness level. If desired, you can set the display to dim, turn off, and go into sleep mode. After that, click “Save changes” and exit.
7 Ways to Change Brightness on Windows 10
Users of this operating system can adjust screen settings in several ways.
Windows Settings
Changing the screen brightness level occurs in several steps:
- Right-click to open the menu on the desktop
- Go to - Screen Settings
- Move the slider forward or backward to adjust brightness
At the bottom of the brightness scale there is a parameter - Night light. Enter settings. Here you can change the time for setting the night light. This function can be left or disabled. When switching to night time, the brightness of the monitor decreases. The light level is set on a scale called Night Color Temperature. Next, set the time parameters. In addition, the geolocation function helps determine the time of sunset and sunrise.
Power plan options
To get started, call up the “Power Options” menu. This can be done by right-clicking on the battery icon in the bottom panel on the desktop or “Control Panel”:
- Control Panel
- All Control Panel Elements
- Power supply
- Changing schema settings
- Adjust brightness
In addition, in the “Advanced Settings” section the choice of actions is wider, which allows you to better adjust the brightness.
Hotkeys
Most laptops, especially the latest generation, have special buttons to adjust the display backlight. They are usually located next to the volume keys. The most common location is the arrows next to “R Shift” or the key range from F1 to F12. The function works using the combination: Fn + Brightness button (“+” or “-”.)
Battery indicator
A very simple and fast way to change the screen brightness. In the taskbar you need to click on the battery icon and open a pop-up window. You will see an adjustment button. Move the slider to the desired level and close the menu.
Changing screen lighting settings using the video card driver
Another interesting way to change the display lighting is to adjust it using the video card driver . For our example, we will consider a driver from Nvidia . To open the video card driver settings, you need to right-click on an empty space on the Desktop. A context menu should appear.
In this menu, select the “ NVIDIA Control Panel ” item (it may be different for another video card), after which the video card driver settings panel will open.
Now in this panel you need to go to the “ Video\Adjust color settings for video ” menu.
In the color adjustment menu, you need to go to the column “ 2. How to make color settings ” and select the “ With NVIDIA settings ” switch. By selecting these options, you will be able to adjust four properties, including display brightness . To increase or decrease the brightness of the display, drag the slider towards plus or minus and you will see how the screen backlight changes.
Such programs that regulate screen lighting using the video adapter driver are also available from video card manufacturers Intel and AMD .
Also on the Internet you can find many programs that adjust the display backlight. All such programs work by accessing the video adapter driver. That is, in essence, they do what you can do in the control panel of the video card (in our case Nvidia). The most interesting of all such programs is F.lux . Its main feature is automatic adjustment of the display backlight , which depends on the time of day.
Reducing screen brightness on desktop PCs
The list of ways to reduce the screen brightness of external monitors is not as long as for laptops. In fact, there is only one method - using a special menu.
Monitor settings
There are special buttons on the monitor to control all the monitor settings. Their location depends on the device model and its manufacturer. They can often be found on the side or bottom. Much less often they are located on the back side. The list of actions to reduce brightness will look approximately as follows:
- Press the main "Menu" button on the monitor. Sometimes it is signed as "Enter".
Next, using the buttons nearby on the device, go to the menu, which is responsible for setting up the picture. It can be called differently. Look for one that has the line “Brightness” or “Brightness”.
Then simply use the same keys to change the value of the brightness bar. When finished, press the special button on the monitor that closes the entire menu. Again, it is called differently on different devices.
If you are unable to complete the necessary steps yourself, write your monitor model in the comments - we will definitely give more precise instructions on how to reduce brightness.
Thus, from this article you learned about the main methods of reducing screen brightness on devices running Windows 10. Let us recall that this indicator is only one of the parameters that affects the comfort of working on a PC. To change other settings, follow the link below and read our dedicated guide.
Hello. The brightness on my laptop began to change spontaneously: when the image is dark, the brightness drops, and when it is light, it is restored to its normal level.
How can I get rid of this problem, otherwise my eyes are starting to get tired because of it? OS: Windows 8, graph. accelerator (video card) Intel HD 4000 (built-in).
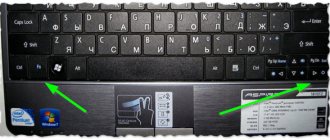
An example of adjusting the laptop backlight using the Fn key
For example, we will use a Lenovo s110 netbook with the Windows 7 operating system.
It uses the Fn modifier key in combination with the ← and → cursor keys to adjust the backlight. To increase the backlight of the Lenovo s110 laptop, you must use the Fn+ → key combination. To lower the backlight you need to use the combination Fn+ ←.
As you raise or lower the backlight, you will see how the value of the graphic indicator changes.
Hotkey Features program is responsible for this indicator .
As you can see, increasing or decreasing the lighting settings of a laptop screen using the “ Fn ” key is quite simple. You can use this example on other laptops, since the principles of using modifier keys are the same.
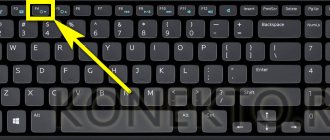
In particular, on SAMSUNG NP350 , the keyboard shortcuts are:
- to increase brightness - Fn+ F3;
- to decrease - Fn+ F2.
Adjustment using hot keys
Many laptop models have function keys on the keyboard designed to adjust brightness. Often, on such buttons you can see a light bulb or sun icon.
To adjust the color rendition, press one of these buttons several times (similar to changing the speaker volume).
Some laptops have a separate hardware switch located between Ctrl and Win.
Often, manufacturers HP, Lenovo, Acer, Samsung, Asus, Dell, Sony Vaio build in options to reduce and increase brightness by simultaneously pressing the Fn key and F1, F2, F3, F5, F6, F8, F12, etc. Also, by default, these can be combinations of the FN button and one of the arrow keys.
Manually adjusting the monitor backlight
For desktop computer users, screen lighting settings can be adjusted on the display itself. For example, we will use the LG Flatron W1943SS . To adjust the lighting, you need to go to its menu. To do this, press the MENU key on the monitor control panel.
After this, press the AUTO/SET key. A brightness adjustment window should open where you can change it.
I would also like to note that the monitor settings do not depend on what OS or driver is installed. They are regulated exclusively in the monitor. Each monitor from a different manufacturer has its own manual settings. You can find out the details of adjusting the screen lighting parameters of a particular monitor in the manual, which is included with the sale or can be downloaded in electronic form on the manufacturer’s website.
Adjusting contrast in Windows 10
While holding down the Shift and Alt keys on the left side of your keyboard, press the Print Screen key.
After you are asked if you want to enable High Contrast mode. Click Yes.
To return to normal contrast mode, repeat step 1 and high contrast mode will be canceled.
If pressing a key combination doesn't bring up the High Contrast prompt, you can turn it on in the Ease of Access menu:
- Open Control Panel.
- Click "Ease of Access."
- Select Ease of Access Center.
- Select "Make your computer easier to browse."
- Make sure that the "Turn high contrast when..." option is turned on.
- Click OK.
Method 2: Action Center
This method is convenient because it allows you to reduce the screen brightness without switching between windows. Everything is done quite simply.
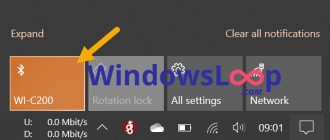
- In the tray on the “Taskbar”, click on the “Notification Center” icon, which is located in the very bottom right corner of the screen.
- A new window will appear, where system notifications are usually displayed. There are also additional Windows settings. Click on the “Expand” line in this window.
- You will see the list of quick actions expand. A bar will appear below it to adjust the brightness. Move the slider on it to the left until the result is satisfactory.
To close the Notification Center, just click on the icon again with the left mouse button (LMB) or do it anywhere on the Desktop.
Please note that this setting may not be available on older builds of Windows 10 (16xx and 17xx). If you use one of them, just resort to any other method.
Why do you need external lighting and is it necessary?
External lighting will be required primarily in the evening or at night, when sunlight (natural light) no longer penetrates into the room. Although daylighting should also be given close attention. For example, it is highly undesirable to use a computer in basements or where natural light does not reach for some reason.
But let's return to the question above. Answering this question, we can say with confidence that such lighting is simply necessary. Many users do not think about this at all, accepting the screen glow as sufficient for illumination. But this is a deep misconception. Here are a few exterior lighting options that may come in handy when setting up your workspace.
1. General lighting. Everyone has the usual lamp on the ceiling or additional spotlights. To work in the dark, the light should not be too bright, it is advisable to dim it. It should also not create glare on the screen or cause other inconvenience.
:/> How to copy from disk to disk
2. Working. All kinds of lamps and, of course, table lamps will be used here. Lamps can be placed on the wall or floor, lamps on the table. The main rule here is that the light from the devices should not shine on the screen or cast glare.
It is advisable to have a flexible and multifunctional lamp, with a regulator and an incandescent lamp. It is better to place it on the table on the side of the monitor or on top so that the light falls on the table (the correct location is in the diagram above). It is also possible to install lamps around the entire perimeter of the workplace.
3. Combined lighting. It combines both general (muted) and task lighting, in which you can use, for example, a table lamp. As a rule, many users use combined lighting.
What is the difference between color brightness and backlight brightness?
You should not confuse the brightness of the screen backlight with the brightness of the color of the device, although these things are interrelated with each other. Backlight brightness means an increase or decrease in the amount of light coming from the screen, which can be adjusted by simply pressing a button.
Color is a characteristic of electromagnetic radiation emanating in waves from objects and perceived by a person subjectively. The waves are perceived first by the eyes and then by the human brain and are converted into color sensations. Objects themselves do not have color, but when illuminated by light they absorb some of the light waves and reflect some. These reflected waves will be the color of the object.
When designing monitors and televisions, three colors are most often used: blue, red, green. When mixed, they produce one image or another. In addition to the colors themselves, image quality is enhanced by contrast, color saturation, hue, sharpness, and color temperature. Some TV models may have an HDR mode, which makes the picture realistic and vibrant.
To adjust the color brightness on the monitor, the user needs to make more subtle adjustments. This can be done through the monitor settings menu or through the video card software. For example, you can experiment with the choice of color shades, saturation (color intensity), color temperature, color gamut, etc. On the TV, depending on the model, we adjust the saturation, color gamut, color temperature, etc.
Not just the brightness of the backlight...
Speaking about brightness, one cannot fail to mention the contrast settings, which also affect the intensity of the screen glow. Contrast is the ratio of the maximum brightness of any element of the image to the brightness of the background. The contrast of a dark image on a white background and vice versa differs.
In other words, when users increase the contrast slider to the maximum value, the screen becomes whiter, but if they reduce the contrast to minimum, the image will be black. What contrast to choose is up to the user.
:/> The laptop is connected to the network, but it is not charging: what should I do?
If the contrast is low, then it will be difficult to distinguish light colors on the screen. If it is tall, then the abundance of light will hit the eyes. However, you can lower the brightness level and simultaneously increase the contrast, stopping at the moment when your eyes begin to see everything on the screen without strain.
https://www.youtube.com/watch?v=xOdzHo7zl3w
In conclusion, it is worth adding that it is better to adjust the brightness and contrast to suit your individual needs and feelings. The main condition here is that the image should not cause discomfort or fatigue the eyes. In addition, you need to maintain a distance from the monitor, take periodic breaks from work, and do not neglect eye exercises.
*{padding:0;margin:0;overflow:hidden}html,body{height:100%}img,svg{position:absolute;width:100%;top:0;bottom:0;margin:auto}svg{ left:calc(50% – 34px)}
” frameborder=”0″ allow=”accelerometer; autoplay; encrypted-media; gyroscope; picture-in-picture” allowfullscreen>
Via the color calibration tool
Few people know, but starting from Windows 7 OS, it is equipped with an excellent tool for calibrating the display. It can be used both on desktop computers and laptops, duplicating the functionality of the video driver software. An important advantage of this option is the presence of ClearType text smoothing technology, which optimizes the display of fonts on the monitor used. The simplest color management in Windows 10 and older is also available here.
To get started with the calibration tool:
- Go to the “Color Calibration” menu, located along the path “Control Panel / Hardware and Sound / Screen”.
- After brief introductory information about the principles of setting up the screen, click “Next” several times and move on to the first stage, “Adjusting the gamma.”
Our task is to achieve minimal visibility of the points in the circles using the slider on the left and click “Next”.
- After another “briefing” and several clicks on “Next”, we find ourselves at the second stage “Adjusting brightness”.
There is no adjustment slider, but there is a man in a black jacket and the letter X in the background as a guide for finding balance. You can adjust the brightness using one of the methods described above.
- Next up is “Adjusting Contrast,” a sarcastically smiling man in a white shirt helps us choose the level.
There is no slider again, so we use the video driver program, hot keys or the Power menu.
- “Adjusting color balance” contains three level sliders for red, blue and green.
Here you can adjust the “warmth” of color rendering that is comfortable for the eyes and remove color highlights.
- The last step is to configure the text display with the ClearType tool. If desired, you can disable it by unchecking the last calibration window.
Here your task is to find the clearest and most pleasing sample of text. This completes screen calibration.
Effects of Common Tuning Errors on the Eyes
Light is one of the most important factors that has a profound effect on the eyes. It is known that the pupil dilates in bright light and contracts in dim light - this is called the pupillary reflex. The process occurs reflexively, regardless of the person, with the help of two muscles (a complex ring-shaped sphincter and a radial dilator). The first is responsible for the constriction of the pupil, and the second, accordingly, for the dilation.
Thanks to these muscles, which contract and expand, the iris regulates the penetration of light rays into the eye. When the brightness of the display decreases, the pupil dilates, allowing a large amount of light to enter the eye. Moreover, if the muscles are tense for a long time, from strong or dim light, this will gradually lead to severe fatigue.
"windows mobility center"
A little more action will be required from the user who wants to reduce or increase the brightness of the laptop screen on Windows 7; the second method, associated with launching the utility utility, will be required.
To configure a monitor setting without using the function keys:
- Open the Start menu by left-clicking on the flag located in the lower left corner.
- Go to the "All Programs" folder.
- And from here launch the Windows Mobility Center application.
- In the window that opens, the user can move the slider to adjust the screen brightness, and then proceed with further system settings - for example, free up space on the C drive.
Important: you can also find “Windows Mobility Center” by entering the corresponding query in the search bar of the Start menu and selecting the very first item in the list of found items.
Why do brightness settings fail?
This often happens due to incorrectly updated drivers or due to the lack of a video card software update.
To update the drivers you need to complete the following steps:
- Click “Start” and go to “Toolbar”;
- Open the “Device Manager” section;
- Expand the “Video adapters” tab;
- Call the context menu on the existing driver and click on the “Update” line;
- Next, indicate the location of the software, if disk drivers are included with the PC, or search on the network.
Sometimes difficulties are caused by a driver that does not match the system, and it is recommended to restore an earlier version of the software . In the “Device Manager” window, enter the driver properties and roll it back, as shown in the figure below.
Through third party programs
At the moment, there are many programs to eliminate the shortcomings of Windows 7 and 10, in particular, displaying the screen brightness settings in the taskbar or on the desktop. We will look at the simplest screen shading utility, DimScreen.
To install the program:
- Download it from the developer’s website using the link https://barbadosmaney.ru/dimscreen.
- Run “DimScreen.exe” as administrator.
- The utility automatically appears in the tray toolbar.
It does not have an interface as such and is represented only by a context menu with brightness levels in percentage terms.
Other programs may be more functional, but DimScreen is one of the best options for those who want to instantly change the brightness of the display and are not looking for anything extra.