Often absolutely trivial operations on a PC require simplified management. This need also arises when changing the display resolution. It would seem that Windows OS utilities can handle this, but as practice shows, in some cases this is not enough.
Applications come to the rescue that allow you to change both standard properties - bit depth and resolution, and advanced ones - refresh rate. Some of the presented solutions can change different values when hotkeys are used, which is much easier compared to standard methods. Among other things, one of the programs has a function that allows you to connect several output devices to the computer, each of which has its own values preset.
Carroll
When you select a resolution, the data is applied to all PC users. The presented software product allows you to use different values if necessary. The information is remembered so you don't have to enter the same numbers every time. A fairly large list is provided, which contains many options for you to choose from. The program is presented in a single window and has a minimum set of elements - according to its specialization. Moreover, the Russian version of this application is not so necessary.
HotKey Resolution Changer
The main purpose of the program is to change the resolution for monitors connected to the PC. In addition, you can select the bit rate and hertz, which are also present in the customizable parameters of this software. Using hotkeys makes it much easier to select different options for each individual device. To save data entered by the user, there are profiles, the maximum number of which reaches nine. The application is located in the tray and consumes minimal system resources. The utility version does not support the Russian language, but is provided by the developer for free.
MultiRes
A very simple utility in which all operations are performed from the taskbar, so the application does not have a graphical interface. For convenience, autorun is configured in the parameters. There is a Russian version of this solution.
The software discussed is useful for performing tasks that involve changing screen properties. Using hot keys will be convenient in everyday work with multiple displays.
Thank the author and share the article on social networks.
| Description | DOWNLOAD (733 Kb) | Screenshots (1) | Statistics | Reviews (2) |
- Program rating - 4.20 out of 5
- 1
- 2
- 3
- 4
- 5
Carroll
— a simple tool for controlling the monitor screen resolution. In situations where several people use the same computer, logging in under different accounts, the display screen resolution is set the same for all users. This is not always convenient, because... Each of us has different preferences for screen settings, which may also depend on the applications used.
The program will change this situation by allowing each user to automatically (without manual intervention) use their chosen screen resolution when logging into the system. When you first launch the program, you will be asked to choose the permission type from the proposed list. The list is quite large, experiment to get the best result for you. When you have found the type you need, just click “Change screen resolution and restore with every logon” - now this screen resolution mode will be used by default when logging in. Other users of the same PC do the same, but under their own account.
It seems like Carroll doesn’t do anything special, but still, sometimes such a setting can be very useful, without forcing you to constantly change the screen parameters “to suit you.”
| Rate the program! 4.20 out of 5, total ratings - 14 |
Actual Multipale Monitors
A program for optimizing work on multiple monitors.
Emulates menus and controls on all screens, filling some gaps in work typical for Windows.
It also works on fairly old operating systems.
Allows you to fine-tune the technical parameters of the screen, as well as configure and synchronize their control. Adds some features and components that were not originally included in the operating system.
Positive:
- Optimization of work in a multi-monitor system;
- Setting up systems and parameters;
- High stability.
Negative:
- Paid license;
- Not very wide functionality of technical settings;
- Load on the device's hardware resources.
User reviews of the software: “Quite productive and worth the money,” “the only program that can disable focus loss on a screen that is not currently in use.”
9.5 Grand total
conclusions
It is best to base your choice of software on your own needs. For users of multi-monitor systems, the UltraMoon program is most suitable, allowing not only to configure the interaction of monitors with each other, but also to configure them in a fairly wide range.
However, this program is paid, and if there is a need to save money, then it is very difficult to select software, since all high-quality and popular programs for multi-monitor systems are distributed for a fee.
It is important to remember that such programs place a fairly significant load on the computer’s hardware resources, so it is not advisable to install them if you only have one monitor (although they, of course, will work). Nokia Monitor Test is one of the best free programs for setting monitor parameters, allowing you to change its technical characteristics according to the requirements of a particular user
Nokia Monitor Test is one of the best free programs for setting up monitor parameters, allowing you to change its technical characteristics according to the requirements of a particular user.
MultiRes
A free program for easily changing video card modes, created by EnTech Taiwan, known for its excellent PowerStrip program. It is especially useful in situations where we often need to change the refresh rate of the video card and the resolution of both one and several monitors.
All parameters of the MultiRes program are available from the program icon placed in the system tray (the so-called tray). Selecting the appropriate mode is possible with one click. Unlike PowerStrip, the program doesn't allow you to define your own graphics modes. MultiRes can also be launched from the command line with the appropriate options, allowing all modes to be set automatically (also for multiple monitors).
UltraMon
The most functional and simple program of all presented in the TOP. It is easy to work with and helps you make fairly fine adjustments to the monitor and change even the most insignificant parameters over a wide range. It is distributed for a fee, but has a trial period.
It is especially convenient for working with multi-monitor systems - it allows you to copy and move desktops from one monitor to another, copy them, stretch the taskbar across several monitors, etc. It also allows you to technically adjust screens - change color, resolution, etc.
The advantages of such software are as follows:
Positive:
- “Tailored” for multi-monitor viewing;
- Simple controls and intuitive interface;
- Wide functionality.
Negative:
- Paid license;
- The functionality is quite narrow, namely setting technical parameters;
- A large number of functions that are not required by the average PC user.
And here’s what users who have already worked with this program say: “I couldn’t find anything better than this program”, “It doesn’t have some of the functions that Actual Multipal Monitors has, but overall I’m happy with the software”, “It works stably, the functionality is sufficient for optimization screen management."
Carroll
Carol is a small and fairly easy-to-use program, the main function of which is the ability to set a specific screen resolution for each Windows user account. Carroll is an ideal solution when multiple users share the same computer and each of them prefers to work at a different resolution (to reduce or enlarge).
Windows OS has the ability to store several basic user settings in an account, but it does not provide the ability to set one screen resolution. The problem arises when users prefer to work with different display parameters, among which their resolution is the main setting. Therefore, every time they launch their account, they must change it manually.
The solution to this Windows flaw is the Carroll tool for switching extensions in Windows 7 and others. The program allows each user to define their preferred screen resolution and, in addition, when logging into their account, the tool will automatically apply the specified resolution.
How to choose the optimal image for your smartphone screen
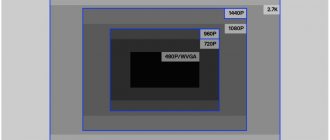
Before choosing a resolution, it is worth considering that a high indicator will always affect the battery life of the device. For example, you can take a device with a 5-inch screen whose resolution is 1440x2560 pixels, and a smartphone of the same diagonal size, only with a resolution of 1080x1920. In the latter case, the battery will last twice as long, but the clarity and quality of the picture will be worse. There is a table showing the optimal resolution in terms of diagonal:
| Diagonal | Permission | Density |
| 4 | 800×480 | 250 ppi |
| 4,5 | 1280×720 | 326 ppi |
| 4,7 | 1280×720 | 317 ppi |
| 5 | 1280×720 | 294 ppi |
| 5 | 1920×1080 | 441 ppi |
| 5,5 | 1920×1080 | 401 ppi |
| 5,5 | 2560×1440 | 534 ppi |
| 5,7 | 1920×1080 | 386 ppi |
| 5,7 | 2560×1440 | 515 ppi |
Editing configuration files
After installation, any software creates elements of the “cfg” or “ini” type, which contain important information about the program settings. I can't give the exact name and location as it is different for each game. You'll have to manually go through the folders looking for files named "config.ini", "game.cfg" (or something similar).
You can view and edit their contents using the built-in Windows Notepad. Often, you should find the parameters in the text - Width/Height, Size, W/H and assign them the correct resolution values. Here's an example:
It is advisable to first create a copy of the document so that you can restore the settings later.
Main advantages of the program:
If you have problems with the settings on the audio or picture monitor, then this software can help you. Install Display Tuner on your computer and you will forget about these problems. Wide functionality allows you to configure the monitor in any situation.
Details There are different situations when you work on a computer or play. Sometimes it becomes necessary to select the screen resolution or change it. Usually we go to the “Properties” of the desktop, find the options and select the resolution that we need. This is a lengthy procedure that requires attention and patience. But, we, as slightly lazy people, are looking for simpler, easier ways to achieve our goals. By the way, resolution is the number of monitor dots, or pixels horizontally and vertically.
To change the screen resolution, a special small and free program ScreenSet v1.0 was developed, i.e. utility version 1. Now you do not need to go to “screen properties” and its “parameters”. You just need to download the free ScreenSet utility once from the links below, run it on your computer and select the required screen resolution. One click and the resolution will change!
The ScreenSet v1.0 application will be useful to many, but especially to webmasters and designers, programmers and software and graphics testers. The permission set contains all the standard options.
Here is a list of possible resolutions: 640x480, 800x600, 1024x768, 1152x864, 1280x720, 1280x768, 1280x960, 1360x768, 1600x900, 1600x1024, 1600x12 00. When you exit the application, the original, last default resolution is restored. The program was developed in 2006 and has not been updated. Works in Windows environment.
File size: 368 KB.
| resources: |
*if you have any questions, please write to us about it.
TS-MIDI Editor is a free MIDI file editor. Install the program.
A universal program for changing the resolution in games
On the Internet you can find a lot of amazing and useful programs that were developed by independent programmers. In your case, a utility called "Res-o-matic" will be useful. You can download it completely free of charge at https://www.bcheck.net/apps/reso.htm.
The program size is only 19 kilobytes. And this tiny tool will change any resolution in almost any monitor and game without having to go into the game. It's very easy to work with. After launch, you will see a line with a “Browse” button. By clicking it, you need to select your game from the list of installed applications. Then select a resolution for it below. Save the settings and launch the game for which you changed the settings.
Programs for changing screen resolution
You can also change the screen resolution on Windows using the tools built into the system. However, in some cases their capabilities are not enough or the process itself can be difficult.
In this case, it is recommended to use special applications designed for more detailed adjustment of the image display on the screen. You can find a program that does the same standard settings as a Windows utility, or a more complex application where you can change advanced settings. For example, the screen refresh rate. Some of the presented solutions allow you to change the screen characteristics using only hot keys, without the need to launch the program, which is convenient. There are also programs that allow you to configure several screens connected to one computer at the same time.
Carroll
Quite an old program. Which allows you to change the screen resolution for all accounts on the computer, and set separate settings for each of them. The specified parameters are remembered by the system, which eliminates the need to enter them each time. The program interface is presented in a single window and has a set of elements that correspond to their specialization. Among the general list there are several settings templates for you to choose from. The program has a Russian version, however, there is no particular need for it, since the number of control elements is minimal.
HotKey Resolution Changer
The main purpose of this program is to change the resolution of monitors connected to the computer. In addition to setting the resolution itself, you can specify its bit depth and hertz. This program is very convenient if two or more monitors are connected to the computer. Some parameters can be set using special hotkeys. The latter can be configured if necessary.
To avoid entering the same settings, you can save them in special profiles. In total, you can open up to 9 profiles. When you launch an application, it opens in the system tray and consumes minimal system resources. Unfortunately, the official version of the program does not support the Russian language, but this problem can be solved by downloading the Russian language.
Custom Resolution Utility - CRU 1.4.1
Custom Resolution Utility is a program for “overclocking” the monitor (increasing the screen refresh rate). The user can select the appropriate mode from several available profiles. The program allows you to change the resolution and frame rate at which the monitor can work for a long time. Custom Resolution Utility (CRU) allows you to change these parameters manually.
The program is used mainly by gamers, since such overclocking of the monitor can make the picture smoother.
HDR (a new imaging technology) mode has recently been added to the Custom Resolution Utility It can be used even in those monitors where it was not originally provided. Reviews say that the difference in the picture is visible to the naked eye.
If you select the wrong resolution or frequency, the screen will stop showing altogether. However, you can return the original image parameters by entering through safe mode.
When overclocking a monitor, it is important to understand that the manufacturer did not intentionally intend for the device to operate in this mode. Therefore, constant operation at a higher frequency can lead to rapid failure of the monitor.
Functions and features of the Custom Resolution Utility - CRU 1.4.1 program:
- Changing the monitor frequency and resolution;
- HDR mode for improved quality;
- Free distribution;
- Changing incorrectly set parameters is carried out only through safe mode;
- Compatible with Windows from XP to 10.
Screenshots
Similar programs
Microsoft .NET Framework 4.0.30319 Java Runtime Environment 1.8.0/1.6.0 Speed AutoClicker 1.0.0.0 AMD Overdrive 4.3.1 AutoClicker v3.0 dxcpl 4.8.1 Microsoft .NET Framework 3.5 AutoClicker v3.0 @BIOS GIGABYTE B12.1207.1 VirtualBox 6.1.4
Changing the resolution
1) In video drivers (for example Nvidia, Ati Radeon, IntelHD)
One of the easiest ways to change the screen resolution (and in general, adjust brightness, contrast, picture quality and other parameters) is to use the video driver settings. In principle, they are all configured in the same way (I will show a few examples below).
IntelHD
Extremely popular video cards, especially recently. In almost half of budget laptops you can find a similar card.
After installing the drivers for it, simply click on the tray icon (next to the clock) to open the IntelHD settings (see screenshot below).
Next, you need to go to the display settings, then open the “Basic settings” section (the translation may differ slightly depending on the driver version).
Actually, in this section you can set the required resolution (see screenshot below).
AMD (Ati Radeon)
You can also use the tray icon (but not every driver version has it), or simply right-click anywhere on the desktop. Next, in the pop-up context menu, open the line “Catalyst Control Center” (note: see photo below. By the way, the name of the configuration center may vary slightly, depending on the software version).
Next, in the desktop properties, you can set the desired screen resolution.
Nvidia
1. First, right-click anywhere on the desktop.
2. In the pop-up context menu, select “Nvidia Control Panel” (screenshot below).
3. Next, in the “Display” settings, select the “Change resolution” item. Actually, from those presented, all you have to do is select the one you need (screen below).
2) On Windows 8, 10
It happens that there is no video driver icon. This can happen for several reasons:
- reinstalled Windows, and you have a universal driver installed (which comes with the OS). Those. there is no driver from the manufacturer...;
- There are some versions of video drivers that do not automatically put the icon in the tray. In this case, you can find a link to the driver settings in the Windows Control Panel.
Well, to change the resolution, you can also use the control panel. In the search bar, type “Screen” (without quotes) and select the coveted link (screen below).
Next, you will see a list of all available resolutions - just select the one you need (screen below)!
3) On Windows 7
Right-click on the desktop and select “Screen Resolution” (this item can also be found in the Control Panel).
Next you will see a menu that will display all the possible modes available for your monitor. By the way, the native resolution will be marked as recommended (as I already wrote, in most cases it provides the best picture).
For example, for a 19-inch screen the native resolution is 1280 x 1024 pixels, for a 20-inch: 1600 x 1200 pixels, for a 22-inch: 1680 x 1050 pixels.
Older CRT-based monitors allow you to set the resolution much higher than recommended for them. True, a very important quantity in them is frequency, measured in hertz. If it is below 85 Hz, your eyes begin to ripple, especially in light colors.
After changing the resolution, click "OK". You are given 10-15 seconds. time to confirm settings changes. If you do not confirm within this time, it will be restored to its previous value. This is done so that if your picture becomes distorted so that you cannot recognize anything, the computer will return to its working configuration.
4) On Windows XP
It is practically no different from the settings in Windows 7. Right-click anywhere on the desktop and select “properties”.
Next, go to the “Options” tab and a picture will appear in front of you, as in the screenshot below.
Here you can select the screen resolution and color quality (16/32 bits).
By the way, the quality of color reproduction is typical for old CRT-based monitors. In modern ones the default is 16 bits. In general, this parameter is responsible for the number of colors displayed on the monitor screen. Only a person is practically unable to distinguish the difference between 32-bit color and 16-bit (perhaps experienced editors or gamers who work a lot and often with graphics). Whether it’s the butterfly’s business...
PS
Thank you in advance for any additions to the topic of the article. I have everything for this, the topic is completely covered (I think :)). Good luck!
What to do if the driver recovery function does not work
If the recovery option from the second step does not work, then you must first completely remove the existing drivers and then manually install the original ones using the official installer from the AMD or Nvidia website.
Instructions for Radeon cards
If your computer has a Radeon graphics card, download the AMD CleanUninstall Utility. This is the official driver removal utility for Radeon cards.
Launch it, click on OK to confirm the removal and wait until it is completed. After a while, a window with the results will appear - click “Finish” and confirm restarting the computer. Now you can install new drivers.
Uninstalling AMD Drivers
If you have Radeon HD 2000, 3000, or 4000 series graphics cards, download the AMD Catalyst 13.4 Legacy Beta Driver utility.
For newer ones, you can install drivers automatically using the AMD Driver Autodetect program.
After installing them, the resolution will be restored to the correct value compatible with the hardware-supported monitor or laptop screen.
Instructions for NVIDIA cards
Uninstall the current driver for the NVIDIA card - the easiest way to do this is using the DDU (Display Driver Uninstaller) utility.
Then download and install the original one for your device from the NVIDIA website.
After installing them, the screen resolution should return to its original value.
After switching to a better OS, problems with your monitor resolution may appear. The image will appear fuzzy and small. You can adjust the screen resolution of Windows 10 yourself and go back; there is no need to go back to the old Windows.
Monitor screen resolution is the number of pixels in the entire volume on the desktop, in pixels. If the resolution is high, desktop icons and everything else become distant.
Problems with monitor size are extremely rare. You cannot change the screen resolution of Windows 10 at all, but it is possible in several cases. If on the PC, the drivers are not installed or installed incorrectly. You can change the resolution by installing the video card drivers again.
How to change screen resolution in Windows 10?
There are several ways to troubleshoot problems. Before installation, you need to look at the physical resolution. This can be done by looking at the technical specifications.
1.The easiest way is to right-click on the desktop and click on “Display Settings”. Next, the “Advanced screen options” item should appear. When you select it, a window with the monitor size will appear. There you can select what you need. If you have multiple monitors, it is possible to set any screen resolution on Windows 10 by selecting one of them. Having made your selection, click “Apply”. The picture on the screen will change. You can save the selection or change it to something else.
2. The second method of change is through “Start”. By clicking on it, select “Options” - “System” - “Screen”.
You can then change the monitor size by scrolling the mouse wheel. Click “Apply” and the screen will change. The recommended resolution should be 100% for apps and other elements to look normal.
3. Another easy way is through the “Control Panel”. You can find it by going to Start. In the control panel there is “Adjust screen resolution”. There you will be able to reduce or increase the size of the Windows screen
4. You can also change the resolution using the graphics adapter driver. This method will help you change the resolution settings if the previous ones did not help. Windows 10 may simply not see tall monitor size formats. Let's look at an example of how to change the screen resolution using the NVIDIA driver. Right-click on the desktop and select “NVIDIA Control Panel”. The panel of this driver will open, where you need to click on “Change Resolution”. There are all kinds of resolutions, also a finer size, you can configure it yourself by selecting “Customize”.
Windows automatically sets the most suitable screen resolution. It does not work for some monitors. It depends on the compatibility of the monitor with Windows. The required permission may not be available.
The resolution for Windows 10 should be the highest. For example, if after changing Windows 7 to 10, the resolution is automatically set to 1280x720 pixels, then you need to change it to 1366x768 pixels. There may be something else, in which case you need to pay attention to the resolution that is recommended. Next to the suggested Windows 10 screen size, there will be a “recommended” next to it.
Changing the screen resolution on Windows 10 is very easy. You can do this yourself, without outside help.
imuser.ru
Changing brightness settings on a laptop
It is worth taking into account that depending on the manufacturer, the overall brightness indicator and possibilities for customization will vary greatly
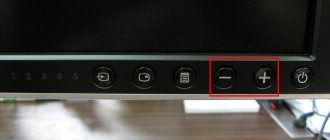
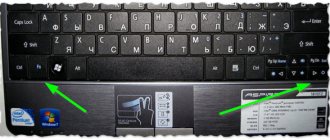
Option 1 – Change the brightness level using hotkeys
In the vast majority of laptops, in order to change the brightness, you need to use a combination of several function keys. For example, by holding down the “Fn” button, you can use the arrows to adjust the brightness level of the monitor. Despite the fact that along with the Fn button there may be completely different input keys, the screen brightness symbol is always depicted as a sun symbol.
Option 2 – adjust brightness using the control panel
You can also change the brightness using the display settings through the control panel. In this case, you need to do the following:
- Go to the Control Panel menu (in the Windows 10 search, enter “panel” and select “Control Panel” from the list).
- Open the screen control option – the icon labeled “Screen”.
- In the window that opens, find and open the “Brightness Settings” item.
- After which, you will find yourself in the laptop power consumption settings menu. At the bottom of the window that appears there will be a slider that is responsible for brightness settings.
- Next, you will need to set the monitor brightness level to a comfortable level and exit the settings. All new settings will take effect immediately.
In my case, there were no “Display” settings, there was an Intel HD graphics setting:
Option 3 – change the brightness using the video card driver
All modern laptops run on a basic video adapter from Intel, AMD or Nvidia. It is with the help of the driver preinstalled on your laptop that you have the right to independently change the display color settings, making it brighter or more saturated.
If you are using a video adapter from AMD
Using a driver from AMD, you can change the standard settings for image clarity on the display. Due to the fact that the company has released a huge number of driver updates, the items in the settings panel may vary greatly. For example, in Catalyst 10.2, to apply the new options for brightness settings, you need to visit the Color menu. To get to the driver settings menu, just short-click the right mouse button while on the desktop and select “Catalyst Control Center”.
If you are using a video adapter from NVIDIA
- Right-click on the desktop and select “NVIDIA Control Panel” from the context menu.img8
- In the navigation panel that appears, in the left row, select “Customize desktop color settings.”
- You will be offered several displays to choose from, if you have more than one, where you will need to select the one you need, and then click on the “Use NVIDIA Settings” item. After which you will have access to display settings, which include brightness, contrast and gamma. For all the specified settings to take effect, you will need to click the “Apply” button.
If you were still unable to adjust the display brightness using the function keys or all the adjustments made to the driver were ineffective, then most likely you are faced with a problem with your video card driver. This can happen after updating drivers to the latest version. One way to resolve this problem may be to roll back the video card software to a previous version or completely remove it and clean install it.
Problem solving
Below we have compiled a list of monitor resolution issues that PC users encounter in Windows 10:
- The first most common problem is old video card drivers
. Typically, Windows 10 automatically looks for graphics card updates. But if the computer is not connected to the Internet, video card drivers will not be automatically updated.In this case, the driver discs included with the video card package will help you. Pre-downloaded updates in the form of installers from the official websites of video card manufacturers Intel, AMD and Nvidia can also help.
- Another problem could be incorrectly installed drivers
. Typically, this situation occurs when the user downloaded the wrong driver for his video card and installed it on the system.In this case, removing this driver and installing a new one, specially created for your video card, will help.
- Like video cards, some monitors
also
require the installation of their own drivers
in Windows 10. Typically, these drivers are included with the purchased monitor; they can be downloaded from the official website of the monitor. - Often users, to save money, use cheap Chinese HDMI adapters and cables
. This option of connecting the monitor to the computer often causes problems in which the image is stretched, the picture becomes fuzzy and its quality constantly changes.This problem is solved by replacing adapters and cables with better ones.
In this chapter, we have described the most common problems that lead to incorrect monitor resolution and stretched images. If you follow all the recommendations presented in this chapter, then you will certainly solve the problem.
Screen Resolution Manager
Screen Resolution Manager is a utility that allows the user to change the screen resolution. In addition, the user can adjust the color depth, frequency, brightness and contrast, and even the color scheme. All these settings can be made immediately after loading the user profile.
In fact, there are not many utilities with which you can change the screen resolution. This means that you can set the desired number of pixels on your monitor and adjust the images depending on your needs. But you can always find out what expansion indicators should be by looking at the instructions.
Changing resolution and other monitor parameters using third-party software
Third-party programs allow you to find out what sizes are available and what displays they fit.
The Carroll program is software that is designed to change absolutely all monitor parameters in one single window.
This utility is perfect for Samsung Syncmaster family monitors.
You can download the program here.
You can also use this application to find out the recommended resolution and the required update frequency.
Appearance of the main window of the Carroll program
How to change the game resolution without going into it through “Properties”
If the game does not start correctly (black screen) and you cannot enter its menu, then we will try to fix the error with a simple manipulation:
- Find the shortcut to the desired software on the desktop and right-click on it. A list of actions appears, we need the option - “Properties” (it’s at the very bottom);
- A window will open with several tabs, go to “Compatibility” and check the “Use 640x480” option:
- Be sure to save the settings by clicking OK. We launch the game and see a not very beautiful image. But the point here is to somehow get into the game menu, where you can actually change the resolution to a suitable one (in accordance with the characteristics of the monitor);
- When you fix the problem, open the shortcut properties again and uncheck the previously checked box.
Setting resolution using AMD Catalyst utility
If you have a video card from AMD installed, you, just like in the previous example, can change the screen parameters using the utility from the manufacturer.
Step 1:
Right-click on a free area of the screen and find and launch “AMD Catalyst Control Center” in the list.
Step 2:
In the menu list on the left, open “Desktop Management” -> “Desktop Properties” (in the Russian version of the drivers this will be Desktop Management -> Desktop Properties). In the properties area, set the required screen resolution and click “Apply” or “Apply”.
Select the required options
Is My LCD OK
To a greater extent, this program is intended for diagnosing LED and LCD monitors, but it also allows for configuration.
It is distributed free of charge and is a utility, that is, it does not require installation on a computer and can be launched from removable media.
The principle of its operation is that the screen is alternately filled with different colors, as a result of which the user can detect dead pixels and restore them. There are also several specific monitor tests.
Dexpot
Dexpot is an easy-to-use tool for screen resolution on Windows 10 and earlier and for creating virtual desktops that are independent of each other. There can be up to 20 of them, and for each of them the user has the opportunity to place different wallpapers, display icons, screensavers or even resolutions. Switching between individual desktops can occur from the tray icon and keyboard shortcuts specified during setup. Dexpot also gives you the option to secure access to selected screens using a password.
In addition, several interesting plugins are available at the software level. They allow, among other things, integration of the tool with the taskbar in Windows 7 and efficient switching between desktops (cube effect).
A portable version is also available for download, which does not require installation on the system and is ready to use immediately after downloading. The program installer offers an additional component called “Speed up your computer.” However, this add feature is not implemented and removing it is problematic. Therefore, installing Add Computer Acceleration is not recommended!
How to change screen resolution on Windows 10: step by step steps
Screen resolution is the number of pixels (dots) that we see on the screen. This indicator is calculated relative to the size of the monitor. By default, the Windows system itself sets the appropriate screen parameters (refresh rate, color depth and resolution). But sometimes you have to select the screen resolution manually, for example, adjusting to a certain game with non-standard graphics or if Windows has selected a less than optimal resolution.
How to change resolution
In the latest operating system from Microsoft, the process of changing the screen resolution is slightly different from the same operation in Windows 8 or 7. To change the resolution in Windows 10, you need to learn a number of sequential steps:
If the permission list is inactive
If you updated your system from previous versions of Windows, you may experience difficulties with your video card drivers. In this case, the list of permissions will be inactive and displayed in gray.
The solution to this problem is to download and install the latest drivers that support Windows 10. Once the drivers are installed, the list will become active and you can easily complete the process.
Other methods
In addition to the method of changing the resolution described above, there is another method - adjusting the screen using proprietary software from video card manufacturers.
Using AMD Drivers
In the case when a video card and drivers for it from AMD are installed on your computer, then setting the screen resolution using them looks like this:
Process with Nvidia video drivers
In the case when a video card and drivers from this manufacturer are installed on the device, the process of changing the resolution occurs in a similar way:
Video instructions will demonstrate how you can change the resolution.
Conclusion
By following these sequences, you can change the number of pixels on the monitor at any time, thereby adjusting the image to suit your needs. You can always look at the recommended resolution values for a monitor in its instructions.
WindowsTen.ru
PowerStrip
PowerStrip is the most popular software for Windows 7 for managing video card and monitor parameters. The program allows you to achieve higher resolutions and higher refresh rates than required by device specifications. The new version has expanded support for graphics chipsets, improved resolution, refresh, gamma colors, color calibration, increased and decreased the visibility area on the monitor and the ability to overclock the video card. The database contains data on more than 1,500 monitor models.
How to change screen resolution on any monitor
Modern systems, starting with Windows 7, can independently select the optimal value for the screen, so basically there is no need to worry about this
It turns out that there are people, most likely beginners, asking the question of how to change the screen resolution, no matter what operating system or computer. The instructions will be individual for everyone and, I hope, will help you
There are a couple more points that I will touch on here. Let's say you have a monitor with a resolution of 1920 by 1080 or higher. It is known that setting the value 800×600 for it will not work. Why? But because you will see screen distortion as the values do not match the physical values for the screen.
How to change screen resolution on Windows 7
Let's start from the depths, namely seven. Using this particular operating system, you do not have to worry that the value will not be selected accurately. Although sometimes the value is set lower than necessary, so the knowledge that can be gleaned from this manual comes to the rescue.
The article “How to increase the font size on a computer screen” covered some points on the topic, and the article itself is quite useful. If interested, you can read it.
To manually adjust the screen resolution, you need to right-click on an empty space on the desktop. A menu will appear where we select the “Screen Resolution” option.
One of the subsections of the control panel called “Display Settings” opens. Here we see three parameters:
Naturally, we are concerned about the second point. The first one is responsible for choosing an additional monitor, and the last one is already clear. Open the Resolution options tab and select the maximum. In my case - 1366 by 768. Most likely, opposite the maximum resolution there will be a corresponding word - Recommended.
Note: It is worth paying attention to the moment when you cannot change the screen value. The fact is that you must install drivers for the graphics adapter
As a result, you can change the screen value not only from the control panel, but also in the video card settings. Below I will explain how to use these settings. (Drivers are usually installed automatically).
How to change screen resolution in Windows 10
The specified operating system has the same parameters from the control panel, but it still needs to be found. We won't bother, but let's see how to do this from the options menu.
As in the first case, we right-click on the desktop and select the “Display Settings” option.
A window opens with the “System” subsection. There are many tabs there, but we are interested in “Screen”. On the right side of the window we see several parameters:
- Night light mode – best suited for reading in the dark;
- Scale and layout are what we need;
- Multiple displays – we can connect additional monitors.
Find the “Resolution” parameter and change it to the maximum value, it will be o.
In addition, you can specify the text size in applications. The standard value is 100%, but the value can be changed to 125%.
Unfortunately, this method is the only one in the top ten. The “Display” section has been removed from the control panel and the necessary settings can only be changed through the “Options” menu. That's how bad they are, these Microsoft people.
Using the graphics adapter utility
I’ll show you using an NVIDIA video card as an example, since I don’t have AMD.
When we click on the desktop with the mouse to call up the context menu, we can see the following items:
- Graphics characteristics (Intel HD Graphics);
- NVIDIA Control Panel.
Both of these sections have many settings, but only the first includes screen resolution settings. Let's look at the example of Intel HD. If you have this software, then launch it.
The HD graphics control panel opens. Go to the “Display” section.
In the main settings of this miracle we see all the options that we need. Now you know how to change screen resolution using HD graphics.
: My eyes get tired from the computer, what should I do?
Overclocking the monitor - download Custom Resolution Utility
I want to tell you about one interesting program that allows you to overclock your monitor, or rather, increase the screen refresh rate. The program is called Custom Resolution Utility and you can download it by clicking on the button above. Custom Resolution Utility can not only increase the refresh rate but also set any resolution that your monitor can support. The utility will work on computers and laptops with ATI/AMD, NVIDIA video cards, as well as on some Intel cards. Windows XP is not supported, but everything else since Vista (7, 8.1 and 10) works fine. The program was updated on 02/07/2019 to version 1.4.1.
Password for the archive
spec-komp.com
Instructions for using Custom Resolution Utility
Before using this program, I recommend installing and running any remote access program (for example TeamViewer), in case something goes wrong. You can also boot into safe mode or recovery mode and fix the problem. The program cannot damage your equipment in any way, but everything you do is done at your own peril and risk. I am not responsible for what you do!
So we set up the program:
- Unpack the archive with the program and components.
- Run the CRU.exe file as administrator
- Select the name of your monitor from the drop-down list
- Click on the first Add button
- In the Timing line, select the appropriate value (I’ll tell you what exactly to choose next)
- Enter the resolution values supported by your monitor
- Enter the Refresh rate value below (watch the video!)
- Click OK and next time OK too.
- In the folder with the program, run the file restart.exe or restart64.exe based on the bit depth of your OS
- The screen will blink and switch or not switch to the mode you set.
Review of the best utilities
HDD Low Level Format Tool
A very powerful and advanced utility for low-level formatting of flash drives and other storage media. The program is capable of resuscitating them from almost any, even the most hopeless, state (well, except perhaps for unrecoverable physical damage to microcircuits and controllers), as well as completely erasing absolutely any information without the possibility of recovery. The program erases the disk partition table without leaving a trace, and then re-partitions it.
Program features:
- Full support for almost any model of flash drive or disk from popular manufacturers.
- Compatible with all possible connection interfaces.
- Detailed report on the work done.
- Limited features of the free version and no restrictions in the paid version.
How to use the utility correctly?
- Download the installation file from the site and run it.
- When you launch it for the first time, click the Continue for free button.
- Find your flash drive in the list of displayed media and double-click on its name with the mouse.
- Select from the list of possible operations Low-Level Format - Format This Device - Yes.
- After the procedure is completed, open Windows Explorer, right-click on the flash drive and select “Format.”
- After this, you can use your flash drive.
D-Soft Flash Doctor
An excellent utility for performing low-level formatting with a Russian-language interface and minimal requirements for computer resources. The program does not even need installation, as it works in portable mode. How to use it?
- Download and run the program installation file.
- In the main window, place the cursor on the disk that you want to format, click the “Recover media” button.
- Wait for the process to complete, click the “Finish” button.
- Format the media as usual using Windows Explorer.
JetFlash Online Recovery
The utility is designed for use with JetFlash, Transcend, A-Data media. Maybe you'll be lucky and be able to recover another flash drive. What are the features of the application?
- Complete portability.
- The minimum number of buttons is only two - “Start” and “Exit”.
- Work in the cloud, so the load on the computer is minimal.
You need to download the installation file, run it and click the “Start” button. Very simple and fast.
SP USB Flash Drive Recovery Software
A proprietary utility from the well-known manufacturer of portable storage devices, Silicon Power. However, even if your flash drive from another manufacturer uses standard device identifiers, you can safely use it. To do this you need:
- Download the installation file and run it.
- Select your flash drive from the list.
- Click the start recovery button.
In a couple of seconds everything will work as expected.
Kingston Format Utility
Since Kingston has a significant share of the portable media market, it also offers its customers a utility for restoring USB drives. It is also not overloaded with functions, has the most necessary functions and practically does not load the system. To format a flash drive using this utility, you need:
- Download it and save it in a folder on your hard drive.
- Open the archive, click the Unzip button in the automatic unpacker that opens and select the folder where you want to save the unzipped files.
- Go to the folder where you unpacked the utility and run the program file.
- Select your flash drive from the list of drives and folders and click Format.
- Wait until the program finishes its work to start using your flash drive.
Setting resolution using NVIDIA utility
Utilities from video card manufacturers are supplied along with drivers and utilities for configuring various parameters. With their help, you can both find out the screen resolution on Windows 10 and change it (increase or decrease).
Step 1:
There are two ways to open the NVIDIA Control Panel. First, at the bottom right of the screen in the notification area, click on the arrow to show hidden icons, click on the NVIDIA icon and run “Open NVIDIA Control Panel” from the list.
Step 2:
The second way is through the screen context menu. When installing drivers and utilities from NVIDIA, the program installs a context link by default. Launch NVIDIA Control Panel. Both of these methods launch the video card management utility.
Step 3:
In the task column, expand the “Display” list and select “Change resolution.” On the right side, in the “Resolution:” area, set the required parameters and confirm by clicking “Apply”. Again, the apply button appears only after changing the set resolution to a new one.
Change your screen resolution