05.23.2018 Category: Personalization and designAuthor: Alexey Gerus
Screen resolution is a very important parameter of your computer. It has long been proven that the more pixels there are in an image, the less your eyes get tired and your vision deteriorates. However, people with poor vision, on the contrary, are recommended to reduce the screen resolution.
- How to change screen resolution in Windows 10
Built-in Windows 10 toolsVideo: how to change screen resolution
How to find out the current screen resolution in Windows 10
You can find out the screen resolution using the screen settings or an external service.
- Click an empty space on your desktop and select Display Settings.
Using the desktop context menu, open “Display Settings” - In the window that opens, scroll down the page and click on “Advanced display options.”
In Display Settings, go to Advanced Settings - The Resolution filter shows the current screen dimensions.
If 2 or more monitors are connected to the computer, to find out the resolution of each of them, you need to click on the corresponding icons with numbers. The “Advanced Screen Settings” tab provides comprehensive information about connected monitors
Desktop Settings is an environment for adjusting screen extension, brightness calibration, orientation, and other monitor properties.
You can also find out the screen resolution using an external service, for example, Screen Resolution. It is enough to find the desired site on the Internet, open it, and the page script will do the rest.
Screen resolution can be determined by online services
Video: how to find out the current screen resolution in Windows 10
What does resolution affect?
Screen resolution is the number of horizontal and vertical pixels. The larger it is, the clearer the picture becomes. On the other hand, high resolution creates a serious load on the processor and video card, since it has to process and display more pixels than at low resolution. Because of this, if the computer cannot cope with the load, it begins to freeze and generate errors. Therefore, it is recommended to reduce the resolution to increase the performance of the device.
It is worth considering what resolution is suitable for your monitor. Firstly, each monitor has a level above which it cannot raise the quality. For example, if the monitor is set to a maximum of 1280x1024, you won’t be able to set a higher resolution. Secondly, some formats may appear blurry if they are not suitable for the monitor. Even if you set a higher, but not suitable resolution, there will be more pixels, but the picture will only get worse.
Each monitor has its own resolution standards
As a rule, as the resolution increases, all objects and icons become smaller. But this can be fixed by adjusting the size of icons and elements in the system settings.
If you have multiple monitors connected to your computer, you will be able to set a different resolution for each of them.
Find out the set resolution
To find out what resolution is currently set, just follow these steps:
Open the “Display Settings” section
Let's see what resolution is currently set
Find out the native resolution
If you want to find out what resolution is the maximum or native for the monitor, then there are several options:
Find out the native screen resolution through the system parameters
How to change screen resolution in Windows 10
Changing the screen resolution is very easy, but you shouldn't do it often. The maximum number of pixels creates less strain on the eyes. The screen resolution is lower than recommended by the manufacturers; it is advisable to use it only for people with vision problems.
Using Windows 10 Settings
The easiest way to change screen resolution settings is by using options:
- In the “Resolution” sub-item, select what suits you and click “Apply”.
The “Apply” button will start changing the screen resolution - Confirmation of the action will be required, so when prompted by the system to save the parameters, click the “Save” button before the timer ends.
Otherwise, the setting will not be accepted and the resolution will return to its original point. Confirm changing parameters with the “Save” button
You can also change the screen resolution as follows:
- How to set up the screen on a computer and laptop in Windows 10
- In the Advanced Display Settings menu, click the Graphics Adapter Properties link.
Through additional options, open “Graphics adapter properties” - In the window that opens, click on the “List of all modes” button.
In the graphics adapter properties, click on “List all modes” - In the drop-down list of modes, select the required one and click “OK”.
Through the “List of Modes” you can also change the screen resolution
Using the Control Panel
“Control Panel” is an important tool for monitoring and configuring your computer. Therefore, the screen resolution can also be adjusted through the applets of this environment.
- Press the Win + R key combination, enter control and click OK.
Through the Run window, launch Control Panel - Change the "View" filter to "Small Icons" and after changing the view, select the "Screen" applet.
Through the “Control Panel”, enter the “Screen” applet - In the left column, click on “Setting screen resolution.”
Follow the link "Setting screen resolution" - Fill out the interface, which is similar to “Options”: select the resolution and click “OK” to save the changes.
Select the required value in the “Resolution” filter and click “OK”
In certain builds or after some OS updates, this method may not work, and the “Adjust screen resolution” item may result in the Windows Settings environment. The reason for this is the gradual abandonment of developers from the “Control Panel” and the transfer of all PC settings to Windows settings.
Video: how to change screen resolution in Windows 10
Changing the resolution
There are several ways to change the resolution. You don’t need third-party programs to do this; standard Windows 10 tools are enough. After you set the new resolution, the system will show you what it will look like for 15 seconds, after which a window will appear in which you will need to indicate whether to apply the changes or return to the previous settings.
Using system parameters
Open computer settings
Open the “System” block
Setting the extension, orientation and scale
Using the Control Panel
Open the “Control Panel”
Open the item “Setting screen resolution”
Setting monitor parameters
Video: how to set screen resolution
Why does the screen resolution change spontaneously?
There is only one reason why the screen resolution can change without user intervention - driver problems. But there are many reasons for errors to occur:
- the virus can damage system files;
- overheating can cause the video card to malfunction;
- launching many processes that consume video memory can cause problems with the video card;
- Malfunctions in the electrical network can damage the capacitors, and this will lead to instability in the operation of the video card.
As practice shows, some older games can also change the resolution of the entire screen. Moreover, they do this in such a way that when minimizing the game, the desktop resolution does not return to normal. In cases with such games, the only way to return the original parameters is to completely close the application.
How to solve the problem of self-changing screen resolution
In cases where it is necessary to replace capacitors or a general analysis of the video card and motherboard, it is worth seeking the help of specialists. You can deal with other problems yourself:
- Check the cooling of the video card and clean the system unit from dust.
- Scan your system for viruses. To achieve better results, use more than one antivirus.
- Install the latest video driver. You can download the software only from the manufacturer’s website or using the “Device Manager” from Microsoft servers:
- press the Win + R key combination, enter the command devmgmt.msc and click “OK”;
- in the “Device Manager”, open the “Video Adapters” tab, right-click on the device and select “Update Drivers”;
Update your video card driver via Device Manager - Click on “Automatic search...” and wait for the wizard to finish.
Select “Automatic search...” to allow the wizard to automatically find and install the driver
Restart your computer for the changes to take effect.
Video: how to update video card drivers in Windows 10
What problems may arise when adjusting screen resolution
There are two types of screen resolution problems that are most common:
- the resolution changes every time you restart the computer;
- The screen resolution cannot be changed at all.
If the resolution change occurs only after rebooting or resuming from sleep mode, the problem is in the system configuration settings:
- Press the Win + R key combination, enter the msconfig command and launch it with the “OK” button.
- In the configuration window, go to the “Download” tab and uncheck the “Basic video” item.
Accept the changes with the “OK” button. Uncheck the “Base Video” checkbox to fix the self-resizing screen resolution - Restart your computer.
The problem with the prohibition on changing the size of the screen extension is a little more complicated. The Group Policy Editor is responsible for enabling and disabling Windows settings. It is in this service that some changes need to be made.
- Press the Win + R key combination, enter the command gpedit.msc and click OK.
- In the column on the left, open the tabs along the path “User Configuration” - “Administrative Templates” - “Control Panel” - “Display Properties Window”.
“Group Policy Editor” is responsible for the functionality of Windows settings - Double-click on the “Disable display properties window...” setting, in the window that opens, change the parameter to “Not set” and save the changes with the “OK” button.
Select “Not configured” to disable the ability to change screen resolution - Restart your computer to activate the settings.
Screen extension is the number of pixels that the monitor contains vertically and horizontally. The quality and size of images, as well as their effect on the user’s vision, depend on it. That's why it's so important to be able to change and fix screen sizes in Windows 10.
- Instructions on how to change screen resolution in Windows 10
Screen resolution is a very important parameter of any computer and laptop. An incorrectly set resolution can result in image distortion and increased eye fatigue.
Typically, when installing video card drivers, the required correct resolution is automatically installed. But sometimes this doesn't happen.
How to view and find out the screen resolution set on your monitor in Windows 10 will be discussed in this article.
Special utilities
There are special utilities that cannot change the operating parameters of the computer and peripheral devices, but are able to collect detailed information on many aspects of operation and generate appropriate reports. The most famous of them include:
- Everest;
- AIDA64;
- PC Wizard;
- System Explorer;
- S.I.W.
These are great ways to find out all the ins and outs of your display, as a specific device with a specific identifier. Other information displayed includes interesting data such as the production date and total operating time.
Also here you will find the characteristics of individual modules, which is simply not present in the basic Windows tools. The only drawback of such programs is that for some reason none of them determines the type of matrix - there is no such item in the interface at all. Strange, right?
If this is your first time hearing about the matrix, I recommend reading the publication “What does a monitor consist of?” It may also be useful for you to learn how to choose the right monitor.
That's all for today. Share my publications on social networks and subscribe to the newsletter - it never hurts. Till tomorrow!
The quality and size of the image depends on the screen resolution. They, in turn, can reduce pressure on the eyes while working at the computer. But it happens that the screen resolution can change spontaneously and, on the contrary, cause discomfort.
Where can I see the screen resolution in Windows 10?
Most users, out of old habit from Windows 7 and Windows 8.1, try to see the set resolution of their monitor in personalization.
Personalization on Windows
For those who don't know, personalization is a desktop context menu item and also a control panel item.
In Windows 7, it was in it that you could see the screen resolution, but in Windows 10 the developers removed this feature.
Now viewing and adjusting the screen resolution is in the main settings of a computer with Windows 10, and is also included as a separate item in the desktop context menu.
- How to change computer screen resolution in Windows 10
To view and change the screen resolution in Windows 10, you need to right-click on an empty space on the desktop and select “Display Settings” in the menu that opens.
Display settings in Windows 10
In the window that opens there will be a “Resolution” line with all possible installation options. Opposite the recommended one will be written “(Recommended)”.
In some versions of Windows 10, in order to get to the viewing window and change the screen resolution, you must additionally click “Advanced screen settings” on the “Display” tab.
View screen resolution in Windows 10
The second way to view and change screen resolution in Windows 10 is through PC settings.
To enter them, you need to click on the icon with a message in the lower right corner of the screen near the clock and select “All options” in the menu that opens.
Entering Windows 10 Settings
Next, select “System”.
Menu item - “System”
After this, a familiar window will open with the option to view and change the screen resolution on Windows 10.
Author: · 05/12/2019
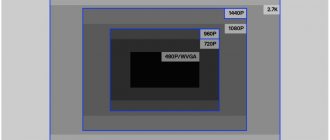
Screen resolution directly depends on the diagonal of the monitor (physical characteristics). It determines the number of dots (pixels) horizontally and vertically, as well as their ratio. The higher the resolution, the smaller the image on the screen and vice versa. For widescreen monitors you should choose one resolution, for “square” monitors - another.
If it was initially set incorrectly, the picture quality will be noticeably lower. These may be defects such as:
- black stripes on the sides;
- disproportionately “moved to the side” image;
- blurry, unclear picture (especially visible in the text);
- too large or, conversely, small icons, etc.
To prevent this from happening, the resolution must be set based on the technical characteristics of the device. You can find it out from the instructions or look at the manufacturer’s official website. As a rule, after downloading the latest version of drivers for the graphics adapter (video card), the computer will automatically install the recommended settings. If this does not happen, the user will have to do it manually. This article will discuss how to find out the screen resolution on Windows 10.
Standard Windows tools
Some monitor parameters can be found using the basic tools of Windows 10, 8 or 7. There are no fundamental differences in the names of menu items, since the changes in these versions affected the interface more than the OS structure itself.
You can quickly determine the model of your monitor by going to the control panel and selecting “Devices and Printers”, where you will find the monitor model, among others. The brand is usually indicated on the monitor itself - the company logo is centered below the screen.
Next, we follow the scheme described above - we look for the information that interests us on websites of relevant topics. Alas, there are no exact characteristics in the device description here.
You can find out a little more, as well as configure some parameters, using the ATI Catalyst Control Center utility or the Nvidia Control Panel, depending on the chip installed on your video card.
Additional installation of these programs is usually not required - they are installed on the PC simultaneously with the graphics accelerator drivers. In the relevant sections you can see the following technical characteristics of the display:
- Current and maximum resolution;
- Frame scanning frequency;
- Image orientation;
- Port used for connection;
- Color depth and color scheme used;
- Digital audio monitor support.
Determining the resolution
This parameter can be determined in several ways. The easiest and fastest way is through the desktop. For this:
- Right-click on an empty area (wallpaper) on the desktop. In the context menu that appears, select “Display Settings”.
- A new window will open with the current display settings. Here you indicate the resolution, scale, orientation (landscape, portrait, portrait format) of the monitor. If other screens are connected to the PC, they will appear in this menu. As for the main one, you can specify the desired parameters for them and turn them over.
There is another way to get to this menu. It is convenient to use if you have a laptop, and the key responsible for calling the context menu (via the right mouse button) does not work on the touchpad. For this:
- Call “Start” and start typing “Settings” in the list that appears. Select a classic app from the Best Match category. Or just click on the gear icon.
- Windows Settings will open. Find and click on the “System” category. She will be first on the list.
- By default, you will immediately be taken to a screen with the necessary settings. If this does not happen, then from the list on the left side of the window, click on “Display” so that the resolution is displayed on the right side.
- Or, on the main Windows Settings page, immediately start typing the keyword “Display” into the empty field to start the search automatically. From the options provided, select Change display settings.
The correct extension for the monitor will be opposite the digital designation. It is detected automatically if drivers for the video adapter are available.
If any other is selected, then it must be changed to the one recommended by the system. If not a single parameter has such an inscription, then this indicates the absence of drivers for the video adapter. In this case, you need to download them.
Find the maximum value
You can find out the maximum resolution using the AIDA64 application:
- Launch the utility and select “Display” in the window that opens.
- Go to “Monitor”.
- Switch to the desired screen if there are several of them installed.
- Find the line “Maximum resolution” and see the value.
How to change screen resolution on Windows 7
You can check the maximum display value without a special program using the system tools:
- Enter PC settings, press “Win + I”.
- Click on the “System” section.
- In the left column, select the “Display” line, and the desired value will be displayed on the right side.
Important! Data may vary if video card drivers are not installed on the laptop.
How to change
You can change the value to the desired one through the display parameters. You can get into them by following the instructions described above. Or you can use another method:
- Launch the Run system utility. It can be found through the Start menu or called by the Win + R key combination on the keyboard.
- In the window that opens, enter the command “desk.cpl” and click “OK” to bring up the display options.
- Screen options will open. Change the resolution through the appropriate category. To do this, click on the digital designation (which is currently installed) and select the desired parameter from the drop-down list.
- Similar actions can be done by scrolling down the page and clicking on “Graphics adapter properties.”
- A small window will appear in which you need to select the “Adapter” tab, and then click on the “List of all modes” button.
- All extensions available for the monitor are displayed here. Moreover, even those that are not available through the “Display” menu (for example, 1920x1080 Full HD). This is convenient if you want to set a non-standard parameter. Select the one you need, then click the “OK” button.
- Confirm to save your changes.
Please note that in the properties of the graphics adapter there will not be a corresponding inscription next to the recommended setting. Therefore, to check whether the selected setting is suitable for your computer, try switching to each one in turn. If you choose the right one, you will immediately notice improvements in image quality.
Disable turning off or dimming the screen
With prolonged inactivity, the display screen goes dark after a certain period, and after a few minutes the computer goes into sleep mode, turning off completely. In the system parameters, you can set the option to turn off sleep mode and screen dimming . To disable the energy saving mode, you need to perform a number of operations:
- Left-click on the “Start” button.
- Open Settings.
- Select the "System" section.
- Click on the “Power and Sleep” icon.
- Click the "Advanced power options" button.
- In the “Power Options” window, click on the “Configure power plan” button.
Select "Power Plan Settings" - In the “Turn off display” line, disable screen dimming when running on AC power or battery power. To do this, select “Never” from the drop-down lists.
Select "Never" from the drop-down list - Similarly, in the fields next to the “Put the computer into sleep mode” icon, disable putting the computer in the off state.
In the drop-down list, click on “Never” - Click "Save Changes".
When working with a standalone device, it is not recommended to disable screen dimming and sleep mode. Disabling will lead to faster battery drain and, as a result, to a decrease in the user's time working with a laptop or tablet.
Video: a non-standard way to disable screen dimming
One of the main criteria for a graphical interface is brightness, contrast and color gamut. The clearer the display of graphic objects looks, the more comfortable the work will be for the user. Therefore, do not neglect spending a few minutes in order to achieve maximum effect when displaying graphics and text documents. It should be remembered that incorrectly setting the screen parameters also affects the user’s visual system and can lead to a gradual deterioration of vision. To adjust the screen and fix minor problems with the image, you can use the methods given in this article. If they do not lead to the desired result, then you should contact the service center specialists.
Possible problems
By default, OS Windows (x32 Bit and x64 Bit) automatically determines the optimal screen settings. In some cases this does not happen, and when you try to specify the required extension manually, it is simply not in the list of available ones.
Most often this happens due to the lack of drivers for the graphics adapter or monitor (especially for non-standard devices). You can update them directly by downloading from the official website of the developer, or through special software.
Other reasons:
- If you are sure that the latest version of drivers is installed on your PC, then try installing the required extension through the properties of the graphics adapter (mode selection). The method is described above and is characterized by a wider selection of available resolutions.
- If you are using a non-standard monitor (applies to stationary PCs), then make sure that the drivers are loaded for it as well (not to be confused with the drivers for the video card). Some monitors require additional software to function fully. It can be downloaded from the manufacturer's official website.
A problem with choosing a resolution can arise when using low-quality adapters, adapters, or cables. Even if you are using a laptop and connecting an additional monitor to it via HDMI. In this case, try connecting the screen using a different method.
Sometimes the reason for a bad image on the screen is that the monitor diagonal (physical characteristic) does not match the screen resolution. In this case, try:
- Go to screen settings. To do this, open Start and start typing “Display” in the search field. From the list of found ones, select and run “Change display settings”.
What resolutions can the monitor support?
To find out what resolution the monitor supports, let’s turn to the already time-tested AIDA64. We launch the utility and go to the “Display” section, where you need to find “Video Modes”. The program will show all possible modes of the video adapter-screen combination. Here it is worth focusing on the fact that not all modes shown in the list will be available in the desktop settings. This is due to the limitations imposed by the operating system and its requirements for the graphics component of the computer. Yes, yes, don’t be surprised - the operating system also has minimum system requirements, like any software you run. And W7 will not run on screens that are worse than 800X600 pixels, although the matrix can provide many more modes.
Therefore, it would be more correct to ask: “What resolution can be set?”
To solve this issue, we will use the standard tools of the “desk.cpl” applet of the control panel, which was described above. So - by moving the resolution slider, you will see all the operating modes of your screen available at that moment, which seem to be a “compromise” between the capabilities of the hardware, drivers and OS requests.
A little about resolution in laptops
It would not be amiss to dwell separately on laptops - these are quite specific products that require a complete package of correctly selected drivers for correct operation. They may also use “interesting” technical solutions in terms of graphics - unusual resolution, non-standard aspect ratio, etc.
Most often, all of the methods listed are equally applicable to laptops, but there may be nuances when everything has been tried and nothing has worked.
Therefore, if all the drivers are installed, and none of the listed methods worked for you, then how to find out what monitor resolution on a laptop will be told by the manufacturer’s website or complete documents. In the case where there is no box or documents, the sticker on the rear roof may still be preserved. It always indicates the serial number and model of the device, according to which Internet search engines will definitely take you to a page with information about your laptop computer.
How to find out your video card model
To download drivers for a graphics adapter, you need to know the model of your video card. Without this information, you will not be able to download them manually, since automatic online device detection does not always do this accurately.
This can be done through a special utility dxdiag. To run it:
- Open Start and enter the name of the application. Then click on the found option.
- The DirectX Diagnostic Tools window appears. Here, go to the Screen tab. The “Device” block will indicate the name of the video card. In our case it is Nvidia GeForce GT 220M. Copy its name to find drivers. The block opposite will indicate additional information about the current software version and the date of the last update.
If dxdiag does not start or other problems occur during the process, then you can find out the video card model in another way, using standard tools from Microsoft. For this:
- Open “Options” and go to display settings (the method is described in the instructions above). Here, find the inscription “Graphics adapter properties” and click on it.
- Go to the "Adapter" tab. The “Type” and “Details” blocks will contain information about the video card model.
Knowing the name of the graphics adapter, you can download the driver from the manufacturer's official website. After this, you can set the optimal screen resolution on Windows.
where to find and see the maximum size of a computer and laptop monitor?
Screen resolution or resolution is the size of an image, expressed in horizontal and vertical pixels. The more pixels - the smallest image elements on the display - a picture consists of, the more pleasant it looks.
The optimal separation capacity is equal to the resolution of the monitor matrix - when each logical element of the picture corresponds to a physical pixel. Let's figure out how to find out the screen resolution on Windows 10 using the operating system and using third-party utilities.
Standard means
The operating system has many tools that allow you to display information about the monitor resolution.
System parameters
In Windows 10 settings, you can find out the used screen resolution in at least three ways. Let's describe everything, letting most people have enough of one thing - the simplest.
1. Open the settings window through the Start context menu, the Win + I key combination, the Start icon, or through the Notification Panel in the tray.
2. Click on the “System” section.
3. Alternatively, hold down Win + R, enter “desk.cpl” and click “OK”.
4. Another way is to right-click on a free area of the Desktop and select “Display Settings”.
The command can be executed in the search bar, Explorer address bar, Command Prompt, and PowerShell.
5. Scroll down the contents of the right side of the window to the “Scale and Layout” section. It contains data about the current screen separation ability.
6. If there is no text after the value “(recommended)”, you need to change the resolution to “native” for the display.
In the next “Multiple displays” block, click “Advanced settings...”, and in the window that opens you will see the current screen and Desktop resolution.
Control Panel
Relevant for older editions of Windows 10, the latest Microsoft updates are gradually moving away from the Control Panel, moving more and more settings to Settings.
- Open Control Panel, for example, through the Start context menu.
- Switch the view of its icons to icons and click on the “Screen” object.
You can also select “Screen Resolution” in the Desktop context menu if you are using Windows 10 before 1803.
If there is no section or item in the desktop drop-down menu, the option is not suitable for your version of the operating system.
- On the left side of the menu, activate the “Setting screen resolution” link. The required values will be displayed below.
Utilities for setting up video cards
Proprietary utilities from AMD, Nvidia and Intel will also display information about the set screen resolution and allow you to change it. To launch the graphics adapter control panel, open the desktop context menu and select:
- for an integrated video card from Intel - “Graphics characteristics”, go to the “Display” section;
- for accelerators from AMD - “Radeon Settings” → “Display” → “Characteristics”;
- Nvidia - “Nvidia Control Panel” → in the menu on the left, click “Display” → “Adjust size and position”.
Command line
Launch a command prompt and run the command “wmic desktopmonitor get screenheight, screenwidth”.
The first value is the number of pixels vertically, the second - horizontally.
DirectX Diagnostic Tool
1. Run the command “dxdiag” in the Win + R window or search bar.
2. Visit the “Screen” tab, in the first “Device” block, scroll down.
System Information
Windows information utility.
- Run the command “msinfo32” via search or Win + R.
- Expand the “Components” branch and click on the “Display” item.
Look for a line with separation ability and current frequency on the right side of the window.
Third Party Applications
Information utilities and programs for setting up a monitor will also show the monitor's separating ability, these methods are suitable for a computer and laptop.
Custom Resolution Utility
A simple and intuitive program for changing resolution, with its help you can change the screen settings or set your own resolution.
1. Go to the link https://www.monitortests.com/forum/Thread-Custom-Resolution-Utility-CRU and click “Download: cru-1.4.2.zip” to download the archive.
2. Run CRU.exe directly from the archive.
3. In the first form “Detailed resolution...” you will see a line with the monitor resolution.
AIDA64
Launch the program, expand the “Display” branch and click “Desktop”. Link to the program: https://www.aida64.com/downloads
MultiMonitor Tool
Launch the application, information is contained in the main window.
https://www.nirsoft.net/utils/multi_monitor_tool.html
Speccy
Look for information about the current resolution in the “Graphics devices” section.
There are many similar applications, but in this case they are all superfluous. Windows 10 has several tools that let you find out and change your screen resolution.
How to download drivers
Once you know your graphics adapter model, you can easily download and install the new version of the software manually. For this:
- In the search engine, enter the name of the video card manufacturer (for example, Nvidia) + drivers. Then go to the official website. To do this, click on the first suggested link from the search results.
- The browser will redirect you to the “Drivers” tab, but if this does not happen, then go to it yourself from the main page. Here, indicate the type, series and family of products, following the information received earlier and the OS version. Click on the big green "Search" button.
Why is there no required monitor resolution?
Drivers can affect the resolution setting. In addition, a similar problem often occurs with laptops, since they may have a non-standard resolution. In the latter case, it is recommended to try to find setup instructions on the manufacturer’s official website (most often it is there, but not always in Russian).
Incorrectly set screen resolution has a negative impact on health, so it is important to learn how to change this indicator manually. Anyone can handle this: in most cases, just select the desired resolution in the parameters.
Source
How to update drivers
You can find out the model of your video card and immediately update its drivers using standard Microsoft Windows capabilities as follows:
- In the Start menu, start typing “Control Panel”, and then launch the desktop application you found.
- For a more comfortable experience, change the way you view available options to large or small icons. Then find “Device Manager” in the list. Click on the inscription with the left mouse button to launch the application.
- In the window that opens, find the “Video adapters” category. Please note that depending on your computer, there may be several subcategories available. If any drivers were installed for the device, then the model name should be there (in our case it is Nvidia GeForce GT 220M). If they are not available, you will see the message “Unidentified device”.
- Right-click on the available adapter and select “Update driver” in the context menu.
- The update wizard will start. Select Automatic Search to have the OS check for updates online. Then wait for them to install.
- If you downloaded the distribution kit from the official website, disk or removable media, then click the second item: “Search for drivers on this computer.”
- Specify the path to the files. To do this, click the “Browse” button and select the folder with the downloaded drivers. Click Next to begin installation.
After the process is completed, the most optimal one for your screen will appear in the list of available resolutions. Remember that next to it there will be a corresponding “Recommended” inscription.
If you are already using the latest version of drivers, the system will display a message stating that the most suitable drivers are already installed on this PC. This notification may also indicate that Windows was unable to find updates. In this case, you can try to download them manually, through the official website (the method is described above).
Methods for measuring monitor diagonal
Manual diagonal measurement
Manual measurement. It is impossible to come up with a simpler and more reliable method - you will need a calculator and a ruler. Or a tape measure, a meter, a caliper (it’s a joke about the caliper, although you can also use it). We apply the tape measure to the corners of the screen and remember or write down the resulting value. You need to measure exactly the area where the information is displayed and not take into account the frames around the display. The resulting numbers need to be divided using a calculator by 2.54 and you will get the required inches. Some length measuring instruments are marked not only in millimeters and centimeters, but also in inches - then there is no need to divide.
Specialized programs
Specialized programs. AIDA64, SiSoft Sandra and similar diagnostic tools will help you find out the diagonal of your computer monitor without resorting to rulers. By going to the “Display” section (the name may differ for different software - we are looking for the most appropriate item in the program menu) where opposite the “Monitor” line will be the desired parameter. The program takes the value from its own database, so if the data is displayed incorrectly or is not there at all, we recommend using a newer version.
How to find out the monitor diagonal size using documentation?
If you still have the box from your device, then inspect it from all sides - usually in one of the corners there is a sign with a list where the manufacturer writes down the parameters.
Google to the rescue
Not necessarily, of course, Google, but using a search engine you can get to the equipment manufacturer’s website, where in the section of products manufactured by the company, select your model and see what’s what.
Factory sticker on the case
If the above methods are not suitable for some reason, you can try to inspect the device and look for a factory sticker on the case - the factory will have written down the basic data on it that you can use.
Method of mathematical solutions
For really desperate geometry lovers, we suggest using a method for solving a simple problem. Here the well-known ancient Greek philosopher and mathematician Pythagoras comes to the rescue with his famous theorem. It states that the sum of the squares of the legs of a triangle is equal to the square of its hypotenuse. In our case, the sides will be the vertical and horizontal of the display, and the hypothesis will be the value we are interested in. We perform simple calculations - we square the width and height separately, sum them up and extract the square root from the resulting number. If the ruler is graduated in millimeters, then divide the result by 2.54 and get inches.
* When applying rulers, tape measures, etc. to the display, be careful not to damage the matrix and its coating with sharp parts. Some screens are very fragile, and leaving a scratch is easy.
The first method is the most accurate and guarantees absolute accuracy of the result. You will take the measurement yourself and, with a careful approach to the matter, error will be eliminated.
Diagonal diagonal is different
When choosing an electronic friend based on display size, before finding out what diagonal the monitor has, you should pay attention to the aspect ratio. The total screen area with an aspect ratio of 4:3 is larger than that of 16:9. The first option is more suitable for typing documents, internet browsing, and office work with text files. The second format has a multimedia focus - large-format cinema, graphic editors, watching videos, video processing programs. Therefore, if you do not plan to work on a computer, then 16:9 will be the best choice - films will not be cut off at the edges with black stripes.
Other measurement methods
We hope that the methods we have proposed will be enough to find out the monitor diagonal in any situation, and we will not consider completely exotic ones. Let’s just list them for, so to speak, general educational purposes:
- Laser rangefinder.
- Use an object of known length.
- Odometer. This is a device for measuring length and distance, it is a wheel that needs to be rolled along a segment and the arrow of the device will show the distance traveled in millimeters.
How to find out the diagonal?
Sometimes you come across round or oval screens, then the indicator is taken as a line running between the points that are farthest from each other, which are opposite. Let's find out how to calculate how many inches there are in a monitor.