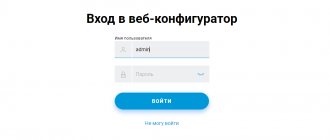
In this manual, I will tell you in detail how to reflash a Keenetic router of any model, starting from simple Start. 4G, Lite and ending with the most expensive ones - Extra, Giga, Ultra. I will show you the procedure for updating the WiFi router software - Keenetic OS - to the latest version through the device’s web interface. I’ll make a reservation right away that they deliberately do not show how to do this through the device’s command console, because the web interface provides all the possibilities for this, it is more convenient and simpler for both a beginner and a more advanced user. You can access the web interface from a computer or smartphone connected to the router’s network. To do this, you need to launch a browser and enter the address 192.168.1.1 in the search bar, or this domain name - my.keenetic.net. After this, an authorization window should appear in which you will need to enter your login and password. As a rule, login admin, factory password 1234. During initial setup, the device asks you to change the password, and therefore if you do not know it, you will not be able to access the web interface.
Updating the ZyXEL Keenetic router
Regardless of the specific model, the procedure for updating ZyXEL Keenetic routers in most cases comes down to the same steps. If you wish, you can resort to either a fully automatic method or by installing the software yourself in offline mode. On some devices, the interface may differ, requiring slightly different manipulations.
Read more: Firmware update on ZyXEL Keenetic 4G and Lite
Option 1: Web Interface
This method is the most optimal in most cases, as it requires a minimum number of steps to download and install updates. In this case, you need to configure the device to connect to the Internet in advance.
Note: Only newer and fully compatible firmware can be installed.
Alternative firmware - OpenWRT and From Oleg drivers
As with many other router models, there are other firmware versions for Zyxel Keenetic from third-party developers. The most popular are OpenWRT and the so-called “From Oleg”. In theory, they implement more functions than the standard branded one. However, their use was most relevant at the time when the Zyxel Keenetic firmware NDMS 1 and NDMS 2 was installed. However, much of what was in the custom versions was introduced into the modern Keenetic OS operating system. Plus, the interface of the OpenWRT control panel and “From Oleg” is not as intuitive as in Keenetic OS. Therefore, I would recommend using them only if you are well versed in all the intricacies of setting up a router.
Where to download Zyxel Keenetic firmware
The firmware for Zixel Kinetic and any other router is on the official page. It is recommended to take them there. If you don’t find it, you can take a chance and look on third-party resources, but be sure to check for viruses. Everything you need is located on the website https://www.zyxel.com/ru/ru/support/download_landing.shtml. Enter the specific model of your device and download a type called “Firmware”.
It is advisable to download the latest version. There are usually two options: version 1.0.0 and NDMS version v2.00. We look at the date of creation of the software and download it. Just in case, several options are loaded, if any.
The downloaded file is packed into an archive, from which you need to extract data with the .bin extension.
Reviews
Consumer opinions are radically divided. “Zixel Kinetic-Three”: device review” is a popular topic on the Internet, which says that there are many more supporters of using the Keenetic Lite device than opponents. Some user reviews note the following nuances:
- “I’ve been using Keenetic Lite III for more than a year, at first everything was fine, there were, of course, network “dumps”, but it was treated by rebooting or the “Off/On” button. After 17 months, especially the last of them, I started to get downright annoying. At least once a week there are disconnects, the cable is supposedly not connected, or something else! There were no such problems before. Yes, it was necessary to reboot once every 2-3 months, but this did not affect my nerves.
- “I bought keenetic lite-3 to replace my old router. I immediately liked the “hard” mode switch, the amplifier, the excellent adapter with an access point, and during the installation process, setting up the Zixel home router keenetic lite-3, which took a matter of seconds. An obvious disadvantage is that the WPS button cannot be disabled in access point mode. Of course, it’s not important for the home, but it’s not suitable for public places. Operating range, excellent signal, user-friendly interface and settings - great! The design of Keenetic Lite is super!”
- “Before I purchased the third Zixel, I had been using another router for several years, but I didn’t remember any positive emotions from working with it, so I decided to buy a new one. I wanted to find a reliable and high-quality one, but inexpensive, so that I could turn it on and forget it. I read about “Zixel” on a review site, liked everything, although I didn’t really trust the comments: everything looked too smooth. I bought Keenetic Lite for only 1,450 rubles, I won’t say that I like everything about it, but I don’t plan to buy a new one in the near future. So judge for yourself!”
How to update the firmware of a Zyxel Keenetic router
Firmware installation on Zyxel is quite easy. There are several ways to do this procedure.
The main method is to use an Ethernet cable connection. You can reflash via Wi-Fi, but it is not recommended.
Firstly, the flashing time is long, and secondly, something can happen to the equipment if the wireless network signal is lost and the process is interrupted. This option is used as a last resort.
Via the Internet online
This is a method for those who have a stable Internet connection on their Zyxel router, but for some reason need to flash it. Go to the control panel, then go to the “System” tab. Find the “System Information” block on the right. If there are updates for the device, the “Updates” line will say “Available”. Click on the link.
At the bottom, click the update button and wait for it to download and install. Everything happens automatically. At the end of the process, the word “No” is visible in the window next to the “Updates” line.
Also, during this procedure, sometimes an error occurs - “The maximum allowable firmware size has been exceeded by x kbytes.” You can simply try to reboot the router, and if that doesn’t work, use another method.
Via mobile application
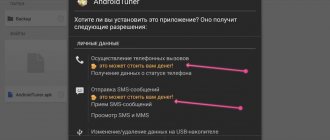
The Zyxel router is controlled remotely using a smartphone. For this purpose, there are Android programs ZyXEL Keenetic NetFriend or Zyxel My.Keenetic on the Play Market. The first option allows you to update the router software, the second changes the Wi-Fi settings. We proceed as follows:
- We download, launch and see a window informing us that the device is connected and ready to use. Just click OK.
- Connect to your wireless network.
- Next we choose a provider.
- Enter the username and password provided by your Internet service provider. If other information is provided, we enter that as well.
- The “Device Update” button should appear in the next window.
- The installation process will begin, and when everything is ready, an advice message will appear.
Offline without direct internet access
Another popular method of flashing firmware for the Zyxel Keenetic router is using a file without using the Internet.
It was indicated above where the Zyxel firmware files are downloaded from; the archive is unpacked to any convenient location on the computer.
We enter the control panel of the router. According to the standard, the IP address 192.168.1.1 is entered into the address bar, and the word admin is entered in both fields.
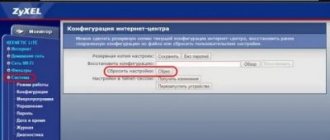
Now go to the “System” section, click on the “Configuration” tab. Find the firmware line and click on it. The File Management window opens. Click “Browse”, select the unpacked file with the .bin extension. Click “Replace”. Confirm the file replacement by clicking OK.
Next you need to wait a couple of minutes. Then in the “NDMS Version” block we see a different version of the installed firmware.
Possible malfunctions and ways to eliminate them
Any device is prone to problems and malfunctions, and the keenetic lite III is no exception. Failures, freezing and slowdown of the system are possible; it is impossible to foresee everything in advance, just as it is impossible to list the problems that arise with the router. The router system has a debugging mode; it is installed like this:
- Go to the “System” settings section.
- From there, go to the “Diagnostics” tab, where click on the “Start debugging” button.
After this, the corresponding icon will appear at the top of the system monitor; by clicking on it, you can observe and control the process, terminate it or start it again.
How to restore a Zyxel Keenetic router if the firmware has failed
If the Zyxel firmware crashes due to an unsuccessful update, which often occurs when the process breaks, there is a special recovery utility.
It is called Keenetic Recovery. This tool is designed for the Windows operating system and is capable of restoring the functionality of most Keenetic models.
It is recommended to download the necessary components from the website at https://help.keenetic.com/hc/ru/sections/203198569. Unpack the downloaded archive to a convenient location on your computer and run the file with the .exe extension.
If you are updating your Zyxel Keenetic router, it is recommended to disable your antivirus and firewall for the utility to work properly. There are frequent cases of program blocking.
Next, you should follow all the steps suggested by the Keenetic Recovery “Setup Wizard”.
If this option does not work, use a more complex method:
- We launch the utility from the downloaded archive.
- Find the fw folder in the directory. There are firmwares for various router models. Determine the version for your device. The file itself has the extension bin.
- Download the tftp server from the site https://www.tftpd64.com/tftpd32_download.html and install it on your PC.
- Transfer the firmware file from the archive to the installed server folder. We throw along the path C:Program FilesTftpd32.
- Let's start the server.
- We connect the router to the computer using a cable. Then we set the IP address in the network connection settings to 192.168.1.2, the subnet mask to 255.255.255.0.
- Press and hold the router reset button, and then turn on the device itself.
- Release the button when the indicators start flashing.
- In automatic mode, the router must receive the firmware file from the server.
- The update will occur in a few minutes, the device will restart and have a new software version.
- Reset network connection settings to default.
Where are the network connection settings:
- Open the Start menu and go to Control Panel.
- Go to the “Network and Internet” section.
- Click on the item “Network and Sharing Center” on the left.
- Click on the item “Change adapter settings”.
- Select the desired network and go to its properties.
- Double-click on the “IP version 4” option.
Settings
To configure the Zyxel Keenetic Start router, just connect a PC or laptop to the router, go to the browser and enter the IP address in the address bar of the device (marked on the router box).
If IP data is missing, you should specify the standard address for Zyxel Keenetic Start: 192.168.1.1. If problems arise during connection, it is recommended to adjust the combination of numbers: 192.168.0.1.
Upon successful login, the user will be prompted to set parameters in two ways - manual or automatic.
Manual setting
When starting the equipment for the first time, you should refer to the Start parameters. With this option, it is recommended to select “Web Configurator” rather than the quick setup type.
When you restart, the parameters are set in the “Internet” option (in the PPPoE/VPN tab). Here you will need to activate the “Add a new connection” option and adjust a number of settings:
- in the “Connection Settings” menu you will need to indicate the labels (in the first two fields);
- in the “Description” field, specify the connection name (any);
- “Protocol type” – PPPoE;
- “Connect via...” – Broadband connection;
- “Username” and “Password” - according to the data reflected in the agreement with the provider.
Keep the remaining parameters as default and commit the changes with the “Apply” option. Checking the connection status is available in the “Connections” section of the router. A label with a green mark next to the new name will indicate the correct operation of the data transmission channel.
Automatic setup
To set up automatically, just activate the “Quick setup” option and wait for the connection to be checked. In the field that opens (for authorization), you will need to specify your login and password. When using PPPoE, set o. If a different type of connection is used, then the login and password information must be entered manually (provided by your Internet service provider).
When you activate the “Next” option, you will have access to updates (if available, it is recommended to update). Upon completion of installation, the computer will reboot and fix the configuration. The PC and router cannot be turned off during the installation process.
Setting up “Internet” - the connection itself
Each company delivers Internet to its customers' homes using a specific protocol. Your task is to find out what this protocol is. It is not necessary to immediately call the company’s support. Most often, it is enough to open the agreement that you entered into with the operator when connecting to the Internet. Not only the protocol should be marked there, but also the information that needs to be entered in certain fields when setting up the router.
We will describe in detail how to create a connection on Zyxel Keenetic Start for each protocol (L2TP, PPTP, PPPoE, unique or automatic IP).
PPPoE protocol
Let's start analyzing the settings with one of the most popular standards:
- You need a block with Internet parameters - it is indicated by an icon in the form of a planet in the bottom row of icons.
Switch directly to the PPPoE/VPN category. Let's move on to creating the future connection. Click on the PPPoE tab and click on “Add” - Let's immediately include the first two points. The description can be left untouched. We set the protocol, of course, to PPPoE.
- We rewrite the user name on the network from the agreement with the operator.
After this we indicate the password. You can save immediately - you don’t have to change other parameters. Enter your operator's network name and password in the appropriate fields
L2TP and PPTP protocols
Next up are the protocols that relate to encrypted private networks (VPN):
- In the same PPPoE/VPN category, click on the gray button to add a connection.
- For the protocol, set either PPTP or L2TP - whichever your operator supports.
- Now we carefully rewrite the name and security key, and then set the server address of the provider’s private network.
- We do not touch the remaining parameters. The only thing is that you can set the IP manually if you took a separate service from the operator with a unique IP on the Internet.
- Be sure to save.
Set PPTP or L2TP in protocol
Unique IP (static) or automatic
This pair of standards needs to be configured in another category in the “Internet” block - in IPoE. Also click on “Add”. In the “IP Settings” menu, set either “Auto” or “Manual input”. In the first case, you just need to save the changes, and in the second, you need to additionally rewrite all the data from the contract (gateway, IP itself, subnet mask, a couple of DNS addresses).
Mark the port to which you connected the provider cord
Method 3: Automatic update via mobile app
The final method is to use the proprietary mobile application from Keenetic. It requires a connection to the router via Wi-Fi and allows you to automatically install updates without logging in to the web interface via a browser.
- Find My.Keenetic through the Google Play Market, install and run this application.
Connect to your network wirelessly or scan the QR code on the back of the router to access the control system.
You can now select a network to configure from the list.
Once selected, click on the gear icon to go to settings.
From the list of options, select Firmware.
Check the current version and make sure that an update is available, and then click on the “Device Update” button.
Wait for the download to complete and the necessary components to be added.
You will be notified that the updates have been installed successfully. Now you can proceed to further configure the router or finish working in the mobile application.
Firmware Zyxel Keenetic Giga is a process that will not take much time even for a novice user. You just need to choose the method you like and implement it, following the instructions given.
Describe what didn't work for you. Our specialists will try to answer as quickly as possible.
Connection
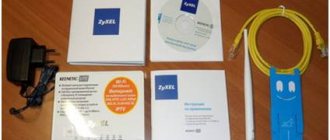
Before software configuration, you should perform hardware configuration (as for routers from other manufacturers). This means physically connecting the device to power, connecting network wires, etc. You can enter the settings of the Zyxel router using a wired or wireless connection.
Wired
For initial setup, it is recommended (both by the manufacturer and by experienced professionals) to use a wired connection and a personal computer or laptop:
- Plug in the power supply and connect it to the power socket of the router.
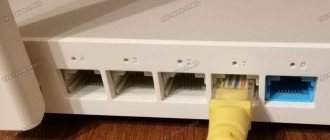
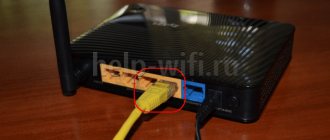
- Using a LAN cable, connect the computer and the router by connecting the wire to the LAN port.
- Make sure the LAN light on your router is active and blinking.
- On the computer, the LAN connector should be illuminated (on laptops, the indication is not present in all models).
Wired connection of the router to the computer:
Via Wi-Fi
If you decide to set up Zixel Kinetic and go into the router settings via a Wi-Fi connection, then follow these steps:
- Turn on the router (connect to the power supply).
- We use any device with a Wi-Fi adapter (computer, laptop, phone). We are looking for our network. It may bear a name with the name of the manufacturer.
- If you don’t know the name, or worse, the network password, and the standard factory one doesn’t work (you can see it on the device sticker at the bottom), then you should press the WPS button and within 2 minutes you can connect devices without a password.
Approximate wireless network data: