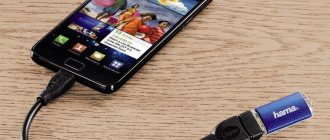
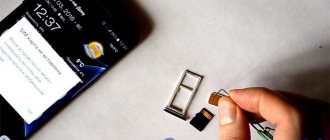
Almost all smartphones and tablets released in 2020-2021 have a large amount of built-in file memory, which is expandable thanks to a microSD card of 128 GB or more (mid-class models and flagships can work with flash drives). But among owners of older and affordable mobile gadgets with internal storage of 16 GB or even less, the issue of lack of free space is especially serious.
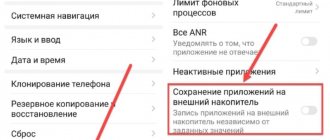
The instructions are useful for both beginners and experienced users. It will talk about transferring applications, both using standard means and using special applications that require root rights.
How to transfer applications to a memory card using accessible means
First, methods for older versions of Android will be presented, then we will describe in detail how to combine internal file storage and a memory card using the standard means of new versions of Android and MIUI, using a computer, and at the end we will describe methods that are suitable for users who already have root rights and have installed TWRP.
Since the earliest versions of Android, the system has had the ability to transfer most installed applications to the SD card. Instead, in Android 6.0 Marshmallow it became possible to use a memory card as an internal file drive. On smartphones and tablets running later versions of Android, combining an SD card with internal file storage disk space works on the same principle. The only thing is that some interface elements, menu items and settings sections have received slight visual changes.
Transferring applications on devices running earlier versions of Android
Let's look at how a standard function works on an old Samsung Galaxy phone based on Android 5.0:
Go to “Settings” - “Applications”. Depending on the manufacturer and firmware, the item may be called “Application Manager” or “All Applications”.
Select the downloaded game or application. If the app can be moved, the Move to SD card button will become active. Click on it.
If the button does not work, it means that the developer has prohibited installation of the application on the memory card and it will not be possible to move it using standard means.
There are no “Move to memory card” or “Change” buttons
These applications cannot be transferred to a memory card because the application developer did not provide such an option.
You can check whether your device supports transferring applications in the following way: download the game “Bejeweled Classic” from Electronic Arts from the Play Store, and try to transfer it to a memory card.
Screenshot from Play Store: icon and game name
If you managed to transfer the game “Bejeweled Classic”
Transferring apps to the memory card on your device works. Other applications are not portable because their developers did not provide this feature.
If you couldn't transfer the game "Bejeweled Classic"
There may be two reasons for this:
- The memory card is not inserted or is damaged - insert or replace the memory card.
- Your Android device is below version 4.2.2, which does not have this feature.
News, articles and publication announcements
AppMgr III (App 2 SD) for batch moving applications
In order not to open the settings of each game or program and see whether they can be moved or not, try it - in it, the moved applications are found in a separate tab.
Hold your finger on app cards to mark them. Select the ones you need and click on the folder icon at the top. In the new window, click the red arrow, which will take you to the application details page. To go to the settings of the next selected program or game, click on “Back”.
AppMgr III will also tell you which applications are best not to install on an external drive so that all functions work correctly.
Using an SD card as internal memory to transfer games and programs
This feature appeared in Android 6.0 and works on Android 7 Nougat, Android 8 Oreo, Android 9 Pie, Android 10 and Android 11. It allows you to use a memory card as a 2nd drive. That is, the flash card does not replace the internal file storage, but is combined with it - the volume of the built-in file memory is added to the capacity of the SD card. After expanding the storage, you can transfer photos, videos, music, files and, of course, applications to the memory card. But there is one point: in order for transferred applications to work quickly, the SD card must have a high write speed.
Data from a memory card formatted as an internal drive will not be read if you install it in another device. To use a microSD card in a new device, you need to format it as portable storage.
After connecting, a message will appear in the notification shade that a new memory card has been found. Simply click the “Configure” button, select “Internal memory” in the window that opens, and then follow the instructions. Don't forget to transfer files from the SD card to another storage device, because they will be deleted during the formatting process.
Instructions for setting up the card:
1. Go to “Settings” → “Storage” (may be called “Storage and USB drives” or “Memory”).
2. Click on “SD card”.
3. Open the menu by clicking on the three dots in the upper right corner and selecting “Settings” (in some firmware “Storage settings” or “Memory”).
4. Press the "Internal Memory" button.
5. A warning will appear on the screen that all data saved on the SD card will be deleted. Therefore, first copy them, and then proceed by clicking on “Clean up and format”.
6. If you are using a low-class flash card (for example, microSD Class 6), a message will appear on the screen that the memory card is working slowly.
See also: Date of announcement of the Meizu M6 smartphone and new Power Banks
7. Before completing the formatting process, you will be prompted to transfer some files and applications to the SD card. Select the option you need, click “Next” and then “Transfer”.
8. Finally, click on the “Done” button.
Now go to “Settings” → “Applications” → “Application details” (if this item is not there, proceed to the next step) and select the installed application or game.
Select the “Storage” subsection (or remember “Memory”), then click the “Change” button and select the SD card.
In the window that appears, click the “Move” button and wait until the transfer process is completed.
What to remember when transferring data to a memory card
As you know, a memory card (or SD card) is an important functional element of today's phones, allowing you to expand their data storage capabilities. Support for memory cards is built into the functionality of the Android operating system, allowing, starting from version 4.0, to save the data we need to the phone’s memory card.
| Features of SD cards: | Explanation: |
| Speed class | Each memory card has its own speed class. Using an SD card on a Samsung without the proper class can be convenient if we use it as the basic storage of the data we need. |
| Incorrect storage selection | Advanced features such as HD video recording, moving files or applications can lead to slowdowns, crashes or errors in the phone's operation. If you encounter similar problems when working with SD, purchase a faster card. |
| You can choose any volume | You can purchase an SD from 4 to 512 GB, insert it into your device, and save the data you need on it. It is important to familiarize yourself with the technical characteristics of the phone to understand the maximum storage capacity it supports. |
Below we will present instructions for moving files (photos, videos, applications, etc.) to an external card for Samsung phones based on Android 7.0 and later models.
This is useful to know: how to set up a camera on Samsung.
Moving applications to a flash card on Android 9, 10 and 11
The process of combining an SD card and internal file storage on stock Android 9, 10 and 11 is not much different from the similar procedure on Android 6, 7 and 8. The process of transferring games and applications has not changed at all compared to previous versions of operating systems. But some interface elements in new versions of the system have undergone some redesign.
You can still format a memory card in 2 ways:
by performing the initial setup of a newly connected SD card or using the built-in Settings function. In the first case, you need to open the notification panel, click on the alert containing the text “Tap to set up”, and then select “Phone storage” and follow further instructions.
If the memory card was already connected before, then the formatting process will be reduced to performing certain actions. Here's what you'll need:
To get started, go to “Settings”, then to the “Storage” section and select the SD card. If at this point you are asked to select an application to view files, do so. You can use the standard Files application or Google Files.
When the file manager opens, click on the three dots in the upper right corner, then select “Storage Settings” from the menu that opens.
After that, select the second type of formatting - “Internal memory” and click on the “SD card: format” button, which will appear on the screen inside the dialog box that opens.
The process of formatting the memory card will begin, which will end with a warning if the connected memory card is of a low class. It can also be applied, but the migrated applications may work with some delay in the future.
Next, you will be asked to transfer files to the memory card, including multimedia and some applications. If you click the "Transfer Content" button, the data transfer process will begin. Once completed, this may take some time. At the end, click the “Done” button.
If you want to choose which applications you want to transfer and which not, click on the “Transfer content later” button, and then click “Done”.
After formatting the flash card, applications downloaded from Google Play will be installed on the external drive themselves.
To manually transfer games and applications to the memory card, open the application manager (Settings → Apps and notifications → Show all apps). Next, find the required application in the list, open its settings and select the “Storage” subsection.
All you have to do is click on the “Change” button, select the SD card as the storage location for the application data and tap on “Move” in the next window.
Standard options for transferring programs on Android
On devices version 6.0, you can change the location of a particular program using the built-in functionality. The thing is that the SD card is considered by the device as an extension of the internal memory. For this reason, the move function is built into the firmware and is successfully used.
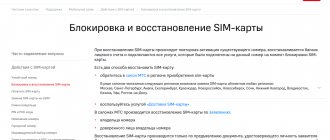
Android phone does not see SIM card - what to do
How to transfer applications to a memory card on Android using standard functionality:
- You need to open your phone settings.
- Go to the "Device" section and then "Applications".
- Each program is transferred separately, so you should find the one you need. The application menu opens with a short press.
- Go to the "Storage" section and then click the "Change" button.
- In the “Change storage location” window that appears, you can select internal memory or SD card.
- Wait for the transfer to complete.
Important! In different phone models, the algorithm of actions may change due to the characteristics of the system. It is recommended that you review the instructions for system data transfer for a specific smartphone in advance.
The standard transfer is similar on all models, but there are still some differences
Transfer apps to SD card on Xiaomi running MIUI
On Xiaomi, you cannot transfer applications to a memory card using built-in means - there is no this section in the system settings, and in the application settings there is no required button. But the function itself is not “cut out” from the MIUI firmware, which means that owners of Xiaomi smartphones have the opportunity to combine internal file storage and a memory card. It is necessary to use one loophole, getting to it in roundabout ways.
Also take into account the fact that during the formatting process, all data on the SD card will be erased. Therefore, take care of copying them to a PC or any other external file storage device.
Here we need the free Activity Launcher program, which can be downloaded and installed from Google Play. When you launch for the first time, accept the terms of the license agreement.
The main Activity Launcher window will display a list of all installed and preinstalled games and applications. Find the “Files” application (depending on the localization of MIUI, the program may be called “Documents”), click on it and select one of the 2 items in the list called “Downloads”. To make it easier to navigate: the identifier of the first process is com.android.documentsui.FilesActivity , the second one is com.android.documentsui.LauncherActivity .
The Downloads application will launch. Open the side menu and then select SD Card.
Click on the three dots displayed in the upper right corner, and then click on “Memory”.
A settings window will open with 2 items. Select the second one - “Internal memory”. In the window, click "Clean and Format".
The process of formatting the memory card will begin. As soon as it passes, you will be asked to transfer files, photos, some applications and other various types of data to the SD card. But this can be done later.
To immediately move the data to the memory card, select the “Move Now” option and click “Next”. Tap on “Transfer”.
When the data transfer is successful, the message “SD card device is ready for use” will be displayed on the screen. Click the “Done” button. After completing all the steps, applications downloaded from the Google Play Store will be automatically installed on the memory card.
If you select the second option, “Move later,” you can move applications manually. To do this, you will need to use the same Activity Launcher program. Launch it, find “Settings” and click on it. In the drop-down list, select one of the 3 “All applications” processes. Their IDs:
com.android.settings.Settings$AllApplicationsActivity. com.android.settings.Settings$ManageApplicationsActivity. com.android.settings.applications.ManageApplications.
A list of all system processes, as well as pre-installed and downloaded games and applications will appear on the screen. Find the application you want to move to the flash card and open its settings. After that, select "Storage".
See also: How to recover photos, videos, archives using Recuva?
Click the “Change” button, select the SD card, then click the “Move” button, after which the application transfer will begin.
Methods for transferring applications
When transferring applications to a flash drive, you need a memory card with high data transfer speeds. It is best if the media is class 10. Otherwise, programs will launch in slow motion. The transfer process will not give the desired result.
There are few ways. The choice depends on the firmware of the portable device. It remains to be seen whether the phone supports this option.
- Moving using standard Android OS tools. This option is appropriate if the device firmware supports the option. In this case, the use of OS tools is optimal: the system knows how to do it better.
- Transfer when using applications. This option is appropriate for those whose firmware does not have the ability to transfer application data and software to external media. Third-party utilities can do this.
There are 2 transfer methods. It is worth dwelling on them in detail, since the process is complex and requires preliminary preparation.
How to move apps to memory card on Samsung Galaxy
Owners of Samsung Galaxy mobile gadgets can transfer applications using standard means. The only thing notable about the transfer function on smartphones and tablets to One UI is that for it to work you will have to enable developer mode and perform some actions.
To get started, open Settings, scroll to the bottom of the list and go to the Phone Information section. Next, go to the “Software Information” subsection.
Tap on the “Build number” line seven times, after which a message will appear with the text “Developer mode is enabled.”
Return to the main settings menu and go to the new Developer Options section. Scroll the list to the “Applications” block and turn on the toggle switch located in the “Allow saving to external drives” line.
After completing all these steps, the app transfer feature will appear. To start moving games and applications, return to the main settings menu and open the Applications section. Next, find the game or application whose data you want to transfer to the SD card and open its settings.
Open the “Memory” subsection, click on the “Change” button and select “Memory card” in the “Change storage location” window.
Next, click the “Move” button, the data transfer process will start.
How to return a memory card to its original state
Problems with external media are not uncommon. If there is a large amount of information on it, it is actively used, then there is a possibility that, over time, malfunctions will appear in its operation. This doesn't mean it needs to be thrown away. There is always the option to restore microSD.
What you need
To perform recovery, you must connect the card to the PC
- Computer or laptop with Windows OS;
- Connection to PC to card.
You can connect it via a card reader or USB card reader.
Formatting a memory card as an internal drive using a computer
If Android 6, 7, 8, 9, 10 or 11 is installed on a mobile gadget, and there is no section in the settings menu for formatting the SD card as internal file storage, this means that the manufacturer has not added this function to the firmware. But users can format the memory card themselves thanks to the ADB utility.
To do this, enable USB debugging on your mobile gadget, connect it to your PC and run ADB from the command line or from Windows PowerShell, if one of the latest builds of Windows 10 is installed on your PC. Enter the following command and press “Enter” (in the Windows PowerShell window add ./ before the command).
adb shell
The console will launch and the $ . Enter the command and press “Enter”:
sm list-disks
The SD card identifier of the form disk:XXX,XX will appear in the line below. Replace XXX,XX with the value of the resulting identifier and run the command:
sm partition disk:XXX,XX private
Wait until the command finishes executing. Next, go to Settings → Storage and select SD card. Open the list of options by clicking on the three dots in the upper right corner, then click the “Transfer data” button.
Click the “Transfer” button and wait for the process to complete. Finally, click the “Done” button.
How to move multiple apps to SD card on Android 8 Oreo, 9 Pie, 10 and 11
In order not to perform the same steps to transfer applications separately, the AppMgr III (App 2 SD) application, which we talked about at the beginning of the article, will come in handy. Only on Android 8 Oreo, Android 9 Pie, Android 10 and Android 11 you will have to give AppMgr III several permissions.
Launch the application. A notification will pop up that the program needs access to your usage history. Click on “Allow”, select AppMgr III from the list of applications, turn on the switch and return to the application. You can also configure access to your usage history by going to “Settings” → “Applications and notifications” → “Advanced settings” (“Advanced” on Android 9, 10 and 11) → “Special access” → “Access to usage history” (“ Access to data" on Android 9, 10 and 11).
Select the games and applications that you want to move to the flash card and click on the folders with the arrow inside. In the “Move to Map” window, click on the red button below.
A message appears that AppMgr III needs permission to change system settings. Tap on the switch, which will take you to the settings section. Turn on the toggle switch and go back. The options for this permission are located along the path “Settings” → “Applications and notifications” → “Advanced settings” (“Advanced” on Android 9, 10 and 11) → “Special access” → “Change system settings”.
You will then be prompted to allow AppMgr III to automatically perform actions without confirmation for each application. Click on “YES”, go to the “Accessibility” section, select “AppMgr III”, switch the toggle switch to “ON” and confirm by clicking “OK”. Return to the program.
Application transfer will begin immediately
When the process is finished, it will be shown that the applications have been moved to the memory card.
Transfer games from cache to SD card on Android
Most of the user memory is occupied by the cache of installed games. To move it, it will help, which can mount directories from internal memory to external memory. Root rights are required for it to work.
Download FolderMount from Google Play, launch it and give it Superuser rights.
In the “List of Pairs” tab at the top, click on “+”.
Come up with and enter the name of the folder pair in the first line.
See also: Specifications of the HTC Ocean Harmony gadget are known
Click on the second one, after which the built-in file manager will open. The game cache is located in the “Android/obb” directory, and the application cache in “Android/data”. Go to the folder you want to mount and click on the checkmark.
The screen will ask if you would like to create the destination folder automatically. Click on "YES" if you agree. In this case, FolderMount will copy the path from the internal file storage and create the same on the external drive. Click on "NO" if you want to manually set the mount endpoint and select the folder where you want to move the files.
To start the copying process, click on the checkbox and confirm the transfer in the next window.
The process will be displayed in the notification bar.
When copying is complete, switch the toggle switch on the “List of Pairs” tab to mount.
At the bottom there will be a button with a pin image, click on it and all directories will be mounted at once.
To move files back from the destination folder to the source folder, first unmount the pairs. To do this, turn off the toggle switch or tap on the crossed out pin, then hold your finger on the pair and click on the trash can icon.
Mounting cache folders
The second way is to mount folders. Physically, the cache is stored on MicroSD, and the device’s memory contains only the images necessary for proper operation. At its core, these are like shortcuts in Windows; files are stored on one local drive, but accessed from another. Actions are performed using the FolderMount application (Root rights are required, otherwise the program will not work). The mounting process is simple and consists of several steps in which two folders are linked together.
- Open the application and click on the plus button.
- In the window that appears, fill in the information in three fields:
- “Name” – the name of the mounted folder (not necessarily exact).
- “Source” is the path to the folder whose data needs to be moved.
- “Destination” is the path to the folder on the MicroSD where the transferred data will be stored.
- We confirm the choice and agree with the warning about transferring files, wait for the operation to complete.
- Activate the mount by pressing the pin button. After this, the files in both folders are linked together.
Please note that file managers will report duplicate files in your linked folders. In fact, the information is contained only on the MicroSD, and the internal memory contains images. To delete an application whose cache was transferred to the memory card, first unmount the folder. To do this, click on the pin of the previously linked pair, then long press, after which the basket shortcut will appear. The data will be moved to the original directory and deleted.
The free version of FolderMount is limited compared to PRO, and offers 3 mount points. But even this is enough to free up space from the heaviest applications.
Memory card partitioning on Android via TWRP
If TWRP is already installed on your device, partition the SD card using it. To do this, go to Recovery and click on “Advanced”.
Select "Partition SD card".
Oh and click on the “OK” button.
Select the file system of the ext-partition to be created and specify its size. For example, 2048 MB - this memory will become available for transferring applications and the volume of the SD card will be reduced by so many megabytes. Leave the Swap partition size (swap file) at 0.
Pull the slider to begin marking the flash card.
At the end, click the “Reboot System” and “Do Not Install” buttons if you do not want to download the official TWRP application.
The device will reboot. If you go to “Settings” → “Memory” (“Storage” in the latest versions of Android), you will see that the microSD size has decreased. The second section will only “see” Link2SD, App 2 SD and similar applications.
Danger of the problem
Tablets and smartphones today have different sizes of built-in memory. True, given the abundance of applications and the ability to connect different gadgets, the main memory may not be enough.
Of course, in our age, everyone understands that the elementary solution here is to connect an SD card, because today phones store not only contacts, but also a lot of useful and entertaining things.
So modern microSD can add up to 8 GB of memory, microSDHC - up to 32 GB, microSDXC - optimally offer 64 or 128 GB, but the most expensive of them can accommodate 2 TB of information.
For comparison, music downloaded to a phone usually weighs 3-10 MB, a photograph on a smartphone takes 1-5 MB, and a movie of the poorest quality starts from 700 MB. Not to mention games for smartphones. In general, when purchasing a card, you will, of course, be guided not only by the capabilities of your device, but also by your needs.
It just happens that the card is finally inserted, the problem should get better, but here it is again: you download the application from the Play Market, and it again goes to the smartphone’s memory.
Clearing the cache is only a temporary measure. So why doesn't Android want to save to the card? The issue of forcing files to be moved to an external card directly depends on the OS version.
How to create a hidden partition on an SD card using AParted
The second method allows you to split the memory card into two sections if you already have Superuser rights, but no TWRP:
Download from Play Market. If the version downloaded from Google Play does not work, find the .apk file of the application on the Internet, download it and install it, allowing the installation of applications from unknown sources.
Go to “Settings” → “Memory”, click “Disable memory card” and confirm the action.
Launch AParted and grant root access.
There are two bars on the “Create” tab: the top one will show the new partition, and the bottom one will show the current size of the flash card and its file system.
Click on "ADD" to create the first partition. This will be a new size of memory card where you can save your photos, music, videos and other files. Leave the checkbox next to “Format”, select the fat32 file system and specify the size. To set it more precisely, click on the number next to “MB”, enter the required value and click “OK”.
Click “ADD” again and create a second hidden partition where games and applications will be transferred. Pull the slider all the way, leave o and select the ext file system.
Click on “APPLY” and in the warning window that appears, select “OK”.
The microSD separation process will start.
Upon completion, two sections will appear on the second line.
Now connect the memory card through the settings menu if this does not happen automatically. Her new size should appear there.
Working with Link2SD
Open Link2SD and give the program Superuser rights.
A window will immediately appear asking you to select the file system of the hidden SD card partition. Check the desired ext version and click OK. If the window does not appear, open the menu on the left and click on “Recreate mount script”.
Next, click the “Reboot device” button to mount the second partition of the memory card. Next will be a reboot.
After starting Android, go to Link2SD, click on the three dots in the upper right corner and select “Multiple”.
Check the required applications and open the menu again. Click on "Submit".
Next, select which application files you want to transfer to the second partition of the SD card. You can only move data files using the paid version of the Link2SD application.
There is also the “Move to SD card” function, which moves applications using the standard apps2sd method, which is not available to users whose devices do not have the Link2SD utility installed.
If you need to move one game or program, find it in the list, click on it and select “Send” or “Move to SD card”.
In order to move applications back, select them and click on “Return” or “Move to phone”. If you need to merge partitions, simply format the SD card in the “Settings” → “Memory” menu.