Author of the article
Vladimir Novoselov aka Rescator
Technical support specialist, PHP programmer, WordPress developer
After the failure of the Rt-Ac52u version, which sold poorly due to its price, the Asus company tried to work out the bugs and Asus Rt-Ac51u entered the market. This is the same dual-band device, with the exception of the external design and the absence of several goodies in the package.
Connecting a router
Unlike the previous model, the router is placed on a table or hung on the wall to save space (feet and ears are provided). The company's engineers did not reinvent the wheel, so the sticker does not contain particularly important information.
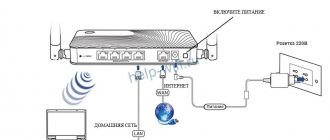
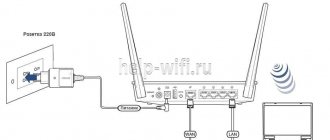
The cable (provider) from the computer is switched to the blue socket, the free port of the network card is connected with a patch cord (from the kit) to any of the yellow sockets.
Setting up the Asus Rt-Ac51u router is also supported via a wireless network. After turning it on, 2 more networks will appear in the device search - Asus and Asus 5G. Respectively 2.4 GHz and 5 GHz.
The power cable is plugged into the appropriate socket and the other end is connected to a 220V network. Then press the power button located next to the indicators on the front panel. After a couple of seconds, the power diode lights up steadily - the device is ready.
Appearance and hardware platform
The packaging of the device contains comprehensive information about what the device is capable of: it has a USB port, supports cloud technologies, modern modems and a high-speed wireless network. Among other things, the manufacturer promises support for IPv6 and Windows 8 (although it’s time to prepare for Windows 10, which was released on July 29, 2015). Inside the box there is the router itself, a power supply, an eight-core patch cord, instructions, a warranty card and a CD with an electronic version of the instructions and utilities. The power supply, unfortunately, is not vertically oriented, like some other ASUS routers, although the instructions show a vertical power supply.
The appearance of the router is typical for its family, except that its surface is completely matte and the antennas are not removable.
On the rear panel there is a button to reset user settings, turn off the power, a power connector, a USB 2.0 port, a customizable WPS/Wi-Fi button, a WAN port and four LAN ports.
On the top panel there are indicators of the operation of all interfaces. There are numerous ventilation holes on the side walls of the case and the bottom. Also on the bottom panel there are cross-shaped technological holes for wall mounting of the router.
The electronics of the ASUS RT-AC51U wireless router consists of one green textolite board, the main elements of which are located on both sides. On the bottom surface there is a Spansion FL128SAIF00 flash memory module with a capacity of 16 MB.
The system is built on the basis of the MediaTek MT7620A SoC processor and the MediaTek MT7610EN wireless chip. The RAM is a DDR2 module Winbond W9751G6KB-25 with a capacity of 64 MB. We have already encountered such components before, for example, in the ASUS RP-AC52 repeater.
Let's now move on to studying the software capabilities of the device.
Authorization in the admin panel
Although a disk is included in the package, it does not contain any drivers or configuration programs. Everything is done via a web interface.
Enter the address https://192.168.1.1 in the browser. The default login and password for Asus Rt-Ac51u is admin. When prompted, enter them into both fields. After pressing “Enter” the user is taken to the settings menu.
It may be in English, but the language switches in the upper right corner. Select Russian from the drop-down list. Naturally, with an English start, the button on the invitation will be “Sign in”.
Web Interface Overview
After rebooting the ASUS RT-AC51U, the administrator will be given the opportunity to fine-tune the device. Let's list all the menu items in order: Network Map, Guest Network, Traffic Manager, Parental Controls, USB Application, AiCloud 2.0, Wireless Network, Local Network, Internet, IPv6, VPN, Firewall, Administration, System Log and Network Utilities.
The network map, as always, is a handy tool for accessing frequently used network settings and connected devices. In the “Internet Status” group, you can see the connection characteristics and enable the ability to reserve a connection to the Internet via a connected 3G/4G modem. In the wireless network status, you can set security parameters and see the load level of the router itself.
In the list of clients, in addition to typical information, you can simply click on the MAC address to find out the manufacturer of a specific device. Moreover, this information will be relevant regardless of the device firmware version, because the request goes to an external database of MAC addresses of network equipment manufacturers. Also here you can assign a unique icon to each connected device and reserve the received address for it.
Using the “Guest Network” item, you can enable up to three guest networks for each frequency range (six networks in total) with individual security settings, the ability to configure intranet access restrictions and a MAC address filter. It is noteworthy that you can set the duration of the guest network without fear of forgetting to turn it off.
The traffic manager is responsible for configuring the quality of service of transmitted data and monitoring traffic consumption. QoS can be configured either manually or automatically, indicating the maximum speed according to the tariff plan.
In traffic monitoring, you can assess the load on wired and wireless networks both in real time and view the history of traffic consumption over the last 24 hours and for each day.
Parental control allows you to easily limit the access of specific devices (for example, children’s smartphones and tablets) to the Internet at certain times every day. Access is completely disabled, without the ability to create black or white lists of sites. On the page containing parental control settings, there is a link to a video explaining how this option works.
The “USB application” section, in our opinion, is the most interesting. It provides access to six different modes of using the USB port at once. You can use all modes by connecting the necessary devices via a USB hub. These devices can be printers, MFPs, modems and external storage devices.
Support for 3G/4G modems in the device is not present “for show”; the ASUS RT-AC51U wireless router allows you to use the modem as the main or automatically connected backup channel. The list of supported modems is constantly expanding, the most popular models are supported. However, we were unable to get a couple of modems on hand to work, for example, the Huawei E5830, although they were successfully detected. It is worth noting that these modems are not in the list of compatible modems. Naturally, we reported this to the manufacturer, so we hope to see their support in future firmware versions. The latest firmware versions now support phones based on the Android operating system as a 3G/4G modem.
The printers support two printing protocols: LPR and ASUS EZ. If everything is clear with the first, then the second is an easy-to-set up program for Windows operating systems, which also allows you to use the scanner in an MFP. And, unlike modems, printer support in our case turned out to be better. Even though the tested Epson L800 model was not on the compatibility list (but other Epson L series printers were), printing was successful immediately after setting up the printer according to the instructions provided on the ASUS support site.
And finally, support for USB drives turned out to be the widest. Using the ASUS RT-AC51U wireless router, you can organize shared access to user data via FTP and Samba protocols, configure access to the same data via the Internet, and also using a mobile application.
Among other things, the Download Master and Media Server applications are available for installation, the latest versions of which are downloaded from the Internet and installed on the selected USB drive. The first can be used to download files from HTTP and FTP resources, BitTorrent networks, eDonkey and even the little-known Usenet. The download manager web interface is located at https://192.168.1.1:8081/downloadmaster/.
Another advantage of the download manager is the utility for Windows, which is registered in the system as the default client for BitTorrent and Usenet files. Using the same utility, you can install extensions for Chrome/IE browsers to directly download files through Download Master without having to visit its web interface.
When using Download Master, the user may encounter an error that hides downloads from the list almost immediately after adding them. Re-adding downloads to the queue is accompanied by a message indicating that the job is in the queue. By connecting via Samba or FTP, you can find the files you want to download in the /Download/Complete folder with a size of zero. This error may occur after a firmware update, so the manufacturer recommends reinstalling Download Master every time after updating the firmware.
The multimedia server, in turn, allows home devices to access media content using DLNA and iTunes standards. The web interface of this service is available at the following address https://192.168.1.1:8081/mediaserverui/. It has virtually no settings, does not divide content into categories, and by default makes all drives connected to the router available for use.
AiDisk technology provides remote access to external drives connected to the router. To configure it, you need to contact the settings wizard, which will configure the necessary rights and open the ports. Also, if you wish, you can register your name in the ASUS DDNS service for free and receive an address like myrouter.asuscomm.com.
Local and remote synchronization settings are placed in a separate section called “AiCloud 2.0”. It includes tools for synchronizing files between a USB drive and the ASUS cloud, as well as for synchronizing files between two ASUS devices with AiCloud 2.0 support via the Internet. It is worth noting that the main function of this cloud is access to files and folders from the global network, and not only to data on the disk connected to the router, but to files and folders located on network drives of computers on the local network. An additional option is the WoL (Wake on LAN) function, which allows you to turn on your computer remotely. It is also worth noting the availability of software clients for working with AiCloud for Android devices, as well as iPhone and iPad.
The wireless network settings are quite typical for a dual-band device that supports the 802.11AC standard.
In the “Local Network” item, you can set only parameters related to the functioning of the IPv4 protocol; IPv6 settings are placed in a separate section. It is possible to create routes manually and receive them from the provider's DHCP server. It is possible to allocate one or two ports for connecting IPTV set-top boxes.
In the “Switch control” tab, the NAT hardware acceleration function is available, which is increasingly found in older models of ASUS routers.
Among the settings related to connecting to the Internet, the following connection types are available: static settings, DHCP, PPPoE, L2TP and PPTP, and the latter allows you to connect to VPN servers even with 128-bit MPPE encryption. There is also a useful option “Extend the TTL value”, which allows you to connect to the networks of providers that prohibit the use of routers on the client side. Technically, such a prohibition is implemented by setting the field value TTL=1 in packets sent to the client. We have already reviewed this technology earlier in our review of the ASUS RT-N11P wireless router.
This section also contains settings for port forwarding, DMZ, DDNS and NAT Passthrough. Although using the AiDisk service uses certain ports on the external interface of the router, they are not visible in the port forwarding table, and you can only see a warning about a possible port conflict if you try to use them manually. Manual forwarding will take precedence.
As mentioned earlier, all IPv6 settings are placed in a separate section of the same name. The following connection types are supported: static and dynamic addresses (Stateful and Stateless), as well as 6to4, 6in4 and 6rd tunnels.
A nice feature was the presence of a built-in VPN server that works using the PPTP protocol with MSCHAPv2 authorization and MPPE encryption with a key length of up to 128 bits. Clients can also use an OpenVPN server with a higher level of protection and a number of security settings.
In addition to the VPN server function, the VPN client function is available. This functionality may be in demand if you need to connect remotely to a corporate network. The following protocols are supported: OpenVPN, PPTP and L2TP.
Among the Firewall settings, both classic protection options are available - protection against DoS attacks, prohibiting sending echo replies via the ICMP protocol, filtering sites by URL addresses, as well as more advanced ones - filtering pages by keywords (except for compressed pages and the HTTPS protocol) and filter by ports.
In the same menu item, IPv6 traffic filtering is configured. By default, all outgoing and reply IPv6 traffic is allowed, but incoming traffic must be allowed separately.
The “Administration” menu item allows you to select the device operating mode: wireless router or access point; specify the administrator password, configure time synchronization, enable or disable telnet access.
In the same menu item, you can check for a new firmware version, make an archive copy of the settings, or reset the user settings of the device.
The system log in the device is divided into several categories: general output of messages from all running services, wireless network, DHCP, IPv6, routing table, port forwarding table and NAT translation table.
Among the network utilities you can find the following: ping, traceroute, nslookup, netstat, as well as the Wake-On-Lan function, which allows you to save MAC addresses of devices, which will certainly be useful, since now the administrator does not need to enter MAC addresses manually.
This concludes our review of the capabilities of the device’s web interface and moves on to its command line.
Quick setup
If the router is being configured for the first time or has previously been reset to factory settings, the user will be greeted by the “Quick Internet Setup” wizard.
It is functional and simple, allowing you to set up an Internet connection and a wireless network in a few steps. Its capabilities are familiar from earlier AsusWRT firmware. A user who wants to control the entire process needs to immediately close it and go to the main settings window.
How to reset your Asus router
There are two ways to reset all settings to factory settings: from the administrative panel and using the reset button on the device body. We will discuss software reset later.
The reset button is not always easy to find
And resetting the settings using the button is very simple - you need to find it on the back or bottom panel. It is often recessed in such a way that it could only be reached with something like a pen or paper clip. Pressing once will activate the reset process. Sometimes you will need to hold the button down for a while. In any case, it is better to clarify this point in the router manual.
Manual setting
The instructions suggest starting the setup of the Asus Rt-Ac51u by connecting to the Internet. To do this, go to the page of the same name in the “Additional settings” block of the right menu.
Often on forums, users complain that the provider changes settings without warning, so several possible connection options are shown below.
PPTP
Beeline, which connects users via PPTP, is particularly zealous in this matter, so let's start with it. The provider's TP says that this is done for preventive purposes (to catch inactive accounts).
The provider's standard PPTP setup looks like this:
- connection type: PPTP;
- WAN IP address: Obtain automatically;
- DNS WAN: Obtain automatically;
- account setup: Login and password provided by the provider;
- special requirements from the supplier are written “tp.internet.beeline.ru”.
PPTP (static)
Setting up PPTP with a static IP address is slightly different, but depends on the provider.
- Connection type: Static IP;
- WAN IP address: taken from the agreement with the provider;
- DNS WAN: specified in the contract;
- account setup: from the contract;
- special requirements from the service provider: no;
- It is recommended to clone the computer's MAC address.
L2TP
Algorithm:
- Connection type: L2TP;
- The IP address and DNS are issued by the provider;
- To set up an account, you will need the username and password from the agreement;
- There are no special requirements from the service provider. But it is recommended to clone the MAC address of the computer.
All data is provided by the provider, with the exception of the login, which is in the user’s documents.
L2TP (static)
L2TP with static IP address:
- connection type: Static IP;
- WAN IP address: taken from the agreement with the provider;
- DNS WAN: specified in the contract or provided automatically (depending on the provider);
- account setup: Login and password are issued by the provider;
- special requirements from the service provider: MAC binding.
RRPoE
Such a connection is often offered by Rostelecom. Setting up PPPoE comes down to specifying a username and password. Everything else switches to automation.
- Connection type: PPPoE;
- WAN IP address: automatic;
- DNS WAN: automatically (specified in the contract);
- account setup: Login and password are in the contract;
- special requirements from the service provider: It is mandatory to clone the MAC from your computer!
PPPoE (static)
The PPPoE configuration with a static IP address takes a little longer.
- Connection type: PPPoE;
- WAN IP address: taken from the agreement with the provider;
- DNS WAN: specified in the contract;
- account setup: Login and password are in the contract;
- special requirements from the service provider: you must clone the MAC from your computer!
Specifications of ASUS model RT-AC51U
- Network standards IEEE 802.11a, IEEE 802.11b, IEEE 802.11g, IEEE 802.11n, IEEE 802.11ac, IPv4, IPv6
- Product category
AC750 complete AC performance : 300+433 Mbps - Wi-Fi coverage area
Medium homes - Data transfer speed
802.11n: up to 300 Mbps 802.11ac: up to 433 Mbps - Antennas
External 5 dBi antenna x 2 Internal PCB antenna x 1 - Transmission/reception
MIMO technology 2.4 GHz 1 x 1 5 GHz 1 x 1 - RAM
8 MB Flash 64 MB RAM - Operating frequency
2.4 GHz / 5 GHz - Encryption
64-bit WEP, 128-bit WEP, WPA2-PSK, WPA-PSK, WPA-Enterprise, WPA2-Enterprise, Radius with 802.1x, WPS support - Firewall and access control
Firewall:SPI intrusion detection Access control:Guest access, Parental control, Network service filter, URL/Port filter - WAN Connection Type
Internet connection type : Automatic IP, Static IP, PPPoE(MPPE supported), PPTP, L2TP Dual Link support Multicast Proxy support - Connectors
RJ45 for 10/100 BaseT for WAN x 1, RJ45 for 10/100 BaseT for LAN x 4 USB 2.0 x 1 - Features
SmartQoS - WMM - User definable rules for IP/MAC/Port - Upload and download bandwidth management - ACK/SYN/FIN/RST/ICMP with highest priority Parental Control Guest Network: 2.4 GHz x 3, 5 GHz x 3 VPN server: IPSec Pass-Through, PPTP Pass-Through, L2TP Pass-Through, PPTP Server, OpenVPN Server VPN client : PPTP client, L2TP client, OpenVPN client Enhanced media server (AiPlayer app compatible) - Image : Jpeg - Audio : mp3, wma, wav, pcm, mp4, lpcm, ogg — Video : asf, avi, divx, mpeg, mpg, ts, vob, wmv, mkv, mov AiCloud personal cloud service 3G/4G data sharing Printer Server — Multifunctional printer support (Windows only) — LPR protocol support Download Master — Support bt, nzb, http, ed2k — Support encryption, DHT, PEX and magnet link — Upload and download bandwidth control — Download scheduling AiDisk file server — Samba and FTP server with account management IPTV support - Button
, Reset Button, Power Button - LED Indicator
USB x 1 LAN x 1 Wi-Fi x 1 WAN x 1 Power x 1 - Power supply
AC Input: 110V~240V(50~60Hz) DC Output: 12 V with max. 1 A current - OS support
Windows 7 32-bit/64-bit Windows 8 32-bit/64-bit Windows® 10 Windows Vista 32-bit/64-bit Windows® 8.1 Windows 2000 Windows XP 32-bit/64-bit Mac OS X 10.4 or higher Mac OS X 10.1 or higher Mac OS X 10.x or higher Windows® Server 2003 Windows® Server 2008 Mac OS X 10.6 Mac OS X 10.7 Mac OS X 10.8 Mac OS X Linux Kernel (Support Ubuntu only) Linux AndroidTM - Dimensions
189 x 129 x 36 ~ mm (L x W x H) - Weight
270 g - Equipment
.RT-AC51U Wireless-AC750 Cloud Router .RJ-45 Cable .Power Adapter .Quick Start Guide .Warranty Card .Support CD (User manual & Utility software) - Operating modes
Wireless router mode Access point mode
ASUSWRT GUI
A convenient graphical interface ASUSWRT is designed for monitoring and configuring network parameters. Setting up an ASUS router via the ASUSWRT interface is an extremely simple process that takes just a few minutes. Dual WAN technology allows you to simultaneously use two sources of Internet connection (two IPS) to balance the load or use one of the connections as a backup. Do you prefer gaming or streaming videos? The Quality of Service (QoS) technology implemented in the RT-AC51 router allows you to specify the priority for the use of Internet channel bandwidth by various applications. The graphical interface helps you visually monitor network traffic.
ASUS Router app
Using the separate ASUS Router mobile app, which has an intuitive interface, you can change router settings, monitor network traffic, diagnose connection problems and update firmware code.
Supports high-speed Wi-Fi 802.11ac and 256QAM™ technology
The 802.11ac module installed in the RT-AC51 router, which supports data transfer rates of 433 Mbps in the 5 GHz band and 300 Mbps in the 2.4 GHz band, allows you to enjoy the benefits of fifth-generation Wi-Fi technology.
Dual frequency band support
The 802.11ac module installed in the RT-AC51 router, which supports data transfer rates of 433 Mbps in the 5 GHz band and 300 Mbps in the 2.4 GHz band, allows you to enjoy the benefits of fifth-generation Wi-Fi technology.
Wi-Fi setup
A lit WAN diode indicates that the provider has accepted your settings. It is suggested to open some address in the next browser tab (for example, yandex.ru) and check the connection. If everything is successful, you can complete the setup. But if WI-FI was used to communicate with the device, now is the time to check it, install protection, and configure wireless clients.
The network rises when turned on, but a wired connection is recommended to set it up. During the security configuration process, the router will restart the wireless network, and for further work the user will have to connect his device (laptop, tablet) again, using a new name and password.
By going to the “Wireless Network” block in the left menu, you get to the “General” page. We configure the Asus Rt-Ac51u router to work with wireless clients of this page.
Since both networks have the same settings, we will use the picture only for one - 5 GHz. The selection of ranges is made in the “Frequency range” drop-down list. The 5 GHz grid is selected.
- SSID is the name of the network; home devices can use it to find the router.
- Hide SSID—if set to “Yes,” the network will disappear from the search. For devices that previously connected to it, the connection will remain available.
- The next row of settings can be left untouched, with the exception of “Channel”. When operating two networks, the channels must be different so as not to create layers, which will lead to connection problems.
- “Authentication method” is set to maximum - WPA2-Personal.
- The AES “WPA key cipher” is more modern, the keys are longer. Usually chosen by the router itself.
- "WPA Preshared Key". Here you enter a password that will need to be entered on all devices when trying to connect to this network.
- You don’t have to touch the rotation - it works if only the field above remains empty.
- Next, click “Apply”. The parameters of the second range are set similarly.
The remaining pages of the section allow you to enable additional functions, but you can configure them only if you clearly understand what is being done and why.
Testing
Traditionally, we decided to start this section by establishing the router boot time, by which we mean the time interval that elapsed from the moment power was applied to the devices until the first echo response was received via the ICMP protocol. The ASUS RT-AC51U wireless router boots in 41 seconds. We consider this a normal result.
The second, no less traditional test was checking the device’s security, performed using the Positive Technologies XSpider 7.7 network security scanner (Demo build 3100). A total of 15 open ports were detected. The most interesting information discovered is presented below.
Before moving directly to load testing, we would like to introduce our readers to the main parameters of the test bench.
| Component | PC | Laptop |
| Motherboard | ASUS Maximus VI Extreme | ASUS M60J |
| CPU | Intel Core i7 4790K 4 GHz | Intel Core i7 720QM 1.6 GHz |
| RAM | DDR3 PC3-10700 SEC 32 GB | DDR3 PC3-10700 SEC 16 GB |
| LAN card | Intel PRO/1000 PT ASUS PCE-AC68 | Atheros AR8131 ASUS RT-AC66U |
| operating system | Windows 7 x64 SP1 Rus | Windows 7 x64 SP1 Rus |
The network address translation (NAT/PAT) function of the RT-AC51U router can be disabled, so we measured the device’s performance both when performing simple routing and routing with NAT/PAT. In the latter case, measurements were carried out in two modes: with hardware acceleration enabled and disabled. For testing, the JPerf utility version 2.0.2 was used. Measurements were made for 1, 5 and 15 simultaneous TCP connections
At first glance, using hardware acceleration does not bring any noticeable increase in routing speed, however, enabling hardware acceleration frees up the processor to perform other tasks.
We couldn't ignore the router's support for PPTP/L2TP/PPPoE tunnels. Typically, PPTP performance is the lowest, so we decided to carry out measurements using this connection. The measurement results are presented in the diagram below. Testing was carried out both with and without MPPE128 encryption.
In addition to supporting the current version of the IP protocol – IPv4, the ASUS RT-AC51U wireless router also supports the next version of this protocol – IPv6.
The presence of a USB port allows you to connect external storage devices to the model under test: flash cards or hard drives with a USB interface. Access speeds for user data located on such an external drive are presented in the diagram below. For measurements, we used our external hard drive Transcend StoreJet 25M3 with a capacity of 750 GB, formatted in the following file systems: FAT32, NTFS and EXT2/3.
Obviously, the bottleneck in this case is the wired Fast Ethernet interface.
We also decided to measure the performance of the Download Master application running on the router. For measurement, we decided to use one of the popular torrent distributions, the volume of which was approximately 2 GB. First, we downloaded this file using a torrent client installed on a computer connected to the LAN port of the RT-AC51U router. The measured speed was about 11 MB/s, which is similar to Fast Ethernet performance. We then connected the external hard drive to the router and started booting on it. The speed demonstrated by the device largely depended on the file system used. Thus, for the NTFS partition we received an average download speed of 1.3 MB/s, while using the EXT3 partition showed an average speed of 2.1 MB/s. The graphs below show the loading of the external interface of the router while Download Master is running for both file systems. It is worth noting that the ASUS RT-AC51U processor load during the test was consistently 100%, which gives us reason to believe that the obtained speeds are limited precisely by the performance of the router itself.
Finally, we got to measuring the performance of the router's wireless module. First, we took measurements for one pair of client devices: one wired and one wireless node. It seemed to us that the obtained speeds were again limited by the Fast Ethernet interface, so we decided to add a second pair of client devices in order to load the wireless segment of the network to the maximum. The measurement results for both frequency ranges are presented below.
During all our tests, the temperature of the router case did not rise above 33°C, while the air temperature in the room was 25°C.
This concludes the testing section and moves on to summing up the results.
IPTV
Having specified the basic parameters, proceed to setting up the TV. It is located in the “Local Network” block, “IPTV” page. It is recommended to set the parameters as indicated in the picture.
You need to enable IGMP at the bottom of the page. It is important to understand that “Select IPTV/STB port” will redirect all TV traffic to the specified port. If the user wants to watch TV from several devices, it is better not to change this.
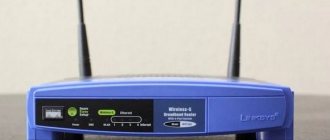
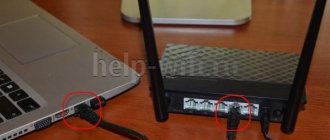
External interface of the Asus router
Externally, almost all routers from Asus look the same, with the exception of models with a unique design. In the simplest case, it is a box in a horizontal position with status indicators placed on it. Depending on the configuration, there may be from 1 to 6 antennas. Typically, the more antennas, the better the quality of the received signal, which means the higher the stability of the connection. The back contains LAN ports, WAN ports, power connector, USB and reset button. In general, this is what any classic router looks like now.
The rear panel usually contains a standard set of connectors and interfaces
Firmware update
As usual, Asus offers instructions, drivers and new firmware for all its products on its website.
- Go to the official website of the manufacturer https://www.asus.com/ru/Networking/RTAC51U/HelpDesk_Download/.
- Next, select the BIOS & FIRMWARE section. The page offers new firmware Asus Rt-Ac51u.
- After downloading the firmware, return to the router admin panel, “Administration” section.
- On the “System” page there are password settings for logging into the web interface.
- The “Firmware Update” page is intended for working with firmware.
- Read the notes about the work in the section. Using the “Select file” button you need to specify the location of the downloaded firmware. Then click “Submit”.
- The router will begin installing the firmware, and then reboot with the new version of the program.
Do not turn off the router during the firmware update process. This will damage the device.
Conclusion
The AC51U model from ASUS is not new on the market, but the device supports modern data transfer standards, has small dimensions and an attractive price, which has decreased significantly in recent years. The device is not suitable for building a high-speed wired network, but it is quite suitable for basic home use.
pros
The AC51U router, according to consumers, has the following advantages:
- practical design and high quality workmanship;
- multifunctional firmware and the ability to replace it with an alternative one;
- the ability to expand capabilities thanks to the presence of console access and a USB port;
- the most affordable router with support for the 802.11ac protocol among ASUS models;
- support for two frequency ranges is provided;
Minuses
The AC51U router from ASUS is marked with the following negative ratings, namely:
- budget MediaTek MT7620A chipset, considered obsolete;
- lack of gigabit network ports;
- AC51U from ASUS is not the most budget network equipment with these characteristics on the market;
- Standard firmware with flaws.
What is the secret of Padavan firmware?
Installing and configuring the Padavan firmware corrects these shortcomings, and also often opens up new functions in the Asus router that were not present in their native software.
- Many bugs and problems solved
- Improved stability
- Additional software utilities such as torrent client, Aria2 download manager, UPnP/DLNA A/V media server and others
- Expanded diagnostic capabilities
- Improved IGMP Snooping mechanism
- Built-in NFS server
- Added L2TP/OpenVPN server
- Improved IPv6/PPTP/L2TP components
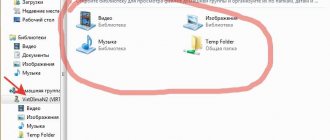
What do the router indicators tell you?
Each light on the front panel of the router has several meanings. Knowing them, you can determine exactly how many devices are connected, at what frequency the router operates, whether the connection is made using the WPS function, and much more. Let's start looking from left to right (see picture below). The first four icons (number 1) are dedicated to the LAN network and light up when a device is connected to a specific LAN port. The absence of an indication means that nothing is connected to this port or there are problems with the connection (with the cable, the device itself, or the port). Under the number 2 there is an Internet icon, which indicates the operation of the WAN port. No indication means that nothing is connected to the port or there are connection problems. The number 3 shows the USB port indicator. If it is on, the device is connected and working; if not, then nothing is connected to the port or there are problems with the device. The number 4 indicates wireless network indicators at 2.4 GHz and 5 GHz frequencies. These indicators, unlike the previous ones, have three meanings. A lit indicator means that the Wi-Fi network is working at a given frequency, a dark indicator means the network is turned off, a blinking indicator means that the network is working and data is being transferred through it.
The last one in the row, numbered five, is the power indicator. It has even more meanings: on and off states, as well as blinking. If the indicator blinks quickly, this indicates that devices are connected via WPS; if it blinks slowly, then the router is in recovery mode after launching the corresponding function in the admin panel.