Setting up a router as a WiFi access point is useful for expanding an existing wireless network from another router. In general, there are several similar router operating modes that can be used to strengthen the signal. In particular, as a repeater, in which the auxiliary router receives the Internet from the main router via WiFi and then distributes it wirelessly.
What is the difference between the access point mode on the router?
Access point mode differs from it in that two routers are connected to each other via cable. Such a connection is more stable, which means that losses in signal quality and final speed within the network are reduced. That is, if you want to increase the WiFi reception area and at the same time minimize the negative aspects, then you should configure the second router as an access point connected via wire.
Another reason to use this method is when you have an old router with a weak WiFi module, but with standard LAN ports that support speeds of up to 100 or 1000 Mbit/s. This means that the speed via cable will be adequate, but via a wireless signal it will no longer meet modern requirements. In this case, you can just take a more modern router with fast WiFi and configure it as an access point.
For a router or access point, placement is key
Routers connect to access points using Ethernet cables and then transmit the same wireless signal. Having a cluttered cord at home or at work isn't ideal, so equipment like HomePlug adapters is practical. Using mains power to transfer data from one outlet to another, the access point can be located anywhere within reach of an outlet. Consider using apps to measure Wi-Fi signal strength when deciding where to place your hotspot and determining where the signal starts to drop.
How to set up a router as a WiFi access point?
To configure a wifi router as an access point, you must perform the following steps, universal for all models and manufacturers:
- Plug the router into a power outlet
- Insert the cable into the LAN connector on the auxiliary device and into the same LAN port on the main one, which is already transmitting a signal
- Connect via WiFi to the second router, go to its settings and enable access point mode
- Set up a wireless network and save settings
But the menu on routers from different companies is different, so let’s take a closer look at the most popular ones
Peculiarities
What is Access Point (AP) Mode? We will talk about the features in the context of comparison with the router mode.
You can watch a video about the differences between the devices:
- Let's consider this situation. At home there is a wired network, computers, a printer, a TV set-top box are connected to the router by cable - all LAN ports are occupied. And we need to connect another smartphone and laptop, while they are in another room, where the signal from the existing network is poor. We turn on the access point mode on the additional router, connect both devices and the issue is resolved - without unnecessary wires, all home devices are combined into one network and gain access to the Internet.
- To connect to the Internet, you may need connection settings. For Access Point Mode you will have to run them on each device. In router mode, the setup is done once - a wireless network is created and then you can connect to it.
- A router, unlike an access point, has network protection against attacks and the ability to limit traffic. Of course, this requires you to make the appropriate settings, but it's worth it - you will get protection from network attacks, you will be able to determine the speed for certain devices and enable traffic prioritization.
- There are more options in router mode, but this means that it is more difficult to configure. Here you can set a name for the wireless network and create a password for it. You can forward ports, enable parental controls, many devices have the ability to create a guest network, and much more.
- The access point, as an independent device, does not distribute IP, does not connect to the provider - it simply receives the Internet from the router and distributes it further “over the air”. However, some can do all this, but they also have their own nuances, and the cost of such access points will be comparable to the price of routers. Therefore, in such a situation, it is better to buy a full-fledged router.
In this section I want to briefly tell you in what modes the router can operate:
- Wireless router – organizing access to the Internet via Wi-Fi using one wired connection for several users.
- Access point mode – converts a wired connection to a wireless one.
- Booster mode – to increase the Wi-Fi signal coverage area, while the network name and security key will be the same.
- Bridge mode is convenient for creating a separate network using an existing one, but with its own name and network key.
- Client mode - the router works as a wireless adapter to connect additional devices to the local network.
What you need to remember is that you can make an access point from a router, but vice versa - not.
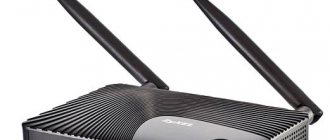
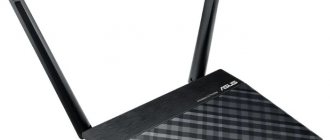
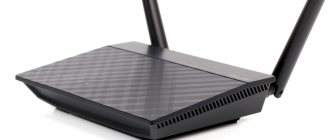
Asus router as a wireless access point (AP, Access Point)
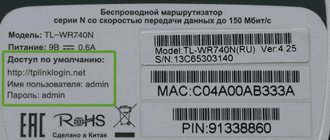
On the Asus router, we need to open the “Administration” section and select the “Operation Mode” tab. It is necessary to check the box for “Access Point” or “Access point mode/AiMesh router in access point mode” depending on the translation and modification. That is, if your model supports seamless WiFi roaming, it will be automatically activated in this mode.
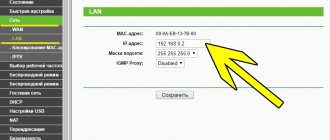
Next, we assign an IP address for the access point. Since the device will be connected to an already existing local network, it must have its own address assigned in accordance with the settings of the main router. That is, if it has an address of 192.168.1.1, then it must be registered in the “Main gateway” section. And for an Asus router in point mode, write “192.168.1.2”, “192.168.1.3”, etc. - any other one from the range allowed in DHCP and not occupied by another device.
Finally, set the network name and password to connect to WiFi
Save the settings and wait for the reboot. After which you can connect to the Internet via a wireless signal.
What is your opinion: is WiFi harmful?
Yes
22.91%
No
77.09%
Voted: 36472
Definition
Before we talk about access point mode, we need to remember what it is. Access Point (AP) is a wireless station that is designed to connect “over the air” to an existing network or to create a new one.
Most often, APs are used to provide access to the local network to mobile devices - tablets, smartphones, laptops, etc. To transfer information, a set of communication standards for communication in a wireless local network is used - IEEE 802.11.
All routers can operate in Access Point mode. In addition, there are devices on the network equipment market that operate exclusively as access points. This is useful if, for example, you have a large house and the router does not cover the required area with the signal. Then the access point will play the role of a repeater and expand the Wi-Fi zone.
So, AP is just an access point. A router is a multifunctional device that not only receives and transmits data, but also redistributes it according to the rules, and also performs a number of tasks.
I wrote in detail about the differences between an access point and a router here.
Netis router as a wireless access point
On Netis, setting up this mode is a little more difficult - approximately the same as on Asus routers. We need to go to "Anvansed"
And open the “Wi-Fi Settings” subsection in the “Wireless Mode” menu. Here we are interested in the following points:
- Radio mode - select “Access Point”
- SSID - coming up with a name for the future wifi network
- Broadcast SSID - set “On”
- Authentication type - select WPA2/PSK
- Password - set the key to connect to the signal
What is better to choose for installation at home?
Outdoor Wi-Fi access point: description, installation process
To understand what is best to use at home or at work in a small office, you need to familiarize yourself with the information given in the comparative table of characteristics:
| Routers, routers | Access point |
| After connecting the Wi-Fi router via a network cable and making the settings once, the user will no longer need to configure a separate PC or smartphone. It’s easy enough to connect to a wireless network from all devices. | Each device located in the access point’s wireless network must be additionally entered into the provider’s settings. |
| To work with some highly specialized interfaces or programs, you may additionally need to forward ports on your network equipment. This is due to the inability to “see” the internal IP address of paired devices. | APs broadcast traffic as transparently as possible, which is good for solving some highly specialized problems. The IP address of the paired device is available without any additional settings. |
| In a few clicks, you can independently organize your home network: the router will play the role of a DCHP server, distribute IP addresses within the network, users will only have to hide with a specific wireless network | You can also organize a home network using an access point, but you just have to tinker a lot. It is also quite possible that you will need to additionally request additional IP addresses from your Internet provider. |
| If the user needs a high speed wireless connection, then you can always connect the PC to the network cable directly via a network cable, which will improve the performance. | The vast majority of APs do not have a wired data transfer interface to end devices, and wireless connection speeds may not suit everyone. |
| Routers have more advanced functionality - a firewall, a built-in firewall, which guarantees improved network protection. | APs are not equipped with any tools to protect the network, with the exception of ordinary traffic encryption. |
TP-Link router for home use
At home and in the office, it is better to use routers and routers, since their functionality is expanded, and there are budget modifications made from good materials.
For your information! Having a personal account allows you to set the necessary parameters for the smooth operation of network equipment.
Wireless bridge (WDS mode)
This mode is used to establish a wireless bridge between two networks. A very useful mode when it is necessary to connect two physically separated networks, for example, in two neighboring buildings, when the cost of laying the cable is expensive or it is simply physically impossible to lay the cable. As shown in the figure, two APs are required.
There are APs that are sold specifically designed to work in this mode. As a rule, they are mounted on the facade of buildings and structures and must be made of materials that can withstand the conditions outside.
In the photo above, the AP is installed outside along with the plane, and shows the readiness of a wireless bridge consisting of two APs in order to connect two buildings.
This mode is not part of the WiFi standard, so it is recommended that the two devices that form the wireless bridge be the same model .
In the two figures above you can view the parameters of a Wi-Fi bridge from two different manufacturers. It can be noted that the parameters that need to be specified are channel, usage, channel width, MAC address of the access point to which the connection is made to establish the bridge, security type and key. Please note that no WiFi device can connect to this configuration. AP in bridge mode you can communicate with the AP at the other end of the bridge.
Please be aware that this communication method is not optimal from a performance standpoint. Therefore, this solution is only used if cabling is not possible or the cost is high. To understand this includes a graphical representation of the performance of a cable wireless bridge obtained using the iperf application.
For five streams simultaneously, the Ethernet cable provides speeds of about 90 Mbps (left), and the bridge delivers speeds of about 16 Mbps (right).
Reasons for lack of Internet in hotspot mode
Having done everything correctly, a person may still encounter difficulties, which include issues related to:
- network blocking by antiviruses and firewalls;
- impact on the system and its parameters of the virus;
- errors in the operating system.
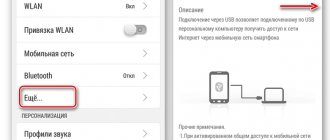
How to create an access point on iPhone: setting up Wi-Fi in a smartphone
Antivirus programs that protect the device in real time often block all network connections. Before creating and enabling an AP, you should configure or disable the firewall in the same settings.
Viruses can enter a device with applications that were not installed from official sources. To eliminate them, the antivirus, on the contrary, should be turned on and checked the system with a simple scan. If this does not help, then you can install a stronger program.
Important! You can track the virus program yourself. To do this, you need to go to the application (task) manager and find out which non-system software has the rights to control network connections and remove it. After that, turn on the device again and check the connection.
Another option is to reset all phone settings to factory settings. To do this you need:
- Go to Settings;
- Select “General” or “Phone Settings” - “Reset”;
- Perform a reset and wait for the procedure to complete.
Router Connection Guide
To configure the router normally, you need to have information about the type of connection. It is prescribed in the contract concluded with the provider.
It is also important to determine whether the binding will be done to the physical address of the device. If the connection is Point to point protocol over Ethernet (PPPoE)/Layer 2 Tunneling Protocol (L2TP)/Point-to-Point Tunneling Protocol (PPTP), then you will usually also need an IP address and other personal data. All this data is available in the contract.
First of all, you need to read the router instructions. Then the device must be connected to the network. A power source is used for this. The indicators may not light up when turned on. In this case, you need to press the button on the back of the router. She starts the device.
The back panel for connecting the router to the network and cable looks like this:
Modes and features of setting up a Wi-Fi network
Wi-Fi standards:
801.11 is an IEEE standard that defines media access and provides physical layer specifications for wireless local area networks with speeds up to 2 Mbps. The 802.11 standard covers DSSS and FHSS high-frequency radio channels, as well as infrared channels. 802.11a is an edition of the IEEE 802.11 standard that covers networks operating at speeds up to 54 Mbit/s using DSSS technology. 802.11b is an edition of the IEEE 802.11 standard that covers networks operating at speeds up to 11 Mbit/s using DSSS technology. 802.1lg is an edition of the IEEE 802.11 standard that covers networks operating at speeds up to 54 Mbps using DSSS technology, backward compatible with the 802.11b standard. 802.1li is an IEEE standard related to wireless network security. It combines 802.1x and TKIP/CCMP protocols to provide user authentication, confidentiality and data integrity in wireless LANs. 802.1x is an IEEE standard for authentication and access control at the data link layer. Access point - A type of base station that a wireless local area network uses to enable wireless users to interact with the wired network and roam within a building.
AD HOC MODE
(peer-to-peer network mode) - a wireless network configuration in which users can directly establish connections between their devices, without the need of a base station. Wireless personal and local networks can operate in this mode.
The main advantage of this mode is its simplicity of organization: it does not require additional equipment (access point).
The mode can be used to create temporary networks for data transmission. However, you must keep in mind that Ad Hoc mode allows you to establish a connection at a speed of no more than 11 Mbit/s, regardless of the equipment used. The actual data exchange speed will be lower and will be no more than 11/N Mbit/s, where N is the number of devices on the network. The communication range is no more than one hundred meters, and the data transfer speed drops quickly with increasing distance. To organize long-term wireless networks, you should use infrastructure mode. Example: On the client side we will use a wireless USB adapter. All settings for other types of adapters (PCI, PCMCI, ExpressCard, etc.) are carried out in the same way. When connecting the adapter, you must install the driver that comes with all wireless equipment. The Wireless Network Connections icon should appear in the Network Connections window. We will first build a wireless network in Ad Hoc mode from computer1 and laptop1, and then you can connect other computers. This can be done in two ways: using the built-in service of Windows XP or Windows Vista and the D-Link AirPlus XtremeG Wireless Utility program, which comes with D-Link equipment. 1) Setting up a connection using the built-in Windows service. When installing the interface using the built-in Windows utility, no additional programs are required. But to do this, you need to check the Use Windows to configure the network checkbox on the Wireless networks tab in the properties of the wireless connection. Before establishing a connection, you need to configure static IP addresses. They are configured in the properties of the wireless connection, on the General tab, in the Internet Protocol (TCP/IP) properties
Let the first computer (Computer1) have an IP address: 192.168.0.1, and the second (Laptop1): 192.168.0.2, and the subnet mask: 255.255.255.0. Now to organize a network in Ad Hoc mode , double-click the left mouse button on the wireless interface to start the Windows service. Here, on one of the computers, let's run Set up a wireless network. In the wizard that appears, you must enter the SSID (for example, AdHocNet) and enter the access key. This completes the configuration of one computer. On another computer we also start the Windows service, and in the main window select the network that appears (AdHocNet). If the access keys match, this computer connects to the first one and thus creates an Ad Hoc wireless network. If you need to connect more computers, then all the same actions are carried out as with the second one. In this case, the network will already consist of several computers. 2) Setting up the connection using the D-Link AirPlus XtremeG Wireless Utility program. In this case, you need to install this program and uncheck the Use Windows to configure the network checkbox. To organize Ad Hoc wireless communication, run this program on the first computer and go to the Settings tab. Then enter the SSID of the network you are creating (for example, AdHocNet), select Ad Hoc mode and set the IP address with the wireless interface mask. We will leave authentication and encryption open for now. If you need to make additional settings, you can make them on the Advanced settings tab. On other computers, we also run this program and open the Browse Networks tab: In the window that appears, select a network, and to configure the IP address of the second computer, click the Configuration button. Then click the Connect button, and if the access keys match, the wireless adapter will connect to the first computer. Other computers are connected in the same way. Available networks are updated using the Update button.
Infrastructure mode
In this mode, access points provide communication between client computers. An access point can be thought of as a wireless switch. Client stations do not communicate directly with each other, but communicate with the access point, and it already forwards packets to the recipients.
The access point has an Ethernet port through which the base service area is connected to a wired or mixed network - to the network infrastructure. Example: Let's configure a wireless access point in infrastructure mode. Configuration is carried out via a wired interface, i.e. using an Ethernet connection. Although you can do this via a wireless interface, we do not recommend it, because... with a sufficiently large number of access points, confusion in the settings may occur. 1. In the Network Connections window, disable network and wireless adapters. In the context menu, select “Disable” for each adapter. As a result, all computers are isolated from each other, there are no network connections. 2. Configure network adapters for communication with the access point. LAN Connections->Properties->TCP/IP Protocol->Properties -Use the following IP address -Specify the address 192.168.0.xxx, where xxx is your computer number (1, 2, 3, etc.). -Specify the mask 255.255.255.0 -Enable the cable connection 3.Connect to the access point. We connect the access point with a network cable to the network adapter and supply power. Resetting the point settings. To do this, press and hold the reset button for five seconds. Do not turn off the power while pressing reset! The point loading time is about 20 seconds. When the download is complete, the Power and LAN indicators on the point light up. In Internet Explorer, type https://192.168.0.50. A prompt will appear to enter your name and password.
4. Let's start setting up. Enter “admin” as the username with a blank password. Let's first configure the IP address of the point. This is only necessary if you have many access points. On the Home tab, click the Lan button (on the left). -Set the address 192.168.0.xxx, where xxx is the unique point number. -Mask 255.255.255.0 -Default Gateway 192.168.0.50 When configuration is complete, click “Apply” to reboot the point with new settings. 5. Enable access point mode. Wait for the point to load, and enter the new address https://192.168.0.xxx in the browser On the Home tab, click the Wireless button (on the left) Set: Mode: Access Point SSID: Network SSID Broadcast: Enable Channel: 6 Authentication: Open System Encryption: Disable
Please note that the settings we have chosen do not ensure wireless security and are used for training purposes only. If you need to make more subtle settings, go to the Advanced tab. Before setting up your access point, we strongly recommend that you read the setup documentation; a brief description of all parameters is on the Help tab. Once the settings are complete, click “Apply” to reboot the point with the new settings. Disconnect the point from the network interface. Your point is now configured to connect wireless clients. In the simplest case, to provide Internet to clients, you need to connect a broadband channel or ADSL modem to the point. Client computers are connected in the same way as described in the previous example.
wds and wds with ap modes
The term WDS (Wireless Distribution System) stands for “distributed wireless system”. In this mode, access points connect only to each other, forming a bridge connection. Moreover, each point can connect to several other points. All points in this mode must use the same channel, so the number of points involved in bridging should not be excessively large. Clients are connected only via a wired network through the uplink ports of the points.
The wireless bridge mode, similar to wired bridges, is used to combine subnets into a common network. Using wireless bridges, you can combine wired LANs located both at a short distance in neighboring buildings and at distances of up to several kilometers. This allows you to combine branches and the central office into a network, as well as connect clients to the Internet provider network.
A wireless bridge can be used where laying cables between buildings is undesirable or impossible.
This solution delivers significant cost savings and provides ease of setup and configuration flexibility for office relocations. Wireless clients cannot connect to an access point operating in bridge mode. Wireless communication occurs only between a pair of points that implement a bridge. The term WDS with AP (WDS with Access Point) means “distributed wireless system, including an access point,” i.e. Using this mode, you can organize not only a bridge connection between access points, but also simultaneously connect client computers. This allows you to achieve significant equipment savings and simplify the network topology. This technology is supported by most modern access points.
However, it must be remembered that all devices within the same WDS with AP operate at the same frequency and create mutual interference, which limits the number of clients to 15-20 nodes. To increase the number of connected clients, you can use several WDS networks configured for different non-overlapping channels and connected by wires through uplink ports. The topology of organizing wireless networks in WDS mode is similar to conventional wired topologies. Topology of the “bus” type The topology of the “bus” type by its very structure assumes the identity of the network equipment of computers, as well as the equality of all subscribers. There is no central subscriber through which all information is transmitted, which increases its reliability (after all, if any center fails, the entire system controlled by this center ceases to function). Adding new subscribers to the bus is quite simple. You need to enter the parameters of the new access point into the last one, which will only lead to a short-term reboot of the last point. The bus is not afraid of failures of individual points, since all other computers on the network can normally continue to communicate with each other, but the remaining computers will not be able to access the Internet. Ring Topology A ring is a topology in which each access point is connected to only two others. In this case there is no clearly defined center; all points can be the same. Connecting new subscribers to the “ring” is usually completely painless, although it requires mandatory shutdown of the two extreme points from the new access point. At the same time, the main advantage of the ring is that relaying signals by each subscriber allows you to significantly increase the size of the entire network as a whole (sometimes up to several tens of kilometers). The ring is significantly superior to any other topology in this regard. The topology of connections between points in this mode is an acyclic graph of the tree type, that is, data from the Internet from point 4 to point 2 can pass in two directions - through points 1 and 3. To eliminate unnecessary connections that can lead to the appearance of cycles in the graph, the Spanning tree algorithm is implemented. Its work leads to the identification and blocking of unnecessary connections. When the network topology changes, for example, due to the disconnection of some points or the impossibility of channels working, the Spanning tree algorithm starts again, and previously blocked extra links can be used to replace the failed ones. “Star” topology “Star” is a topology with a clearly designated center to which all other subscribers are connected. All information exchange occurs exclusively through the central access point, which thus places a very heavy load. If we talk about the star’s resistance to point failures, then the failure of a regular access point does not in any way affect the functioning of the rest of the network, but any failure of the central point makes the network completely inoperable. A serious disadvantage of the star topology is that it strictly limits the number of subscribers. Since all points operate on the same channel, usually the central subscriber can serve no more than 10 peripheral subscribers due to the large drop in speed. In most cases, for example, to combine several districts in a city, combined topologies are used.
Repeater mode
A situation may arise when it is impossible, or inconvenient, to connect the access point to the wired infrastructure, or some obstacle makes it difficult for the access point to communicate directly with the location of the clients' wireless stations. In such a situation, you can use the point in Repeater mode.
Similar to a wired repeater, a wireless repeater simply rebroadcasts all packets arriving at its wireless interface. This retransmission is carried out through the same channel through which they were received. When using a repeater access point, be aware that overlapping broadcast domains can cut the channel's throughput in half because the initial access point also “hears” the relayed signal. The repeater mode is not included in the 802.11 standard, so to implement it it is recommended to use the same type of equipment (up to the firmware version) and from the same manufacturer. With the advent of WDS, this mode lost its relevance, because the WDS functionality replaces it. However, it can be found in older firmware versions and in outdated equipment.
Client mode
When moving from a wired to a wireless architecture, you may sometimes find that your existing network devices support wired Ethernet, but do not have interface connectors for wireless network adapters. To connect such devices to a wireless network, you can use an access point - client
Using a client access point, only one device is connected to the wireless network. This mode is not included in the 802.11 standard and is not supported by all manufacturers.
Why is a router needed and what is it?
A Wi-Fi Router is a network device that is used to route data packets between computers on a network and networks in general. It also detects and assigns a unique IP address to connected devices, provides security for them, and can also act as a wireless access point.
Confusion between routers and wireless access points arose after routers were equipped with a Wi-Fi module. Initially, routers were produced only in the form of wired devices - routers equipped with many LAN ports, but the popularity of Wi-Fi wireless technology forced developers to add this module to the device design.
Next, let's talk about how to choose an access point
access points and their application
Technical characteristics of the access point
Manufacturing materials
The device is divided into the following types based on materials of manufacture:
- For external placement. Used when you need to place the device outdoors or in other unpredictable environments.
- For indoor placement. Placement in an office or home.
It should be noted that the first type requires stronger materials in order for the device to work as long as possible.
Varieties
All TDs are usually divided into three types:
- External. This type of device is installed on streets and other open areas. This could be an open summer area of a cafe, a public stop, or a park. The operating principle is identical to the usual ones, they differ in protection from moisture and increased power.
- Office. The essence of this type can be determined from the name. Designed for home and office use, capable of working only indoors.
- Portable. One of the most autonomous varieties. They allow you to organize a fairly powerful and fast network in any convenient location.
Antenna power
It is measured in decibels and increases the coverage of a Wi-Fi area. If the area is small, you can take it with internal antennas. But there will be problems in future expansion. So it’s probably worth buying with normal external antennas at 2-3 dB.
In this case, you can buy more powerful ones and change them. They are easy to unscrew and connect. But you can get this right away with a margin of 10-12 dB. The number of antennas also affects coverage, but on dual-band devices you can enable two networks, 2.4 and 5 GHz, depending on the model.