Home Tutorial How to cut a fragment from a video
Author of the article: Nikita Chernov
| 5.0 Ratings: 5 (Yours: )
Do you need to cut off an extra fragment in a video or reduce the length of the clip? This may be necessary to remove ads and bad moments from a movie, when sending a large file by email, and when uploading material to social networks. To edit data, you can use computer programs, online services and mobile applications. In this article we will look at several ways to cut a piece from a video on a computer and smartphone. The proposed options are suitable for users with different skill levels, and everyone can find the optimal solution for themselves.
Method number 1. How to cut unnecessary fragments from a video in VideoSHOW
If you want to split a long video into parts, remove the beginning and end of a clip, or save a specific section from a video, use the VideoSHOW program. It is suitable for solving any problem: you can make full-fledged video editing, apply effects, reformat a video file or trim material without recoding.
To use the editor you do not need to have any special skills - it is intended for beginners and intermediate users. You can download the application for free in Russian using the button below and install it on all versions of Windows.
Download the VideoSHOW editor and cut the required fragment from the video!
Watch the video tutorial, which clearly shows how to remove all unnecessary episodes in the VideoSHOW editor:
Next, we will tell you how to cut a fragment from a video on a computer in 4 simple steps.
:
Step 1: Add a video file
Launch the program via the desktop shortcut and select the “New Project”
.
In the "Clips"
, select a folder with video files and drag the necessary materials to the timeline.
You can download files in all popular formats: AVI, MP4, MKV and others
If you have imported several videos, you can join them together with smooth transitions. To do this, go to the appropriate tab and select the type of animation: standard, three-dimensional, double or gradient.
Select the appropriate option and drag it to the junction of the clips
Step 2. Removing unnecessary passages
Return to the "Clips"
. The editor offers two solutions that will allow you to cut out an unnecessary passage from a video:
1.
You can
remove the beginning and end of the video sequence
, leaving only the central part of the recording. To do this, select a fragment on the timeline and click on the scissors icon. Use the trim handles to specify a new length for the content.
Save the cut portion of the video
2.
To
cut a part from the middle of a video
, add the video to the timeline twice. If a transition was set between the copies, right-click on the animation and delete the element.
Remove transition between copies
Select the first video and click on the scissors icon. Remove unnecessary torque by trimming the end of the material. Then do the same with the second clip, removing the remaining unwanted segment in it. The excerpts will be seamlessly stitched together during conversion.
Trimming the second section
Step 3: Enhance Your Video
VideoSHOW offers a large number of functions that will improve your video track. You can go to the "Effects"
and transform added clips using ready-made animation presets. To apply visual effects you do not need to have any special skills - the editor will automatically apply a filter on top of the video sequence.
Click "Apply to Slide"
If you want to diversify your project, add opening and closing titles from the “Credits”
. The editor contains more than 60 ready-made designs that you can customize to suit your idea.
An example of the design of titles built into the program
In the "Music"
you can add a background melody from the software collection or upload an audio file from your computer. If you need to create voice comments, use audio recording tools. You can adjust the volume of each track and apply sound effects.
Adding music to a leftover episode
Step 4. Export the result
Once the correction is complete, hover over the “Create”
. You can prepare content for viewing on a PC or laptop, burn it to DVD, or adapt it for publication online or on your website.
Options for displaying the cut fragment
Pros:
- quick cutting of a video clip into parts;
- tools for improving video footage: built-in title designs and effects, working with layers, key frames and chromakey;
- support for all popular video formats;
- ready-made export profiles for web platforms;
- the program is suitable for beginners and intermediate users;
- convenient Russian-language interface.
Minuses:
- The video editor is available for free only for a trial period.
Trimming and editing videos on MacOS
Apple PCs and laptops are considered the best solution for amateur and professional media content processing. The software is perfectly optimized for hardware, which ensures high performance during playback and rendering, and the interface is so intuitive that even a beginner can easily handle it. Let's look at how to trim videos on a PC running MacOS.
OpenShot Video Editor
1.
Launch the video editor OpenShot Video Editor. Open the directory where the media file from VK or other source is located. Select it and drag it into the software window. Clips are automatically added to the project.
2.
In the field where all video files of the project are displayed, we find the one we need.
Right-click on it and select the Split Clip
.
3.
A separate window opens.
On it we see a playback screen, a time scale and two large buttons. First, we find the point from which the video should begin. Click Start
and notice that the button now has a background image.
We perform similar actions with the end point: this time we use the neighboring one – End
.
Click Create
.
4.
We notice that new material has appeared in the window with project files. This is our mini-clip, derived from a larger video. We add it to the timeline of the main project, save the media file in the desired extension.
Final Cut Pro
1.
Open the editing software Final Cut Pro. Add a video file to the project and move it to the timeline.
2.
Using the mouse, move the red marker responsible for the position on the playback field. It should be where the clip splits into two fragments.
3.
Select the video trim tool.
the Blade
icon (hotkey – B).
4.
Using the changed cursor, click on the selected location.
This can be repeated endlessly to split the video an unlimited number of times.
can also not select Blade
, but perform cropping using the keyboard shortcut
Cmd + B.
5.
Return to
Select
by pressing A. Delete the desired segments by highlighting them and clicking Delete on the keyboard. Let's combine the remaining episodes.
iMovie
1.
Open the iMovie video editor. We add the file that needs to be processed to the library. Drag content onto the timeline.
2.
Then there are several ways.
First: move the cursor to the beginning of the video (in the window below), hold down the mouse button and start dragging until the moment where you want the clip to begin. The same can be done with the end of the fragment. Second method: on the timeline, find the beginning of the clip, press the hot key I. Rewind to the end, click O. Next, right-click on the selected area, select Trim Selection
.
3.
Move the video to the beginning of the timeline and save it.
Method number 2. How to remove one or more parts from a video in Sony Vegas
If you have experience with video editing, you can use professional software such as Sony Vegas. The software is suitable for accurately removing a segment from a video clip, high-quality color correction, audio processing, creating visual effects and using built-in filters.
The program is demanding on computer resources
, so it should not be installed on outdated equipment and laptops.
It is also very expensive
: a perpetual license can be purchased for 38,990 rubles. If this price does not suit you, you can download the software for a trial period and perform editing before completing the demo version (possibly overlaying a logo).
Let's figure out how to cut a piece from a video and save it to your computer using the Sony Vegas editor. To do this, follow several steps:
1. Import clips.
Launch the software and create a new project. Drag video files from Explorer onto the Timeline.
2. Deleting individual frames.
There are several tools for correcting material:
- If you need to split a clip, then place the cursor at the cutting location and hold down the “S”
. - To cut a moment, set the start and end points by highlighting the segment on the timeline. Click on the “Delete”
and the passage will be deleted. - To erase the end of a clip, simply zoom out on the timeline.
Removing unnecessary parts from a video in Sony Vegas
3. Saving the total.
Select all the elements in the timeline, and then open the
File
.
Select the “Render As”
and set the optimal export parameters in the window that appears.
Rendering content after processing
Pros:
- tools for professional clip processing;
- built-in special effects;
- fast data encoding thanks to hardware acceleration;
- possibility to download a trial version.
Minuses:
- not suitable for amateur use;
- complex interface;
- high cost of purchasing software: 38,990 rubles.
How to trim videos online without losing quality – review of available solutions
If you do not have the opportunity to install a special program or you simply do not want to waste time installing it, specialized online services can also handle the task of cutting videos. It won't take much time, and the result will be almost the same.
Online Video Cutter
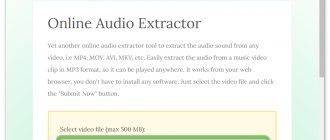
There is no way to add audio, pictures or visual effects, but this online service does its job just fine. However, you will not be able to trim a video larger than 500 MB. You can download source video files not only from a PC, but also from cloud storage, as well as via links.
The program successfully recognizes most of the most popular video formats, and the service itself works quite quickly. With its help, you can trim the end of the video, its beginning, or cut out a specific fragment of the video. You can save the edited video in quality from 240p to 1080p.
Videotoolbox
How to download photos and videos from Instagram?
This application has a little richer functionality than the previous one, since here you can compress and convert video files. You can trim or crop the video with millisecond precision. However, there is no viewing window, so the video has to be rendered each time to evaluate the result.
Wincreator
This service is intended exclusively for video editing. The video can be downloaded from a link or from a PC. In addition to trimming the video, you can insert audio recordings, insert pictures, set the smoothness of transitions, and add other visual effects. This editor is free, but it cannot be called the best.
Method number 3. How to remove unnecessary things from a video in an online service
You can remove an unnecessary fragment from a video online using a special service, for example, Clideo. The resource will allow you to quickly remove an unwanted passage
from the middle or reduce the length of the clip. However, the processing speed depends on the quality of the Internet connection; in addition, the web platform has limitations on the size of the downloaded file.
To trim length, go to the Clideo page and follow these steps:
1. Data import.
Click the add video icon or drag a file from Explorer.
Wait for the download to complete
2. Video processing.
If you want to reduce the duration of the clip, check the box next to the
Extract Selected
. To cut a scene from a movie, select the second option. Then select the fragment on the timeline by dragging the corners of the selection.
You can also add fade in and fade out effects
3. Downloading the work.
Choose the appropriate extension: MOV, AVI and others.
Click on the “Export”
and download the material to your PC, Google Drive, Dropbox.
To remove the site logo, you need to buy a subscription
Pros:
- the resource supports all popular extensions;
- allows you to apply fade-in and fade-out to the video track;
- does not require software installation.
Minuses:
- to correct long videos and large video files, you need to buy a subscription for $9 per month;
- In the free package, a watermark is placed on the result.
Method number 4. How to save a specific part of a YouTube video
If you need to download a specific fragment from a YouTube video, you can use the special online service ClipConverter. It will allow you to download video material from the Internet, specify the appropriate format and quality of the data, and also accurately enter the time of the excerpt for saving.
How to cut multiple frames from a video using this online converter? First of all, you need to copy the link of the clip from YouTube. To do this, open the video and click “Share”
. Then go to the web platform website and follow the simple instructions:
1. Download settings.
Paste the URL of the YouTube video into the appropriate field by holding down the
“Ctrl+V”
.
Click Continue
. Select resolution up to 4K and specify the video format of the final material: MP4, 3GP, AVI, MOV, MKV.
2. Content trimming.
Uncheck the
“Start of Video”
and
“End of Video”
.
Enter the exact start and end times of the segment. To download a video clip, use the “Start”
.
Extracting a specific fragment from a video with further conversion
Pros:
- download video in high quality;
- downloading a clip from the Internet in a suitable format;
- no application installation required on your computer.
Minuses:
- English menu;
- some antiviruses perceive the service as a threat;
- You can't preview a cut episode.
Saving results
Regardless of what type of Movavi you are using (Editor Plus or Suite), to save a new project with trimmed parts you need:
- Open the main menu and click on “Save As”.
- Set a name for the created project, indicating a location to save it.
- Save video project.
This option is suitable for cases when work on the project is not completed. In this case, it is recommended to store the files used in a separate folder. Used videos, photographs, and audio cannot be transferred to a new location until the project is completed.
To save the finished video after trimming the fragments, you need to click on the green “Save” button, which is located in the lower right corner, and set the required settings.
Method No. 5. How to cut video on your phone using the iPhone/Android app
When processing content shot on a smartphone, the best solution would be to use mobile applications, for example, the InShot editor. It has versions for Android and iPhone, and is also suitable for beginners in video processing
. The application allows you to stitch together several clips, add background music, blur the background, overlay text and apply filters. With it, you can create a simple video for social networks YouTube, Instagram and TikTok.
To trim part of a video on your phone, download the software from the App Store or Play Market. Launch it and follow these steps:
1. Loading a clip.
In the start menu, click on the
“Video”
. Open access to media and specify the desired content.
2. Cutting out part of the video.
Click on the
“Crop”
and select the appropriate editing option: reducing the length of the video or cutting out the moment. Then move the trim points and apply the changes.
3. Conclusion.
Click
"Save"
and set the resolution and frame rate.
The work will be automatically saved to the device memory
Pros:
- built-in filters and stickers;
- publication of the result on Instagram, YouTube, TikTok, Facebook;
- adjusting resolution and frame rate.
Minuses:
- in the free version, a watermark is placed on the end;
- a lot of advertising;
- export in one format - MP4.
Free Video Editor program interface
After launching the application, the Free Video Editor program window will open. The program has a simple and user-friendly interface.
At the top there is a menu bar for accessing the settings and functions of the program.
The main part of the window is occupied by the work area with the player and the scale on which the audio track is located.
Below the work area there is a timeline with a playback indicator.
Below the timeline are buttons that allow you to perform specific actions in the Free Video Editor. These control buttons are grouped by task.
Buttons to control video playback:
- “Go to beginning”, “Play (Space)”, “Play fragment”, “Previous frame (Left)”, “Next frame (Right)”, “Go to end”.
Buttons for managing tags:
- “Go to previous tag”, “Go to next tag”.
- “Edit tags”, “Set tag”.
Button for editing a fragment:
- “Start of fragment (M)”, the same button “End of fragment (M)”.
Button to change the orientation of the video in space:
- "Rotate (R)."
Buttons for state transformation:
- “Invert Selection (Z)”, “Deselect Selection (X)”.
Buttons for jumping to fragments:
- “Go to previous fragment”, “Go to next fragment”.
Buttons for working with large files (lasting more than 3 minutes)":
- “Zoom in (+)”, “Zoom out (-)”, “Zoom 100%(*)”.
On the bottom panel there are buttons for selecting formats and settings for saving videos.
You can enter the program settings from the “Options...” menu by selecting the “Options” item in the context menu.