The steps to enter the settings of Asus routers are not much different from the algorithm of actions on other router models.
The algorithm of actions is as follows:
- connect to the router using a cable connection or wireless;
- Log in to the control panel using your browser;
- enter settings.
It is recommended to enter the settings in order to adjust them using a computer, even though it is also possible to log in through mobile devices. It is also advisable to use a cable connection, since if you use Wi-Fi there is a significant risk of getting a “corpse” as a result of manipulations.
Connection
To receive a response from the domain or network address that is responsible for the configuration, both the router and the device from which the configuration will be changed must be on the same network. This can be done in two ways: wired (using a cable) and wireless.
The instructions we give in the article are universal; they apply to the entire range of routers of this brand. For example, ASUS RT-G32, ASUS RT-N12 VP B1, ASUS RT-AC51u and others.
Cable
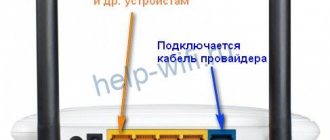
To do this, you will need a device with a LAN port, for example, a computer or laptop, and a patch cord. One side of the cable is connected to the network connector on the motherboard, the other to the LAN connector of the router. A wire from the provider must be connected to the WAN port of the Asus router; others should not be connected.
Wireless
Here the list of devices suitable for connection is greatly expanded. Thanks to the ubiquity of wireless adapters in various gadgets, you can set up an Asus router even from the refrigerator, as long as it has a browser. Possible techniques may include:
- Computers with a Wi-Fi adapter - built into the motherboard, connected to a USB or PCI-E port.
- Laptops with a built-in network card (or external via USB).
- Smartphones.
- Tablets.
- TV set-top boxes for Android or tvOS
All you need to do is connect to a wireless access point by entering your username and password, and open a browser or application to configure it. If a large list of points is available and it is difficult to determine the correct one, look for the one with the strongest signal and Asus in the name.
The latter is only true for cases where no preliminary settings, including those from the provider, have yet been made.
Connecting the router to the Internet and computer
Before you start setting up your Asus router, you need to choose a suitable location for it. It is better if it is located in close proximity to the computer from which you access the Internet. And if you plan to connect several gadgets at the same time, you should place the set-top box in the central part of the apartment.
Once a location for the router has been selected, you will need to connect it to the network and PC.
To do this you need to do this:
- Plug the device into a power outlet and make sure all the lights come on. If this does not happen, you need to look for the start key on the back panel and press it.
- Connect the Internet cable to the WAN connector provided for this purpose. As a rule, it is highlighted with a color indicator.
- Connect the router to a switched on computer using a LAN cable.
Now you need to pay attention to the lower right part of the PC monitor. A notification should appear here indicating that a new device is connected. After this, you can proceed to the next stage of work.
Advice. If you are setting up an Asus router that has already been in use, before connecting it to the Internet and computer, you need to reset the previous settings.
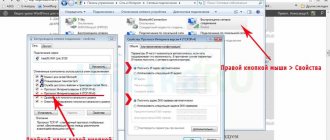
Login to the admin panel
The next step is to search for the address at which you can enter the settings on the local network created using the router. There are two ways to do this - through a computer and browser, or through a phone (tablet). The first one is a little more difficult for a beginner. The second is essentially the same, but thanks to the device format, much will be semi-automated. For example, entering text with hints, auto-generating passwords in the web interface, etc.
It is worth considering both methods, since there are situations in which one or another device is inaccessible and you have to look for workarounds.
Via computer
The admin panel of most modern Asus devices has one default address: https://router.asus.com and does not require long IP searches. If this address doesn't work, here are some possible combinations:
- 192.168.1.1 is one of the most common options.
- 192.168.0.1 – less common.
- 192.168.20.1 – only for older models.
After the welcome page with the login and password entry form is displayed in the browser tab, you need to fill it out (how will be described below). After this, the user enters the setup program - personal account.
To display all web elements correctly, it is recommended to use a modern web browser - Chrome, Safari, Firefox or Opera. The Edge engine built into Windows 10, which recently received a major update, is also suitable. Internet Explorer users may encounter problems.
Read a detailed article on how to set up an Asus router.
From phone
The process of entering the settings of the Asus router is almost identical to the first one, but with some differences. The algorithm is the same - log into the browser and dial the address. The convenience lies in the fact that input from the on-screen keyboard is accompanied by hints both in it and in the address bar.
Unfortunately, Asus routers do not have their own phone application, and therefore it is impossible to configure them through it.
How to set up an Asus router
Once logged in, the router can immediately prompt you for quick setup. That is, install all the basic necessary parameters for the operation of the wireless network. Here the user will not get confused in numerous menu items and settings. However, for more precise settings you will have to go through all the steps point by point.
DHCP
The abbreviation DHCP stands for Dynamic Host Configuration Protocol. Which, in turn, can be translated as a dynamic host configuration protocol. This protocol defines many settings and options to automatically set parameters for network operation. But most noticeably DHCP works with IP. It automatically distributes IP addresses to each new connected device.
DHCP can be disabled by manually distributing IP
This way, you can avoid name conflicts on the same network and not have to worry about manually setting gateway, DNS and IP information. All modern routers have this protocol enabled by default. But if necessary, you can turn it off. This can be done by going to the “Local Network” section in the web interface. And here on the DHCP server tab you can uncheck the “Enable manual assignment” checkbox.
PPPoE connection
This is a point-to-point protocol over Ethernet, which has become the most popular type of connection among Internet providers. It is with the help of PPPoE in the router that you can connect to the Internet. All related options in the admin panel are located in the Internet section. The “Connection type” item suggests choosing one of the options, among which we are interested in PPPoE.
In fact, there is nothing complicated about the installations
Then in your account you need to specify the username and password that should have been issued by your Internet provider. After making changes, click “Apply”. That's it, now the router has access to the Internet.
VPN using LTP or PPTP
VPN is a virtual private network that is created based on an active Internet connection. It is organized, as a rule, between two nodes, the transfer of data between which must be protected. It is with the help of a VPN that you can protect your data from interference by third parties.
VPN will allow you to protect your data or bypass some restrictions
VPN can be implemented using various protocols, for example, LTP or PPTP. Almost all Asus routers support them. To set up a VPN between the provider and the client, you need to visit the connection settings again and select PPTP or LTP from the drop-down menu. Then you should find out whether the provider issues an IP address automatically. If not, then you need to get it and specify it manually. Then all you have to do is enter your account information (login and password) and save the changes.
Setting up Wi-Fi in an Asus router
After the Asus router is connected, you need to create a wireless connection. And in order for devices that require Internet access to connect to the router, it must broadcast a common local network, receiving and sending data to its clients. In Asus routers, this is done using the “Wireless Network” section. The first thing you should pay attention to now is the frequency at which the device will operate. New models are capable of doing this at 5 GHz. The fact is that this range is less congested, which means it has less interference from various other devices and, as a result, more stable network operation.
In the settings you can specify the channel manually by selecting the least loaded
The next important point is SSID. This is the network name that will appear in the list of networks on the device that wants to connect to the router. You can name the network anything you like - “Moi Wi-Fi”, “Free Net” or simply by the name of the model. Next, you can check the “Hide network” checkbox. Quite a useful option. Although the chances of third-party clients connecting blindly are extremely low, such a possibility still exists. When hiding a network, you can connect to it only by knowing the name. That is, it will not appear in the list of available ones.
It is better to choose the security method WPA2-Personal or similar. Today, this is the most secure client authentication mechanism on the network, although it is also not 100% secure. Then all that remains is to apply the changes made and try to connect from any device.
How to set up IPTV
The latest firmware versions and router models support IPTV setup without additional steps. Asus even has a separate tab for this in the “Local Network” section. In order to transfer IPTV from the router to an external device, for example, Smart TV, you need to connect them with a cable.
IPTV is a separate type of connection for media content
Then here, in the settings, you need to specify the port to which the connection took place. By the way, you can try the provider’s pre-installed profile, if there is one on the list. After making changes, you need to click “Apply”.
Login and password
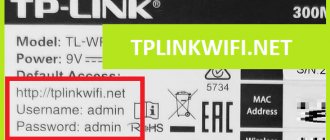
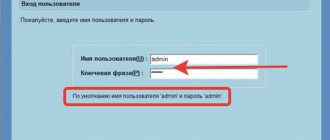
The best way to find out your account login information is to look at the bottom wall of the router. There is a sticker that tells them. If it is missing or damaged, the universal combination is simple - admin and admin in both fields.
The admin login information and the SSID and password of the access point are not the same combination. You should not try the password for the Wi-Fi network and you should not set the same combinations for logging into the admin panel and for connecting to the wireless network.
If the password is not suitable, you will have to reset it.
How to provide access to settings
First you need to provide a cable connection. To do this you need to do simple steps:
- install the router cable into the LAN connector ( this is important, it should not be confused with WAN >);
- install the other end of the cord into the PC network connector;
- connect the router to the power supply.
If there is no network cable at the router, then the only way out is to log in using a wireless Wi-Fi connection.
Connecting to it will not be difficult if the router has been used before. And in the case of a new device, as soon as you plug it into an electrical outlet, the router will immediately begin broadcasting. In this case, to connect to a Wi-Fi network, you will not need to enter a security code (by default the network name is “Asus”).
Factory reset
This can be done in two ways: software and hardware.
To perform a soft reset, you need to know your login information:
- We go to the web interface of the router.
- In the “Advanced Settings” section, select the “Administration” section.
- Select the “Manage Settings” tab.
- Opposite the inscription to factory settings, click the “Restore” button.
For the hardware method, you need to take an unbent paperclip or pin and press the Reset button on the back wall for 10 seconds. But this may not be enough.
Therefore, there are several additional ways to perform a hard reset:
- With the router turned off, press and hold the WPS button while pressing the power button. Wait until the power indicator starts blinking. When it stops, release the WPS button, after which the router will reboot automatically.
- In some models, after the above steps, an automatic reboot does not occur and you need to do it manually.
- For Lyra models, instead of the WPS button, you need to hold the Pair button, which is similar in action, and for Lyra Voice, you need to hold the Set button.
After this, you can log in using admin – admin.
What to do when the power light is flashing?
One problem users may encounter is that the power light is blinking, but the device itself is not working. Sometimes outdated firmware is the main cause of this problem.
Reboot
The first thing you should try is to reboot the router:
- First turn off the device by pressing the “Off” button and unplug the power cable from the outlet.
- Wait a couple of minutes and reconnect the power source and turn on the device.
Changing adapter settings
To change router settings, you will need a stable Internet connection:
- From the system parameters (Win + I), go to the “Network and Internet” section.
- On the main tab, find the adapter settings item and left-click on it.
- Open the properties of the network connection by right-clicking on it and selecting the desired option from the menu.
- A new window will open - in the list of components, find the item “IP version 4 (TCP/IPv4)” and double-click on it.
- Change the IP address to automatic. Click “Apply” to save.
Firmware download
To perform this action, you must:
- Disconnect the cables and power supply from the router.
- Press the reset button (“Reset”, “Restore”) and hold it for several seconds.
- Connect the router to a power source. Release reset when the indicator on the panel begins to flash. This means the device is in recovery mode.
- Go to the official Asus website, open the support page, enter the router model in the search bar and press “Enter”.
- Find your device in the list that appears and select the “Driver & Tools” tab.
- Download the latest firmware.
- Extract the trx file from the downloaded archive.
- Open Asus web interface. In the "Administration" section, select the "Update..." tab.
- Add the extracted file and click "Submit".
- Wait for the update process to complete.
Reset
You need to hold down the reset button (“Reset”, “Restore”) with a thin, sharp object and hold it for 15 seconds. (but no longer than 30 seconds) – the WPS indicator should blink.
Release the button and wait another 1 minute to allow the router to reboot with factory settings. The problem will be solved, but you will have to set up your Internet connection again.
Resetting settings helps solve many problems when other methods do not work.
Possible problems and solutions
The main problem is the lack of connection to the admin site and the inability to change the settings of the Asus router. There may be several reasons:
- In the properties of the wireless adapter on the PC, the IP is set to manual. It needs to be changed to automatic.
- It is the current device that is experiencing connection problems. You need to check the availability of the settings portal from another gadget.
- A wired or, conversely, wireless connection does not work without prior configuration. Try both options if possible - connect your computer to the router with a cable or use a wireless connection with your smartphone.
- Reset settings using the above method.
- Try all admin addresses listed in this article.
- The account login and password may have been changed. If the user does not remember them, they also need to be reset.
If all else fails, the problem may be hardware. A simple user cannot solve it. It is better to contact a service center, where the device will be repaired or offered an adequate replacement.
Setting up Wi-Fi (Wi-Fi network)
In order to set up a regular WiFi network in the 2.4 GHz range on ASUS routers, you need to select the “Wireless network” item in the main menu and the “General” tab:
In the SSID field you must enter the name of the Wi-Fi network you are creating. Any word in English can be used in this capacity. Then you need to select the “WPA2-Personal” authentication method and enter the password in the “WPA Pre-Shared Key” field. As a rule, there is no need to change anything else, since the most optimal parameters are set by default.
To configure WiFi 5 GHz on ASUS routers (RT-AC51U, RT-AC52U, RT-AC55U, RT-N56U, RT-AC66AU and AC68U), you need to set the value to 5 GHz :
And then everything is exactly the same as usual: we enter the “SSID” (it is desirable that it is slightly different from the one used on 2.4 GHz), indicate the verification method “WPA2-Personal” and the WiFi password, Click the “Apply” button .
Old web interface
If you are using old firmware of ASUS routers made in blue tones (RT-G32, WL-520GC, etc.), then in this case just proceed by analogy. Here are some video instructions that you may find useful:
As you can see from the video, there is no difference in the designation of key parameters in different firmware versions.
Hello! I have already written universal instructions here, but the people demand bread and specific circuses. So today on the agenda will be how to enter the settings of the ASUS router. Yes! For any ASUS router. Another universal instruction, but specifically for this vendor.
If you can’t enter the settings, write about it in the comments, we’ll figure it out together. Another option is to search our website for your specific model (for example, ASUS RT-N12). The article you need will contain a lot of useful information!
Content