Author of the article
Artyom Neuman
Web developer, content manager on IT projects
The Zyxel Keenetic Lite III router belongs to a line of inexpensive, but at the same time high-quality and reliable devices for home and small offices. The router is not particularly different from its predecessors in the line: the design of the device has been slightly rethought and some technical characteristics have been improved to meet modern needs. Since the device is from the budget segment, it is equipped with only the essentials to create a stable connection.
Connection
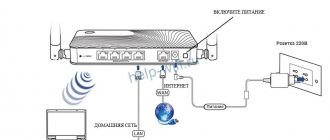
The router is connected in a standard way: first the router is connected to the network, and then the connection with other devices occurs. More detailed instructions are as follows:
- Connect the router to a 220V power supply. Use the included power supply for this. If necessary, first secure the router to the wall.
- Connect the router to your PC or laptop via Wi-Fi or LAN.
- Connect an Ethernet cable or USB modem to the router so that it starts distributing the Internet.
To connect to the router via Wi-Fi, you need to follow these steps:
- Open the list of available wireless access points. In Windows, this requires clicking on the Wi-Fi icon in the taskbar.
- Among the list of access points, find “Keenetic Lite 3”. The name may be changed by the provider. In this case, look for up-to-date information in the contract for the provision of communication services.
- Connect to this network.
Configuration occurs through a web interface, which can be opened through any browser on a computer.
general description
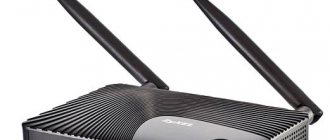
ZyXEL AP is a small device in the form of a router. Its lower part is made of metal, and the front part is made of plastic. This was done in order to reduce the weight of the device. There are no antennas inside; they are connected externally via N-type connectors located at the bottom rear. This TD is installed in a vertical position. This determines this arrangement of connectors and antennas. To attach the device to anything, use the screw holes located on the back of the case. In addition to them, the kit includes fastenings for mounting the device into a wall or mast.
In order to connect the AP to an external network, a secure RJ45 port is used. It allows you to connect via a local network and make connections using the PoE communication standard. Also included is a 0.5 A injector.
Login to router settings
To log into the Zyxel router, enter the following address in the search bar of your browser: https://192.168.1.1. To move on, press Enter.
You will be asked for a login and password. Specify the standard ones: login – admin, password – admin or 1234. The data can be changed by your provider. In this case, see the latest information in the contract or contact technical support.
Immediately after logging in, the firmware will prompt you to change the standard login-password pair. You can perform the change later - when you are finished with the basic settings.
Automatic setup
By default, it is proposed to configure Zyxel Keenetic Lite 3 in automatic mode:
1. A window will open asking you to quickly configure the router. Click "Quick Setup" to confirm.
- The type of network connection will be automatically detected: Ethernet, modem or ADSL cable. If the automatic detection did not work correctly, you can specify the desired type yourself.
- The system will ask if you need to register MAC addresses. If the provider does not register MAC addresses, then leave the default value. Otherwise, check with your provider for current MAC addresses.
- Next, select your country and region of residence. This is done through a drop-down list. If your locality is not on the list, then enter its name manually.
- At this step, you enter your login and password, which are issued by your provider/operator. You can find them out from the contract or by contacting technical support.
- The firmware will prompt you to enable “Yandex Internet filter with DNS”. It allows you to protect yourself from various attacks. Whether you turn it on or not is up to you.
- Click on the “Go online” button to complete the automatic configuration of the router.
The globe icon on the router body should light up, which will indicate successful setup and connection to the Internet.
Internet centers Zyxel Keenetic Omni II and Keenetic Lite III
The second generation of Zyxel Keenetic Internet centers appeared on the market two years ago and began with three models of the upper and middle levels. Later they were joined by five more devices, and now there are more than a dozen modifications in the series. Moreover, the latest newcomers are no longer adding to, but replacing previously released devices.
From the point of view of the hardware platform, Zyxel Keenetic Omni II and Keenetic Lite III are no different from their predecessors. They are also based on the MediaTek MT7620N SoC, equipped with 8 MB of flash memory and 64 MB of RAM, 100 Mbps wired ports and a single-band 802.11b/g/n access point at 300 Mbps. The Omni II model has a USB 2.0 port, which the Lite III lacks, but the latter has a hardware mode switch. Among the external differences, you can notice a changed design of the case and packaging, which, of course, is not a reason for an update.
These devices are one step above the simplest version of Keenetic Start. The Keenetic 4G III is no different in terms of hardware, which allows you to use the USB port only for modems. So the information in this material can safely be attributed to him. Summarizing the characteristics, we can say that the Lite III is the basic model for those who do not need a USB port, and the Omni II will be of interest to those who plan to use not only modems, but also drives. Note that the presence of a USB port still significantly expands the range of tasks the router can solve.
The release of new products coincided with a major update of the firmware, the operating system of which received a new kernel, which significantly affected the entire firmware and required significant effort for implementation. At the time of writing, the new kernel was also used in beta versions for the Viva and Extra models. It is planned that all current generation devices will receive similar updates.
Contents of delivery
In the generation of models under review, the manufacturer slightly changed the design of the outer covers of cardboard boxes and used a bright orange color on the ends. The rest has changed little - a large photograph of the device on the front side, detailed technical specifications, delivery kit, as well as a description of the capabilities and use cases on the back side. Moreover, all texts are completely localized.
Photos of smartphones and logos of mobile application stores attract attention. Apparently the company decided to follow the example of other manufacturers and released a specialized utility for configuring routers. It is difficult to say how much this function is really in demand in practice; much will depend on the quality and capabilities of the program. But given the widespread use of mobile devices, it may well prove useful. We will definitely get to know her in the appropriate section.
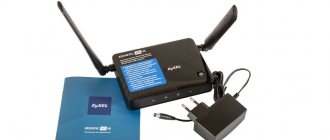
The delivery package for routers in this segment has not changed for a long time, and these models are no exception - a router, an external compact switching power supply (9 V 0.6 A for Lite III and 12 V 1 A for Omni II), a network patch cord, a fairly voluminous user manual, warranty card and a small flyer describing some of the company's products.
Appearance
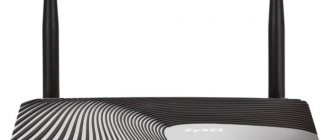
The devices received the same housings, which, however, differ from previous generations. In particular, non-removable antennas are now located on the side ends, so the router can no longer be placed on its side.
The dimensions of the cases have decreased slightly and are 140x103x30 mm excluding cables and antennas. Black plastic is used again. At the same time, the bottom was left glossy, the sides were made matte, and on the top cover we see a familiar pattern with waves and a predominance of gloss.
At the bottom of the devices there are two rubber feet and two holes for wall mounting with the connectors facing down. There are ventilation grilles at the side ends. The Keenetic Lite III model has a hidden reset button on the left. The Omni II adds a USB 2.0 port and a multifunction button. On the top panel of the routers there is a large and convenient button for connecting clients using WPS technology and disabling the access point. Let us remind you that the functions of the buttons can be changed in the settings.
At the back there are five network ports and a power supply input with a button. Keneetic Lite III additionally has a hardware operating mode switch - main, adapter, amplifier, access point. There are no antennas here now, so there can be no difficulties with connecting cables or accessing the switch.
Non-removable antennas are installed on the side ends. Their rotating mechanism seems more reliable than previous implementations. The length of the antennas is more than fifteen centimeters, and the shape and design of the outer casing has also changed slightly and become more interesting. This, of course, does not affect the speed, but it’s still nice.
Router operation indicators are located on the front end. They have a green glow, are quite informative and do not irritate with frequent blinking. But when mounted on a wall, they may not be visible.
With the exception of the continued use of gloss, there are no comments on the design of the new products.
Hardware configuration
In terms of hardware configuration, the models do not differ from their predecessors. They are based on the popular MediaTek MT7620N platform, are equipped with 8 MB of flash memory, 64 MB of RAM, have a radio unit built into the processor with support for 802.11b/n/g networks in the 2.4 GHz band with a maximum connection speed of 300 Mbit/s and a network switch on five wired Fast Ethernet 100 Mbps ports. It is worth noting that processor revision 0206 is used here.
The Omni II model has a USB 2.0 port and an additional button, while the Lite III is distinguished by the use of a hardware operating mode switch. Please note that the operating mode of this device cannot be changed via the web interface. At the same time, the model saves four independent sets of settings (one for each mode) and can quickly switch between them.
Features and capabilities of the firmware
The current Keenetic series products have unified firmware NDMS2, which we have already described several times in our publications. Differences may include different hardware configurations, such as the presence of USB ports or dual-band radio, or the availability of certain packages. So most of the further information can be applied to other solutions in the series.
When turned on for the first time, the devices automatically offer the user assistance in setting up Internet access and other basic settings. This uses a built-in database of providers, which greatly simplifies the process. It is also possible to launch the assistant from the web interface. After completing the wizard, the router independently checks the functionality of the network connection and the availability of firmware updates, and after the user’s permission, it can install them.
The design of the device’s web interface can be considered quite convenient, although of course the abundance of possibilities can be a little confusing if you’re not used to it. It is also worth noting that it looks good on low-resolution screens, which is becoming increasingly rare today. There are no comments on the responsiveness of the interface, as well as on the translation. In this case, it is worth considering Russian as the main language, and English as an additional one. Let us remind you once again that the firmware for this series is created by domestic developers.
Compared to many other routers on the market, the products in question have several distinct software differences. In particular, in addition to supporting IPoE, PPPoE, PPTP and L2TP connections, you can use Wi-Fi client mode, USB modems (in routers with a USB port), 802.1x and a CABiNET authorizer to connect to the Internet.
Simultaneous configuration of various connection options is supported, including using several wired ports, to implement the redundancy function. Its effective use is facilitated by the Ping Check module, which allows you to monitor the performance of communication channels. We also note the possibility of forcibly turning off the power to the USB port in manual or automatic mode, which allows you to increase the reliability of work with USB modems. The compatibility list contains many modern models, including those designed for fourth generation networks.
If the address issued by the provider is not permanent, you can use dynamic DNS clients, including the domestic DNS master. Access to local network services is provided by configuring address translation rules and UPnP support. An additional level of protection for users, especially their mobile devices, can be achieved thanks to the support of SkyDNS and Yandex.DNS services. Note that they can now use the assignment of individual profiles to clients to use DNS servers from the provider.
In the “Home Network” group you can change the local address of the router and also configure a DHCP server. In this case, you can create several network segments, dividing them by IP address ranges. This feature is used, in particular, to maintain a guest wireless network. Here you can also configure a DHCP relay and disable NAT.
To work with IPTV, the IGMP protocol, port allocation for set-top boxes, VLAN technology are supported, and there is also a built-in udpxy server.
The wireless access point settings are standard. There is a choice of network name, protection mode, channel number and width, country, standard and signal strength. Please note that the device’s factory settings include the individual network name and password indicated on the sticker. We didn’t forget about the MAC address filter, WPS and the implementation of a guest wireless network. Note the lack of scheduling and support for authentication via the RADIUS server.
In addition to the services mentioned above for filtering DNS queries, routers have a programmable filter for incoming packets, the tables of which are programmed for each interface (including local ones) individually.
Additional packages of interest include VPN server (PPTP), ALG for some popular protocols, IPv6, packet capture module, support for NTFS and HFS+ file systems, user identification for network file access, transmission file download system, DLNA server, support for certain USB models -modems. Many of them are relevant only for models with a USB port, but, in particular, the Lite III also has a VPN server. Note that the VPN clients present in the firmware can also be used to connect to remote networks, and not just to the Internet.
The devices have advanced monitoring and diagnostic tools, which allows technical support to more effectively solve possible problems. In addition to the extended status page, where you can find information about connections, current traffic, as well as processor and RAM load, you can view the routing table, a list of local network clients, their active connections, data about wireless devices (including connection speeds), USB drives and VPN clients.
The system event log is stored on the device or can be sent to an external syslog server. There are no special functions for searching in it or setting filters. There is no sending information by email. The advantages include high detail of events.
The system parameters include setting the time, resetting the configuration, rebooting, updating the firmware and installing components. It also provides for selecting the operating mode of the device (except for Lite III), setting the operation of the buttons on the case, working with system files (configuration, log and firmware), programming users and indicating their rights to services.
Note that now the operating modes use separate individual sets of settings, and on the Lite III they can be changed with a hardware switch.
In some cases, when contacting technical support, the ability to create an extended report on the operation of the device and the network packet capture module may be useful.
The USB port in the Keenetic line is used to connect drives, modems and printers. In the first case, you can use devices with multiple partitions, and the list of compatible file systems includes all the popular options today, including FAT32, NTFS, EXT2, EXT3 and HFS+. In addition to access via SMB and FTP protocols (including via the Internet), drives can be used for offline downloading of files and broadcasting multimedia content to DLNA receivers.
At the time of writing, the official list of printer compatibility included almost five hundred models. Depending on the model, printing over a Windows network or using a network port may be supported. With the exception of printing, MFP capabilities are not supported.
The manufacturer also pays great attention to working with modems for cellular networks - the compatibility list includes about forty 4G models and more than eighty 2G GSM/3G UMTS, not counting options for 3G CDMA networks. Moreover, work with modern devices is carried out in the most productive modes, which allows you to achieve high speeds.
As mentioned above, the manufacturer introduced a special Keenetic NetFriend utility for mobile devices based on Android and iOS for the initial configuration of routers.
It has built-in interactive instructions, uses a QR code on the case to connect to the router’s wireless network, has a location function for filtering the built-in list of providers by locality, and the ability to manually configure parameters. It’s a pity that the current version does not support setting up IPTV, changing Wi-Fi settings, and does not have monitoring and diagnostic functions. On the other hand, IPTV in many cases will work out of the box, and the wireless network is already configured in protected mode. So, even in its current form, the program can be useful for novice users.
Performance
The routers under consideration differ only in the capabilities associated with the presence of a USB port. So formally it would have been possible not to test the performance in routing and wireless access tasks of both models, but we still did it, although we did not expect big differences. Testing was carried out on our standard bench using synthetic benchmarks.
If you follow our publications, you may remember that when testing its predecessor, we had no comments in terms of routing speed. The new products, despite the above-mentioned reasons for updating the firmware and all modules, performed even a little better in full-duplex tests. So the models under consideration can be safely recommended for operating at speeds up to 100 Mbit/s inclusive with any type of Internet connection.
The efficiency of working with the provider’s local network has also been preserved, as can be seen from the next pair of graphs.
As we wrote earlier, these mid-level models received in the current firmware the implementation of a VPN server operating using the PPTP protocol. This allows you to organize a secure remote connection to your home network and some other useful scenarios. To test performance in this mode, we used a connection to the router from a computer located in the external segment of the network with a standard Windows client. The graphs show indicators averaged over three scenarios (reception, transmission and simultaneous reception and transmission, all in eight streams).
When working without encryption, you can get from 75 to 100 Mbit/s in this task. Using MPPE128 reduces the speed to 30-40 Mbit/s. As we can see, the implementation of this service in devices of the considered level makes complete sense.
The wireless access point built into the routers operates with a maximum connection speed of 300 Mbit/s. However, performance in this scenario will likely be limited by wired ports that are only rated at 100 Mbps. The routers were configured for maximum performance with a 40 MHz channel and WPA2-PSK encryption. The testing used the TP-Link TL-WDN4800 adapter (802.11n, 2.4 and 5 GHz, up to 450 Mbit/s) and two options for placing a computer with it - four meters of line of sight and four meters through one non-permanent wall. The previously used point at eight meters through two non-permanent walls was dropped from the list due to the presence of strong interference from a large number of neighboring devices in the 2.4 GHz range.
And in this group of tests we see the expected results - about 90 Mbit/s for the maximum reception or transmission speed, and also about one and a half times more for full-duplex modes. Note that the second placement option may show better results due to the client’s greater distance from the center of the house and neighboring networks.
The last test applies only to the Omni II model, since it has a USB 2.0 port that supports storage. The speed of reading and writing to a connected disk with NTFS, FAT32, EXT3 and HFS+ file systems of a large file using the SMB and FTP protocols was tested.
In this test, like the previous one, the limiter is the device's 100 Mbit/s wired port. So the maximum performance is about 10 MB/s. It’s difficult to call this option a full-fledged network drive, but it’s certainly suitable for backing up small amounts of data, watching HD video on a TV, and creating an FTP server. We also note that in this test the new product performed faster than its predecessor.
conclusions
The updated models of Zyxel Keenetic Omni II and Keenetic Lite III Internet centers, like their predecessors, left a very pleasant impression. The devices are based on the MediaTek platform, which is well suited for the mass segment, and have optimal technical characteristics - 100 Mbit/s wired network ports and a 300 Mbit/s wireless access point. The Omni II model is distinguished by the presence of a USB port, which allows you to implement many additional scenarios, and the Lite III is interesting with a hardware mode switch. Let us also remind you about the presence in the line of the Keenetic 4G III solution, which is similar in characteristics to these devices.
As for the built-in software, you can see that the manufacturer pays even more attention to it than to the hardware platform. Regular updates for the entire line allow not only to improve compatibility with the services of domestic providers and expand the range of functions and capabilities, but also to increase productivity. For some categories of users, the disadvantage here may be the closed nature of the firmware and the inability to add their own software modules. At the same time, the devices discussed in this article cannot be installed with a previous generation program that retains this feature.
There are no comments regarding the speed of operation of the considered models. They can be used without any compromise with all tariff plans and connection options on channels up to 100 Mbit/s inclusive. Testing has shown that wired ports are often a limitation in this case. However, do not forget that gigabit devices are usually noticeably more expensive.
Moving the antennas to the side ends made it possible to relieve the back panel. Another plus is the reprogrammable buttons on the case and the ability to mount the routers on the wall. The traditional disadvantage is the use of gloss.
| Average price according to Yandex.Market | |
| Zyxel Keenetic Lite III | T-11871189 |
| Zyxel Keenetic 4G III | T-12143578 |
| Zyxel Keenetic Omni II | T-11871190 |
| Zyxel Keenetic Lite III offers according to Yandex.Market | |
| L-11871189-10 | |
| Zyxel Keenetic 4G III offers according to Yandex.Market | |
| L-12143578-10 | |
| Zyxel Keenetic Omni II offers according to Yandex.Market | |
| L-11871190-10 | |
Manual setting
The settings of the Zyxel Keenetic Lite 3 router suggest the ability to make more precise adjustments to the parameters. For example, here you can establish a VPN connection and set non-standard values for providers.
For Rostelecom
Manual configuration of a router for Rostelecom, Dom.ru, TTK and other similar ones follows the same instructions:
- Open the “Internet” section using the corresponding icon at the bottom of the interface.
- There, in the “Connections” tab, click on “Broadband connection”.
- In the “Use connector” line, set o. It is marked in purple.
- Check the “Enable” and “Use to access the Internet” checkboxes.
- “IP Settings” set to “Without IP address”. Apply the settings.
- Now switch to the “PPPoE/VPN” tab. There, click on the “Add connection” button.
- Fill out the “Connection setup” form as follows:
- Check the “Enable” and “Use to access the Internet” checkboxes;
- “Type (protocol)” – PPPoE;
- “Username” and “Password” enter those that are by default, if they have not been changed previously;
- “Configuring IP parameters” – “Automatic”.
- Apply the settings using the button of the same name.
For Beeline
The instructions will be relevant for other mobile operators from the Russian Federation:
- Open the “Internet” section using the corresponding icon at the bottom of the interface.
- There, in the “Connections” tab, click on “Broadband connection”.
- In the “Use connector” line, set o. It is marked in purple.
- Check the “Enable” and “Use to access the Internet” checkboxes.
- Set “IP Settings” to “Automatic”. Apply the settings.
- Now open the “PPPoE/VPN” tab. Click "Add Connection".
- In “Type (protocol)” set the value to “L2TP”.
- “Configuring IP parameters” – “Automatic”.
- Apply the settings using the button of the same name. This completes the setup of the Zyxel Keenetic Lite 3 router.
What I liked
The best part is that all the functions of seamless roaming and fast switching that we reviewed have become available to all those who already own Keenetic KN-xxxx series routers, so to expand the Wi-Fi network coverage they don’t need to throw away or change anything: just buy the cheapest one Keenetic router, which will work as an access point for you. If you want one, if you want ten. You can install a wireless network throughout your entire summer cottage over the weekend, or you can install it in a large house, without even looking at the instructions and setup manuals.
In a small hotel or country club, you can set up Wi-Fi once and control the controller remotely by connecting to the router’s Web interface or any access point via the KeenDNS cloud service, even if you do not have a white IP address. Once you set up automatic firmware updates for all components, you will get a network that works in “plug and forget” mode, and if after 4 years, when the hardware warranty ends, one of the kinetics fails, you will always buy it at the nearest store , in contrast to specialized equipment, which even today is supplied to order, and tomorrow it is unknown whether it will be available at all, taking into account sanctions and other economic wars.
Mikhail Degtyarev (aka LIKE OFF) 04/15/2019
Setting up via mobile application
The manufacturing company has developed a special application for smartphones, with which you can find out the current firmware version, view the devices connected to the router, and update the firmware if necessary. The application is distributed for Android and iOS.
Download the application for Kinetic Light 3:
Android;
iOS.
It is not possible to fully configure the router through a mobile application, but, for example, you can check the relevance of the firmware and update it:
- Click on the “About device” block on the main screen of the application.
- To start searching for updates, use the “Device Update” button.
- When updates are detected, the Update button will become active. Click on it.
Conclusion
The advantages of Kinetic Start are determined by the following indicators:
- built-in service "DNS.Yandex" (ensures the security of connected devices when working on the network);
- network filter;
- ability to select a protocol;
- availability of SkyDNS (for parental control).
The disadvantages of this model include the fact that there is no USB port. This circumstance limits the functionality of the router (precludes the possibility of using a printer).
We hope we answered all your questions! If something is unclear, or we have not given a complete review, do not hesitate to write! Our friendly admins and authors are always happy to chat!
Network equipment from ZyXEL has proven itself in the market due to its reliability, relatively low price tag and ease of setup through a unique Internet center. Today we will discuss the topic of router configuration in the proprietary web interface, and we will do this using the Keenetic Start model as an example.
Wi-Fi connection and settings
Connecting and setting up a wireless access point (Wi-Fi) works like this:
- Connect your computer to the router via Wi-Fi. To do this, click on the wireless network icon in the taskbar and select “Keenetic Lite 3” from the available connections. The network name may be changed by your provider.
- Open your router settings in your browser.
- Switch to the wireless network settings using the icon at the bottom of the interface.
- Open the “2.4 GHz Access Point” tab.
- Fill out the setup form:
- Check the box next to “Enable access point”;
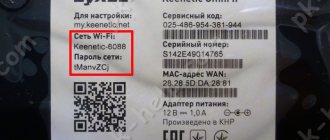
- "Network Key" Copy the corresponding value from the bottom of the device;
- Choose a country.
- Apply the settings.
Testing
For testing, we created a network in the 2.4 and 5 GHz bands with the same SSID and used the Band Steering function. The test smartphone was Oppo RX17 Neo with WiFi Moho software.
Our phone does not support fast switching between access points, 802.11r, although in the settings there is an option to automatically select the best Wi-Fi network, so when migrating the gadget between rooms, the transition was carried out using the PMK cache. What does this mean in practice?
Typically, the first switch in this mode can take up to 900 ms and lead to packet loss, but subsequent switches between hotspots occur without packet loss, although they can last almost 3000 ms.
We asked colleagues who had iPhones to test the assembled network based on Keenetic Giga, and here we got a full-fledged fast transition, for which, in fact, the experiment was started.
Support for fast switching in such distributed Wi-Fi networks is vital if you use an external RADIUS authorization server. The fact is that during a normal transition between hotspots, significant time is spent on each new authorization. If WPA2-PSK is used, then practically starting from the second switch, you do not feel any discomfort when moving through the PMK cache: playback on Youtube does not stutter, video communication via Skype does not either.
Setting up IP TV
IPTV is configured like this:
- Connect the set-top box to the router via cable.
- Expand the “Broadband connection” section in the “Internet” tab.
- In the “IPTV set-top box” line, put a check mark under the connector to which the TV set-top box is connected via LAN.
- Click "Apply" and reboot your router.
Firmware update
The firmware regularly receives updates from the manufacturer. If their installation is neglected, problems with the operation of the router may begin.
The update follows the following instructions:
- Open the "System" tab.
- The “Updates” line should say “Available”. Click on it.
- Confirm the installation of the available list of updates.
- Wait for the download and installation of updates to complete.
Reset
Resetting Zyxel Keenetic Lite 3 to factory settings occurs either through the RESET button on the back cover, or through the web interface:
- Switch to the firmware settings by clicking on the gear icon at the bottom of the interface.
- Switch to the "Options" tab.
- Click on "Return to factory settings".
- Confirm reset.
Classification
Keenetic 4G generation III - multifunctional Internet center
Like any other TD, the ones under consideration can be internal or external. They are intended for outdoor and indoor use respectively. They are not interchangeable, as they differ from each other in some parameters. The first is the coverage area. Naturally, an outdoor access point will have a larger signal range, and in this case an indoor access point will not be able to properly organize Internet access over a long distance.
Important! External access points even have a more rugged and secure design. This is logical, because they are outdoors and are constantly exposed to weather conditions, precipitation, and so on.