Change desktop icons (This PC, Recycle Bin, Network, Profile Folder)
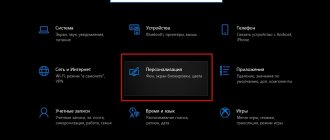
In any version of Windows, you can place on your desktop: My Computer, Recycle Bin, Network, Profile Folder, Control Panel. To do this, in Windows 7 and 8, right-click on an empty space on the desktop => select “Personalization” => in the window that opens, select “Change desktop icons”. In Windows 10, you need to go to the Start menu => Settings => Personalization => select “Themes” on the left side, and open “Desktop Icon Settings” on the right side.
Under “Desktop Icons,” you can check the boxes of the items you want to see on your desktop, then click “OK.” In the same “Desktop Icon Settings” window, select the element for which you want to change the icon and click on “Change Icon”.
You can select an icon from the standard ones (the default icons are located in the files C:\Windows\System32\imageres.dll and C:\Windows\System32\shell32.dll) or click “Browse” and find some of your icons in any other folder.
Icons can be downloaded, and then selected in this window, or selected in any folder on your computer (if they are there), you can also find an application that has an icon, the one you like, and select it in this window. You can choose any EXE, DLL, ICO file with the icon you like. When you select the desired file with the icon, click “Open”.
Select the icon you like and click “OK”.
If you want to return the standard icon, go again to “Desktop Icon Settings” => select the element for which you want to return the standard icon and left-click on “Normal Icon”.
Click “OK” again.
Standard or third-party icons in ico format
First, you need to decide what icons you need: classic ones from Microsoft, which are already stored in the PC memory, or third-party images. In the second case, you must first create a picture yourself or find an image on the Internet. The main condition is that it must be small and have an ico extension.
You can find ready-made icon files with different designs on third-party resources and download them from there, and then install them in any of the following ways, depending on the type of icon (folder, application shortcut, or main Windows icon). To search, use Google or Yandex services: enter the query “Desktop icons for Windows 10” in the line. The variety of icons available for download on the Internet is quite large: copyrighted, themed, standard for certain versions of Windows, etc.
You can change the icons for all shortcuts at once using an icon pack - a separate collection of icons packaged into a single file with a dll extension. Such packages can also be downloaded from various sources. However, be careful when searching for and downloading such files: trust sites that indicate that the files have been scanned by an antivirus. Otherwise, you risk downloading a malicious program along with the file.
Photo gallery: icon sets for the “Desktop”
Shortcuts on the “Desktop” can be non-standard, but they must be in ico format
On the Internet you can find many original icons for folders
Aero icon pack is suitable for users who love modern design
The choice of icons on the Internet is large: from simple to thematic and custom ones
Change folder icon
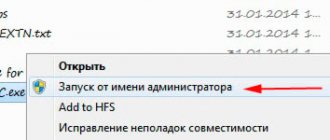
To change the folder icon, right-click on it and select “Properties”.
Go to the “Settings” tab and click on “Change icon”.
You can select an icon from the standard ones (the default icons are located in the files C:\Windows\System32\imageres.dll and C:\Windows\System32\shell32.dll) or click “Browse” and find the desired icon in any other folder.
The folder will change to the icon you selected.
Setting the picture
By default, Explorer displays on the directory icon up to the first 4 images located in it in the “Thumbnail” mode (tiles, large icons). You can make your own changes to the appearance of the directory.
1. Copy the icon you want to use as a thumbnail into the directory.
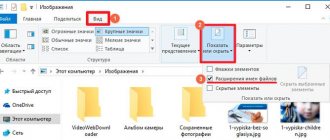
2. In the “View” tab, activate the display of file extensions.
3. Name the image “Folder.gif” and agree to replace the extension.
Change shortcut icon
To change the icon for a shortcut, right-click on it and select “Properties” from the menu that opens.
In the “Shortcut” tab, click on “Change icon”.
You can select an icon from the standard ones (the default icons are located in the files C:\Windows\System32\imageres.dll and C:\Windows\System32\shell32.dll) or click “Browse” and find the desired icon in any other folder.
For example, I have one application on my computer with an icon that I want to set for this shortcut - in this window I find this application, select it and click “Open”.
8. Select an available icon and click “OK” in all open windows.
Download icons for Windows 10
There are several additional icon sets that are built into Windows 10. But there is an ever-expanding list of icons and icon packs that you can get online, so there's no point in using the ones that come with Windows 10. Some of the platforms where you can download icons for free include Iconfinder, DeviantArt, Flaticon, GraphicBurger, and IconArchive. You can also pay for some premium icon packs if you like them.
Once you find a package you like, download it and save it in a permanent location. If they are in a .zip file, unzip them so they are all in the same folder.
Before we start, make sure you keep all these icon images in one place and don't move them after applying. If something goes wrong, you'll want to have them all in one place so they can be easily reapplied. So, I repeat, keep your icons in one place and don't move them around.
Related: How to Mute an App in Windows 10
Change application icon on taskbar
Hold down the Shift button, right-click on the shortcut in the taskbar, then select “Properties” (at this moment the application should be closed), or right-click on the taskbar application shortcut, in the list that opens, right-click on the desired application again mouse and select “Properties”.
Then everything is done as with regular shortcuts: go to the “Shortcut” tab => “Change icon” => select the desired icon.
If you need to change the icon of an Exe file, read the article “How to change the icon of an Exe file.” If you want to change the icon for a specific file type, read the article “How to change the icon for a specific file type in Windows.” If you need to change the icon for any drive, read the article “How to change the drive icon in Windows 10.”
Create your own icons
The easiest way to create a shortcut in Windows 10 is to use a third-party utility. The IcoFX application is popular among users. To use the program in business, you need to download it from an official source and install it on your computer. Then select the image you like.
+ zhivye-oboi-windows.ru How to enable the new dark theme in Windows 10 build 10056
The IcoFX program allows you to select the size and enlarge the image. The user must choose the best option and set the settings. The image will be saved as edited.
Changing system icons - This PC, Documents, Trash.
Folders such as: This PC, Documents, Trash are among the system ones, and therefore changing their icons is somewhat different from other folders.
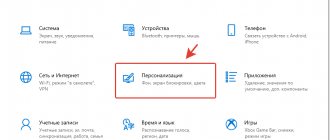
In order to change the icon for one of the named folders, you need to: Start → Settings → Personalization → Themes.
In the Related Options panel, go to Desktop Icon Options.
In the window that opens, select the folder for which you want to change the icon and click “Change icon”.
The system will present the icons already available on the device.
In addition to the library that opens by default with the main icons C:\Windows\System32\imageres.dll, you can look at other icon options in the libraries C:\Windows\System32\DDORes.dll and C:\Windows\System32\imageres.dll.
After selecting the icon you like, click OK.
You have the opportunity to use other icons (downloaded in advance), the main thing is to correctly indicate the path to them (location on the computer).
There are quite a lot of options for personalizing folders on the Internet. Some sites offer services for drawing icons directly to the taste and needs of the customer. Below we provide several free resources that you can use to find different fun icons for your computer.
We advise you to note that after changing the default Trash icons to third-party ones, many users complain that the automatic change of icons (for a full and empty Trash) stops working. This happens because non-native icons usually have the format ico, PNG, ICNS. If you use special software and pack the necessary icons into a dll file, then you will not encounter this problem.
Where can I get the badges, what sizes, format?
Why not subscribe?
Distribution of new, sometimes interesting and useful, materials from the site remontka.pro. No advertising and free computer help for subscribers from the author. Other subscription methods (VK, Odnoklassniki, Telegram, Facebook, Twitter, Youtube, Yandex.Zen)
05/13/2019 at 15:59
There is also a very good utility: AdSevenDriveIconChanger
01/21/2020 at 16:22
Help me, please, return normal system icons to music files. Now, instead of the usual blue note, the music player is displayed in all music files. I scoured the entire Internet, tried everything myself, but the result was zero. OS - Windows 10. I'm really looking forward to your help.
01/22/2020 at 09:45
Hello. I think this will help (I recommend using the method with the registry editor for the required file types) - https://remontka.pro/file-associations-windows-10/
06/30/2020 at 16:11
Healthy, healthy... Maybe I should switch to a human “Hello.”
There is TXT. It has a blank sheet icon, this is the default. But I changed the default launch from Notepad to Notepad++. And now there is an N++ icon on TXT.
How to return the standard one without putting Notepad back?
I want to clarify my attempts...
I don't understand. Std. the icon is there, but I see a different one in Explorer... Why is it always like this. Where to dig.
07/01/2020 at 14:41
Search the HKCR section for pointers to Notepad++ and see if it has somehow registered this file type somewhere.
07/03/2020 at 23:31
Why is it so difficult? just download the pictures in an ISO image of a suitable size and change.
Changing folder icons.
With this question everything is more simple and to change the appearance of the folder you need to:
- Select the folder whose icon will change.
- Right-click on it to open the context menu → Properties.
- A window will open where, in the Settings tab, click the “Change icon” button.
- The %SystemRoot%\System32\SHELL32.dll collection will open, where you can select an icon, or specify a different path to the icons/libraries available on your PC by clicking the Browse button.
Create your own icons to design your folders. To do this, you will need to process the source jpeg/png file in ico, for example, using an online converter.
Method 1: System Tools
In Windows 10, you can change the appearance of any folder. To do this, you can use either the system icon or an icon downloaded from third-party resources.
- We select the folder for which we want to change the icon and open its “Properties”.
Go to the “Settings” tab and in the “Folder Icons” block click “Change Icon”.
To save the changes, click “Apply”.
There are other icon sets in Windows 10. To access them, enter one by one in the address bar:
After each address, press “Enter”.
If you need to install an icon that you created yourself or downloaded from the Internet, click “Browse”.
In the next window, click “OK”.
The folder icon will change immediately.
To return the directory to its standard icon, click “Restore Defaults”.
You can make all folders on your computer look the same by creating a corresponding setting in the Windows 10 Registry Editor.
- Using the Win+R button combination, open the “Run” window, enter the regedit code and click “OK”.
How to create an icon yourself
If you want to set your image (drawn or downloaded from any site) with a png or jpg extension as an icon, you need to reduce its size if necessary using the standard Windows Paint utility, and then convert it to an ico file using special services - converters.
An easier way is to use programs and online icon generators that are already configured to create files with a specific format and other parameters, such as image size. For example, let's take the IcoFX program, which combines an icon generator and a tool for drawing and editing images. It's paid, but its developer IcoFX Software offers 30 days of free use. We will tell you how to use it in the instructions:
- We go to the official website of the utility. Click the green "Download Now" button.
Click the green "Download" button to download the program installer - We launch the installer and select the language in the small window that appears. Unfortunately, there is no Russian there, so we put in English. Click Accept, and in the next window we accept the terms of use of the application. Click Install.
- We wait for the installation to complete and then click Finish in the window with a checkmark next to Start IcoFX.
- In the utility window, select the Image Windows Icon section if you already have an image.
On the program's home page, click the Windows icon of the image if you want to download the image - Select the image file in Explorer.
Select the file in Windows Explorer and click the Open button - After that, click “Resize Image.
Click Resize Image - The editor itself will open with the image already loaded.
A page with a set of image editing tools will open. - You'll probably want to remove the background and just keep the theme for the icon. To remove it, click on the magic wand on the left panel called Magic Wand.
Click on the magic wand on the left vertical panel - Click on the background twice; A dotted line will appear. In the left panel, select a drawing tool, such as Brush. On the right side of the window, click on the checkerboard color tile.
In the right panel, select the checkerboard tile to make the background transparent - Brush over the area outlined by the dotted line. After this, the background will also change to an image with a checkerboard color. This will mean that it is transparent.
- From the top menu, select "File" and then click "Save As."
Click Save to save the edited image - Choose a location to store the icon and give it a name. Click "Save".
Find the folder where you want to save the future icon and click “Save” - If you want to draw the future icon yourself, click on the “New Window” icon in the initial window. In the next window, select the color quality (it is best to set True Color) and the icon size.
Select the size and color quality of the future drawing - In the editor we draw an icon using the available tools: brush, pencil, fill and others. If you want it to be smooth, use the Line tool.
- Once your drawing is ready, save it using the Save As option in the File menu and set it as an icon.
If you no longer like the look of the old desktop icons, change them to other classic Windows icons or your own - any small ico images that you find on the Internet or draw yourself. You can use built-in Windows tools and third-party applications to change icons.
Setting label sizes
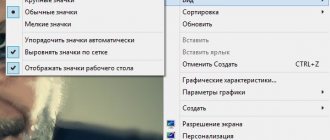
Changing the size of desktop shortcuts is quite easy. To do this, go to the active desktop and right-click on it. After this action, a context menu will open in which you need to go to the “ View ” line.
As you can see in the image above, you can make the size large, regular, and small. This setting allows you to adjust the size for monitors with different resolutions and diagonals. For example, for large monitors you can reduce the size of the labels, and for small diagonals you can make them larger. It is also worth noting that in the “View” item you can pin shortcuts in a grid and pin them automatically to the desktop.