Modern smartphones are equipped with a large number of sensors to make the process of use as comfortable as possible. These sensors make the device smarter, allowing you to add a large number of new functions, as well as optimize energy consumption. One of these is the light sensor . You might not have noticed it before: most likely, it is built in next to the front camera in your smartphone, and is only noticeable in bright light. Its main functions are recognition of ambient light levels and automatic brightness adjustment. It also takes part in other useful processes in the smartphone. Today we will tell you about the functions of the light sensor that you might not know about.
We talk about what the light sensor in your phone can do
Light sensor in a smartphone - what is it and how does it work?
We talk about the operation of a simple but very useful technology that is found in almost all phones.
A modern smartphone is a real computer. It is equipped with many useful functions and various sensors that have wide functionality. In some cases, a familiar pocket gadget can easily replace a computer.
At the moment, there are several basic sensors that can be found even in budget gadgets. One of them is the Camera Light Sensor. The dimmer cannot be called one of the main sensors, but its presence helps the smartphone save energy. This technology is needed to automatically adjust the screen brightness. The sensor is located above the display near the earpiece - unless you look closely, it is almost invisible.
At first glance, it may seem that a Light Sensor is not needed, because the brightness can be adjusted independently. In fact, the sensor plays an important role. Imagine a situation where you need to see what time it is at night. We activate the display, and it almost literally “hurts” the eyes with its light.
Another example: you went outside on a bright sunny day, a message arrived, and the screen brightness was reduced to minimum. With these settings, even in the shadows it will be difficult to see not only notifications, but also to adjust the brightness. If the gadget is equipped with the above-mentioned sensor (Camera Light Sensor), the screen brightness increases to a comfortable level in automatic mode.
Modern flagship smartphones and tablets can be equipped with a more advanced version - an RGB sensor. It is capable of not only automatically changing brightness, but also capturing the intensity of primary colors (red, green and blue). This allows you to better adjust the picture on the display and also adjust the balance for photos. Some phones equipped with a light sensor can measure the level of ultraviolet radiation. With its help, you can determine the suitable time of day for tanning.
If you are unhappy with the light sensor or simply do not need its functions, you can disable the sensor. This is very easy to do - lower the curtain with quick settings and uncheck “Auto brightness”. You can also turn off brightness control in Android settings.
Source
How to calibrate (repair) sensors?
Compass calibration occurs through certain actions, which may differ depending on the software, but information about which should certainly appear on the screen of compass applications.
Through the GPS Status application, you can calibrate not only the compass, but also the accelerometer, and, if necessary, you can reset GPS data, which in some cases can improve navigation performance.
If there is no response to calibration, and the accuracy of the compass leaves much to be desired, then on Android devices you should try installing the Digital Compass and Qibla Direction application, which sometimes helps out when other options are useless.
When setting up a proximity sensor , or rather when resetting its settings, sometimes the Proximity Sensor Reset software helps, in which you need to follow the instructions on the screen. However, judging by the reviews, this method does not help everyone, but there are actually few alternative options.
In some smartphones, you can calibrate some of the sensors directly from the operating system settings. There is no point in giving the exact location of the settings, since it may differ depending on the model, but in the screenshots below you can see what the menu with the calibration function might look like (using the example of the AGM A10 and Ulefone Armor X7 smartphones).
Calibration is also provided in the engineering menu for some smartphones running on chipsets from MediaTek. You can get to the engineering menu by dialing *#*#3646633#*#*, or through the MTK Engineering Mode application. Before this, you may need to activate developer rights by going to “Smartphone Settings/Phone Information” and clicking on “Build Information” six times (names may vary slightly).
Once in the engineering menu, you should open the Hardware Testing , and then select the Sensor , after which a list with sensors available for calibration should open. Next, calibration is started by clicking on the Start Calibration , after which prompts may appear on how to correctly complete the calibration.
However, even if the list contains an accelerometer (G-sensor), a gyroscope, and proximity and light sensors, when you try to calibrate, you may fail, and the message Fail . This happens, and there is nothing you can do about it. There is no universal method for troubleshooting some sensors, and sometimes it is completely impossible, but it is worth trying all the methods described in the article.
For Xiaomi smartphones, the following instructions are provided for calibrating the proximity sensor:
The Additional tools menu also includes accelerometer and gyroscope calibration - just follow the instructions at the top of the screen.
You can also watch the video tutorial:
Source
Many, having seen the phone’s light sensor in the stated technical specifications, are interested in what it is and why this additional function is needed.
A light sensor is a device for detecting the level of light that comes from outside. And it is needed so that your mobile phone, based on sensor readings, using software, can set the desired brightness level for the display.
For example, when it’s dark, the gadget will automatically set the screen brightness to a low level so that your eyes don’t get too much strain. And in daylight, the display will become brighter so that the information becomes clearer, and you can see it without straining your eyes. When buying a case, you should take care that the sensor does not become dark and stop functioning.
Functional
The job of the light sensor is to analyze the ambient light and take the necessary actions. What does the light sensor provide:
Automatic brightness adjustment according to the environment . When using a smartphone, you can enable automatic brightness adjustment. This is done from the quick access panel or from the settings menu.
By activating this function, the user allows the smartphone to change the screen brightness in accordance with the lighting level. The device should respond immediately when automatic tuning is turned on. In bright light the screen becomes brighter, in the dark it fades. Changing the intensity of the display allows you to save energy when necessary and comfortably use the device in the dark.
The main problems encountered in the operation of the light sensor are long response times and poor light estimation. You can configure the sensor using special applications. This can be done through the Proximity Sensor Calibration . The program allows you to configure the device's proximity and light sensor. The application must be installed and launched. After starting work, the user is given instructions at each stage.
The second stage involves taking sensor readings in a darkened state.
The third step takes readings from the free sensor.
After this, you are prompted to start calibration.
The results must be saved and the device rebooted.
The procedure will correct the situation if the screen does not go off when approaching your ear during a conversation or the sensor’s operation causes complaints. But only on condition that the sensor responds to user actions. If there is no reaction, then you need to contact the service center.
Source
Making your own photo relay
Radio enthusiasts can try making their own relays using commercially available components. As already mentioned, the main element of the system is the photosensor: these can be photocells, transistors, diodes and photoresistors.
Let's consider creating a simple twilight switch based on a triac.
The proposed circuit diagram of a simple photo relay contains:
If there is no lighting, the triac switch opens and the light turns on. As the light level increases, the voltage shifts, and the brightness of the connected lamp drops until it turns off.
Let's complicate the device by adding a relay output. Added photo relay connection diagram:
It has the following components:
When PR1 is illuminated, a current sufficient to activate the relay will arise in the system.
The above circuit is very simple and will provide only rough operation of the sensor. But it can be supplemented with various elements that increase sensitivity and speed of operation, as well as setting threshold values.
Why do smartphones need “mysterious” sensors at the top of the screen?
On the channel we have already discussed some sensors used in smartphones and saw that each of them improves the operation of the smartphone and introduces some functions.
Today we will continue talking about sensors. Not everyone pays attention to whether “strange” dots or stripes can be seen on the front side of the smartphone in the upper part; this is clearly not a camera and clearly not a speaker with a microphone.
In fact, for the smartphone to work correctly, it has built-in proximity sensors and light sensors.
We measure pressure and height
We have already written all the code for working with the pressure sensor in the previous section, having obtained the value of atmospheric pressure in millibars in the pressure variable.
Continuation is available only to members
Option 1. Join the “Xakep.ru” community to read all materials on the site
Membership in the community during the specified period will give you access to ALL Hacker materials, allow you to download issues in PDF, disable advertising on the site and increase your personal cumulative discount! More details
Proximity sensor
The proximity sensor on a smartphone is most often used to help it know when to lock the screen while talking on the phone.
The fact is that when we bring the smartphone to our face, we can touch the screen with our skin and make accidental presses, which can even reset the call. Many people have experienced something similar when talking on a smartphone.
The sensor emits infrared waves to determine the distance to an object and reacts to a closely approaching object. Then the processor, having processed the information received, understands that the screen needs to be locked, since it is programmed for this.
Thanks to this sensor, when we bring the smartphone to our ear during a conversation, the smartphone display turns off and, accordingly, the sensor does not react to accidental touches on the skin.
Select images
In addition, such sensors can sometimes be used to turn on or off certain functions, such as locking the screen or muting the sound. Such capabilities depend on the specific smartphone manufacturer and software.
You can check how the proximity sensor works like this: call someone, turn on the speakerphone and cover the top of the screen at a distance of about 1-2 centimeters with your palm. The screen will turn off until you remove your hand from the screen.
Accelerometer
As our colleagues from phonearena report, the accelerometer is one of the most common sensors. According to the classical definition, its task is to calculate the difference between the true acceleration of an object and the gravitational acceleration. You've probably heard a lot about how to use it. Without an accelerometer, smartphones would hardly change from portrait to landscape orientation and could do without user clicks in all kinds of racing simulators.
Light sensor
This sensor is mainly used to automatically adjust the brightness level of the screen when we enable the auto-brightness function.
In practice, many smartphones are equipped with low-quality light sensors and they do not quite correctly adjust the brightness in automatic mode.
The light sensor is a special light-sensitive sensor that transmits information to the processor about how much light is in the environment.
If there is a lot of light, the brightness of the screen increases so that the screen can be seen even in bright sunshine. When there is little light in the room, the brightness of the screen automatically decreases so that it does not “hurt” the eyes and is pleasant to read or watch.
Likewise, depending on the light entering the sensor, the screen brightness can be gently adjusted to achieve the optimal screen brightness setting.
Select images
It is worth noting that the “auto-brightness” mode helps to increase the service life of a single battery charge, as it adjusts the brightness of the screen. It is the screen that is turned on that consumes the most battery power in a smartphone.
If you liked the article, give it a thumbs up and subscribe so you don't miss any interesting articles. Thank you!
Did you like the article? Subscribe to the channel to stay up to date with the most interesting materials
Source
Taking readings
To receive events generated by the sensor, you need to register an implementation of the SensorEventListener using the same SensorManager . It sounds complicated, but in practice it is implemented in one line:
Sensor defPressureSensor = sensorManager.getDefaultSensor(Sensor.TYPE_PRESSURE); sensorManager.registerListener(workingSensorEventListener, defPressureSensor, SensorManager.SENSOR_DELAY_NORMAL);
Here we register the previously obtained barometer by default using the registerListener , passing the sensor as the second parameter, and the data update frequency as the third.
The SensorManager class defines four static constants that determine the update frequency:
- SensorManager.SENSOR_DELAY_FASTEST — maximum data update frequency;
- SensorManager.SENSOR_DELAY_GAME - frequency typically used in games that support gyroscope;
- SensorManager.SENSOR_DELAY_NORMAL - default update rate;
- SensorManager.SENSOR_DELAY_UI - frequency suitable for updating the user interface.
It must be said that when specifying an update frequency, you should not expect that it will be strictly observed. As practice shows, data from the sensor can arrive either faster or slower.
The first parameter remaining unexamined is the implementation of the SensorEventListener , where we will finally get concrete numbers:
private final SensorEventListener workingSensorEventListener = new SensorEventListener() { public void onAccuracyChanged(Sensor sensor, int accuracy) { } public void onSensorChanged(SensorEvent event) { // Get the atmospheric pressure in millibars double pressure = event.values[0]; } };
onSensorChanged method SensorEvent object that describes all events associated with the sensor: event.sensor - a reference to the sensor, event.accuracy - the accuracy of the sensor value (see below), event.timestamp - the time the event occurred in nanoseconds and, most importantly, array of values event.values . For a pressure sensor, only one element is transmitted, while, for example, for an accelerometer, three elements are provided for each of the axes. In the following sections we will look at examples of working with various sensors.
onAccuracyChanged method allows you to track changes in the accuracy of transmitted values, determined by one of the constants: SensorManager.SENSOR_STATUS_ACCURACY_LOW - low accuracy, SensorManager.SENSOR_STATUS_ACCURACY_MEDIUM - medium accuracy, calibration possible, SensorManager.SENSOR_STATUS_ACCURACY_HIGH - high accuracy, SensorManager.SENSOR_STATUS_UNRELIABLE - The data is unreliable and needs calibration.
After you no longer need to work with the sensor, you should cancel the registration:
sensorManager.unregisterListener(workingSensorEventListener);
Sensors of modern smartphones
Vladimir Nimin
We continue to understand the structure of the smartphone. Last time we looked at screens, and today we’ll talk about sensors.
Accelerometer , also called G-sensor. The official definition is that it is a device that measures the projection of apparent acceleration. In simple terms, the accelerometer helps the smartphone determine its position in space, as well as the distance of movement. Main functions of the accelerometer:
An accelerometer is a bulky device, inside of which there is an inert mass that reacts to all movements. This option was not suitable for a smartphone, so they came up with a chip with a crystal structure, a piezoelectric element and a capacitance sensor. When the smartphone moves/rotates, the piezoelectric element emits discharges, and the sensor interprets them, thus determining the position and speed.
The accelerometer is a basic sensor that is found in any, even the cheapest, smartphone. Although it is a surprisingly technically complex product. In smartphones, the accelerometer understands movements in 3 axes. The third is needed for 3D positioning. By the way, all modern cars have an accelerometer, but there it is usually two-axis (because the car does not spin in the air).
Not all accelerometers are created equal. They are made from different materials. Accordingly, some are more sensitive, some less.
The gyroscope is one of the coolest sensors, the usefulness of which for smartphones was not suspected for a long time until Steve Jobs came on the scene and explained how it should be. Watch the presentation of this awesome feature and how the audience exploded with delight.
The gyroscope and accelerometer should not be confused. These sensors partially duplicate and complement each other. The gyroscope also serves to track the device's position in space, but it does this by determining its own angle of inclination relative to the earth's surface. This is very important because it means that in zero gravity conditions, you won't be able to play Asphalt 9 using your device's tilt controls. Be careful!
A gyroscope (unlike an accelerometer) cannot measure the distance traveled, but it determines the position in space much more accurately. To understand, please watch the video of Steve Jobs above. Starting at 1:10, Jobs shows how the accelerometer and how the gyroscope determines the position of an object in space.
Typically, in modern smartphones, both sensors work in tandem. The gyroscope is important for games, augmented reality, and a number of other applications. Often, in cheap smartphones, the manufacturer prefers to save on the gyroscope.
Proximity sensor. As the name suggests, it is a sensor that helps determine the presence of an object in front of it. The simplest example is turning off the screen when the smartphone is brought to the ear. Also, the proximity sensor eliminates phantom screen activations when the smartphone is in a bag or pocket. Such a sensor can, on its own or in combination with a front camera, track hand movements above the screen to perform certain functions. For example, scrolling through a page in a browser and the like. There are many proximity sensor technologies available. It can work like a radar, sonar, Doppler effect, there is an infrared proximity sensor, and sometimes a photocell is installed.
A basic proximity sensor, which turns off the screen when brought to the ear, seems to be already in all smartphones. But the advancedness of the sensor can be assessed by the presence of additional functions.
Light sensor - everything is simple and clear here. This sensor helps to automatically set the screen brightness. The light sensor is already considered a basic sensor, but cheap smartphones can skimp on it. And then you will have to set the brightness manually each time.
A modern light sensor usually works in combination with smartphone AI. For example, if the sensor has set a certain brightness, and you manually correct it, the smartphone will take note and next time it will make the screen brighter on its own. Accordingly, always let the light sensor get used to it and adapt to your habits before judging its performance.
The Hall sensor is one of the most mysterious sensors in a smartphone, because few people know why it is needed. The sensor, based on the so-called Hall effect, detects the magnetic field and measures its strength. In physics terms: electrons in a conductor are always perpendicular (90 degree angle) to the direction of the magnetic field. The electron density on different sides of the conductor will differ; a potential difference arises, which is detected by the Hall sensor.
But smartphones use a simplified Hall sensor that detects only the presence of a magnetic field.
Usually a Hall sensor is needed for additional accessories. For example, it is he who turns on the iPad screen when the user removes the magnetic case. By the way, in this function the proximity sensor can easily replace the Hall sensor.
The Hall sensor also works in tandem with a compass, making the latter more accurate.
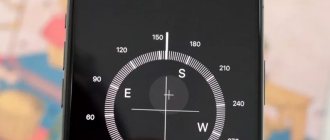
A compass (magnetometer) is a very important sensor, even if you are not involved in orienteering. It is the compass that is responsible for the fact that on Google Maps the user sees not just a point, but an arrow pointing in which direction you are looking.
When the compass is calibrated, the direction display is narrow. To calibrate the compass, open Google maps and turn your smartphone using the figure eight wheel:
Barometer - usually only flagships can boast of having such a sensor. The barometer assists GPS and helps determine altitude. Having such a sensor is useful, since building diagrams already appear on Google Maps, and the barometer will determine which floor you are on. The barometer is also used in applications that determine physical activity. The essence is the same: determine how many floors you have passed.
Humidity sensor – the Samsung Galaxy Note 4 once had such a sensor, but then Samsung abandoned it. The role is obvious. The sensor detects the humidity level.
The heart rate sensor/blood oxygen sensor is another proprietary sensor from Samsung, but it is also found in many fitness bracelets. Works in conjunction with LED flash. You put your finger on it, the LED shines through your finger, and the sensor measures how the light waves are reflected. The waves are reflected differently depending on the pulse: the blood vessels either narrow or expand. The function of determining oxygen in the blood works on the same principle.
GPS – global positioning system. In fact, it’s not even a sensor, but the smartphone’s ability to communicate with satellites thanks to either a separate or multi-chip that supports several systems at once. Now every developed country has its own satellite system. GLONASS in Russia, Galileo in Europe, BDS (or BeiDou) in China, QZSS (or Quasi-Zenith Satellite System) in Japan. You can download the GPS Test program, which will show which satellites your smartphone sees. For example, the screenshot below displays the GPS, GLONASS and Galileo flags.
GPS is an excellent technology, but it is slow (until you find and interrogate all the satellites) and consumes a lot of energy and works well in open areas, so A-GPS (Assisted GPS) was also invented. The principle is based on the fact that while GPS is searching for satellites, the smartphone manages to poll cell towers, Wi-Fi networks, and Bluetooth devices for location. This significantly increases the cold start time and reduces energy consumption.
Dual band GPS . Support for this option appeared in nachbfz devices with Android 7 and older. The iPhone can't do that.
Usually satellites send out two signals: coarse and fine. If we talk about GPS, these are channels L1 and L5, and for Galileo these are E1 and E5. L1 is a rough channel. In the city, any signal reaches the satellite not only directly, but also by being reflected from third-party objects (for example, buildings), that is, several signals arrive at the satellite at once. Accordingly, it also returns more than once, and an approximate location area is formed where all the returning signals intersect. There is also an exact channel L5. This channel is much less susceptible to distortion, since it works on the principle: The first signal that reaches the satellite is the correct one (after all, it follows the shortest path, and not through reflections), and the rest can be ignored.
Previously, L5 belonged only to military and special facilities, but now there are many satellites in the sky, and there are enough L5 satellites for everyone, so it was decided to share.
Instead of a conclusion
The Geiger counter is the most unexpected sensor, right? This is a Japanese theme. And as far as there is information on the Internet, such a sensor was only in the Sharp Pantone 5 phone, which came out after the accident at the Fukushima-1 nuclear plant.
A modern smartphone should have on board: an accelerometer, a gyroscope, a proximity and light sensor. A compass is also required. If you can do without a gyroscope, then a point on a map without a direction is annoying. A-GPS is already available in all smartphones. It would be great if the GPS would work in two bands. It would be great if there was a barometer.
Source
Barometer and temperature sensor
A person with high sensitivity to sudden changes in atmospheric pressure simply needs to have a barometer application on their smartphone. On Google Play, for example, one of these programs is called “Barometer”.
The barometer sensor is capable of not only warning the user about the approach of a cyclone - anticyclone; This is not even its main function. The sensor increases the efficiency and accuracy of the gadget's GPS navigator. GPS satellites show where in the world the location you are looking for is located - but not at what altitude . This shortcoming of their work is eliminated by the barometer. A pressure sensor can help find, say, the office of a certain company in a multi-story business center building.
Mobile barometers are not new; Sony Ericsson devices were also able to boast pressure sensors. However, on the modern market there are few gadgets equipped with such sensors. Barometers are increasingly being installed on rugged smartphones from manufacturers such as Conquest, Land Rover, and iMan. Pressure sensors are also present on Xiaomi Mi5 and Cubot Dinosaur.
Temperature sensors, unlike barometers, are present in most smartphones - but you cannot measure the temperature outside with their help. We are talking about internal thermometers , the task of which is to ensure that the gadget does not overheat. One smartphone can have a lot of similar sensors: the first controls the graphics accelerator, the second controls the processor cores, and so on. If overheating occurs, the internal thermometer automatically stops charging or reduces the output amperage.
External thermometers on gadgets are also found, but they are still “a novelty.” The first smartphone with a built-in thermometer was the Samsung Galaxy S4. The sensor turned out to be necessary to improve the performance of the pre-installed S Health application.
Unfortunately, external thermometers of mobile devices have a significant drawback - low accuracy. The data is distorted due to the heat emanating from the user’s body and the insides of the device itself. The developers have not yet been able to solve this problem.
For the needs of the S Health application, another interesting sensor was installed on the Samsung Galaxy S4 - a hygrometer . This sensor measures humidity levels, giving the user the ability to effectively control the indoor climate.
Why do you need auto-brightness on a smartphone and should you turn it on?
Auto-brightness is one of the most controversial features in modern smartphones. Despite manufacturers' recommendations regarding energy saving, users most often turn off auto-brightness to manually control the brightness level of the display. The most interesting thing is that users of a wide variety of devices do not like it. But frequently manually adjusting the display brightness is dangerous for your phone in its own way and can lead to unpleasant consequences. Why have device manufacturers still not learned how to adequately configure this automatic adjustment function? How does the light sensor work? How to properly calibrate auto brightness on a smartphone? And is it necessary to use it?
Let's understand auto-brightness on a smartphone: what is good and what are its disadvantages
How to save battery on your phone
Energy saving in a smartphone depends on the light sensor, which regulates auto brightness
The light sensor plays a vital role in saving battery power. Please note that manufacturers recommend using auto brightness on a regular basis to use the battery more economically. The display is the most energy-consuming module in a smartphone. Thanks to the light sensor, the operation of the display is optimized, which has a beneficial effect on battery consumption. By the way, in older mobile phones, the light sensor worked not only with the display, but also with the keyboard: during the daytime, the keyboard backlight in the device was turned off in order to save the charge of the already modest battery. But smartphones are still better than mobile phones - read about this in our article.
6 reasons why you should not buy a fitness bracelet
What is auto brightness in a smartphone?
All phones have an Auto Screen Brightness feature that automatically adjusts the display brightness based on light levels. In theory, in sunny weather the brightness should increase, and if you are in the dark, then decrease. In most cases, the function does not work correctly, which angers users and further disables it in the settings. The function works due to the light sensor, which is located next to the earpiece and front camera. The highest-end smartphones are equipped with a more advanced version of this sensor - an RGB sensor, which is capable of not only changing brightness, but also reading the intensity of primary colors, adjusting image quality and correcting the color balance of photos.
Should I use auto brightness?
Adjusting brightness manually may damage the display. So don't get carried away
Manual adjustment is often convenient for us, but harms the smartphone. For this reason, the battery drains faster and the display begins to fade over time. This problem should be dealt with by the light sensor, which is what it exists for. Unfortunately, it rarely works correctly, and manufacturers do not tell you how to properly calibrate it. The iPhone even hid this feature away in “Universal Access” so that users would spend more time looking for it and would not disable it again.
Auto brightness: pros and cons
The function does not always work correctly, but in most cases it is very useful to use. There are several good reasons for this. The system automatically selects the optimal display brightness level. If it is sunny now, but clouds appear in an hour, the sensor will understand that it is necessary to reduce the brightness of the display. Thanks to auto-brightness and automatic display adaptation, the image quality on the screen does not change.
Without calibration, auto brightness can blind you at night
Auto brightness has a positive effect on the battery life of the smartphone. It would seem, what is the difference between manual and automatic tuning? Experts from Battery Universe in their study concluded that manually adjusting the brightness level reduces operating time. This is due to the fact that in sunlight, users increase the brightness to 100%, forgetting to turn it off in time when there is no longer a need. As a result, the smartphone begins to heat up and discharges much faster. The auto-brightness function also selects the optimal display brightness settings for watching videos with minimal load on the battery.
Turning on auto brightness is the only way to adapt the screen to the current lighting
The function also has obvious disadvantages. For example, in sunny weather, the smartphone does not provide a sufficient level of display brightness so as not to kill the battery. On the one hand, this is useful for the smartphone itself, on the other hand, you begin to experience discomfort because you cannot see anything on the screen.
Auto brightness goes crazy in different ways: sometimes you wake up at night and can’t sleep. You start reading an article on the Internet and your eyes concentrate more strongly on the text and get tired faster due to the fact that the brightness is at a minimum. This increases the strain on your eyes (and the level of hatred towards this function), as a result of which you have to manually adjust the screen brightness.
Bright display in the middle of the night is unpleasantly blinding
Despite the general recommendations of manufacturers, auto brightness literally burns out the smartphone screen. In theory, this function can ruin the display: due to the fact that software and algorithms are involved in setting the comfortable brightness, a failure may occur. For example, if you continuously use your smartphone with auto-brightness turned on, and the lighting level is constantly changing, then this function begins to go crazy. Frequent changes in the brightness of the display have an adverse effect on the matrix: the screen becomes dim, various spots may appear, yellowness around the perimeter of the screen, or unpleasant glare, which users of our Telegram chat have repeatedly complained about.
Adjust brightness level and other settings
When we say that we have to adapt the brightness, we don't mean the notification shade, but the settings. It is important to know that the brightness level that we choose in the settings allows us to which will then be adapted through the light sensor, unlike the Quick Access panel where we make a spot correction. That is why we recommend exiting the settings after the sensor has completed its work.
Other aspects to consider are screen calibration, where you should select a standard color tone
it works for us in all situations and doesn't do it in full sunlight or in complete darkness.
Also remember that night mode can make your screen feel like it has less brightness, which we solve by turning it off, changing the color temperature, or changing the programming at other times.
Protecting your eye health
The main function of the light sensor is automatic brightness adjustment. This is especially true at night, when too bright a screen can cause eye strain. Many people underestimate how much prolonged use of a phone at maximum brightness can damage their eyesight.
The night light sensor detects the light level and then automatically sets the minimum brightness. If you take the phone in the dark, a comfortable brightness will be set, which does not cause pain in the eyes.