In this article we will present several ways to enable AHCI mode for SATA in the BIOS without reinstalling Windows 10 and thereby increase performance, efficiency, and also reduce energy consumption of modern HDD and SSD drives...
What is the difference between AHCI and IDE?
IDE is the old mode of operation via the SATA interface, which is practically no different from its predecessor PATA (a wide and thin cable was used for PATA). This operating mode was popular before the widespread introduction of AHCI, which allowed modern drives to unleash their full potential in speed and capabilities.
AHCI is a modern mode of operation via the SATA interface. Working in this mode allows you to get maximum efficiency from SSD media with a very high data writing speed. In addition, AHCI mode has more economical power consumption and also allows you to replace hard drives without turning off the computer. Working in AHCI fully reveals the capabilities of the SATA interface.
How to determine the current operating mode?
To determine the current operating mode, simply follow these steps:
Step 1. Go to “Control Panel” “Start” button .
Step 2. In the window that opens, select the “Small icons” display mode and LMB click on the “Device Manager” .
Step 3. In the window that opens, click on the “IDE/SATA controllers...” and the operating mode will be indicated opposite the standard controllers. The screenshot shows IDE mode.
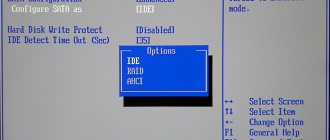
You can also find out the operating mode through the BIOS or UEFI. The parameters where information about the operating mode is located are usually located in the items “SATA Mode” , “Storage options” , etc. depending on the motherboard model and firmware.
Important! Do not switch operating modes in BIOS or UEFI, as this will make it impossible to boot the operating system.
Checking for AHCI Availability
Having plunged headlong into a theoretical vacuum, convinced that AHCI mode for Windows 10 is important, many will express a desire to enable it as soon as possible.
It is important to understand that new computer equipment on which Windows 7 or 10 is installed is already accompanied not only by automatic activation of the mode, but also by automatic installation of drivers. If you still have doubts as to whether the specified mode is supported, whether it is installed on your PC or not, you can use useful tips and find the answer to this question yourself.
Mode checking algorithm
Checking AHCI mode in Windows 7 or 10 is easy. Initially, you need to open the “Device Manager”, you can do this in two ways.
First of all, click on the “Start” menu and go to the “Control Panel” menu. In the window that opens, in the first rows of the general list there will be such an important “Device Manager” for you.
You can also open it by entering the phrase “Device Manager” in the search bar.
In the “Device Manager” that opens, you can easily find the line IDE ATA/ATAPI controllers. Click on it so that this section opens and displays its contents.
If the AHCI mode in Windows 7 or 10 is installed, and the corresponding drivers are installed at the same time, in the sublist that opens you can find something resembling one of the entries:
- Standard AHCI1.0 Serial ATA Controller;
- Intel(R)5 Series6 Port SATA AHCI Controller.
Note that the key in both of these entries is the presence of the word "AHCI" itself. Unfortunately, the absence of this word indicates that this mode is disabled and not installed.
In particular, if the word “IDE” flashes in this line, it means that you can confirm that the desired mode is not installed; you will have to work hard to remove “IDE” and install AHCI.
If you really want to change everything, then direct your efforts to familiarize yourself with how to enable AHCI mode in Windows 7 or 10.
Method number 1. Enabling AHCI mode through the registry
Step 1: First, you need to open the Registry Editor. This can be done by right-clicking on the “Start” button and then selecting “Run”. In the jnr line you must enter the regedit and confirm with the OK .
Step 2. In the window that opens, go to the path HKEY_LOCAL_MACHINE\ SYSTEM\ CurrentControlSet\ Services\ iaStorV
Step 3. Click on the “Start” , set the value to 0 and confirm the action with the “Ok” , as shown in the screenshot.
Step 4. Go to HKEY_LOCAL_MACHINE\SYSTEM\CurrentControlSet\Services\iaStorAV\StartOverride and do the same steps for the parameter called 0.
Step 5. Go to HKEY_LOCAL_MACHINE\SYSTEM\CurrentControlSet\Services\storahci , double-click on the Start and set the value to 0.
Step 6. Go to HKEY_LOCAL_MACHINE\SYSTEM\CurrentControlSet\Services\storahci\StartOverride and set the value 0 for the parameter called 0.
Step 7. Reboot the PC and go into the BIOS, where you need to set the AHCI operating mode. In different models of mother cards, the path to the mode switching screen may have different names. The screenshot below shows the most common option.
Save the changes and restart the computer in safe mode.
After the reboot, a new SATA driver package will be installed, and the system will require another reboot, after which AHCI mode will be enabled.
It is worth noting that in some cases this method does not work, which leads to a “blue screen” and a further reboot.
To try another method, you need to return IDE mode to the BIOS
How to enable AHCI on Windows 10
Many users of PCs and laptops with an SSD drive are wondering how to enable AHCI mode in Windows 10. This is due to the fact that thanks to this mode, it is possible to increase the performance of the hard drive due to Native Command Queing and Device Initiated Power Management technologies. In most cases, this mode is enabled on gadgets with Windows 10 preinstalled. If the operating system was installed in IDE mode, changing it to AHCI is quite difficult, but possible.
Method number 2. Enable AHCI mode using the command line
Step 1. Turn on the computer, right-click on the “Start” and open the “Command Prompt” or “Windows PowerShell” as an administrator.
Step 2. In the window that opens, enter bcdedit /set {current} safeboot minimal and confirm by pressing Enter .
Step 3. After completing the operation, you need to restart the PC, go into the BIOS and change the operating mode, as described in the first method. The computer will boot into safe mode and install the necessary drivers. After that, open the command line again as an administrator and enter the command bcdedit /deletevalue {current} safeboot . Confirm by pressing Enter .
After the next reboot, a new operating mode will be enabled, optimized for the use of high-speed SSD drives.
What to do if important data is missing?
Any manipulation of the hard drive increases the likelihood of data loss. Especially when it comes to manipulating the disk operating mode, etc.
Often, in an attempt to enable ACHI mode, users perform actions that disrupt the logical structure of disks . Moreover, often inexperienced users, when enabling ACHI via the command line, execute commands that initialize the disk - that is, all data on the disk is destroyed and initial settings are made.
Therefore, be extremely careful when performing any manipulations with the disk.
If you notice the disappearance of important files or problems with local drives, immediately restore the data to a safe place. Otherwise, you may lose your data permanently .
To recover data, download and install the RS Partition Recovery .
RS Partition Recovery program
One-stop data recovery solution
The program allows you to recover lost data due to accidental deletion of files , formatting of the drive , damage to the logical structure of the drive and in many other cases.
In addition, RS Partition Recovery supports ALL types of modern file systems , so you can recover files not only from Windows disks, but also from those that worked in other operating systems (including server ones).
Important : Be sure to select a drive that is different from the one on which the file was previously stored as a location for recording the recovered files. This will avoid overwriting the file.
It is for this reason that RS Partition Recovery allows you to write recovered files to a separate hard or local drive (or flash drive ), pack the recovered information into a ZIP archive , or immediately send it to an FTP server .
Possible consequences of reinstallation
Why does my computer wake up on its own in Windows 10?
The above actions may lead to undesirable consequences. For example, Windows will stop turning on and starting, or the hard drive will disappear from visibility. In such cases, it is recommended to enter “sata ahci driver windows 10” in a search engine and download drivers from an official or trusted site.
Important! It is not recommended to activate another disk technology if you do not understand why and how this is done.
Using the Command Line
Now it has become clear what IDE and ACHI are, enabling Windows 10 is not difficult even for beginners. If you don’t want to use the BIOS, you can easily find the necessary parameters in the registry editor or the command line.