Users often encounter problems accessing the World Wide Web. The reasons may be completely different.
Today we will try to figure out what to do if the system displays the message “limited access to Wi-Fi” and how to avoid this problem!
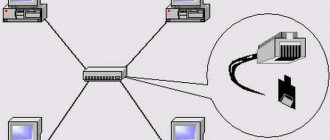
First, it’s worth understanding that the router itself does not provide access to the World Wide Web. To do this, it must have a connection to the provider and be configured. The router itself is a device for creating an access point over a WiFi network. Therefore, without Internet access, you will not be able to use the provider’s service.
What causes the limited connection problem?
How to fix the situation if you find limited access to your WiFi network? To approach the solution directly, it is necessary to study the main causes of the problem. If you have access to the Internet via a network cable, but the router does not allow you to access the Internet, then the following may interfere with this:
- incorrect network router configuration;
- failure of the router drivers (the situation is typical for unlicensed copies of the OS);
- The wireless network on the device itself is not configured correctly.
In addition, on laptops, the wireless network when connected to WiFi says “Limited” if the user has changed the power mode. So, in power saving mode, insufficient power may be supplied to the adapter, which causes glitches.
Why is Wi-Fi limited on a laptop?
Wi-Fi connected - no Internet
The functionality of the router does not provide direct access to worldwide networks. To receive it, the router must be connected to the provider. You need to make the appropriate settings on the receiving device. The router receives Internet traffic and distributes it wirelessly between equipment connected to Wi-Fi.
Technically, the procedure is implemented through a network adapter built into the user’s equipment. It is worth noting that it is usually not sold complete with personal computers, so for this equipment it must be purchased separately.
Important! Equipment that is not equipped with the necessary elements to ensure the reception of an Internet signal is one of the reasons for its absence.
How the access restriction warning is displayed on the device screen
There are three main reasons why access to the World Wide Web is complicated or impossible when trying to connect via wireless networks:
- lack of connection with the provider - identified by the lack of connection on all devices, including directly via cable;
- problems with the router or incorrect settings in it - determined by the lack of Internet for all users of the devices, but its presence when a wired connection is implemented;
- Problems with a laptop – communication via Wi-Fi is possible on all devices except one.
To eliminate some of them, it is enough to reboot the device, reinstall the drivers, or make adjustments to the settings. In some cases you will have to contact your provider.
If everything is fine with the equipment, but the Wi-Fi connection is limited - it appears and disappears, you need to contact a specialist to fix the basic equipment or try to solve the problem yourself. The cause of the problem may be technical problems with the provider. To eliminate this, you need to connect the computer equipment directly to the wire. If there is no connection, you should call the operator and fill out a request. If, when connecting directly via wire, the Internet is still available, then the access restriction is due to one of the reasons:
- error in the router software;
- incorrect router settings or incorrect configuration;
- Incorrect network settings of the receiving device.
Note! Limited Wi-Fi connectivity on a laptop may be due to a change in power mode. When set to Economy status, the adapter will not have enough power, which may cause the device to limit the activity of all functions.
Solving the problem of limited connection on Windows 7
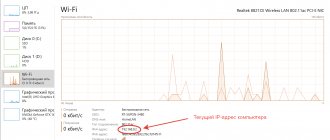
Limited access to WiFi on a laptop with Windows 7 is most often observed due to incorrect IP address settings. You can fix the problem as follows:
- We go to the network and sharing control center.
- Right-click on the wireless connection and select “Properties”.
- In a new window, you need to find and select the line “Internet Protocol version 4 (TCP/IPv4)”. Open it by double clicking.
- Check the box next to “Use the following IP address”.
- Manually enter the new router subnet address. It is indicated on a sticker located on the bottom of the device. Most often this is 192.168.1.1.
Note! If the router has a different address, for example, 192.168.0.1, then you need to set a different address on the laptop from the same subnet. The countdown of available ones starts from 192.168.0.2.
Power supply problem
Objectively, this is one of the rarest phenomena. But such cases also occurred, which makes it necessary to include them in this list.
Some laptops that have the power saving scheme enabled may disable network cards. Due to this, power consumption is reduced and the battery consumes its charge less intensively.
Here, rather, the amount of supplied power decreases, which the adapter may not have enough of, and it begins to be openly capricious. Alternatively, the wireless network stops working.
To solve this problem, you will need to set a ban on the network adapter from switching to this high-saving mode. For this:
- right-click on the network adapter icon;
- open the “Properties” menu;
- go to the “Power Management” tab;
- Uncheck the box that says allow turning off this device to save energy.
The problem is now solved. You can check if the connection is restored. If yes, then the reason was found correctly, and you managed to deal with it yourself.
Solving the problem of limited Internet access on Windows 8
Quite often, users note that when updating the Windows 7 OS to version 8, there are failures when accessing the Internet. What does limited Internet access via WiFi mean in this case and how to fix it? This is usually due to incorrect transfer of drivers from the “seven” to the new operating system. In this case, there will be access from other devices, but from a laptop running G8, it is limited. What should I do if my Windows 8 laptop has limited WiFi connectivity? The solution is to enable/disable the network adapter:
- To do this, call the “Run” command (Win+R key combination). In the window that opens, enter the command ncpa.cpl.
- A list of available connections will appear on the screen. You need to find the existing adapter and right-click on its icon.
- Select disable and wait until the icon turns gray. This means that the equipment has been successfully disabled.
- After this, you should turn on the device again and check access.
Why does it say limited Internet access via WiFi? The culprit may be the low connection priority in the OS. It is worth saying that software control of this parameter will not be enough. Sometimes, to solve a limited network problem, you have to disable higher priority devices, such as an Ethernet connection.
This is done as follows:
- go to the network and sharing control center;
- click on “Change adapter settings”;
- in a new window, right-click on the Ethernet or other connection that you want to remove;
- From the list of suggested actions, select “disable”.
Live communication
If you find out that you cannot connect to your own wireless network, dial the operator’s technical support number. This should be done for the reason that changing Wi-Fi settings may not only not correct the situation, but also significantly worsen your situation - in some cases you even have to reinstall the software on the router. In addition, limited access is most often a consequence of the following reasons:
- An invoice from a service provider that is not paid on time.
- Technical problems associated with a line break or breakdown of receiving equipment in the house.
- A changed MAC address of a router or computer that is not registered with the provider.
It is possible that you will not have to make any effort to fix the connection.
However, what to do if the provider finds it difficult to name the reason? Most companies will offer you to call a technician who will charge a certain amount for his services, but this is not at all necessary. You will need to open the Wi-Fi network settings and try to figure out the causes of the problem.
What should I do if my phone has limited connection?
Problems with network access are also observed on mobile devices. What should I do if my phone has limited WiFi connection? The solution to the issue comes down to the following steps:
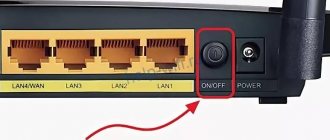
- reboot the router;
- reboot the phone;
- deleting the network and reconnecting to it;
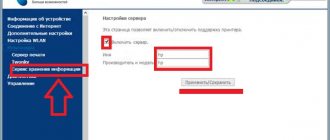
- changing the broadcast channel in the router settings (“Wireless” – “Wireless Settings” – select any available channel from the list – “Save”);
- selecting the AES encryption algorithm.
General solution for all versions of Windows
Regardless of your operating system version, there is a universal solution for most network problems and errors. The method consists of resetting network parameters via the command line:
- Launch Command Prompt with administrator rights.
- Write a few simple commands in it:
- Route –f;
- netsh winsock reset;
- netsh int ip reset c:resetlog.txt.
- Restart your PC.
After these manipulations, problems with the network will be resolved. It is worth knowing that all settings will be reset and you will have to enter them again.
Disabling the system update service
Sometimes this particular service can place an extremely heavy load on the operating system. And because of this, it will stop working normally.
At the same time, this same service may not be displayed within the local system node in the Task Manager and it will seem that this is not the reason at all.
But it’s definitely worth trying to disable the update. There are two ways to do this - one of them will definitely suit you, depending on the OS.
So the first way is as follows:
1. Through the “Start” menu, open “Control Panel” and find the “System and Security” section there. Click on it.
Rice. 6. “System and Security” section in the Control Panel.
2. In the next window, click on “Windows Update”.
Rice. 7. “Windows Update” item in the “System and Security” section.
3. On the left panel, click on the “Settings” item. Next you will see the inscription “Important updates”. Under it you can choose when they will occur. Actually, in it you need to select the “Do not check...” option.
4. And also uncheck the two items that are located a little lower. After this, the system will not check for updates and, accordingly, will not boot.
Rice. 8. Disable automatic checking for Windows updates
You can also save the system from the need to constantly check for updates in services. You can get to the window with them as we described above - press “Win” and “R”, the program execution window will open, enter “services.msc” into it and press “Enter”. Next do this:
5. Find “Windows Update” in services. Right-click on this item twice.
Rice. 9. “Windows Update” in the services window
6. A detailed view window for this service will open. Then everything is as we also said above - next to the “Startup type” inscription, select “Disabled”. If this is not possible initially, first click on the “Stop” button. Then follow the steps described above.
Rice. 10. Detailed view of the operating system update service
7. All that remains is to click the “Apply” button and then “OK”. Close all open windows.
Tip: If the problem persists, try restarting your computer for the changes to take effect.
Quite often, this simple method helps get rid of this annoying problem.
Network settings with the DHCP server enabled on the router
If a DHCP server is enabled in the router settings, the manually entered network address may not match the range of addresses on the PC. This may be the cause of the problem, which can be resolved as follows:
- Press +R and enter the command ncpa.cpl.
- Select your LAN or Wi-Fi network adapter and click “Properties” in the context menu.
- Select the "TCP/IPv4" option.
- Select the checkboxes at the “Obtain an IP address automatically” level. With DNS you can choose the same thing.
- Click OK and restart the network or computer.
If the Internet is working, but some sites are not working or connecting to the network takes longer than usual, install alternative DNS. For example, Cloudflare DNS 1.1.1.1 and 1.0.0.1.
"Service Node" is overloading the disk drive
How to remove a Wi-Fi network on Windows 7: list of unnecessary connections
Important! Often in Windows a problem appears in the form of an overloaded disk by this process. In most cases, the problem is solved by simply restarting the computer, since the error occurs due to a single failure of one of the services. However, if the service starts to malfunction, restarting it will not fix the situation.
In other words, the drive will continue to malfunction and the problem should be taken seriously. That is, first disable the anti-virus software and disable it from running along with the system.
Turn off SuperFetch
This service works in the following way: programs that are often used are loaded into the computer's memory directly, rather than being launched again every time the computer is turned on.
Such a simple, at first glance, procedure can significantly relieve your computer of unnecessary data and excess load.
But sometimes it works in a completely incomprehensible way and, on the contrary, begins to load the system with unnecessary files.
And all because these same “frequently used” programs turn out to be too many over time. Moreover, for some reason these programs are launched while the system is running.
It turns out that the longer the user works with the system, the more programs SuperFetch opens.
In general, in some cases it is worth trying to disable this service.
Only first this needs to be done within the framework of the process in question, and then, if it does not help, for the entire operating system. The process looks like this:
1. In Task Manager, open Service Host: Local System. To do this, click on the right arrow, which is located to the left of the element's label. After that, it will turn into a down arrow (in Figure 2 it is highlighted with a green square).
2. A list of items that are part of the local system node will open. Among them, in fact, there may be SuperF. If this is the case, left-click on it once and click on the “End task” button, which, as before, is located at the bottom left.
Rice. 2. Task Manager with SuperFetch service
3. Next, restart your computer and try using your computer again. If the problem persists, you should try disabling SuperFetch for the entire operating system.
4. To do this, in the same Task Manager window, go to the “Services” tab (located at the top). We need a service with the name "SysMain" and the word "SuperFetch" in the "Description" column.
5. You will need to right-click on this element and click on “Stop” in the drop-down menu.
Rice. 3. Disabling the “SysMain” service in system services
6. Try restarting your computer again and using its services. If nothing changes, open the services window, that is, services. To do this, you can use the search or press “Win” and “R” at the same time, then enter “services.msc” and press “Enter” on the keyboard. The window shown in Figure 4 will appear.
7. In it, find the SuperFetch service and double-click on it with the left mouse button.
Rice. 4. SuperFetch in the Windows Services window
8. A more detailed view of this service will open. There, on the “General” tab, find the inscription “Startup type”. Next to it will initially be written “Automatic”. So, you need to select the “Disabled” option, then click “Apply” and “OK”.
Rice. 5. SuperFetch Service Detail Window
Attention! If after performing these steps the performance problem is not solved, be sure to return everything as it was, that is, enable SuperFetch in the Windows services window.
How can you spot the problem?
At some point, the user manages to launch the Task Manager. This is done by simultaneously pressing the “Ctrl”, “Alt” and “Delete” buttons.
And there turns out to be an element called “Service Node: Local System”, which loads the system more than any other, that is, in the “CPU”, “Memory” and “Disk” columns there is the most percentage.
All this looks as shown in Figure 1.
Rice. 1. "Service Host: Local System" in Task Manager.
The first thing that comes to mind is to simply close this process in the Task Manager.
This means that the user will select this program in the general list and click on the “End task” button in the lower right corner of the open window.
Perhaps this process will be completed, but the next time it starts it will make itself felt again. That is, this will definitely not solve the problem.
Over time, the computer begins to work in normal mode (without freezing or slowing down) for less and less time. In the end, it becomes simply impossible to work with him.
It is worth saying that this problem is relevant for Windows 8 and 10; it does not occur on Windows 7.
Get to the point!
We will look at several really working ways to get rid of this annoying problem.
Cleaning SoftwareDistribution with updates
If the above method did not bring the required results, you need to open the Command Prompt again and empty the SoftwareDistribution directory. To do this, you need to stop two services with the commands:
- net stop wuauserv
- net stop bits
You can then open the C:\Windows\SoftwareDistribution directory and completely clear its contents (no need to delete it). When it is empty, you should restart Windows and turn on the services back the next time you start:
- net start wuauserv
- net start bits
Important! Update services do not need to be re-enabled - in most cases, updates are required very rarely for a user's computer. In addition, this will help free up system resources for your tasks.
Automatic error correction tools
How to open access to a computer via local network Windows 10
Such programs are most often used on smartphones running Android or iOS, since they have fewer options for fine-tuning the Internet from their interface. For the most popular Android system there is an Android Wi-Fi Fixer application. It essentially repeats the actions performed by diagnosing Windows problems. It searches for errors and automatically corrects them where possible. If something could not be corrected, the user will be told about this in a report after checking the operating system. When the scan starts, the software starts checking all possible network parameters and tries to connect to your home wireless network.