How to disable Secure Boot in BIOS
It’s worth noting right away that Secure Boot is not integrated into the BIOS. It is found only in UEFI (a more advanced version of the BIOS, sometimes with a full graphical interface).
By default, UEFI Secure Boot can be disabled in two ways:
- Directly through UEFI settings.
- You need to turn off your PC.
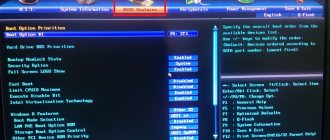
- Press the power button. When the logo of the laptop or motherboard manufacturer appears, press Del on the keyboard.
- After that, find the “Secure Boot” item (usually located in “Security”) and select “Disable”.
- Then press F10. This is automatic saving of parameters followed by turning off (or rebooting) the device.
- If Windows 8 (8.1) is installed on your PC, then to enter UEFI you need to:
- Go to “Options”
- Next “Update and Security”
- Then - “Recovery”, click on “Reboot”.
- After this, the system diagnostic window will automatically open. You need to click on “Advanced options”
- Next, select “UEFI Setup”.
How to disable Secure Boot (video instructions)
General rules for disabling the UEFI feature
Read also: How to enter BIOS? All possible login methods
You can use various methods to disable it.
The first of which is possible if your device has Windows 8 or higher operating system.
In this case, you will need to open the right panel and select "Settings" , then go to the section for changing computer settings.
Then you should select the “Recovery” in the “Update and Recovery” and click on the “Restart now” using special computer boot options.
Selecting boot options
In additional parameters, select UEFI settings and reboot the device.
UEFI selection item
Another way to enter the BIOS of your laptop is to use the key combination Fn+F2.
After doing this, you will also have access to all BIOS settings.
On some operating systems, hotkeys may differ.
So on desktop computers this is most often the Delete key, and on most laptops it is F2.
In order not to be mistaken about which keys allow you to enter the BIOS settings on your device, you can see them on the initial screen at startup.
To begin with, it is worth considering the BIOS settings InsideH20 setup utility with the available UEFI function, since this is a common set of firmware for most laptops.
This includes devices from brands such as Acer and Toshiba, the transition of Secure Boot to an inactive state is somewhat similar.
Examples of disabling Secure Boot on different laptops and motherboards
On laptops and boards from different manufacturers, you can disable secure boot using the same algorithm. In general terms it is:
- Login to UEFI.
- Find the Secure Boot item.
- Set the value to “Disable” or “Off”. And then restart the PC.
But you need to take into account that this function is responsible for the automatic integration of the Windows license code into the system. If a manufacturer uses such a feature, then disabling Secure Boot will disable the Windows license.
That is, you will need to enter the code manually (via the standard “Activation” menu) or purchase a new license (for example, if you plan to upgrade to the advanced edition).
Disable option on Hewlett-Packard devices
Read also: 5 Tips for setting up the Windows page file (7/8/10)
This operation may require some additional steps on some HP notebook models.
One such model is the HP Pavilion.
HP laptop BIOS
Initially, you should start the laptop and at the very beginning of boot (as soon as the very first characters appear on the monitor screen), press and hold the Esc button for a while.
After this, the “Startup Menu” , which contains boot options.
Next, you need to use the F10 button to get to the BIOS settings window.
Having entered it, you have to select the “System Configuration” located at the top of the window, which you should navigate to using the arrow buttons.
By pressing Enter you will be taken to the settings window for this item, in which you need to select the “Secure Boot” .
To disable it, set the value opposite it to [Disabled].
After this, go to the item “Legacy support” , which is responsible for compatibility with other operating systems.
Set it to the [Enabled] state, since this function is disabled by default.
The system will issue a warning for your actions, which you must ignore and select “Yes” .
Next, press the Enter button, after which a standard reboot occurs.
During this process, a window will open warning you that the operating system's secure boot mode has been changed.
To complete the settings, you will be asked to enter a four-digit code and press the Enter key.
After this, the computer will continue to reboot, and all existing BIOS UEFI changes will take effect.
When you start it again, you need to hold down Esc on the keyboard, which will allow you to enter the boot menu.
Here you will need to select the option to launch the operating system - hard drive, CD-Rom or bootable flash drive.
Disable Secure Boot on Asus motherboards and laptops
- Logging into UEFI is done using Del at startup.
- Next go to “Boot”.
- In the “Secure Boot” tab, select “Other OS”.
- Save using F10 (or click on “Save” with the mouse cursor).
What is Secure Boot or secure boot
Secure Boot is a protocol for checking bootable operating systems that is part of UEFI. This protocol verifies the digital signature of operating systems or UEFI drivers that are loaded when the computer is turned on, and if such a signature is missing, it prevents them from starting.
Using Secure Boot protects the system from the introduction of malicious code into bootable components of operating systems. Such an injection, for example, was used by the Petya ransomware virus, which spread in 2022. Secure Boot can also be used to limit the list of operating systems that can run on a computer.
Secure Boot is currently supported by operating systems such as Windows 8, Windows 10 and Windows 11, as well as some Linux distributions such as Fedora, openSUSE, RHEL, CentOS, Debian and Ubuntu.
In the yet-to-be-released Windows 11, Secure Boot is a requirement and is listed in the system requirements. Although, with the help of small tricks, current builds of Windows 11 can be installed without TPM and Secure Boot.
How to disable Secure Boot in Windows 10 on laptops from 2009 to 2013.
Disabling occurs in a similar way, but there is UEFI - without a graphical interface (visually similar to BIOS). There you will need:
- Go to the “Security” tab. And in the “Secure Boot” line select “Disable”.
- Afterwards, save the settings via F10.
Solving problems with Secure Boot
There are a few caveats when working with Secure Boot.
- You must enable UEFI settings in the BIOS - Legacy Boot Mode is disabled.
- For UEFI, the drive must have GPT markup; MBR is used by older BIOS versions.
To check the format of the data allocation table:
Open Task Manager via Win + X
Expand the Disk devices and open Hard disk properties
In the Volume , click the Fill and pay attention to the Section Style line.
To change MBR to GPT, you need to copy all the data to another drive, format the current one in GPT and reset the files back.
Some firmware managers support resetting keys to factory defaults. The option is located primarily in the same BIOS Setup section as Secure Boot. If your UEFI supports this feature, restore the keys and reboot the computer, saving the new configuration.
Disabling Secure Boot on HP Pavilion laptops and other HP models
In laptops from HP, to enter the UEFI settings you need to when the logo appears on the screen (after pressing the device's power button)
- Press the Esc key several times.
- A menu of additional device startup options will appear. To enter UEFI you need to press F10.
- And to disable secure boot, you need to go to the “System Configuration” section, in the “Secure Boot” line, select “Disable”.
- Use F10 to save the settings (the device will then reboot automatically).
Disabling on a Toshiba laptop
Read also: [Instructions] How to enter Safe Mode in the Windows operating system (XP/7/8/10)
Go to BIOS.
“Security” section , which is present in the top menu list.
Don't forget that all movement through the list is done using the arrow keys.
Toshiba laptop BIOS
Having thus selected the required item, press the Enter key to enter its settings.
After that, go down to the “Secure Boot” located at the bottom of the tab.
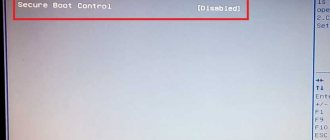
By default, this function is enabled and labeled [Enabled].
When you click on this item with the Enter button, you will be given the opportunity to select the [Disabled] option - disabled.
Using these steps, you will disable the Secure Boot function on your laptop, but this will not be enough to install another operating system on it.
You will also need to activate compatibility mode with other OSes; to do this, go to the Advanced using the same arrow buttons.
On this tab, among the available list, find the “System Configuration” and press the Enter button.
Having entered the settings of this item, select the line “Boot Mode” (in some models there may be “OS Mode Selection” ) and in the menu that opens, go from the default position “UEFI Boot” (on some devices there may be “UEFI OS”) to the mode “CSM Boot” (there may also be options such as “CMS OS” , “UEFI and Legacy OS” ).
After making all the settings, press the F10 key for them to take effect, and in the “Save & reset” , confirm your intention by selecting “Yes” and press the Enter key.
The final step will be to reboot the laptop, after which you can install any other operating system on the device.
To do this, you will again have to enter the BIOS using the F10 or Esc key and select the connected installation flash drive or bootable CD in its settings.
How to disable secure boot on Lenovo and Toshiba laptop
The whole procedure is performed in a similar way as on Asus laptops, which have UEFI without a modern graphical interface. The only difference is that when the manufacturer's logo appears, you must:
- Press F2 instead of Del
- Or the Fn+F2 combination on laptops whose keyboards do not have a NumPad
- Then go to the “Security” section and in the “Secure Boot” line indicate “Disable”.
- The F10 key will save the settings and automatically reboot the device.
How to check if Secure Boot is enabled?
The inability to upgrade from 10 to Windows 11 may be due to several reasons. Therefore, it would not hurt to first make sure whether secure boot is really disabled on your computer. For this:
- msinfo32 command into it without quotes and click “OK”:
1
- The System Information window opens. On the right side, find the “Secure Boot Status” element:
- If it says “Off,” it means that Secure Boot is either not enabled or is not supported at all by your computer.
Another way is to use the free WhyNotWin11 program, which is designed to determine whether your computer is compatible with Windows 11:
- download the WhyNotWin11 program on our website .
- Just run it and see what is listed next to “Secure Boot”:
Now that we have found out that the reason for the impossibility of updating to Windows 11 lies in the disabled Secure Boot feature, we can begin to enable it.
Disable Secure Boot on Acer devices
By default, disabling Secure Boot on Acer devices is not available (the item is highlighted in gray). That's why:
- The first thing you need to do after logging into UEFI (using Del when turning it on) is to go to the “Security” section and set a login password. It will be automatically requested the next time you try to enter the BIOS.
- After that, save using F10 and reboot. When you turn it on, after pressing Del, you will need to enter the same password.
- Then you need to go to the “Boot” section, in the “Secure Boot” line set “Disable”.
- Then use F10 again to reboot the device. On some devices, the required item is located in the “Authentication” section.
On some motherboards, you still need to first enable the “Legacy Bios” item (also located in the “Boot” section). This applies to those devices that were produced between 2009 and 2011. It was then that UEFI was massively integrated, but to support outdated OSs they also added traditional BIOS (working in compatibility mode).
And disabling Secure Boot will be available only in this mode (by default, there is no line about secure boot at all).
Why enable Secure Boot on Windows 11?
In short, the Secure Boot function is designed to protect Windows and, as a result, the computer from malware that can be loaded along with the operating system. Such viruses are considered the most dangerous, because... they are loaded before the antivirus, so the latter cannot detect them. This is usually how the most sophisticated viruses operate: data encryptors (and also ransomware viruses), rootkits (which allow remote access to a computer), miners (“extract” cryptocurrency using the computer’s power), etc.
And, of course, secure boot is simply necessary for Windows 10 users who decide to upgrade to Windows 11 via Update Center or by writing the original system image to a bootable USB flash drive (for non-original, i.e. pirated/modified images, this feature checks for the presence of Secure Boot may be disabled).
Disable Secure Boot on Samsung laptop
- To enter UEFI, use the F2 key.
- Next, you need to go to the “Boot” section, set the “Secure Boot” line to “Disable”.
But even after this, installing a third-party OS (for example, a Linux distribution) will not work.
When you try to boot from the installation drive, the device will only display an error that a compatible bootloader was not detected.
To fix this, you need to select “OS Mode” in the “Boot” section and select “Legacy” or “CSM”. And then save the parameters via F10.
Check if TPM 2.0 is present in Windows 10
To determine whether TPM is enabled on your computer, follow these steps:
- Open Start in Windows 10.
- Search for tpm.msc and click the top result to open the Trusted Platform Module (TPM) management tool.
- In the Status and TPM Manufacturer Information section, confirm the presence and version of the TPM.
If the device includes a TPM chip, you will see hardware information and status. Otherwise, if you see a "Cannot find a compatible TPM" message, then the chip is disabled in UEFI or there is no compatible TPM on your computer.
How to disable Secure Boot for Gigabyte motherboard
One of the advantages of UEFI in Gigabit motherboards is full support for the Russian language (starting from the very first versions). And to disable secure boot, you need to:
- Go to “BIOS Features” and turn off the corresponding item (set to “Disabled”).
- Then select “Download CSM” and set it to “Always”.
To install some OSes, you will also need to set “Legacy” in the “Boot option filter” line.
To save the settings, use F10, or select the corresponding item at the bottom of the screen (using the mouse cursor).
If you are unable to enter BIOS UEFI Asus
In some cases, the operating system loads very quickly and you may not have time to enter UEFI. In this case, use these instructions:
- Right-click on the Start menu.
- Go to "Power Management".
- Click on the “Advanced power options” link.
- Click on the “What the power buttons do” link.
- In the window that opens, uncheck the “Enable fast startup” line and click “Save changes.”
If you have any questions or something doesn’t work out, be sure to leave a comment and I will quickly help you.
Troubleshooting
Sometimes the Secure Boot settings may not be correct.
In this case, even after installing the system, in the corner of the desktop you can see an error message like “Professional SecureBoot is not configured correctly Build 9600.”
The reason for the appearance of this information is not at all that the operating system turned out to be unlicensed or was incorrectly activated, but only about a decrease in the security of the computer and the need for the following actions:
- Determining in one of three known ways whether Secure Boot is currently working;
- Checking the security policy type;
- If the mode is disabled, to eliminate the message about security problems, you should enable it (when installing the system, you can again choose to disable SB), restart the computer, enter the BIOS and enable Secure Boot.
Fig.5. Enabling SB in the UEFI settings of the AsRock motherboard to solve the problem.
If the applied method did not help resolve the problem, you should try resetting the UEFI settings to factory settings.
For this purpose, there is a Factory Default item in the BIOS. If the computer does not support this mode, it will most likely not be possible to resolve the issue.
The only possible option is to install updates from Microsoft such as KB288320, which is part of the GA Rollup A package.
You can download it from the manufacturer’s official website, be sure to take into account the bit capacity of your system – x86 or 64.