Hello! Today I will tell you about the Windows 7 error “Windows was unable to connect to...” of some Wi-Fi network. A similar error is present throughout the Windows OS family, but in some places it has different formulations. The main thing is that there is a solution to this problem, and it is quite simple. We will devote this article to solving such a problem. Go!
Have questions? Doubts? Bad mood? Comments are available below - be sure to write something there! For XP and Windows 10 we have separate articles on this issue.
Three main segments of a wireless network. Due to a glitch in one of them Wi-Fi does not work:
1. External problems: when the Internet provider’s signal does not reach the router (the device that “distributes” Wi-Fi).
2. Network problems: problems within the router itself. The router does not distribute the Internet.
3. Internal problems: problems with the computer that cannot connect to a working Wi-Fi network (typical message - authentication error).
It is recommended to diagnose the cause of the failure in this order. After all, if the problem is external, then there is no point in manipulating the router and computer.
Clear Internet settings and reset DNS cache
If none of the steps suggested above produce positive results, you can clear your Internet settings and reset your DNS cache. But it’s important: resetting Internet settings means resetting them to default, and if your connection parameters are not automatic, but specified manually, for example, a static IP address, then all these parameters will need to be specified again. And, accordingly, these parameters must either be known from the provider, or written out in the properties of the configured network adapter. To reset Internet settings, launch the command line, it must be launched as an administrator.
And enter the command like this:
netsh winsock reset
Then we restart the computer and try to connect to Wi-Fi. If this operation has no effect, then reset the DNS cache. To do this, we need to enter a command like this into the command line (again, launched as administrator):
ipconfig/flushdns
And in this case, we restart the computer, and then try to connect to Wi-Fi.
External Wi-Fi faults
The first task when Wi-Fi is not working is to determine whether the signal is reaching the router. The vast majority of such devices are equipped with LED indicators. You need to find among the icons on the router body the icon responsible for indicating the external signal. This icon may have the following symbols:
ADSL
WAN
Ethernet
3G/4G
If the corresponding LED blinks or lights up steadily, it means there is Internet, but the problem is in another segment - you can move on to the next section of the article. No icon is lit? This means the router has stopped working. Check the power supply and connect the device to a different electrical outlet.
If the indicator is not lit, this means that it is not receiving an external signal (the network is fully operational, but without access to the Internet). In this case, you should turn off the router, turn it on after a few seconds, then wait 1-2 minutes for the device to fully boot and try to “catch” the signal from the provider. It is also recommended to check the reliability of the cable connection with the router (in the case of mobile Internet, the functionality of the SIM card): if the physical connection is broken, then the router does not distribute the Internet.
Rebooting and checking the cable didn't help - you did everything, but the Internet doesn't work? You need to call the provider's technical support: the problem is not in your devices. Did you pay for the services on time?
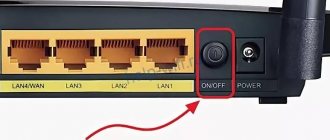
Router problems
When an external signal is clearly “audible” on the router, but the computer cannot “catch” the Internet via a wireless network, you should check the presence of the network from another device - for example, from a smartphone/tablet, or from another PC. If mobile gadgets also do not work, then the problem lies in the router (another name for a router). If the connection on another device is working, then you should move on to the next section of the article - PC problems.
A router is essentially a small computer with its own processor, memory and a miniature operating system - firmware. From time to time, problems arise with it - like any computer. When the router stops working, first try rebooting the access point and wait a couple of minutes. Often this action is enough to restore Wi-Fi operation.
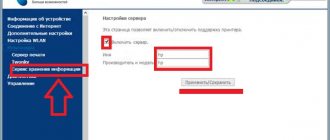
Fig: Logging into the router control panel: you need to enter the address 192.168.1.1 into the browser (on some models - 192.168.0.1)
You need to log into the router control panel. To do this, enter the address: 192.168.1.1 into the address bar of any browser (some models have a slightly different address: 192.168.0.1). You can usually find out the router’s address in the device’s instructions, and sometimes it is printed on the access point’s body. The browser will ask for your username and password (usually the admin/admin pair).
By the way, if the computer requests authorization, this means that the router is just not distributing the Internet, but the Wi-Fi itself is working. If the login and password prompt does not appear, this means that the wireless network is completely absent. Try this: connect to the router wired - it comes with a short network cable. One end needs to be inserted into the port on the computer, the other into the port of a working router. After that, enter the address 192.168.1.1 into the browser again.
Got an "authentication error" message? Try entering your password and login again: in Latin letters, without using capital letters; You can also find out your login and password in the instructions. When everything is entered correctly, the main page of the control panel will open.
Although the design and interface language of each router manufacturer are different, there are general principles for working with the control panel. We will look at solving problems with Wi-Fi using the example of a TP-Link device.
Fig: Main page of the access point web interface.
Additional solutions to the problem
Additionally, common problems should be noted:
- For some reason, the WiFi adapter was turned off by software. You can connect it and return it to the active state using the Fn key combination + wireless network icon (usually located on the function keys or numbers; on modern computers it can be made in the form of an airplane icon, symbolizing flight mode). You can also control its visibility from the device manager, through the context menu options.
- The wireless module is disabled by hardware. This often happens when a special button is touched, which disconnects the power supply circuit of the transceiver and is located on the PC case; accordingly, to solve the problem you need to return it to its original position. There may also be an extreme case - the WiFi module fails, but you can replace it yourself or contact a service center.
As you can see, there are quite a few reasons why Windows 10.8 and Windows 7 do not connect to WiFi, and the difficulty of fixing them varies markedly. In this case, you must strictly follow the attached instructions and, most importantly, do not be afraid to use the error log.
When Wi-Fi does not work (connection using a network cable)
Look for a section called Wireless (other names include Wi-Fi, Wireless Network, etc.). In the picture this section is marked with a green frame. Once there, find the checkbox to enable wireless communication and check it, then again set the network name and password for authentication in it, remove possible MAC address filters.
The Advanced options section should have approximately the same parameters as in the figure below:
· Channel selection: automatic;
· Bandwidth (20/40 MHz);
· Router operating mode: “access point” (or AP, access point);
· Mode: bgn for modern devices, or g for older PC models.
Reboot your Wi-Fi router and try connecting to the network again. Having trouble connecting? Try changing the name (SSID) and password, playing with the channel selection, choosing a different bandwidth. Reboot every time after changing the next setting if the interface requires it.
Rebooting the computer and router
Due to glitches in Windows 10 itself, your Wi-Fi connection may also be glitchy. You just need to restart your PC or laptop and try connecting again. If this does not help, you need to reboot the router. Moreover, you can try to reboot the router several times. If the reason for the inability to connect to Wi-Fi is interference on the channel used by the router, as a result of reboots, the router itself may change the channel used to a free one. But, of course, this is a solution for cases when we do not have a specific network channel specified in the router settings, and the device is configured to automatically select a channel.
If you use an external adapter connected via USB , you can also try to reconnect the device by hardware, including using a different USB port.
If your computer can't connect to a working Wi-Fi network
Often laptops are equipped with additional function keys for controlling devices: sound, touchpad, wireless adapter. Try to find the button with the Wi-Fi icon in the top row of the keyboard (F1 - F12) and press it simultaneously with the Fn key (bottom row). If the adapter does not work (it was turned off by accident, or to reduce power consumption), then after pressing this combination it will work again. You can check whether the adapter is turned on using the wireless icon near the Windows clock: a cross on the icon or the absence of an icon indicates that the adapter is turned off.
When the wireless network works on other devices, but in the Windows tray the wireless network icon is crossed out (or is completely absent) - the problem with Wi-Fi lies in a specific computer, and not in the network itself. This means that only this device fails to connect, but the Wi-Fi itself is operational. If the icon is marked with a yellow-orange dot, then try clicking on it and looking for the name of your network. It was found, but when entering the password an authentication error pops up? The problem is the wrong layout, the Caps Lock key pressed, or simply the wrong password.
In the case of a desktop PC, you must physically remove and reconnect the Wi-Fi adapter (usually a device the size of a flash drive, connected to the USB port at the back of the case). If the adapter is a built-in type (or we are talking about a laptop), try checking its functionality: right-click on “My Computer” / “Computer” - “Properties” - “Device Manager”.
Take a look at the “Network adapters” section: if one of them, especially those with the word Wireless in the name, is marked with a question mark, exclamation mark or cross, then the problem is a conflict between this device and Windows or with another PC node. It is enough to download the latest drivers for the wireless adapter and install them again - after this operation, the computer usually sees the network again.
In this case, an attempt to click on this control causes a message: unable to connect to the network.
The adapter is definitely turned on, the drivers are installed and there is no hardware conflict in the Device Manager, but the Internet still does not appear on the computer? There is probably a software problem with the networks. Let's check in the Windows Network Connection Center whether the OS considers this adapter to be enabled.
Fig: Windows Network Sharing Center
In the left part of the Center you need to select the “Change adapter settings” section. All Windows network adapters will appear in the next window. Take a look at the screenshot below: the wireless adapter in this case was turned off by software (highlighted in gray). In this case, the Internet does not work solely because the adapter is turned off. To enable it, just right-click and select “Enable”.
Fig: Software enable the wireless adapter
Finally, sometimes Wi-Fi experiences network incompatibility issues between devices. The router refuses to connect to the IPv4 protocol parameters that Windows offers it. You should “submit” to the router and give it the right to independently assign the network configuration. It sounds complicated, but in practice it's just one small adjustment.
Fig: Resetting the network adapter configuration in Windows
In the Network and Control Center, you need to select the current wireless connection, find the “Properties” item in it (screenshot on the left). In the dialog box that appears, find “Internet Protocol Version 4” and select “Properties” again. A window with IP address parameters will open. It is recommended to select automatic network configurations - so that the router can independently assign IP and DNS addresses (screenshot on the right). This method helps especially well if manually entered network addresses were visible in the window as in the right screenshot. This configuration is incorrect, and the computer does not see the network.
Network diagnostics
When Windows fails to connect to WiFi, these operating systems provide a special set of tools called the Network Diagnostic Framework (DMF) to diagnose the Network. To start it you need to do the following:
- open “Control Panel”;
- find the “Troubleshooting” section;
- in the interactive output area, the system itself will write information about the error that has occurred, after which you can launch the “Windows Network Diagnostics” utility using a hyperlink.
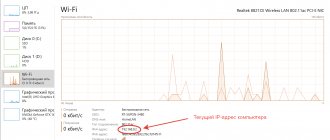
By the way! The “ping” and “tracert” commands are useful when carrying out diagnostic procedures to identify network errors. They should be executed from the command line (“cmd”) as follows: “ping 8.8.8.8” and “tracert 8.8.8.8”.
In the first case, information will be received about the actual presence of a connection with the specified resource, in the second - the number of nodes traversed before reaching the final goal.