To restrict access or to protect a document, you need to set a password for the Excel file. The most reliable way to protect a file: encrypting the entire Excel workbook. Protecting Excel with a password will keep your important data safe.
Microsoft Excel is a popular spreadsheet program that is part of the Microsoft Office suite. Excel is widely used by individuals and businesses for work.
Working in Excel can sometimes be labor-intensive; a lot of time is spent on creating tables. Therefore, it makes sense to protect your work from accidental or intentional impact, especially if unauthorized persons have access to the Excel workbook. Due to corrections or editing made to an important document, you can lose the data collected over several hours or days of work.
The program offers flexible settings to protect entire or individual elements of an Excel file:
- Book protection - protection of structure and windows.
- Sheet protection - protection of the sheet and cell contents (customizable in detail to specific needs).
- Book access—control access to the book for computer users.
- Protect a document with a password—set a password to open the document.
All other passwords in Excel, except the password to open a document, are not encrypted, so there are ways to remove them. For example, there are ways to unprotect an Excel sheet.
In this instruction, we will look at how to set a password on an Excel file to protect the entire document (book). We need to protect Excel with a password to restrict access to the file, so we will set a password in Excel to open the file. Another user without knowing the password will not be able to open the Excel workbook, our data will be reliably protected.
Attention! Remember and keep the password for opening the Excel document in a safe place. It will be impossible to recover your password.
In this article we will look at encrypting Excel files using a password in the following programs: Microsoft Excel 2016, Microsoft Excel 2013, Microsoft Excel 2010, Microsoft Excel 2007, Microsoft Excel 2003.
How to put a password on an Excel file in Microsoft Excel 2016
In MS Excel 2016, you can set a password to open a file to protect the workbook from unauthorized persons.
Follow these steps:
- With your Excel workbook open, go to the File menu.
- In the “Details” tab, click on the “Book Protection” button. The following settings for document protection will open in the drop-down menu:
- Mark as final - marks the book as final and not editable
- Encrypt with password—set a password to open this workbook
- Protect Current Sheet - Manage permissions to make changes to the current worksheet
- Protect workbook structure—prevent changes to the workbook structure
- Add Digital Signature - Add an invisible digital signature
- Click on the “Encrypt using password” option.
- In the Document Encryption window, enter the password in the appropriate field.
- In the Confirm Password window, confirm the password you entered earlier.
After setting a password to open a document, the “Book Protection” section in the “Information” tab will turn yellow.
- Close the Excel file and click the “Save” button in the warning window.
When you try to open an Excel file, a password entry window will open. To open access to the file, you must enter the password for the encrypted book.
Protecting the book structure
Excel allows you to password protect files either as a whole or in individual parts. Now let's deal with selective (selective) document protection.
To save only the document structure from changes using a password, do the following:
- Select a tool: “Review” - “Protect Book”
- In the “Protect structure and windows” window that appears, enable the “structure” option and enter the password. Click OK.
Note. To solve this problem, you can go another way: “File” - “Information” - “Permissions” - “Protect book structure”.
If the structure of the book is password protected, this means that you cannot:
- Move, delete, copy, rename all existing sheets.
- Insert (create) new sheets and even chart sheets.
- Transfer or copy sheets to other books.
- Show hidden sheets.
- Limiting some operations performed using VBA macro code.
Helpful advice. Workbook structure protection is often used to prevent the display of hidden sheets that store simple databases for: simple applications created using Excel or drop-down lists, etc.
How to remove the password to open a Microsoft Excel 2016 workbook
If you no longer want to protect your Excel file with encryption, you should remove the password from your Excel workbook.
You can remove the password from Excel 2016 as follows:
- Open an Excel workbook.
- Enter the password to open the document.
- Go to the “File” menu, in the “Information” tab, click on the “Book Protection” button.
- Select Encrypt with Password.
- In the “Document Encryption” window, in the “Password” field, remove the previously set password, and then click on the “OK” button.
- Close the Excel workbook and agree to the changes in the file.
How to password protect an Excel file in Microsoft Excel 2013
Let's see how to password protect an Excel document in MS Excel 2013.
In Excel 2013, follow these steps:
- With your Excel workbook open, go to the File menu.
- Open the “Details” tab, and then click on the “Book Protection” button.
- From the context menu, select Encrypt with Password.
- In the “Document Encryption” window, enter the password in the “Password” field, click on the “OK” button.
- Confirm your password in the next window.
- When closing the Excel document, confirm that you agree to change the file.
After launching the Excel file on your computer again, enter the password to open the document.
Check yourself or what I traded my time for
You have gained useful practical knowledge. You learned:
- set passwords in Excel 2007—2010-2013 documents in two ways
- remove opening password from Excel 2007-2013 files in a couple of clicks
You also gained a lot of theoretical knowledge that will help you right now or in the future. You learned:
- that Excel has a whole range of password protection that can always be cracked instantly
- that for password-protected Excel 97-2003 you need to look for the encryption key, not the password
- that there are online services for decrypting Excel 97-2003 documents
- that to find the password for opening Excel 2007-2013 documents you need to use video cards
- that the main criteria when looking for a program to recover Excel 2007-2013 passwords are support for video cards and the speed of password recovery
How to remove Excel protection in Microsoft Excel 2013
If you no longer need to protect your Excel workbook with a password, remove the password for opening the document in MS Excel 2013.
To remove password protection in Excel 2013, follow these steps:
- Click on the Excel file to open it.
- In the “Enter Password” window that opens, insert the password to open the file.
- Go to the “File” menu, open the “Information” tab, click on the “Book Protection” button.
- Click on the “Encrypt using password” option.
- In the “Document Encryption” window, remove the password and click on the “OK” button.
- When closing the Excel file, agree to the changes.
useful links
VerniDostup.ru - online service for removing passwords in Excel/Word 97-2003
Accent OFFICE Password Recovery is a program for recovering passwords for all versions of Excel. Works on NVIDIA/AMD video cards. Able to search for encryption key for Excel 97-2003
Passcovery Suite is a professional utility for recovering passwords on NVIDIA/AMD video cards with support for a large number of formats, including all versions of Excel. Available with rainbow tables for Excel/Word 97-2003
Keepass is a free, cross-platform, open-source utility for generating and storing strong passwords.
How to put a password on an Excel document in Microsoft Excel 2010
When working in MS Excel 2010, you can protect Excel with a password to restrict access to the file.
Do the following in Excel 2010:
- In the Excel workbook, go to the "File" menu, open the "Information" section.
- Click the “Protect Book” button.
- In the context menu that opens, select “Encrypt with password.”
- In the "Encrypt the contents of this file" window, enter a password.
- In the Confirm Password window, enter your password again.
- Close the Excel document, changes made.
Now, when opening an Excel workbook, you will be required to enter a password.
How to set a password to change an Excel document?
This setting is relevant for a document with which a large number of people work and allows you to set a ban on making intentional or unintentional changes. You can protect the sheet and the contents of protected cells from:
- highlighting locked or unlocked cells;
- formatting cells, rows and columns;
- inserting rows, columns and hyperlinks;
- deleting columns and rows;
- sorting;
- using AutoFilter and PivotTable reports;
- changes to objects and scripts.
To use the function:
- Create a new or open an existing Excel workbook.
- In the top menu, select the “Review” category and go to the “Protect Sheet” section:
- The “Sheet Protection” window opens, where you can specify a password to disable protection and mark the functions available to users:
- When specifying a code combination, you will need to enter it again for confirmation:
- After this, the sheet will be protected in accordance with your settings, and if prohibited actions are performed, the information window “Cell or chart is protected” will be displayed:
- You can remove protection through the “Reviews” category and the “Unprotect sheet” button:
Edit protection
In addition to the usual password protection, you can block some specific functions on a separate sheet, or on the entire workbook. Let's see how it's done.
- Well, I think there is no need to talk about the fact that you need to go into excel. In the menu at the top, select “Review”. Then click on “Protect Sheet” or “Protect Workbook” (Or again select “File” - “Information” - “Protect Workbook”). In both cases, everything is done the same way, it’s just clear that the first option is valid only within one sheet, and the second option is valid throughout the entire book.
- You will see a window in which you will have to select those items that will not be available to any user until he enters the treasured security word. Well, let's leave the checkboxes as they are. Now be sure to enter your password to disable the protection and click OK.
- Try to enter some cell. You will immediately see a window with the inscription: “And crap for you!” Well, I was joking about the last one). A window will simply appear in which you will be told that this cell is on a protected sheet. In general, you will need to remove the protection.
- To remove this protection you need to select the “Review” menu and click “Unprotect”. After that, enter your password and everything works.
Well? Everything worked out? I think you shouldn't have any problems. But if you still have problems, please contact us. I'll help you).
Using the free office program Open Office Calc
This is one of the easiest ways to remove a forgotten password from a file.
What do we have to do:
- Download and install the free Open Office program.
- Open the password-protected file in Open Office Calc.
- Go to the “Service” tab
- Next, select “Protect Document”
- Uncheck the box with the name of the protected sheet.
Remove password in Open Office - The password will be removed from the file.
- Now all that remains is to save the non-password-protected file and open it in Excel, if necessary.
Encrypting a file with a password
To make Excel more secure against hacking, you should use the built-in workbook encryption function. After all, there are programs that allow you to remove protection from an Excel file. For example, such as Advanced Excel Password Recovery. This program has an innocent description: “the program is designed to recover forgotten passwords for Excel files.” But we all understand perfectly well the main purpose of this software.
To encrypt files, select the tool: “File” - “Information” - “Protect book” - “Encrypt with password”. In the Document Encryption window, enter a password for maximum file protection in Excel.
Attention! For maximum reliability, pack encrypted Excel files into archives with a password and maximum compression. This will be an even more reliable way to protect information in documents. Also use complex and long passwords using special alt code characters. For example, the code Alt+3 (on the numeric keypad) = ♥.
Setting an external password on an Excel file
In addition to the internal password, you can set up additional protection using special programs for hiding, password protection and encryption. Most of them are free and very easy to use. The table below shows the most popular programs that help protect your Excel files.
| Encryption method | Description |
| Creating an encrypted archive | Windows XP allows you to create password-protected ZIP files. On Windows 7, you can download a free third-party file compression program. It's better to use the completely free and open source 7-Zip. Create a new file adding all sensitive files and set a password. All files will be encrypted |
| Encryption with TrueCrypt | Create a container that will store and protect files on your hard drive. No one will be able to access the contents of the folder without a password |
| FolderGuard | Powerful computer security software. It can be used to control access to files to other system resources. You can use FGuard to protect your personal documents and folders with passwords so that others cannot view or change them. You can password-protect any folder on your computer, allowing only authorized users to view protected files |
On a note
Before you start password-protecting all your books, there are three important things to keep in mind:
- Anyone who has a password to change a workbook can also remove the password protection! Use this particular option wisely.
- Regular users can use a password cracking program. Your best defense against this type of forgery (or theft) is to assign a very long password of random characters. This will not protect against hacking by specialized software 100%, but it will slow it down. This delay may cause a potential attacker to put off working on it.
- If you've forgotten your password and can't log into your workbook and make changes, you can purchase password cracking software yourself.
Excel password protection is a great feature, and fortunately, it's easy to implement. Don't confuse protection and security, don't rely only on the internal password. There are many different types of encryption provided by third party software.
How to password protect an Excel file (Excel)
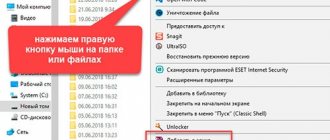
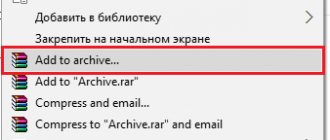
The well-known WinRar archiver will help us set a password for an Excel file. If you don't have it yet, download it online, it's free. When you install it, you need to add an Excel file to it. To do this, right-click on the file, select “Send” and “Compressed zip folder” from the menu (Screen 1).
Depending on operating systems, there may be another option for adding to the archive. For example, “Add to archive” “Add to archive”.
Once we have added the Excel file to the archive, we can set a password for it. Open the Excel file in this program and look for the “Advanced” or “File” section. Then, click “Set password” and enter it in several fields. In one field the main password, and in the second we repeat. Next, save it by clicking the “OK” button. After this action, the password should be installed on the Excel file through the WinRar archive.
You can set a password for Excel files without programs. To do this, open an Excel document. Left-click in the top left corner of the document. Next, select the “Prepare” and “Encrypt document” functions from the menu. Next, all that remains is to come up with a complex password and save it (with the OK button). This is the easiest way to set a password in Excel.
Now we know how to password protect an Excel file using the Winrar program and without it. In order not to forget the previously set password, write it down somewhere in a regular notepad.
Changing the file code to remove sheet protection
This method is needed in cases where the password was lost or was not transferred along with the file from another user. It only works for those documents that are protected at the level of individual sheets, and not the entire book, because we need to get to the “File” menu, which is impossible when the entire document is password protected.
To remove protection, you must perform the following sequence of actions:
- Go straight to step 4 if the file extension is XLSX (Excel workbook). If the document format is XLS (Excel 97-2003 workbook), you must first resave it with the required extension. To do this, go to the “File” menu.
- Select “Save As” from the list on the left, then click the “Browse” button on the right side of the window.
- In the window that appears, select any convenient location to save the file, set the format to “Excel Workbook” and click OK.
- Open in Explorer the folder with the document in XLSX format (just saved or originally existing). To enable file extensions, go to the “View” tab, where we enable the desired option in the “Show or Hide” tool group. Note: the actions in this step and below in the operating system are described using Windows 10 as an example.
- Right-click on the document and in the list that opens, click on the “Rename” command (or you can simply press the F2 key after selecting the file).
- Instead of the “xlsx” extension, write “zip” and confirm the change.
- The system will now identify the file as an archive, the contents of which can be opened by double-clicking the left mouse button.
- In the folder that opens, go to the “xl” directory, then “worksheets”. Here we see XML files that contain information about the sheets. You can open them using regular Notepad. Note: in Windows 10, you can set a default program by file type in the system settings (launched by pressing the Win + I keys), in the “Applications” section, then – “Default applications” – “Select standard applications for file types."
- After successfully opening the file, we need to find the phrase “sheetProtection” in its contents. To do this, we will use the search, which can be launched either through the “Edit” menu (item “Find”) or by pressing the key combination Ctrl+F.
- Enter the desired phrase and click the “Find Next” button.
- Once you have found the desired match, you can close the search window.
- We erase the phrase and everything that relates to it (between the opening and closing tags).
- In the “File” menu, select the “Save As” command (or press the key combination Ctrl+Shift+S).
- It is not possible to save the document immediately in the archive. Therefore, we do this in any other place convenient for us on the computer, without changing the name and specifying the “xml” extension (the file type must be “All files”).
- We copy the newly created file to the “worksheets” folder of our archive (replacing the original one). Note: the “sheetProtection” entry is present in all password-protected sheet files. Therefore, we perform the steps described above to find and delete it with all other XML files in the “worksheets” folder.
- Again we go to the folder containing our archive and change the extension back from “zip” to “xlsx” by renaming it.
- Now you can open the file and safely edit it. You will not need to enter a password to remove protection.
Alternative way
You can set a password in a slightly different way.
- Select the file menu and click “Save As”. You just don’t need to save anything right away.
- In the save window you will see a “Service” button. Click on it and select “General Settings”.
- What did you get? The correct window is in which you must enter a password to open and a password to change. You can set both passwords, or you can set either one. How are they different? If we set a code word to open, then we will not be able to open the document at all until we enter it. And if we set the password to change, then without entering we can open the document for read-only without the ability to edit.
Now let's try to go into the saved document and see how it works in action. If you set both passwords, then first you will have to break through the opening protection, and then through the editing protection (or open the document read-only).
In general, as you can see, there are a whole bunch of ways to protect an Excel document. So you can choose any one.
Setting a password in the "Information" section
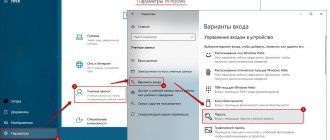
The second method involves setting a password in the Excel “Details” section.
- Just like last time, go to the “File” tab.
- In the “Information” section, click on the “Protect file” button. A list of possible options for protecting a file with a key opens. As you can see, here you can protect with a password not only the file as a whole, but also an individual sheet, and also set protection for changes to the structure of the book.
- If we select the “Encrypt with password” item, a window will open in which you should enter a keyword. This password corresponds to the key to open the book, which we used in the previous method when saving the file. After entering the data, click on the “OK” button. Now, without knowing the key, no one will be able to open the file.
- When you select “Protect current sheet”, a window with a large number of settings will open.
There is also a window for entering a password. This tool allows you to protect a specific sheet from editing. At the same time, unlike protection against changes through saving, this method does not even provide the ability to create a modified copy of the sheet. All actions on it are blocked, although in general the book can be saved. The user can set the protection level settings himself by checking the appropriate boxes. By default, of all actions for a user who does not have a password, only selecting cells is available on the sheet. But, the document author can allow formatting, inserting and deleting rows and columns, sorting, applying an autofilter, changing objects and scripts, etc. You can remove protection from almost any action. After setting the settings, click on the “OK” button. - By clicking on the “Protect book structure” item, you can set protection for the document structure. The settings provide for blocking changes to the structure, both with and without a password. In the first case, this is the so-called “fool protection”, that is, from unintentional actions. In the second case, this is already protection against purposeful modification of the document by other users.
Setting a password and removing it in the “Review” tab
The ability to set a password also exists in the “Review” tab.
- Go to the above tab.
- We are looking for the “Change” tool block on the ribbon. Click on the “Protect Sheet” or “Protect Workbook” button. These buttons fully correspond to the “Protect current sheet” and “Protect workbook structure” items in the “Information” section, which we already discussed above. Further actions are also completely similar.
- In order to remove a password, you need to click on the “Unprotect Sheet” button on the ribbon and enter the appropriate keyword.
As you can see, Microsoft Excel offers several ways to protect a file with a password, both from intentional hacking and from unintentional actions. You can password protect both opening a book and editing or changing its individual structural elements. At the same time, the author himself can determine from which changes he wants to protect the document.
Method 4: Using Third Party Applications
In addition, if you have forgotten the code word, the blocking can be removed using specialized third-party applications. In this case, you can remove the password both from the protected sheet and from the entire file. One of the most popular applications in this area is Accent OFFICE Password Recovery. Let's look at the procedure for resetting protection using this utility as an example.
- Let's launch the application. Click on the “File” menu item. In the drop-down list, select the “Open” position. Instead of these actions, you can also simply type the Ctrl+O key combination on your keyboard.
A file search window opens. Using it, we go to the directory where the Excel workbook we need is located, for which the password has been lost. Select it and click on the “Open” button.
The Password Recovery Wizard opens and informs you that the file is password protected. Click the “Next” button.
Then a menu opens in which you have to choose which scenario will be used to remove the protection. In most cases, the best option is to leave the default settings and only if unsuccessful try to change them on a second try. Click on the “Done” button.
The password selection procedure begins. It can take quite a long time, depending on the complexity of the code word. The dynamics of the process can be observed at the bottom of the window.
After the data search is completed, a window will appear in which the valid password will be written down. All you have to do is run the Excel file as usual and enter the code in the appropriate field. Immediately after this, the Excel table will be unlocked.
As you can see, there are several ways to remove protection from an Excel document. The user must choose which one to use depending on the type of blocking, as well as on the level of his abilities and how quickly he wants to get a satisfactory result. The method of removing protection using a text editor is faster, but requires some knowledge and effort. Using specialized programs may require a significant amount of time, but the application does almost everything itself.
Describe what didn't work for you. Our specialists will try to answer as quickly as possible.
Set a password when saving the file
This method allows you to perform the procedure for assigning a password directly while saving the document.
- Click on the “File” menu.
- In the list that opens, click on the “Save As” item, on the right side of which click the “Browse” button (in earlier versions of the program this button is not present, and you will immediately go to the save window).
- A window for saving the file will appear on the screen. Here we click on the “Service” button, which is located next to the “Save” button. In the list that opens, select the “General settings” item.
- A small window will open in which we can set a password to open or change the file.
- If you need to protect the book only from opening by unauthorized persons, then assign a password for opening.
- If we do not want any changes to be made to the document, we protect it with a password for changes. In this case, you will still be able to edit the book, but you will no longer be able to save it (but you can save a copy of it).
- When opening a document, the program will request the specified password (passwords, if both are specified).
- In the same window with general parameters, we can check the box next to the “Recommend read-only access” option. In this case, when opening a document, even with passwords entered, the toolbar will be initially hidden. But you can always open it by pressing a special button.
- Now that everything is ready, we can click OK.
- The system will then ask you to confirm your password(s) in new windows. Re-enter the data and click OK.
- The program will return us to the main window for saving the document. Here we select the save location, indicate the file name, its format (if necessary) and click “Save”.
- Thanks to the above steps, we were able to protect the document. The next time you open it, you will need to enter the previously specified passwords.
Method 1: Unlocking files using "Microsoft Visual Basic for Applications"
If you lose your password for Excel documents, one of the ways to recover it is to use the MS VBA program, which you will need to first download from the official website of Microsoft Corporation.
- Step 1: Run “VBA” and open the Excel spreadsheet from which the passphrase was lost through the menu “File” - “Open”
- Step 2: Click "Insert" on the toolbar and select the "Module" option
- Step 3: Press the key combination “Alt+F11”, after which the “VBA” window will appear on the right
- Step 4: Enter the "VBA" command in this window as shown in the following image
- Step 5: Next you need to press “F5” to start the recovery process
- Step 6: Wait a few minutes until the unlocking is complete, after which a new window will appear with a set password, which can be used without restrictions for normal editing of our file
The only drawback of this method is that it only applies to one Excel sheet, and if there are several of them, you will have to repeat this procedure for each part of the table.