03/10/2013 security | router setup
Despite the fact that in my instructions I describe in detail how to set a password on Wi-Fi, including on D-Link routers, judging by some analysis, there are those who need a separate article on this topic - specifically about Setting up a password for the wireless network. This instruction will be given using the example of the most common router in Russia - D-Link DIR-300 NRU. See. See also: how to change the WiFi password (different router models)
Is the router configured?
First, let's decide: has your Wi-Fi router been configured? If not, and at the moment it does not distribute the Internet even without a password, then you can use the instructions on this site.
The second option is that someone helped you set up the router, but did not set a password, or your Internet provider does not require any special settings, but you just need to connect the router correctly with wires so that all connected computers have access to the Internet.
It is in the second case that we will talk about protecting our wireless Wi-Fi network.
Connecting to the network with a new password
If you logged in via Wi-Fi, then after applying the settings you should be kicked out of it. This applies to both phones and laptops. With laptops and computers, everything is quite simple: click on the Wi-Fi icon again and select the network. Enter the password you set and check the box for automatic login.
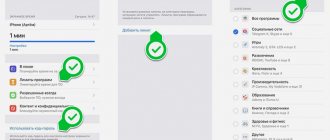
The algorithm is similar on the phone. But if you can’t connect to the network with a new password, you need to forget or delete this Wi-Fi and connect with a new one. Here you need to go to settings, go to the Wi-Fi section. On Android, you just need to click on the network and click on “Delete this network”. On an iPhone, first click on the letter “i” next to the name, and then select “Forget this network.”
Go to the router settings
You can set a password on the D-Link DIR-300 Wi-Fi router either from a computer or laptop connected via wire or wireless connection, or from a tablet or smartphone. The process itself is the same in all these cases.
- Launch any browser on your device connected to the router in some way
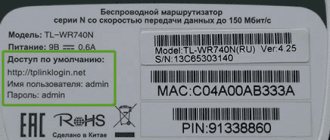
- In the address bar, enter the following: 192.168.0.1 and go to this address. If the page asking for a login and password does not open, try entering 192.168.1.1 instead of the above numbers
Requesting a password to enter settings
When prompted for a login and password, you should enter the standard values for D-Link routers: admin in both fields. It may turn out that the admin/admin pair will not work, this is especially likely if you called the wizard to configure the router. If you have some kind of connection with the person who set up the wireless router, you can ask him what password he set to access the router settings. Otherwise, you can reset the router to factory settings using the reset button on the back (press and hold for 5-10 seconds, then release and wait a minute), but then the connection settings, if any, will be reset.
Next, we will consider the situation when authorization was successful and we entered the router settings page, which in different versions of D-Link DIR-300 may look like this:
Guidelines for creating a password
Putting a simple password on Wi-Fi would not be a good idea. If you have “12345” there, then it can be guessed by accident or on purpose. There are many programs for cracking passwords. So it’s better to set a more complex Wi-Fi password and not worry about anything. Just don’t forget it yourself, otherwise you’ll have to set everything up again.
To create a strong combination, use our password generator. The generated combinations are displayed only on your computer or phone, are not stored anywhere and are reset immediately as soon as you leave the page.
Your generated passwords:
For the password, you should use both small and capital letters of the Russian (not all models support) or Latin alphabet, punctuation marks and numbers. You can also apply the standard recommendation that you should not use names, dates, or just consecutive letters. It’s better not to put special characters like “No., %, @, &” and the like; not all devices work well with them, and entering the password on the phone will be a real pain. There are password generators available on the Internet that generate complete randomness. Just don’t make the combination overcomplicated if you plan to enter your password often.
Follow the link to read how to change the password on a wifi router if it is already set.
Setting a Wi-Fi password
To set a password for Wi-Fi on firmware DIR-300 NRU 1.3.0 and other 1.3 (blue interface), click “Set up manually”, then select the “Wi-Fi” tab, and then select the “Security Settings” tab.
Setting a password for Wi-Fi D-Link DIR-300
In the “Network Authentication” field, it is recommended to choose WPA2-PSK - this authentication algorithm is the most resistant to hacking and most likely no one will be able to hack your password even if they really want to.
In the “PSK encryption key” field, you should specify the desired Wi-Fi password. It must consist of Latin characters and numbers, and their number must be at least 8. Click “Change”. After this, a notification should appear stating that the settings have been changed and prompting you to click “Save”. Do it.
For new firmware D-Link DIR-300 NRU 1.4.x (in dark colors), the process of setting a password is almost the same: at the bottom of the router administration page, click “Advanced settings”, then on the Wi-Fi tab select “Security settings”.
Setting a password on new firmware
In the “Network Authentication” column we indicate “WPA2-PSK”, in the “PSK Encryption Key” field we write the desired password, which must consist of at least 8 Latin characters and numbers. After clicking “Change” you will be taken to the next settings page, where at the top right you will be asked to save the changes. Click "Save". The Wi-Fi password has been set.
Further algorithm for different brands
To set up a password for a wireless network, you will need to make settings that depend on the router model. Let us describe the algorithm for the most common devices. You can also password-protect your Wi-Fi router via your phone; you don’t have to do it from a computer or laptop. The main thing is that it can connect to a wireless network and has a browser.
Asus
The interface of the asus router depends on the year of manufacture of the model. Recently they began releasing devices with a new interface, so look at the pictures to see which one suits you best. On new models, click in the left menu “Wireless Network” in the “Authentication Method” field and set the mode to “WPA2-Personal”. The line “WPA Pre-Shared Key” is responsible for the password itself.
On older models, the algorithm is almost no different. On the left side of the screen, go to “Network Settings” (Advanced Setting), there we click on the “Wireless” section. Don't forget to specify the encryption type in the section that opens. Enter the password in the “WPA Pre-Shared Key” line, then click on “Apply” or “Apply”.
Tp-link
Here, the router settings interface is also different, so choose the instructions that suit your device.
For the old interface, select Wireless Mode in the left column, and from there go to the “Wireless Security” section. Check the box next to the type of encryption you want to see. The password field is called that way, so it’s hard to miss here. Finally, click on “Save”.
Almost nothing has changed in the new interface. Select “Wireless Mode” and then “Wireless Protection”. Select the security type checkbox and enter the password.
D-link
There are also two ways to password protect your Wi-Fi network at home, if you have a router from this company. It seems that no manufacturer keeps their interface forever. In the old firmware, the language can be changed at the top of the window. Click on the flag or language name and select the desired one. Then everything will be simple:
- "Wi-Fi".
- "Security Settings".
- Enter the password in the line “PSK encryption key”, and then click on “Apply”.
In the new version, go to the “Wi-Fi (Wireless Network Setup Wizard)” section. From the proposed options, select “Access Point”. Then you will need to enter the name of the network, but in the next section the password line will be available.
Zyxel
Log into the web interface via your computer or phone, and then click on the wireless network icon at the very bottom. In network protection, specify the type of encryption, and in the line below you need to enter the Wi-Fi password. Apply the settings and that's it.
Keenetic
The Keenetic line is significantly different from the old one (Zyxel Keenetic). Both hardware and software. This means the interface has also changed. Go to the “Home Network” section, and from there to the “Wireless Wi-Fi Network” tab. When protecting your network, don’t forget to select the appropriate encryption type, and enter the new Wi-Fi password in the key field.
Xiaomi
If you bought a Xiaomi router, then I congratulate you. Then there are several possibilities: you learned Chinese while setting up your Internet connection, someone reflashed the router for you, or you got the latest model with settings in English. Or you need to play a guessing game. I will assume the latter option, but we will still provide illustrations in English. In Chinese you just need to point at points without understanding them.
Algorithm:
- Click on the penultimate tab.
- Click on the first icon that represents a wireless network.
- Check the box just like in the picture.
- Write the name in the first line, the encryption type in the second, and the password itself in the third.
Tenda
These routers have almost the same interface on all models. There are differences, but they are not that significant. Thanks to this, you can act according to the same algorithm in all cases. From the top menu, select the “Wireless” tab. On the left side of the menu, click on the “Basic Wi-Fi settings” section. Check the box to enable the wireless network and write a name under it. Just below, check the box for the wireless access point. This will create a wireless network.
Then go to Wireless Security in the left column. In the top line, select the configured name, and just below, select the radio button next to the desired encryption type. On the line below you need to set the password itself.
Huawei
Usually Huawei is used as a modem, but the company also produces routers that are slowly seeping into our market. The setup here is done on the wireless network tab, which is called “Wi-Fi Setup”. To see it, select the “Home Network” section at the top. In the top line write the network name, and in WPA-PSK write the password; less than 8 characters will not be accepted. Click on “Save” and the setup is complete.
Sagemcom (Rostelecom)
Rostelecom uses routers of several models and installs its own firmware in them. It is, for the most part, the same on all devices. This allows the user not to have to worry about searching for instructions and partially relieves the technical support of Rostelecom itself. Setup is quite simple. To begin, open the “Network” section at the top, then in the left column “WLAN”, from there go to “Security”, in the “Encryption” field select the desired encryption type. In the “Shared key” line, all you have to do is enter the password.
Selecting the encryption type
Before you set a password on your router, you need to select the encryption type. To do this, you will have to familiarize yourself with the distinctive features of each of them. Only after this will it be possible to choose the most reliable encryption method.
WPA2 is the most modern and reliable encryption method
There are three main methods of protection that are used most often:
- WEP. In recent years, this encryption method has been used less and less. The fact is that it is already outdated and considered unsafe. If you use this technology, you will not be able to protect yourself from strangers and intruders. Therefore, it is recommended to use other types of encryption.
- WPA. This is a more advanced technology that is supported by all modern devices. Most often, people use this type of encryption to protect their wireless Internet connection.
- WPA2. This is a new and improved version of the technology discussed above. The main feature of WPA2 is that it supports AES CCMP. Thanks to this, it is almost impossible to hack such a network.
Disabling WPS is one of the methods for restricting access to a network router.
It is worth noting that WPA and WPA2 can be divided into several subtypes, each of which also has characteristic features:
- Personal. This is a simple authentication method. To connect to Wi-Fi that is protected using WPA Personal, you will have to enter a special key. This technology is most often used to password protect a network.
- Enterprise. The most complex method used to protect networks in institutions or office premises.
At home, it is recommended to use WPA2 Personal encryption type. This will be enough for reliable Wi-Fi protection.
The password is incorrect
In this case, double-check that the data has been entered correctly. It often happens that the user puts a space at the end or enters data in Russian - since it is not visible. The second option is that the default password was simply changed during the initial setup.
If you received it from a friend and previously it did not work for you at all, then you need to reset the router configuration to the factory one. To do this, find the “Reset” button on the case and press it for 10 seconds.
If it was set up by the provider’s employees, then you should call them and find out exactly how they set the key to the Web interface. But if they do not provide this data, you will still need to reset the device to factory settings, and only then configure it again.
We install the router in a permanent place and connect
Now we install the D-Link DIR-320 router in a permanent place that most optimally meets the previously stated conditions. We bring all wired communications here: twisted pair cable from the provider and other devices that connect to the LAN in this way. We connect the incoming wire from the Internet service provider to the “Internet” port. In the remaining 4 ports we connect the equipment that will use a wired connection. We install the power supply into the outlet, its cord to the router socket. After completely collecting the permanent circuit and checking the correct connections, turn on the router.
Selecting a location for installing a network device
At the first stage, we choose the right place to install the network device. And here everything is not as simple as it seems at first glance. On the one hand, all wires must be suitable for the installation site of the router, and there must be an outlet nearby for power supply. On the other hand, it is most correct to place the router in the center of the room: this will ensure excellent speed of transmission and reception of information, and a high level of Wi-Fi signal. The router should also not be placed near metal sheets, which can dampen the wireless network signal. Based on the recommendations given earlier, you need to choose the location of the router.
Factory reset
If no methods help, the right solution is to reset the settings. There are several ways to do this:
- Find the Reset button on the router. Typically, manufacturers place it on the rear panel. Press and hold the button for 20 seconds. During this time, the Wireless Strength signal indicators should light up. After this, you can release the button and wait a while. This is required for the device to return to factory settings.
- When the router is turned on, you need to hold down the remote reset button on the adapter. Hold it for eight seconds. Also wait until the indicators light up, as in the first method. With these actions, the router returns to factory settings.
- You need to log in to the interface via a web browser. Through it, go to the System page, find Configurations. There you will find the Reset button. Click on it and wait a while. The device will reboot and return to factory settings.
Appearance and purpose of connection elements, indication and control
An information panel is displayed on the front of the device, which consists of the following LED indicators:
Power: Lights up continuously during operation and indicates that the device is plugged in.
Status: When the router is operating normally, it blinks continuously. If it lights up continuously, an error has occurred and the device must be restarted.
Internet: may simply light continuously (if there is a connection, but no data is being exchanged) or blink (if there is a connection and information is being transferred).
The next 4 ports are wired. When connected, they light up continuously and blink when data is being exchanged. If the port is not used during operation, then the corresponding indicator is disabled.
The last LED indicator is associated with the printer. It simply lights up continuously when a printing device is connected, and blinks while the document is being output.
The following communication and control elements are located on the back of the device:
wireless antenna;
USB port for connecting a printer;
4 LAN ports for creating a wired part of a LAN;
input port for connecting twisted pair cable from the provider;
power supply connection socket;
Reset button to reboot the router.
How to find out who is connected to a wireless network
The Wi-Fi encryption key needs to be changed to prevent unauthorized users from hacking your home network. The DIR 300 router allows you to monitor all connected gadgets and users. To view the full list, go to the menu, “Advanced settings”. Select the “WiFi” column, click on the double arrow pointing to the right.
A notification will appear on the screen (the list of Wi-Fi settings will continue), click on “WPS Station List”. A list of all users who are connected to your local network on the monitor. The connection can be set up with any user: just select the desired line, check the MAC address line and click on the “disconnect” column.
Blocking devices by MAC address
According to the instructions, the router of this model has one useful function: MAC address for blocking third-party devices. This is a unique address, by following a link you can secure your network from interaction with other gadgets. The access to this section is located in the “WiFi” settings item, page – “Filter mode”. You must select one of three sub-items “MAC filter restriction mode”:
- disabling: according to this paragraph, filtering by mass address is not performed;
- permission: add allowed users to the desired list and only they will be able to use the services of your local network;
- block: you automatically block devices that you enter into this list.
When you select the item you need, do not forget to save the changes. The next step is leaving a list of devices. It must be compiled on the MAC address page. It is these lists that will set the tone for the subsequent operation of the router. The simplest and most convenient option is to select existing addresses on the device. You can only configure and adjust their number: block unnecessary ones. If the user is not in the list, enter it manually: click “Add”. Don't forget to save your changes! In order to delete a specific MAC address, tick it, delete it and click “Save”.