How to fix Error 2009 on iPhone 3, 4, 5, 6, 7, 8, X and SE or iPad? One of those errors that we see quite often when updating or restoring an iPhone, iPad or iPod Touch is Error 2009 in iTunes .
Someone using an iPhone, iPad, or iPod Touch updating or restoring their device in iTunes may receive the message “Unable to restore iPhone (device name). An unknown error occurred 2009." This is just one of a long list of errors. However, it will not allow you to update or restore your phone.
There are many ways to solve the problem.
Solution 2. iTunes update or other software to fix iPhone 2009 errors
First check if an updated version of iTunes is available.
If there is, then you can download the latest version of iTunes from the Apple store and install it. For those who are using Mac OS system, they should check for updates through OS X. You can download the latest software from the Mac Apple Store. This is a relatively simple process and solves the 2009 bug in some cases. Updating iTunes works more often than rebooting, but even that doesn't solve the error all the time. If this is true in your case, you need a stronger tool to solve this problem.
Reinstall iTunes on your computer
If the above methods did not help, try reinstalling iTunes:
- Go to the Start menu.
- Select the Control Panel option.
- Now go to “Uninstall a program”.
- Find and remove "iTunes".
- Once finished, close all tabs.
- Now download the new “iTunes” setting online.
- Once downloaded, install it.
Uninstalling and reinstalling Apple iTunes will help you quickly fix and solve this problem with error code 2009.
Methods to resolve Error 2009 in iTunes
Like all errors associated with restoring or updating an iPhone, as well as other Apple devices, failure code 2009 has several ways to resolve the problem. Error 2009 notification in iTunes is often caused by a faulty USB cable, connectors, or may indicate problems with your computer. In any case, it is necessary to start correcting the situation with simple steps, gradually moving on to more serious actions if the problem does not disappear.
Method 1: Replacing the USB cable
First you need to check the contact of the cord with the device and connector. It is recommended to use the original cable supplied by Apple. You should also examine it for damage, as any minor deformation or oxidation could be the culprit for iTunes Error 2009. If defects are found, it is imperative to replace the cable with a serviceable and original one.
Method 2: Connect to a different USB port
Often the problem is a faulty connector. To resolve the issue or eliminate the possibility of an error occurring for this reason, you need to connect the cable to another USB port, while avoiding the 3.0 port, which is usually blue in appearance from the others. The connection must be made directly to the computer, without intermediary elements. You also need to disconnect other connected devices except the iPhone 5s or the one you are working with. The exception is the mouse and keyboard.
Method 3: Reboot devices
It is worth trying restarting your computer or laptop, as well as restarting your iOS device (forced shutdown). Oddly enough, often such simple actions resolve the issue in a matter of minutes.
Method 4: Update iTunes
The latest version of the application must be installed on your computer, so you need to update the program to the latest available option on the official website, and then try to start the iPhone recovery process again.
Method 5: Reinstall iTunes
Sometimes the procedure for removing and then installing iTunes effectively solves the problem of dealing with errors. To eliminate program files, you need to go to the “Control Panel” from the “Start” menu, where you find the section with the installed software. Here you need to select iTunes and delete it, and then download the installer for the latest version of the application from the official source and install the service again.
Method 6. DFU mode
Apple developers have prudently prepared escape routes if it is impossible to update or restore the firmware using standard methods. One such tool is the DFU emergency mode. To put your iPhone into this state, you need the following:
- turn off Apple;
- connect the device to a PC or laptop using a USB cable;
- launch iTunes;
- hold down the “Power” button and hold for 3 seconds;
- then, without releasing the power button, press “Home”;
- after 10 seconds, release “Power”;
- At the same time, we continue to hold the “Home” button until the program detects the device in DFU mode.
After these manipulations, only one recovery action will be available, but that’s what we wanted. You need to click the "Restore iPhone" button and follow the instructions on the screen.
Method 7: Using a different computer
If the previous methods were powerless, you can try to do the work using another computer with the existing iTunes program installed, which can bear fruit if the iPhone is working properly.
In a situation where none of the above methods worked, perhaps hardware problems are causing error 2009, then you should contact the service for help.
Antivirus and firewall on PC
Windows doesn't recognize USB devices? 6 ways to fix the error
During the iTunes update process, the program must connect to network resources to obtain new data. Of course, this requires an Internet connection. However, in some cases, standard antivirus programs may block this access, citing the fact that these resources may be infected. In fact, there cannot be any virus software on official Apple services. In this case, we are talking about incorrect antivirus and firewall settings.
To fix error 9 when restoring an iPhone or updating it, you need to go to your PC settings and make sure that the use of a proxy/VPN is not activated in them. This may be the reason for constant blocking.
In addition, if you have a good antivirus on your PC, there is no need to use a firewall. Therefore, you can turn it off at least temporarily. If this does not help, then you can deactivate the antivirus itself for a while (the main thing after this is not to go to suspicious sites). If after this the update process proceeds without any errors, then you need to delve into the software settings and add Apple servers to the exclusion list.
Get rid of Error 2009 in iTunes with PhoneRescue
If you have tried all the above methods but the error still persists, you can install PhoneRescue to fix error 2009 and get your device back to normal.
PhoneRescue is a professional data recovery tool designed to help Android and iOS users recover deleted or lost data, meanwhile PhoneRescue - iOS Data Recovery is also used to fix iTunes errors by restoring iOS system, of course including 2009 problem. This program works on iPhone 4, 5, 6, 7, 8, X, SE.
This is a safe way to restore iOS system and will not cause any data loss, after which your device will be equipped with the latest version of iOS system and the error will also be fixed. Now let's see how to use PhoneRescue to restore your iOS system.
Step 1: Download PhoneRescue - iOS Data Recovery (select "Download for iOS") and install it on your computer. Connect your iPhone to your computer.
Step 2: Select iOS Recovery Tools and click the arrow button to continue.
How to Fix iTunes Error 2009 by Restoring iOS System.
Please note that there are two repair modes you can choose from: standard and advanced. Only advanced mode can restore your iOS system without data loss. The other will delete all data on your device. Step 3
Select Advanced Mode
Step 3: Select Advanced Mode.
Step 4: Follow the three-step instruction on the window to enter the "Recovery" mode, then confirm your device information and select "Download", PhoneRescue will automatically recover your device and error 2009 will be solved.
We hope the above methods will help you fix Error 2009 on your device. If the problem persists, contact Apple Service Center or Customer Support.
Meaning and reasons for appearance
Why is the hard drive clicking? main causes and solutions to the problem
Error 6 occurs when trying to restore or flash an iPhone using iTunes. It may appear even if this is not the first time you have restored your phone through the desktop application. Connecting the phone to a PC and synchronizing with iTunes can go without problems, but the possibility of an error remains, since it is related to the server and not to the client side.
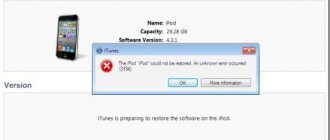
A system message with a problem code appears after you click the "Restore this iPhone" or "Update" buttons in the main iTunes window. Appearance of the error window:
Fig. 2 – appearance of the problem window
Depending on the preinstalled version of iTunes, the program may define the error as unknown or assign codes “6” or “9” to it.
- Errors in the structure of the downloaded firmware file;
- The headers of the data packets that the client program sends to the Apple server to receive a copy of the firmware are damaged;
- An incorrect mode for installing a new version of iOS is running on the iPhone.
Error 3014/3194 in iTunes when restoring iPhone 5, 6, 7, 8, X and iPad
Apple tends to update iOS frequently. Within a few weeks, sometimes days, a new iOS update is released. But, when you have already started updating your iPhone, something went wrong and error 3014 occurs. When your computer tries to connect to Apple servers and the error occurs.
Why did this happen?
Error 3014 in iTunes usually occurs when a restore or update goes wrong. Most often this happens during an update. To put it bluntly, “DO NOT panic.” This annoying error 3014 can be easily removed. Here are seven solutions you can try.
Errors:
- All iTunes errors
- Error 2003/2005
- Error 2009
Solution 1: Correct the "hosts" file
This is a little difficult for non-experienced users, but we will provide step-by-step instructions. If you haven't done something like this before, be sure to make a restore point on your system.
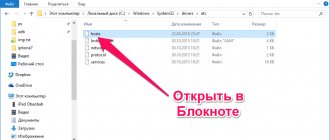
Step 1 Open Notepad. Then “Create and open a file” and go to the path “C:\Windows\System32\drivers\etc”. (You can just paste this path).
Find the "hosts" file.
You should see a “hosts” file, but there are two of them, which one should you open? You need to open the first file using notepad.
Right-click on the desired file, and select open with, then select notepad.
When it opens it should look something like this:
Don't change anything
Step 2 You need to add a line to the end of the "hosts" file.
74.208.10.249 gs.apple.com
Save the HOSTS file, and then try this: Open your browser and go to https://support.apple.com/en-us/HT201442. If you did this step correctly, it will take you to the Cydia website.
Step 3 (Only do this step if your site is not showing up. Otherwise, go back to step 2)
Find the following lines in your HOSTS file and remove them:
74.208.10.249 gs.apple.com
127.0.0.1 gs.apple.com
Once you are done removing these lines, save your hosts file, open your browser and go to https://support.apple.com/en-us/HT201442. It should redirect you to the Apple website.
Once you complete these simple steps, open iTunes and continue the recovery process, it should finish without error 3014.
Solution 2: Update iTunes
It's very simple. If you are not sure, just check the iTunes version, which will let you know that you have the latest version of iTunes installed on your computer. This is pretty obvious, but it's best to make sure you have everything up to date.
You may have seen this happen with other software. From the Help menu you can request "updates" to check.
Solution 3: Check your PC settings
Remember, this is the connection between your computer and Apple servers? It may seem stupid, but the reason why error 3014 occurs may be that your computer and Apple are unable to establish connections due to timing. Make sure the date, time, and time zone are correct.
Synchronize time!
Hope the picture helps!
Solution 4: Update your OS
No matter what operating system you have: a Windows PC or an Apple Mac, you should make sure that you have the latest updates.
Solution 5: Check your security software
Many articles have written about the antivirus problem. It blocks the connection in iTunes.
We don't know what antivirus/firewall you have. The example below is for Windows built-in firewall. The firewall stops all third-party connections. This may be the reason why communication with Apple is broken.
Make sure you have the latest version of your antivirus software.
Update your antivirus
Windows System and Security.
Don't forget to turn it back on!
Solution 6: Are you connected to the Internet?
This can happen if you are connected to a shared Wi-Fi. You must ensure that your internet connection is stable. Obviously, this is an important factor for good communication with Apple servers. Make sure nothing else is running so that iTunes can make full use of your network.
Also read:
Bonus solution!
Rebooting may help.
Just press the Home and Power buttons at the same time. Hold both buttons for ten seconds and your iPhone/Pad/Pod will be forcefully restarted. Try launching iTunes again and reconnect your device using the USB cable.
Read more about how to restart iPhone 8 and X. You can also try restarting the router and the Internet on your computer, in some cases this helped.
If none of the above helped, then try a third-party application that will install the iOS update.
Working solutions
Virus check
Ways to update an iPhone via wi-fi or iTunes
The procedure is banal, but nevertheless useful. It's worth eliminating the problem with malware right away - this way, at least, you won't have to worry about losing communication between iTunes and Apple's servers.
There are three useful tools worth taking advantage of.
We're talking about HitmanPro, Dr.Web CureIt! and Adguard. Each utility needs to sequentially check the system for Trojans, trackers, and ransomware. The check will take no more than ten minutes. Then all you have to do is reboot and try everything again.
Checking the hosts file
If for some reason the ubiquitous HitmanPro was unable to detect anything suspicious in the system, then the time has come to personally look for the problem in the hosts file, located at the address: “C:WindowsSystem32driversetc”.
You need to quickly follow the specified path, and then find and open the hosts file with notepad.
Inside you will find some technical information, as well as some addresses and even websites.
The main goal is to delete the content after the command “127.0.0.1 localhost”. All you have to do is save the changes and restart the computer. By the way, if the file does not open, is not edited, and changes are not saved, then you need to interact with the hosts with administrator rights set.
Reboot and updates
Yes, a banality, but a useful thing. Both your PC and iPhone need to be rebooted. And only then repeat the recovery procedure.
Didn't work again? In this case, you need to check whether the latest version of iTunes is really installed (the developers from Apple should be given their due - errors are corrected quickly enough, and therefore you should not be lazy and skip updates). The check is carried out through the “Help” menu in the top drop-down menu of iTunes.
Hardware problem
Did the above methods not work? Most likely, error No. 9 is caused by a poor-quality USB cable, a non-working PC port (you should try the others), or problems with the iPhone cable. The best way to figure out the situation is to ask someone to visit, borrow someone else's lightning cable and someone else's computer and try to repeat the procedure.
Using DFU
And the last, truly radical method. To enter forced recovery mode, you need to connect your iPhone to your PC, hold down the “Power” key (for about 3 seconds), and then press and hold the “Home” button. After about 10 seconds, Power can be released and iTunes will display a recovery message. All you have to do is agree and start the procedure.
Ways to solve error 2009
Method 1: Replace the USB cable
In most cases, error 2009 occurs due to the USB cable you are using.
If you are using a non-original (or even Apple-certified) USB cable, you should definitely replace it with an original one. If there is any damage on your original cable - twists, kinks, oxidation - you should also replace the cable with an original one and be sure to be intact.
Method 2: Connect your device to a different USB port
Quite often, a conflict between the device and the computer can arise due to the USB port.
In this case, to solve the problem, you should try connecting the device to a different USB port. For example, if you have a desktop computer, then it is better to choose a USB port on the back of the system unit, but it is better not to use USB 3.0 (it is highlighted in blue).
If you connect the device to additional devices with USB (built-in port in the keyboard or USB hub), then you should also refuse to use them, preferring to directly connect the device to the computer.
Method 3: Disconnect all connected devices to USB
If at the moment when iTunes displays error 2009, other devices are connected to the computer via USB ports (except for the keyboard and mouse), then be sure to disconnect them, leaving only the Apple device connected.
Method 4: Recovering the device via DFU mode
If none of the methods given above could help resolve error 2009, you should try restoring the device through a special recovery mode (DFU).
To do this, turn off the device completely, and then connect it to the computer using a USB cable. Launch iTunes. Since the device is disabled, it will not be detected by iTunes until we put the gadget into DFU mode.
To enter your Apple device into DFU mode, press and hold the physical power button on the gadget for three seconds. After that, without releasing the power button, hold down the “Home” button and hold both keys pressed for 10 seconds. Finally, release the Power button while continuing to hold Home until your device is recognized by iTunes.
You have entered the device into recovery mode, which means that only this function is available to you. To do this, click on the “Restore iPhone” button.
After starting the recovery procedure, wait until error 2009 is displayed on the screen. After that, close iTunes and run the program again (the Apple device should not be disconnected from the computer). Start the recovery procedure again. As a rule, after performing these steps, device recovery is completed without errors.
Method 5: Connect your Apple device to another computer
So, if error 2009 has not been resolved, and you need to restore your device, then you should try to finish what you started on another computer with iTunes installed.
Describe what didn't work for you. Our specialists will try to answer as quickly as possible.
Method 9: Contact technical support
If none of the solutions we suggested helped get rid of the problem, there is nothing left to do but contact Apple support. In addition, this is exactly what is suggested to be done on the page of the company’s official website dedicated to error code 9 in iTunes. You can get help both by text and by phone, as well as in the mobile application. Use one of the links below to submit your request.
Contact Apple Support
Instead of contacting technical support, you can also contact the official Apple service center directly, whose specialists will certainly help you fix the problem.
Describe what didn't work for you. Our specialists will try to answer as quickly as possible.
Hardware check
If you receive error 53, follow the instructions in this article.
If you see one of the following errors, it may indicate a hardware problem.
- 1, 3, 10, 11, 12, 13, 14, 16
- 20, 21, 23, 26, 27, 28, 29, 34, 35, 36, 37, 40, 56
- 1002, 1004, 1011, 1012, 1014, 1667, 1669
Follow these steps: After each action, check if the problem is resolved:
If the error message continues to appear, contact Apple Support.
Make sure your device is connecting to Apple servers.
When error 1671 appears, your computer is loading the necessary software. Wait until the download completes and try again.
If you receive one of the following errors, your computer may be unable to connect to Apple servers or your iPhone, iPad, or iPod touch.
- 17, 1638, 3014, 3194, 3000, 3002, 3004, 3013, 3014, 3015, 3194, 3200
- "An error occurred while loading the software."
- "The device is not supported for the requested build."
Follow these steps:
Error 4037 means that the device cannot be updated using a computer because it is password protected and has not been unlocked for the update or recovery. Unlock your device and try again. Find out what to do if you don't remember your password.
If the error message continues to appear, contact Apple Support.
Correct use of lithium-ion batteries
There are general rules for using lithium-ion batteries that will extend their service life and long-term preservation of capacity characteristics and ability to hold a charge. These tips also apply to DS4 controller batteries:
- Do not allow the battery to completely discharge. Lithium-ion batteries do not have a memory effect, so they can and should be charged before they are completely discharged. It is known that any battery has a limited number of charging cycles. If you charge the gamepad at a level of at least 10–20%, you will significantly increase the number of such cycles for your battery.
- Discharge completely once every 3 months. Staying in a charged state for a long time is just as harmful to the battery as constantly discharging it to zero. Therefore, it is recommended to discharge the battery to zero once every 3 months, and then fully charge it and keep it on charge for 8–12 hours.
- Follow storage rules. If you do not use the controller for a long time, keep it charged at 30-50%. Long-term storage in a fully charged state will lead to a decrease in capacity. And long-term storage in an “empty” state will completely disable it; it will completely lose the ability to hold a charge.
- Use original or at least high-quality chargers. In Chinese chargers, numbers are often written at random and do not correspond to reality. And this can lead to battery failure.
- Avoid overheating. Do not leave batteries in direct sunlight or near heat sources. The maximum permissible operating temperatures are from −40 to +50 Celsius.
Fixing errors 2003 and 2005 using TunesCare
If trying to change the USB cable or port turns out to be in vain, you may want to look into TunesCare. It can repair damaged iTunes and fix various errors in one click. You can also restore your device more easily by rebooting
You can also restore your device more easily using reboot.
Let's check how to fix unknown error 2005/2003 in iTunes:
1. Open TunesCare on your PC/Mac and select Fix All iTunes Issues from the main page.
2. Click "Restore iTunes" to start downloading iTunes discs for recovery.
3. Once the download is complete, the program will automatically continue restoring iTunes.
4. Once iTunes is restored, connect your iPhone/iPad and try restoring iOS again.
Part 1: How to Fix iTunes Error 9 without Data Loss (Easy and Fast)
dr.fone has developed “iOS System Recovery”, a general fix for iPhones and other iOS devices to recover from boot issues such as widescreen, black screen, iPhone errors, recovery mode, and Apple logo loop without data loss. These are typical problems that lead to inoperability.
dr.fone toolkit – iOS system recovery
Fix iPhone error 9 or iTunes error 9 without data loss!
- Fixed various issues of iOS system stuck in recovery mode, white Apple logo, black screen, stuck on startup, etc.
- Just fix your ISNA normally, without losing data at all.
- Fixed other errors and iTunes iPhone error such as iTunes error 4013, error 14, iTunes error 27 and more.
- Works for all iPhone, iPad and iPod Touch models.
- Fully compatible with the latest firmware 10.3.
The main advantage is that dr.fone software repairs the operating system without causing data loss. At the same time, your iPhone or other device is updated to the latest, non-jailbroken versions even when the device is unlocked.
Step 1. Launch dr.fone and select "System Restore" Feature
- Click on the “System Recovery” button to launch the function.
- Connect your iPhone to your computer using a USB cable. Software recongnises on iPhone or any other connected device.
- Click on the "Start" button in the software to begin.
Step 2: Enable Firmware Download
- To recover from an operating system crash, the latest firmware must be loaded into the IOS device.
- The software recoNgnises the model, asks for confirmation, and offers the latest download.
- Click the Download button. The process ends automatically.
Step 3. Return to normal life
- After the firmware is installed, the program begins preparing the iPhone.
- The iOS device exits recovery mode. If the Apple logo was previously saved within the loop, it starts working normally. You are already receiving iPad error 9 messages. It takes about 10 minutes for the iOS device to recover and function normally.
- Visual instructions are clearly displayed on the screen.
- Use the device only after completing the process as specified in the software.
With iTunes Error 9 or iPhone Error 9 plaguing so many iOS device users, the new dr.fone solution really simplifies the recovery process after download error and when the iOS device is unresponsive to time-consuming manual methods.
Solution 1: Restart your computer or iOS device (quick solution)
It's a big cliché. But like most other clichés, their popularity comes from their truth on a regular basis. If you have a desktop or laptop, doing a "reboot" often helps put things back in the correct order.
Sometimes you can fix iTunes error 2009 by simply switching your computer off and then on again. After restarting, launch iTunes and then run the update or restore the process again.
Restarting your smart device, your iPhone, iPad or iPod Touch can also be a very simple solution to cure errors that occurred due to USB connection failure. You can try the following steps to restart your device and fix iTunes 2009 error:
- press until "Red Sl" appears on the screen
Rebooting the phone will often do the trick.
If this doesn't work, your next step is to update iTunes.
iPhone Error
Receiving error messages while you are updating or restoring your iPhone, iPad or iPod Touch is a problem. One of these errors that we see evidence of quite often is iPhone Error 2009 or iTunes Error 2009.
Someone who uses an iPhone, iPad or iPod Touch and updates or restores their device in iTunes may receive a message stating that “iPhone (device name) cannot be restored. An unknown error has occurred (Itunes error 2009)." Of the long list of possible errors, “Error 2009” is only one. However, this error will prevent you from updating or restoring your phone.
The iPhone cannot be restored. An unknown error occurred (error 2009)
This all sounds a little grim. This is actually not true. There are many ways to solve this problem. We're going to start with, of course, our favorites.
Recover email from pst file
After reinstalling Windows or when transferring mail to another computer, you can restore all mail data from a backup copy (pst file).
- Open the Import and Export Wizard. In Outlook 2007, select “File->Import and Export...”, and in Outlook 2010, select “File->Open->Import”.
- Specify the action “Import from another program or file” and click the “Next” button.
- At the step of selecting the file type to import, o and click “Next”.
- The next step is to specify a pst file with your email details. To do this, click the “Browse” button, go to the backup pst file and double-click on it. The selected path to the backup copy will appear in the “Import from file” column. Click "Next".
- In the last window of the import procedure, select the “Inbox” folder to download, check the “Include subfolders” checkbox, “Personal Folders” import destination and click “Finish”.
All emails and email contacts will be restored as they were when saved to the file.
What to do if you couldn’t restore your iPhone “Error 9”
Error 9 when restoring an iPhone mainly occurs among owners of older smartphone models, or rather, up to iPhone 7. Let's explore ways to solve the problem.
Antivirus and firewall on PC
During the iTunes update process, the program must connect to network resources to obtain new data. Of course, this requires an Internet connection. However, in some cases, standard antivirus programs may block this access, citing the fact that these resources may be infected. In fact, there cannot be any virus software on official Apple services. In this case, we are talking about incorrect antivirus and firewall settings.
To fix error 9 when restoring an iPhone or updating it, you need to go to your PC settings and make sure that the use of a proxy/VPN is not activated in them. This may be the reason for constant blocking.
In addition, if you have a good antivirus on your PC, there is no need to use a firewall. Therefore, you can turn it off at least temporarily. If this does not help, then you can deactivate the antivirus itself for a while (the main thing after this is not to go to suspicious sites). If after this the update process proceeds without any errors, then you need to delve into the software settings and add Apple servers to the exclusion list.
Reinstalling the application and system
If this does not help, then you will have to remove the software of the gadget itself. Before such manipulations, it is better to save all data, since there is no guarantee that re-flashing will be successful.
Another option is to try returning the gadget to factory settings.
Force reboot iOS
This method is recommended if simply turning the device on and off, checking for updates, etc. did not help. The fact is that when you force a reboot, the phone returns to its factory settings. Accordingly, everything that the user painstakingly added to the phone may be lost. The same applies to standard settings. After the reset, you will have to re-adjust the screen brightness, set the ringtone and much more. However, in some cases there is simply no other choice.
So, to restart iOS, you need to perform several manipulations:
- Open the phone menu and find the “Settings” item in it. Go to it.
- A list of available options will appear on the screen. You need to go to the very bottom, find “Reset” there and click on it.
- A new menu will open, which will present a list of possible operations. You must select "Reset all settings." Other points imply only partial restoration.
- A confirmation window will appear on the screen. You need to double-click on “Erase data”.
- Now you just need to enter your password and confirm the “Erase” command again. The main thing is to check that the current email address and user login are displayed in the window that opens.
After this, the phone will reboot and return to its original settings, deleting all user data.
Possible 10xx errors and their elimination
This problem can occur if you are trying to flash to an older firmware version than the one you are currently using. Or if you try to update to a modem of a version that does not match your gadget, an update error may appear. iTunes often issues such codes, but eliminating them is not so difficult.
To deal with the problem, you will need to download and use a utility called TinyUmbrella. After the program starts, you will need to click on the Kick Device Out of Recovery button, and then calmly download the programs you need.
How does error 4013 manifest itself?
Usually its appearance does not foretell anything. Although in certain cases the error occurs after the gadget is dropped or moisture gets into it (and it is not necessary that the phone falls into water, it can also be raindrops, snow, steam, condensation, wet hands, etc.).
Users often encounter this problem even after the release of the next iOS update. That is, when you try to upgrade, the iPhone shows the cord, and when restoring through iTunes, a message appears about an unknown error 4013.
Checking USB Connections
If you receive error 4005, 4013, or 4014, follow the instructions in this article.
If you receive one of the errors listed below, check your USB connection, USB cable, USB port, or computer:
- 13, 14, 1600, 1601, 1602, 1603, 1604, 1611, 1643–1650
- 2000, 2001, 2002, 2005, 2006, 2009
- Error message saying "invalid response"
Follow these steps: After each action, check if the problem is resolved:
- Connect the USB cable that came with your device. If it is missing, use a different USB cable made by Apple.
- Connect the device to another USB port on your computer. This should not be a port on the keyboard.
- Connect the device to a USB port on another computer.
- If the error message continues to appear, check for other problems with the USB, third-party security software, and then the hardware.
If the error message continues to appear, contact Apple Support.
Update in DFU mode bypassing iOS phone
Unlike the one discussed above, updating in this mode will destroy the user’s information on the iPhone 5S, so it is advisable to make a backup before performing it. But such a reinstallation of the OS often helps to avoid failures with codes 50, 47, 14, 3014, 3194, 4005, 4013, 4014, etc. Don’t forget to download the current version of iOS for your phone through the Apple support site. For this:
- go to https://www.getios.com/ and select the name of your device in the appropriate field;
- In the The Model drop-down list, specify the device model;
- select the iOS version (for iPhone 5S it cannot be lower than the seventh);
- Click Download and get ready to download a file weighing several gigabytes.
Exporting letters
Export allows you to save both letters and other elements located in Outlook into a separate uncompressed file in pst format. The resulting file can be used in the same way as an archive, but it will not need to be unzipped.
- While in the “File” tab, go to the “Open” subsection. Open the “Open” section
- Select the "Import" or "Import and Export" function, depending on the program version. Click the “Import” button
- A. Select the action “Export files”
- Specify that you want to create a file in pst format. Specify pst format
- Select individual folders to export, or check the topmost section and check the box next to the words “Include subfolders.” Specify which folders need to be exported
- Specify the path where the location for storing the file with exported letters will be determined. We indicate where to save the file with the exported files
- If you want, you can set a password for the file, but this is not necessary. Set a password for the file
- As a result, you will receive a file with which you can transfer letters to any computer that has Outlook. Exported file received
Board delamination
There were several fives hanging on “waiting for iPhone”, rolling the processor and the nand did not help, the problem turned out to be in the board itself, having removed the processor, I began to call the nickels that come from the nand, and noticed a situation that if I press harder on the nickel, the contact seemed to ring, but if not press and step as if from the edge of the contact, then the nickel is in the break, so that there are no objections to the purity of the experiment, I will say that everything was done under a microscope and with well-sharpened probes, I repeat that I have seen this on several devices and now if the device arrives with a reboot or waiting, I remove the percentage and the first thing I do is check the nickels that come from the nand. The board is probably delaminating.
Method 1: Fix using the free Tenorshare TunesCare program
One of the easiest methods to correct the situation without diving into the topic is to use the Tenorshare TunesCare program. It was created to solve any errors with iTunes (including version 12.9) and is capable of providing the required result in 2-3 clicks.
Download to your computer and run the program, connect your iPhone.
After identifying the device, a main window with only two buttons will appear on the screen. Click "Fix Sync Problem..." and Tenorshare TunesCare will begin restoring your iTunes library.
If Tenorshare TunesCare cannot recognize your smartphone, or there are problems installing iTunes, or it is working slowly, or God knows what else, there is a second button “Fix all errors...”, just click it and follow the prompts .
Common Windows 7 Error Code 9 errors
Detected Windows 7 Error Code 9 problems with Windows 7 include:
- "Application Error: Windows 7 Error Code 9"
- "Invalid Win32 program: Windows 7 Error Code 9"
- “Sorry, Windows 7 Error Code 9 has encountered a problem. "
- "Windows 7 Error Code 9 could not be found. "
- "Windows 7 Error Code 9 not found."
- "Problem starting the application: Windows 7 Error Code 9."
- "Windows 7 Error Code 9 file is not running."
- “Windows 7 Error Code 9 exit. "
- "Error in software path: Windows 7 Error Code 9."
Windows 7 Error Code 9 EXE errors occur during Windows 7 installation, when running Windows 7 Error Code 9 (Windows 7) related applications, during startup or shutdown, or during Windows OS installation. Logging Windows 7 Error Code 9 errors inside Windows 7 is critical for detecting electronic Windows faults and relaying them back to Microsoft Corporation for repair options.
Hardware check
If you receive error 53, follow the instructions in this article.
If you see one of the following errors, it may indicate a hardware problem.
- 1, 3, 10, 11, 12, 13, 14, 16
- 20, 21, 23, 26, 27, 28, 29, 34, 35, 36, 37, 40, 56
- 1002, 1004, 1011, 1012, 1014, 1667, 1669
Follow these steps: After each action, check if the problem is resolved:
If the error message continues to appear, contact Apple Support.
Priority actions
- Make sure your Mac running macOS Catalina 10.15 is running the latest software. If you have a Mac running macOS Mojave 10.14 or earlier, or a Windows computer, make sure you have the latest version of iTunes installed.
- If your device cannot be recovered and you receive the message “An unknown error has occurred [error number],” follow the instructions in this article.
If the error message continues to appear, try the following steps.
Disable iTunes Assistant
If you're on a Mac, you'll need to go to System Preferences > Account and then click Sign In Items. You will find "iTunes Helper" in the list of items. Turn it off.
If you are using a Windows PC, first open the Task Manager and go to the Processes tab. Find "iTunes Helper" and disable it.
You may have already noticed that iTunes can be very stubborn in insisting that it does exactly what it wants it to do. It will soon enable the iTunes Helper process again. You only need to disable it until you finish the restore or update process.
Now that you have disabled iTunes Helper, you need to try updating your iPhone/iPad/iPod Touch. Whatever process was stopped by iTunes error 2009, you should try it again.
Solution 4: Make sure your antivirus program is updated
They will certainly help us, it would be stupid to start a computer without having one installed, but only for now, and then, antivirus programs can cause problems. Even with something like this iTunes error 2009 situation, the antivirus program on your system could be responsible for getting in the way. Check to see if there are any updates to your antivirus security software available. If there is, then download and install it. When you are satisfied that everything is as it should be, try updating your iOS device again.
Method 2: Uninstall and reinstall iTunes
As mentioned above, one of the reasons why you are seeing iTunes error 0xe80000a is because some components are missing. In this case, you need to uninstall iTunes, download it again and reinstall the program.
Windows 10
You can remove iTunes and its components manually. Below are the components that need to be removed:
- Hello
- Apple software update
- Apple Mobile Device Support
- Apple App Support
To remove these components, you need to click on Start, then Apps and Features and click on all components as mentioned above.
Additionally, you can also use this method for Windows computer:
- Open Run Command by clicking on the Windows key and R button.
- Next you need to type appwiz.cpl and then hit the Enter button.
- Here you need to search for iTunes and click on the Remove button. After that, go to the Trash and empty it to remove any remaining contents.
- Then you need to delete the remaining iTunes files by going to the %ProgramFiles% directory; To do this, open the Run command, enter the previously mentioned command and press enter.
- Here you need to look for folders like IPOD, Hello, iTunes, etc. and delete them. Then go back to the panel and remove hello from here.
How to register equipment?
The main reason for the appearance of error 9 on the new Tricolor TV receiver is unregistered equipment. When signing up for a service package with the company, the client receives a special device that allows them to receive and receive a satellite signal.
The client is given the opportunity to install and connect the receiver himself or invite a company employee to register the receiver. Each receiver and smart card has an original number that allows you to identify the tariff plan and plays the role of a personal account.
You can register the receiver like this:
- on the official Tricolor resource;
- on the client control panel of the company’s services;
- by calling the support service or contacting a company specialist in another way.
You can quickly register the receiver by filling out a special form on the website. In the form you need to enter personal information, contact details and the receiver number, consisting of 12 or 14 digits. The operator manually checks activation within 8 hours. There is no need to turn on the receiver during this period of time.
In the subscriber’s personal account, you can not only register the receiver, but also use advanced functionality. If you do not have access to the Internet, you can register the equipment by calling the support service.