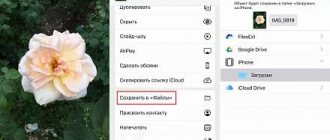
It is not always possible to recover and view deleted information from a device. This is how the two-stage memory cleaning system works. On Apple iOS devices, there is an option that allows the user to first delete a photo and then restore it if a certain storage period has not passed. This option is great for those users who often want to recover photos that they deleted earlier and were unable to understand whether they needed it or whether they could simply restore the photos. If the user is sure that he does not need the photo and needs to get rid of it completely, then he can use the special deletion mechanism on iPhone phones.
How to delete photos from iPhone
Deleting photos via iTunes
This method will leave only one photo in the device’s memory, but later you can easily delete it through the device itself.
Please note that this method will only delete photos that were previously synced on a computer that is currently unavailable. If you need to delete all pictures from your device without exception, go straight to the second method.
1. Create a folder on your computer with a random name and add any one photo to it.
2. Connect your device to your computer, launch iTunes and click on the miniature icon depicting your device in the top area of the window.
3. In the left area of the window, go to the “Photos” and check the box next to “Synchronize” .
4. Near the “Copy photos from” , set a folder with one photo that was there before. Now all you have to do is synchronize this information with your iPhone by clicking on the “Apply” .
Deleting photos through Windows Explorer
The bulk of tasks related to managing an Apple device on a computer are carried out through the iTunes media combiner. But this does not apply to photos, so in this case, iTunes can be closed.
Open Windows Explorer under This PC . Select the drive with the name of your device.
Go to the folder "Internal Storage" - "DCIM" . There may be another folder waiting for you inside.
All the pictures stored on your iPhone will be displayed on the screen. To delete them all without exception, press the keyboard shortcut Ctrl+A to select everything, and then right-click on the selection and go to “Delete” . Confirm deletion.
We hope you found this article helpful.
Thank the author and share the article on social networks.
Using iTunes
This technique also involves deleting photos via a computer, but using the Apple iTunes program. Through iTunes, photos are usually deleted when the mobile device system refuses to provide the user with the opportunity to delete content.
This can happen when graphics have been downloaded to the device by the user using Apple iTunes . In order to carry out the removal process in this way, you will have to do the following:
- Initially, you need to connect your mobile device to your PC, and then go to the iTunes media player menu;
- Go to the settings menu, and then click on the inscription that is responsible for manipulating images;
- When a message appears providing the user with information about synchronization. Click on the checkmark;
- Confirm removal of material;
- After this, you will have to synchronize.
Now this album will disappear from the device memory.
Free up space on your device
Before you delete anything, be sure to back up any photos or videos you still need. When you use iCloud Photo Library, if you delete a photo or video on one device, it's also deleted on all other devices signed in with the same Apple ID.
To see how much free space is left on your device, go to Settings > General > [Device] Storage. Learn more about managing photo storage on your device.
Using a Factory Reset iPhone
In modern Apple devices, you can reset your iPhone using factory settings. This is a radical option that not only resets photos, but also resets absolutely all photos on the phone. This function can be used for various purposes, ranging from problems that are difficult to fix to those proposed in this article.
Returning to factory settings allows you to use your phone in a new way, it will have the same settings that it had at the very beginning when you purchased it. To perform such a reset, you should:
- Go to "Settings";
- After that, click on the “Reset” section;
- In the open menu, you must indicate the option in which the procedure will be carried out. You can delete content and settings, then everything will be deleted. Photos will also be erased and cannot be restored.
After the procedure, the user will delete all settings. It will be almost impossible to use the phone any further.
The system will ask the user twice whether he wants to delete the data or not, since it will be impossible to restore it.
At the beginning of the procedure, an image of the block will be shown. It will remain until all data is deleted. If backups have been performed previously, the user can partially restore lost data. If there is no need for restoration, then we delete the backup copy as well.
Store only what you need
Tap to delete photos and videos from your iPhone, iPad, or iPod touch. When you delete photos, they go to the Recently Deleted album. They stay there for 30 days and then are permanently deleted.
Photos you add to your iPhone, iPad, or iPod touch from iTunes can't be removed from the device directly in Photos. Learn how to delete photos from iTunes.
Deleting a photo
- Open the Photos app.
- Tap the photo or video you want to delete.
- Tap > Delete Photo.
Deleting multiple photos
- Open the Photos app and click Select.
- Tap each photo or video you want to delete.
- Tap > Remove [number of] photos.
Permanently deleting photos
If you want to permanently delete photos or videos within 30 days of deletion, delete them from the Recently Deleted album. There is no way to recover a photo that has been deleted from this album.
- Open the Photos app and go to the Albums tab.
- Open the Recently Deleted album and click Select.
- Click each photo or video that you want to permanently delete.
- Click "Delete" and confirm that you want to delete the photos.
How to clear the Recently Deleted album
On the iPhone, iOS 8 decided to use an album that would store those pictures that the user recently deleted. Usually, a huge number of photos saved on an iPhone take up a lot of storage and space. Therefore, I want to delete unnecessary files to make it easier to use the device. The owner of the device, when erasing unnecessary data, will notice that there is no increase in the amount of free space.
This means that the pictures are not erased, but are accumulated in a special “Recently Deleted” album, so that it can be deleted if necessary, as well as restored.
To completely clean the area, you should do the following:
- Click on the “Select” button. This way the user gets the opportunity to view the album and also mark those photos that he would like to permanently delete;
- Now we tap on the basket, that is, final deletion;
- We confirm that the files are in the trash. Tap on “Delete all”.
Next, the process of comprehensive and high-quality removal will begin. It takes place very quickly, just a couple of seconds, but after this completion the user will not be able to recover all photos.
There is another interesting way to clear an album, which takes a lot of time. It consists in the fact that the user does not need to do anything. He just has to wait until approximately 40 days have passed for the pictures from the phone to be completely erased.
Tutorial to Delete Unneeded Photos from iPad to Free Up Storage
Posted by Dorothy Collins March 23, 2022 09:58
“How to delete photos from iPad? Some images have a trash icon that I can use to empty them, but others don't."
First, the procedures for deleting iPad photos primarily depend on how they are stored there. In this tutorial, we will show you how to delete photos from iPad in various situations. And you can learn about troubleshooting can't delete photos on iPad.
Conclusion:
Over time, you may accumulate a lot of high-quality photos on your iPhone and receive a low memory warning. To keep your device working properly, you can delete unnecessary photos. However, some people are facing the problem that they cannot delete photos from iPhone. In this guide, we have shared several solutions to solve this problem and delete photos to free up storage space. You can choose the appropriate method depending on the situation. If you have more questions about deleting photos on iPhone, feel free to leave a message below this article.
Part 1: How to Delete Photos from iPad
In this part, we will tell you several ways to delete photos from iPad quickly and efficiently.
Deleting photos from iPad may not undo, so for important photos, you may want to start backing up your iPad to an external hard drive before following the instructions below.
Method 1: Manually Delete Photos from iPad
The easiest way to delete photos from your iPad is in the Photos app.
Step 1. Open the Photos app on the iPad home screen and click the Photos tab to display all the photos on iPad.
Step 2. To delete a single photo, tap the photo to open it, tap the Trash icon at the top of the screen. If you need to delete multiple photos from your iPad, tap Select in the top right corner, select each unwanted photo, and tap the Trash icon. When prompted, click "Delete [number of] photos" to confirm.
Step 3. Go to the Recently Deleted folder in the Photos app. Select unnecessary photos and delete them again; otherwise they will be kept in this folder for 30 days.
Method 2: Delete Photos from iPad professional
If you are looking for an easier way to delete photos from iPad, we recommend Apeaksoft iPhone Transfer. It is capable of recognizing all the photos stored on your iPad device and displaying them in a list. What's more, with iPhone Transfer, you can back up your iPad photos to your computer before deleting them. This iPad photo delete app supports all iPad models including iPad Air/Pro/mini and earlier generations. In short, this is the best way to delete photos from iPad in one go.
How to effectively and quickly delete photos from iPad
Step 1. Connect iOS Transfer Tool to Mac
Download and install the best iOS transfer tool on your computer. It offers one version for Windows and another for Mac. Connect your iPad to your Mac using an original Lightning cable. Launch the Apeaksoft iOS transfer app and it will automatically detect your iPad.
Step 2. Preview Photos on iPad Pro Before Deleting
Click your iPad Pro name in the top left corner of the window and select the Photos option in the left sidebar to display all the photos on your device. You can then go through them and decide which one you want to remove.
Part 2: How to Delete Photo Albums from iPad
As stated earlier, the way photos got onto your iPad determines how you delete them. If you find that there's no deletion option for a certain photo, it might just be syncing to your iPad but not downloading to your device.
If you've created a lot of albums on your iPad, you can delete albums directly from iPad.
Step 1. Go to the Albums tab at the bottom of the Photos app.
Step 2. Scroll down and find the album you want to delete from your iPad. Click "Edit" in the top right corner to enter edit mode.
Step 3. Click the Minus icon in front of the unwanted album and click the Delete button. Repeat the procedure on another unwanted album.
Don't miss: here you can also learn how to delete messages on iPhone
Can I delete multiple albums?
Think you can save time by deleting multiple albums at once? Unfortunately this is not possible.
You can delete multiple albums at once, but you only delete the album, not the photos inside.
- Open photos
- Go to Albums, and next to My Albums, click View All to see all of your albums.
- Click on Edit in the top right corner.
- Red icons will appear on each of the albums that you can delete. Just click on the red circle to delete the album.
As we said above, this doesn't actually get rid of the photos inside - it just deletes the album; the photos that were in it will remain on your iPhone.
Part 3: Can't delete photos from iPad? How to fix it
As stated earlier, the way photos got onto your iPad determines how you delete them. If you find that there's no deletion option for a certain photo, it might just be syncing to your iPad but not downloading to your device.
For example, if you turn on iCloud Photo Stream and select Optimize iPhone Storage, that means the photos on your iPad are a copy of the full-resolution versions, while the original photos are stored in iCloud.
Additionally, if the photos on your iPad are synced from your iTunes library, you won't be able to delete them from your iPad either. To solve the problem of can't delete photos from iPad, follow two methods as below.
Method 1: Solve can't delete photos from iPhone using iTunes
Step 1. Connect iPad to computer via USB cable. Launch the latest version of iTunes. After waiting for iTunes to recognize your iPad, click the Device icon.
Step 2. Select "Photos" under "Settings" on the left ribbon. Be sure to check the Sync Photos box, go to the Folders area, and uncheck the boxes for folders containing photos that can't be removed from your iPad.
Step 3. Finally, click the "Apply" button to confirm it. Unlock your iPad and go to the Photos app. The photos you want to delete should now disappear.
Method 2: The Perfect Way to Delete Photos from iPad
If iTunes is not suitable for deleting photos from iPad, you will need an iPad erasing app such as Apeaksoft. iPhone Eraser, Can delete photos from iPad. Moreover, if you want to erase all photos on iPad, iPhone Eraser is the best option because it uses advanced technology to overwrite your device.
How to Delete Photos from iPad in One Time
Step 1. Connect iPad to iPad Erase App
Download and install the desired version of the iPad eraser app on your computer. Use the original USB cable to connect your iPad and computer. Launch the iPad eraser app to complete the connection.
Step 2. Determine the erasure level
Once the app recognizes your iPad, it will show you three level removal options: Low, Medium, and High. The higher the erase level, the more times the app overwrites your iPad. Select the correct erase level and proceed to the next step.
Step 3. Delete photos from iPad in one click
If you're ready, click the Start button to begin deleting photos from your iPad. Once this is done, restart your iPad, the unwanted photos should be deleted permanently.
Bulk delete images on iPhone or iPad
How cool it is to capture the most important moments in life using a smartphone, and how sad and disappointing it is when the phone’s memory fills up. Most users have to go through the same ritual every time: manually deleting all photos to free up space. This takes a lot of effort and time. Due to the long routine process, important pictures may be overlooked and accidentally deleted.
Below are several ways in which you can learn: how to backup all images on Windows or Mac and mass delete all photos from iPhone.
Backup Photos to Computer and Delete Them from iPhone
Windows:
- We connect the phone to the computer using a cable.
- If Autorun is enabled, then select “Open device to view files” in the pop-up window.
- If the window does not pop up, click “Computer” and find the iPhone.
- Find the folder and select all the images. You can use the keyboard shortcut Ctrl + A.
- Right-click and select “Delete” or just the Delete button on your keyboard.
- We connect the phone using a cable to the computer.
- Click on the Finder application in the icon panel.
- Click on Applications in the side menu. Find the Image Capture.app application and double-click. The program allows you to quickly upload and delete all photos to a separate folder.
- After launching Image Capture, the iPhone will appear in the “Devices” section.
- Click on iPhone. All images will appear in the right window of the screen.
- You'll see at the bottom of the screen that Image Capture has automatically selected the Desktop as the storage location for your photos. In order to change the folder, you must click the arrow button at the bottom of the screen. All data from the phone will be automatically downloaded to the folder, and the name will match the name of your smartphone.
- Then select Import All to move everything from your phone to a folder on your desktop. Now that your photos have been downloaded to your Mac, you can free up space on your smartphone using the Bulk app. Before mass deletion, you should check whether everything you need has been downloaded and saved on your computer.
- Next, you need to press Command + A on your keyboard. All images from the list will be selected and marked with green flags.
- Right-click anywhere, and then click the “Delete” button in the menu that appears and confirm the process.
From a computer without iTunes
Uninstalling all images using a computer without using the Apple iTunes service This method is probably one of the fastest, but not the most reliable. This kind of method involves removing all material by pressing one button once. To do this you:
- Connect your device to your personal computer;
- When “Explorer” appears, you will need to select the folder that is responsible for opening the device in order to view files;
- Next, a file of the following type will open:
- When the window opens, you will have to right-click on the folder, and then select the delete option;
- You must confirm the uninstallation.
How to delete photos from iPhone and iPad
If you did not delete the data after backing up on your computer, you can delete photos from your iPhone on the device itself.
- Open your camera roll on your smartphone.
- Then select the “Photos” tab located at the bottom of the screen. Make sure you're on the Moments screen.
- Then click the Select tab and select the ones you want to delete.
- To quickly view all your photos without lifting your finger from the screen, simply slide your finger down or up. All pictures will be selected automatically. Next, you need to click on the trash icon, which is located in the lower right corner of the screen.
- You will then see a pop-up asking you to confirm the process.