First of all, the first thing we need to know is that Windows Update is a Microsoft platform that is part of the operating system by default. The company uses the same thing to distribute updates to its operating system. But we're not just talking about system updates per se, since they are also used for other very important elements such as drivers or built-in antivirus. Hence its enormous importance in most cases.
Despite the many criticisms we've read about this functionality over the years, the truth is that in most cases it usually works quite well. But of course, due to the aforementioned importance, he also became one of the main obstacles for Redmond's team. This is because in certain cases, some users may encounter various problems here. This becomes especially obvious when downloading or installing these updates.
We're talking about problems that, in some cases, even the Redmond firm itself doesn't know what's causing them, making them even worse. Over the years , Microsoft has added some features in this regard, such as the ability to delay receiving updates.
Contents [show]
- How to pause updates in Windows Update
- Clear Windows Update cache
- How to Clear the Windows Update Cache on Windows 10 Stop the Update Service
- Remove unnecessary data from updates
Reasons to remove old updates
The reasons for deleting old updates can be very varied:
- saving disk space;
- low-quality (disturbing the operation of the system), outdated update;
- update files were installed with an error, etc.
Each of the reasons stated is sufficient to interfere with the operation of the system in order to debug it.
As my experience shows, in operating systems that have been running for six months or more, it is almost necessary to remove old updates. Firstly, updates clutter up the system disk, and the more space there is, the better Windows works. Secondly, updates can overlap each other, which causes file paths to become confusing, which also incorrectly affects the system’s performance.
Is it possible to remove updates?
Of course, updates can be removed, but with some nuances:
- the update must be removed correctly. Regular deletion of files will lead to undesirable consequences, including the crash of the operating system;
- Not all updates can be removed. Some, especially those related to Windows Defender, are vital to the secure operation of the system;
- You need to be careful when choosing which update to remove. It is quite possible that it is not old and unnecessary. This means that the system will install the update again.
Proper removal of updates is the key to system performance
Fix error 80240020
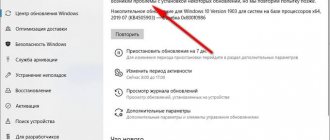
First, you should make sure that there is enough space on the server disk with the W7 program to add a new version: there should be at least 16 GB of free space, and in some cases - 50. If there is space, but W10 does not download and the error appears again, then in W7 you need to enter the command Wuauclt.exe /updatenow in the Run cell and turn on the Enter key. If the source program is W8.1, then you can initiate the command line through Start.
When these steps did not help and update error 80240020 is displayed again, you should try downloading a new version using a utility from Microsoft. After launching the assistant, W10 will begin to boot and the installation disk will be created without performing any additional steps.
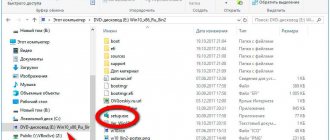
You can create this disk yourself, for which you need to insert the flash drive into the slot and turn on the required file by double pressing the key.
In the window that opens, click “Next”, then select the version of the operating system to install and the method for saving the installation data, it can be a flash drive or an ISO file, which can later be transferred to disk. Now “Next” again. Wait until the files are downloaded and the installation media is created, and then press the “Finish” button.
Clear cache for your PC in Windows 10
To clear cache for your PC on Windows 10, follow any of these procedures step by step.
Disk Cleanup
Click the Search button on the taskbar. Type “Disk Cleanup” in the search box and select the “Disk Cleanup” option as shown in the following image.
Once you select the Disk Cleanup option, the following dialog box will appear.
Select the drive you want to clean and click OK as shown in the image above. Now the following dialog box will appear.
Now check the boxes of the files from which you want to delete, such as temporary internet files, recycle bin, or downloads. Then click the Clean up system files button as shown in the image above. Now it will start calculating the space that will be free after deleting the selected files as shown in the following image.
After the calculation, it will return to the previous dialog box as shown in the following image.
Now if you want to delete some other files, check their checkboxes and then click OK button as shown in the above image. After this, the following warning will be generated. Click the "Delete Files" button as shown in the image above. Now the selected files will be deleted. This procedure will take some time.
Clear cache via command line
Click the Search button on the taskbar. Type Command Prompt in the search box and then right-click on the Command Prompt option, a menu will appear. Click the Run as administrator option. When you select the Run as administrator option, the following editor will appear. Enter the following command into the command line editor: ipconfig /flushDNS
When you enter the command, it clears the cache as shown in the following image.
Execute
Click the Search button on the taskbar. Type "Run" in the search box and click "Run." When you select the Run option, the following dialog box will appear.
Type WSReset.exe in the Open text box and click OK as shown in the image above. After you click OK, the following screen will appear. Now wait a bit while it clears the cache. Once the cache is cleared, the Windows Store app will open. Close the application.
Clear Windows 10 Computer Location Cache
Click the Search button on the taskbar. Type "Settings" in the search field and then click "Settings." Once you click the Settings button, Windows Settings will appear as shown in the following image.
Click on the Privacy option as shown in the image above. When you select the "Privacy" option. As you can see, the screen is divided into two sides. Select the "Location" option on the left side of the screen as shown in the image. Once you click on the Location option on the left side of the screen, the following options will appear on the right side.
Now scroll down the screen and find the Location History option. After that, click on the “Clear” button as shown in the image above. This will clear the Windows 10 cache.
Conclusion
By following this procedure, you will be able to clear the cache for your computer on Windows 10.
Clearing the cache on Windows 10
There are a number of special programs for deleting the cache on the system. They work automatically, since they know in advance where Windows 10 stores temporary files, so it’s enough just to start the process. At the same time, deeper, manual cleaning is also available, the methods of which will mainly be discussed.
Method 1: Third party software
Special programs are the most convenient option for cleaning cached files, especially for inexperienced users. Using the Advanced System Care utility package as an example, it looks like this:
Download Advanced System Care
- Open the software, go to the “Start” tab, mark the items of interest and start the process.
After scanning, the program will show how many unnecessary files can be cleaned. Click “Fix” and wait for the work to complete.
Third-party software, while deleting unnecessary files, can optimize the system, fix the registry, speed up the Internet, clear history and traces of Internet surfing. But if we are talking only about disk space, then, as a rule, much more can be freed up manually.
Conclusion
Clearing your update history should now be an easy task for you. As we've already mentioned, you don't really need to clear history unless you're sure you'll never need the entries in the future. If you are concerned about system slowdown, choose Auslogics BoostSpeed. The tool will make sure that your system is free of unnecessary files and other objects that can affect performance.
If you have questions about the update history or would like to share your impressions, please use the following comment section.
Clearing the Windows 10 update cache
Step 1: Stop the Windows Update service (its name is wuauserv )
Press Win+R, type services.msc, press Enter.
Find the Windows Update (wuauserv) service in the list, right-click on it and select Stop.
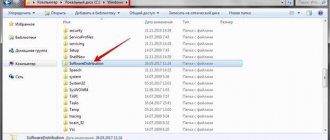
Step 2: Empty the contents of the folder
C:WindowsSoftwareDistributionDownload
Press CTRL+A, then press the Delete key and delete all files.
Step 3: Start the Windows Update service (wuauserv)
That's all.
How to delete downloaded, uninstalled, frozen
Sometimes downloaded updates can cause problems on the PC for which they are installed.
Some problems are minor, others can cause bugs that will negatively impact performance, lead to data loss or loss of functionality, or even prevent the OS from loading.
To remove a problematic downloaded update:
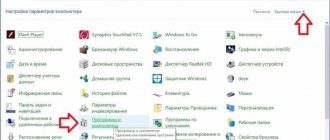
- Press the Windows key on your keyboard and type “Uninstall a program” in the search box.
- Select the "Add or Remove Programs" result from the list of search results.
- A window will open, where you need to select “View installed updates.”
- The window will display all updates installed in the OS.
- Use the search above or try to find the update you need. If you choose the latter, click on the Installed heading to sort them chronologically.
- Once you select the version you want, click on it and simply delete the file.
The OS may require a mandatory restart of the computer to complete the process.
Cleaning up from a previous build
Windows.old is nothing more than a build of the previous OS. This build is around 5-10 GB, so it is recommended to delete the folder.
Before deleting, make sure that all personal files have been correctly copied from the old OS to the new one. If necessary, you can copy them manually by going to the Windows.old directory. Once deleted, these files cannot be recovered.
To remove an old assembly:
- Click on the drive where the Windows.old folder is located and click Disk Cleanup.
- After a short wait, files that can be deleted will be shown. However, you are interested in the “Clean up system files” feature.
- In the list about and click "OK".
After this, the folder will be deleted. This action will help save almost 8 GB of space.
Prohibition of installing individual updates
Microsoft has provided a special mechanism for uninstalling certain updates. This feature is not particularly replicated to ensure that users install absolutely all expected updates.
- Download the utility from the official website. It is not recommended to use other sources to avoid the introduction of malicious code.
- Launch the downloaded file. Click the Hide updates button.
Click the Hide updates button - We check the boxes next to the updates that we do not want to receive. And click the “Next” button. We wait until the utility applies the changes, after which it is recommended to restart the computer.
Check the boxes next to the updates that do not need to be installed and click “Next”
Checking Device Manager for errors
If your PC has damaged drivers, they can be a barrier to installing updates. You need to check the serviceability in the “Device Manager”:
- Going to its window in the “ten” is quite simple: right-click on the “Start” button in the lower left corner of the display and select the manager from the list that appears. In the context menu of the Start button, find the item "Device Manager"
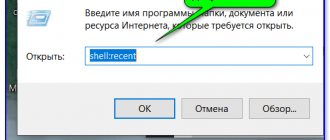
- If the context menu does not appear for some reason, hold down R and Win and insert the code devmgmt.msc into the empty line. After that, click on OK or Enter to execute it. In the “Open” line, enter the request devmgmt.msc and click OK
- Take a close look at the list of connected devices and their drivers. Modules that are indicated by an exclamation point in a yellow triangle or a question mark are problematic. See if there is an exclamation mark next to any device in the list
- To fix a problem with the driver, update it using the special item in the context menu. Click on "Update Driver" in the context menu
- In the new window, click on “Automatic search”. Click on the first link to start automatically searching for updates for the problematic driver
- Wait while the system searches for an available upgrade on official resources. If present, it will be successfully downloaded and installed without any user action. Wait for the end of the search for an update for the driver with which you are having problems
- If there is no update, you will see a corresponding message in the window. In this case, click on “Close”. Call up the driver context menu again, but this time click on “Remove device”. After a couple of seconds it will disappear from the list. Try installing the update without this device. A message may appear in the window stating that you currently have the latest driver installed.
- After this, be sure to return it in place. In the manager, there is an “Action” section on the top panel. Open its panel with one click and select Update Configuration. In the “Action” menu, select the first item “Update hardware configuration”
- If this method does not work, install the driver by downloading it from the official website of the manufacturer of the specific hardware or the PC itself. It also makes sense to contact the company's technical support to find out if your device is compatible with the update that the center cannot install.
:/> Removing a language from the panel on Windows 10: how to remove an unnecessary keyboard layout
System rollback after unsuccessful updates
System updates often affect core system files. Therefore, if there are possible failures during the update, important components of the OS may be so damaged that Windows simply stops loading. In order not to lose important data, it is recommended to regularly create system restore points. This tool will help you get your OS back up and running if updates, viruses, or disk errors cause Windows to crash.
In order to use the restore point tool when the OS is not working, you need to have a bootable Windows 10 USB flash drive.
- In the BIOS settings, we change the method of loading the OS to USB-HDD or similar, depending on the manufacturer of the motherboard.
- In the installation window, click the “System Restore” button.
On the installation screen, click “System Restore” - Next, select “Troubleshooting”.
Go to the “Troubleshooting” element - The following items: “Advanced options” - “System recovery”.
Go along the path: “Advanced options” - “System Restore” and select a point to restore - Next, select one of the last saved restore points and wait until the installation program returns Windows to a working state.
In my personal experience, sometimes a restore point is not enough to get the system back to working order. Personally, I think it’s better to accept it and do a clean installation of the system from the latest distribution, which already has all the necessary updates installed. If the update became so crooked that the operating system crashed, there is no guarantee that re-installation will not lead to the same result.
Video: how to launch a restore point
Deleting temporary files
See also: “What unnecessary services can be disabled in Windows 10 for performance”
In Windows 10, there is a special folder in which temporary files are stored, most of which, in fact, are system “garbage” that need to be deleted from time to time, which will have a beneficial effect on the operation of the computer. This is done like this:
- We go to the Start menu, where we expand the contents of the “Administrative Tools” section and select “Disk Cleanup”. Or open “This is a computer”, right-click on the system drive and select “Properties” in the context menu that appears.
Next, in the window that opens, click the “Disk Cleanup” button. - In both cases, after the scan is completed, the cleanup utility will open. Here we leave a checkmark only opposite the “Temporary files” item and click OK.
- We confirm the operation and wait for it to complete.
Clearing the update log
The update log contains information about all attempts to install updates, drivers and programs by the system. Essentially this is useless information that can also be deleted.
- We clean drive C, as shown above, after checking the boxes next to each item proposed for deletion.
- Launch the command line. We write and execute the commands one by one:
- net stop wuauserv;
- del %systemroot%SoftwareDistributionDataStoreLogsedb.log;
- net start wuauserv.
Enter the commands one by one to clear the update log - Reboot the computer.
It is worth clarifying that the above instructions will only delete the update log, that is, information about them. The updates themselves will be in perfect order, their list with the ability to delete each individual update will still be present in the Control Panel applet.