How to replace a broken Home button - 5 Android apps
Content
Plenty of Android devices ship without physical Home buttons, but Samsungs (among others) still work, and as the top-selling Android manufacturer, that means millions of those buttons still end up in the hands of users.
Whether physical or virtual buttons are better is a debate I'm not going to get into, but what do you do if your home button breaks somewhere?
How to replace a broken Home button - 5 Android apps
In the long run, you'll probably need to replace your phone, but in the meantime, there are several Android apps that you can use to replace your broken home button.
Method number one. Setting up touch buttons
First, let's try turning off the button backlighting. To do this, we need root, a terminal emulator, and a /sys directory at the root of the file system. This is exactly the combination. We are dealing with the Linux kernel, and in systems based on it, all important information about the hardware, as well as the “toggle switches” that control it, are usually located in the sysfs file system, connected to the /sys directory.
Actually, sysfs is not even a file system; more precisely, it is a file system, but it operates with so-called synthetic files. But they are not stored on disk, it is a kind of interface for communicating with drivers: I read the file - received data about the hardware, wrote it down - changed some setting. And to record, you still need root rights.
So, we get root, launch the terminal emulator (or better yet, ADB). And we write the following:
# su # cd /sys
Now we are in the /sys directory, next we need to find the directory where the button backlight driver files are located:
# find -name \*button\* ./leds/button-backlight
Bingo! This is the /sys/class/leds/button-backlight directory. Let's go into it and see what's inside:
# cd /sys/class/leds/button-backlight # ls brightness device max_brightness power subsystem trigger uevent
I bet my Nokia 3310 that the brightness is the current brightness of the buttons, and max_brightness is the maximum. Let's check our guess by writing the value 100 into the first file (well, like 100%, although what scale there is is unknown):
# echo 100 > brightness
Great, the buttons are lit and are not even going to go out.
Moment of truth - write the value 0 to the max_brightness file:
# echo 0 > max_brightness
The buttons went out, forever, like the light bulb in my entrance last night.
But just like a light bulb, they can come back on if you reboot. That is, the command is valid only in the current session. Fortunately, this is not a problem, we will put our command in a script on the memory card:
# mkdir /sdcard/boot # echo 'echo 0 > /sys/class/leds/button-backlight/max_brightness' > /sdcard/boot
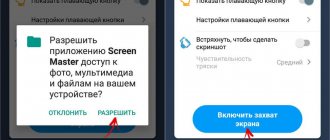
And we, in turn, will put it in autoload using init.d scripts support. We launch the application, select the first three checkboxes, using the Select folder option, select the boot directory on the memory card.
We go through sysfs
init.d scripts support
Half the task is completed, all that remains is to swap the positions of the “Back” and “Browse” buttons. To do this, you need to change the button layout. On Android it is located in several files in the /system/usr/keylayout/ directory. There are quite a lot of them, but if you discard files like Vendor_2378_Product_100a.kl and qwerty.kl (they store layouts of full-fledged Qwerty keyboards that Android supports out of the box), then there will be at most five left.
One of them is exactly what we need. Smartphones often use the ft5x06_ts.kl file, which is specific to the FT5x06 touchscreen controller (the buttons are touch-sensitive, right?), but in my case it turned out to be the Vendor_2378_Product_100a.kl file.
If you open this file, you can see the three lines you are looking for:
key 158 BACK VIRTUAL key 139 MENU VIRTUAL key 102 HOME VIRTUAL
All that remains is to swap the numbers 158 and 139 (any file manager that supports root rights is suitable for this). After the reboot, the new layout will take effect.
Navigation bar
If the Home button has let you down and you've always been intrigued by those minimal icons that most Android phones use for navigation, then Navigation Bar is for you.
This app gives you Material Design Back, Home and Recents buttons at the bottom of the screen just like the official ones. What makes them better is that you can customize them to your liking, decide how long they stay on the screen before disappearing (or lock them if you prefer), change the size of the icons, and even the background color behind the icons.
Oops! AppLock
Oops! AppLock is useful for those who have something to hide on their smartphone. The application has two functions. It can block individual programs, so that they cannot be launched without entering a special password by successively pressing the volume keys. And also Oops! AppLock can serve as a lock screen, replacing the standard one.
After installing Oops! AppLock will prompt you to create a lock key. The combination can include up to five presses on the volume rocker - for example, “up, up, down, up.” Quite an unusual way to unlock a smartphone, don’t you think? Yes, and from children applications they do not need using Oops! AppLock can be hidden. And in order not to be conspicuous to strangers, it disguises itself as a note-taking program.
appbox fallback https://play.google.com/store/apps/details?id=com.keybotivated.applock&hl=ru&gl=ru
Home button
From the same developer behind the navigation bar, the Home button gives the bottom of the screen a glowing color tint that you can then tap or long press to act like a home. button. It also has many customization options, such as changing the size and color of the tasteful glowing light at the bottom of the screen.
You can actually decide what touches and long presses this light does, so you can program all kinds of functions for it, such as Back, Home, Recents, WiFi switching, etc. This means that even if you have a working physical home button, this app is still worth exploring.
Method number two. On-screen keys
Everything is even simpler here. Android has a special debug variable qemu.hw.mainkeys that allows you to control the visibility of on-screen navigation keys. If it has a value of 0, the keys will be shown on the screen, 1 - the opposite effect.
We write a variable with the desired value to the /system/build.prop file, and that’s all:
# su # mount -o remount,rw /system # cp /system/build.prop /system/build.prop.bak # echo qemu.hw.mainkeys=0 > /system/build.prop
Next, you can “disable” the hardware buttons by turning off their backlight, as we did in the first method. It is possible, of course, that there is an option to turn them off completely, but I couldn’t find it.
Multifunctional home button
The multifunctional home button is designed specifically for phones that do not have virtual home buttons. It was originally created for the HTC One, but it also works with Samsung phones. All users need to do is tap the bottom center of the screen to activate the Home button or perform other actions. Unfortunately, the app inserts an element into the notification drawer that only serves as a reminder to launch it, so users still have to put up with a little extra visual clutter.
What are navigation buttons in Android?
This option is available on phones running Android 8.0 or later. It lies in the fact that the usual control using buttons is replaced by gesture control. To enable this feature you need to: Go to “Settings” and go to “Unlimited Screen”.
Interesting materials:
How much can you eat flax seeds? How many cigarettes can you take to Poland by plane? How much can you bring to Belarus? How much alcohol can you bring into Finland? How many products can you import from Finland? How much alcohol can you take across the border? How much can you take out of Finland? How much alcohol can you export from Armenia? How much wine can you export from Italy? How much can you export?
Button Savior
Button Savior offers perhaps the most complete solution to the entire ordeal, but it comes with a major caveat that some features require root. Luckily, returning to the home screen isn't one of those features, and it works great out of the box.
The app works by attaching a small dock to the side of the screen, which disappears behind a small transparent switch when not in use. Clicking this arrow pulls the Dock back, displaying icons for performing various tasks. The app is highly customizable, so you can change the icons in the panel, which side of the screen everything is on, and what order everything appears in.
How to remove a button on the iPhone screen
Attention ! These instructions are described for devices running the mobile operating system iOS 13 and higher.
In general, if this option bothers you and you want to remove the virtual button on the iPhone screen, you can do it like this:
- Go to “Settings” of your phone;
- Next, click on the “Universal Access” section;
- Scroll down to the Musculoskeletal section and click on Touch;
- Here, at the beginning of the list, click on the “AssistiveTouch” tab;
- Turn off this option by setting the slider next to the item to “Off”.
From now on, this option will be disabled.
How to use
After enabling the option, a translucent button will appear on the working screen (transparency is adjusted in the menu (see above). Click on it, a pop-up menu will appear with previously configured options. By default, the following are available for me: custom gestures, calling Siri, calling the notification center, launch Control point, go home and device functions.
User gestures - available standard and individually customizable (9 in total on the screen): 3D Touch, Double Tap, Press and Stretch, Spread and Rotate. You can add 3 of your own gestures.
For the “Device” option, options for sound control, screen lock, screenshot, gestures, etc. are available.
This solution with a virtual Home button (the button itself can be moved around the screen) makes it easier to control gestures and gives quick access to many functions on the phone.
Source
Disable virtual button on iPhone in older devices
This version of the instructions is relevant for Apple phones that run iOS 12 and earlier versions, so the procedure will be slightly different:
- Go to “Settings” of your phone;
- Next, go to the “Basic” section;
- Here in the list, find “Universal Access”.
Well, then the procedure is the same as in the previous paragraph:
- Find the item “Touch”;
- Next, go to the AssistiveTouch section and disable it.