The tenth version of Windows is a fairly universal OS that can be installed on various devices. Considering this circumstance, the system developers provided quite extensive options for setting power parameters. Sometimes it happens that low performance settings are set by mistake, causing the computer to run slower than possible . If you have purchased a new computer and have not yet checked which power management mode you have active, it is recommended that you do so and configure it to suit your needs, otherwise it may happen that, when operating in balanced mode, your PC will not produce its full power. To change power mode, you will need to go to the appropriate section of the settings yourself and set the optimal parameters. So, how to configure power settings in Windows 10.
Power and sleep settings
- Open menu "Start" and click on the button "Options".
- In the window that appears, select a section "System".
- Next you will need to go to the “Power and Sleep” .
- Here you can set the time of inactivity, after which the monitor will automatically turn off.
- And also set the parameters for putting the computer into sleep mode.
- In addition, you can go to the more detailed settings section by clicking on the inscription"Advanced power options".
- Available profiles will appear in the window that opens, which you can fine-tune to your liking by clicking on the inscription"Setting up the power plan" opposite the selected option.
- In the next window, you can select the same parameters as in the previous one, and to open more detailed settings, you will need to click on the inscription"Change additional options…".
- A window will appear where many options will be available to the user. Here you can set options for turning off the hard drive, various sleep modes, batteries, monitor and much more. Immediately, if your PC is unstable, you can restore the default settings by clicking on the corresponding button.
Battery saving options
This feature is quite new and first appeared in the Windows Phone 8.1 operating system. By the way, these parameters are only available when working with a mobile device; they are not active on desktop computers.
- Expand the Start menu and click on the Settings button. Then go to the “System” section and open the “Battery Saving” tab. In this window you will see basic information on the power supply and battery charge level, as well as an estimated forecast of the time after which the battery will be completely discharged or, on the contrary, charged.
- Click on the “Battery Usage” sign. This section will display statistics on battery usage. Here you can see which programs have used the most battery resources recently.
- Now click on the inscription “Change settings for applications running in the background.” Here you can set bans (or, conversely, remove them) for programs to perform various operations while in the background.
- Navigate back to the main page in the Battery Saver section. This time, click on “Battery Saver Settings”. In this category you can make the following settings:
- determine the minimum battery charge level for the saving mode to turn on;
- specify application operating parameters and display brightness while operating in economy mode;
- prohibit or, conversely, allow certain programs to run when battery saving is active on the device.
The tenth version of Windows is a fairly universal OS that can be installed on various devices. Considering this circumstance, the system developers provided quite extensive options for setting power parameters. Sometimes it happens that low performance settings are set by mistake, causing the computer to run slower than possible . If you have purchased a new computer and have not yet checked which power management mode you have active, it is recommended that you do so and configure it to suit your needs, otherwise it may happen that, when operating in balanced mode, your PC will not produce its full power. To change power mode, you will need to go to the appropriate section of the settings yourself and set the optimal parameters. So, how to configure power settings in Windows 10.
Fine-tuning PC power supply
- Select the desired diagram that you will edit.
- Next in the center you will see a list of parameters that you can change. Each of the headings can be opened by clicking on the “+” and selecting the required option.
HDD. Here you set the time of inactivity, after which the disk will be turned off. This will allow you to not use it while you're not using it, and as soon as you resume work, it will automatically turn on.
InternetExplorer . Here you can set the JavaScript update frequency. This setting determines how often Java scripts will be executed on Internet resources. The higher the operating frequency, the smoother the playback of, for example, Flash videos or other applications that use Java. The increased frequency will use the processor more intensively and, accordingly, consume more energy.
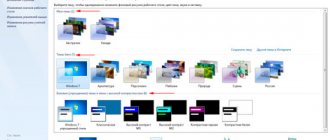
Desktop background options. In this section you can disable changing the wallpaper on your desktop. A slideshow of changing images consumes more power, especially if the photo interval is set to low.
Wireless network adapter settings - this is your Wi-Fi receiver; you can set various parameters for its operation - maximum energy saving or performance.
Dream. This setting is responsible for the parameters of the PC’s transition to various modes of reduced energy consumption. Here you can set the time when the computer will automatically fall asleep, and also allow hibernation or a hybrid option.
Hybrid sleep mode is a low-power setting that combines sleep and hibernation.
Allow wake timers. In this section, you can allow certain events to wake the PC from sleep mode. For example, a task in the system scheduler should run when your PC is sleeping, by setting the Enable , the computer will wake up to perform the scheduled task.
USB
Settings . Here you can tell the computer to turn off power to USB devices when the system is idle.
Power buttons and cover. This section is used to set the actions that will occur when using the PC power buttons or closing the laptop lid. The following options are available: enable sleep mode, hibernate, disable, or do nothing.
Action of the sleep button. This section provides the opportunity to change the function of the Sleep Mode button. If desired, instead of sleep, you can set hibernation or turn off the monitor.
Screen. Here you can configure the settings for adjusting the brightness of the monitor and the time it turns off. For example, in good lighting, the screen brightness will increase and, conversely, in a darker room it will decrease.
This manual described the most popular power settings that can be changed in Windows 10.
Selecting a Windows 11 power plan through the Control Panel
To open Control Panel in Windows 11, you can do the following:
- Open System Settings according to the instructions above.
- Type the query “Control Panel” into the search bar in the upper left corner and click on the icon/element that appears.
To open power settings in Control Panel:
- Open the “Hardware and Sound” section:
- Click on the “Power Options” item:
If in the last open window you select the “Balanced (recommended)” or “Energy Saving” scheme, then in the “Parameters” of the system the ability to quickly change the power mode is unlocked - try:
Well, in fact, this is how power modes are implemented in Windows 11 through the “Control Panel”. Now let's delve into the additional parameters of power schemes.