When working on a computer, situations arise when, when you try to install a cumulative system update, a message appears in Windows Update stating that an update installation error occurred. There were problems installing this update, so it was not installed on the PC.
The process of installing Windows updates, with default settings, occurs automatically; the user can visually observe the installation in Windows Update.
About once a month, Microsoft releases regular cumulative updates for the Windows operating system. Basically, these are patches that solve security problems, as well as fixes or improvements for the system.
The process of installing an update for the Windows operating system takes place in two stages: first, the update files are downloaded to the computer, and then they are installed on the PC.
In some cases, after installing cumulative updates, a system update error appears. Usually, the update is already downloaded to the computer, but for some reason it was not installed.
Windows Update displays an "Update Error" message, indicating that this update or updates could not be installed on your computer.
The user can use the simplest option to solve this problem:
- You need to restart your computer.
- Then you need to enter Windows Update, and then restart the search and installation of updates.
In most cases, the process of reinstalling the update is completed successfully.
If the installation of Windows updates failed, or the update did not install again, the question arises: can I remove downloaded Windows updates from my computer? Yes, such a possibility exists. In addition, the operating system has options for removing already installed updates from Windows.
You may also be interested in:
- Uninstalling Windows 7 updates - 3 ways
- How to uninstall the latest Windows 10 update - 3 ways
This guide will give you instructions on how to remove uninstalled Windows updates from your PC. The proposed methods work in the operating systems Windows 10, Windows 8.1, Windows 8, Windows 7.
Before uninstalling uninstalled or damaged Windows updates, create an operating system restore point. If problems arise on your computer, using a previously created restore point, you can return the operating system to a working state.
What difficulties might there be to remove older updates?
Windows 10 updates come in two types: local and global. Local updates, or patches, are fixes to small areas of the system that protect software from vulnerabilities. Global updates make changes to the system itself. Global update files take up several gigabytes and sometimes take more than half an hour to install. Until recently, global updates on Windows 10 appeared twice a year, but now Microsoft has begun making them smaller in size, but delivering them more often. Every time you install an update, the files from the previous version are saved, allowing you to return to them in case of problems.
Super test on the topic “Money” and how can you be friends with it?
However, Windows 10 stores these files for no more than 10 days after installing the last update. After this period has expired, the system automatically gets rid of old files and you no longer have the opportunity to return to them. If you want to return to the stable version, it is best to uninstall the updates yourself. Win 10 provides many ways to do this.
Is it possible to do this
Not all users think about how to remove old updates on Windows 10, because they are 100% sure that this cannot be done.
Indeed, the question regarding whether updates can be deleted is relevant and requires a mandatory answer.
There is nothing wrong with deciding to remove previously installed updates for Windows 7, 8 or 10. On the contrary, sometimes it is even necessary to do this. Only in this case it is important to take into account some nuances:
- Do it right. If you simply delete files, you might end up with something that shouldn’t be touched. As a result, the entire operating system may stop functioning.
- Uninstall, but not all updates. This is about the question of whether it is possible to remove updates on Windows 10 or other versions of the OS and whether clearing updates will lead to serious consequences. If you don't touch Windows security updates, everything will be fine.
- Choose what you delete carefully. Sometimes a user decides to remove literally all old updates for Windows 10 because a fresh package was recently installed. But new updates do not mean that everything previously installed is no longer required. Perhaps they are not old and are still relevant.
If you simply delete the files of a relatively old update manually and tamper with the system directories of Windows 10 or other operating systems without the appropriate knowledge, the consequences can be extremely serious and negative. To the point where you have to completely reinstall the operating system.
Not every specialist will decide to delete files manually, since some updates for Windows 10 and other versions may remain relevant for a long period of time. It is difficult to accurately determine by viewing system folders what is old and what should still work.
Therefore, the most correct solution would be to use current methods for cleaning updates.
Uninstalling an update using Control Panel
The least difficult method to remove the latest Windows 10 update is to do it using the main system tool:
- Through search or “Start” open PU.
- Go to the "Uninstall a program" page at the bottom.
- Select the “View updates” sub-item to open a list of all existing updates installed on your system. The complete list will appear on the screen in a few seconds. Please note that this utility does not provide a search function. However, you have the option to have updates appear based on download time. To do this, click the "Installed" table header (the fifth one) to sort the list of updates from newest to oldest.
- Find the update you need. It will be in the format: “Security Update for Microsoft Windows (KB*******)”, where ******* is the number of the update with which you are having problems, right-click on the name of the update, and then select the "Delete" command.
- Wait for the removal to complete. Depending on the type of updates, you may be prompted to reboot - agree.
System rollback
If you can't remove the update using the standard method or you have trouble identifying the problematic update, there is an alternative way to roll back Windows back to a working state using the System Restore feature in Windows 10.
System Rollback allows you to return the OS to a previous point in any saved Windows state. But you should make sure that you have saved restore points from when the computer was still working well.
Removing through Windows 10 options
If ten calendar days have not passed since the last update, it is still possible to roll back the changes using the parameters section:
- Press Win + I to open the Settings window.
- Go to the very bottom right section. This is the Security Center, responsible for all external contacts with the system.
- In the “Recovery” subsection, find the “Return to previous version” item.
- Click "Get Started." Follow the instructions of the wizard and perform the restoration in this way. After completing the operation, Windows will ask you to restart your computer.
If this option is not available, it means either more than ten days have passed since the update, or the corresponding files are missing on your hard drive. In this case, you will either have to accept it or reinstall the stable version of the OS.
Take the test on the topic “Legends of the 90s”, remember which of these you had?
Using a Batch File
The previous method allows you to remove one update at a time. If you have multiple updates that you want to remove, create a batch script that contains the WUSA commands.
You can uninstall these updates without opening any windows and skip the reboot by adding /quiet and /norestart to the command line.
Open Notepad and enter the following text:
@echo off wusa /uninstall /kb:4601554 /quiet /norestart wusa /uninstall /kb:4561600 /quiet /norestart END
Click File -> Save As and save the file as a .bat file.
Add command lines for any updates you want to remove and update the knowledge base number accordingly.
Run the batch file.
No windows will open and you will not be prompted to restart your computer. If you want to automatically reboot after removing all updates, add shutdown -r at the end of the batch file.
How to remove using the command line
Now you know how to remove older updates in Windows 10 using the system's built-in tools. Now we will explain how to use the cmd tool. In short, you need to use the system application Wusa.exe. To do this, you need to know the update number (KB) of the update intended for uninstallation. To do this, do the following:
- In the search, enter cmd.exe, but be sure to open it as an administrator, otherwise you will be limited in what you can do.
- Copy this wmic qfe list brief /format:table command and paste it. This command will list all updates made to date. Remember the number of the one you are going to delete.
- Now enter the command: WusaUninstall KB******* (before all capital letters except the first, put a dash /) the number of your damaged update. All you have to do is restart the system and you're done.
Cleaning the computer: ways and methods
Removing installed updates
Already installed updates can be removed, thereby rolling back the version of the operating system to the moment when these updates were not yet received. To completely remove a specific update, as well as to install it, the computer must be restarted at the end of the process. Removing some updates will cause the system to install the previous version of the update, the one that was used before the installation of the update being removed.
There are several built-in methods to get rid of installed versions. Removal options through additional programs will be discussed in a separate paragraph, so if standard methods do not suit you, you can use a third-party application. So, let's look at internal removal tools.
Using the update center
- Expand your computer settings.
Open computer settings - Select the Update & Security tab. Go to the “Update and Security” section
- Go to the update history, which contains all information about installed updates.
Open the update log - Click on the “Uninstall updates” button.
Click the “Uninstall updates” button - The control panel will open. A list of installed updates will appear on the screen; you can sort it by one of the columns. To erase an update, select it and use the Remove button. Select the update and click on the “Delete” button
- You will be asked to confirm the action, do this by clicking the “Yes” button. After removing all unnecessary updates, restart your computer.
Click the “Yes” button
Video: Uninstall updates using Update Center
Using the control panel
In the previous paragraph, we got to the desired section of the control panel through the computer settings, now let’s look at how to do this directly:
- Expand the control panel.
Opening the control panel - Select the Programs and Features tab.
Open the “Programs and Features” section - In the left sidebar, click the View installed updates button.
Click on the “View installed updates” button - Done, now highlight the unnecessary update, use the “Delete” function to erase it. Rebooting your device will confirm the removal is complete. Use the “Delete” button
Video: Uninstall updates using Control Panel
Using the command line
- Find and open the line using administrator rights. Open command prompt as administrator
- Please note that in order to remove updates using a command, you must find out the unique number of this update in advance. It always starts with KB, you can find it in the update log, when viewing the list of installed updates, on the official Microsoft website, or using the wmic qfe list brief /format:table command, which calls up a table with dates and update numbers. Run the command wmic qfe list brief /format:table
- Once you know the numbers you need, use the command wusa /uninstall /kb:unique_code to begin uninstalling a specific update.
Run the command wusa /uninstall /kb:unique_code - You may be asked to confirm the deletion, do so by clicking the "Yes" button.
Select the “Yes” option - To complete the procedure, you must restart your computer. This can be done immediately or later.
Choose whether to restart the computer now or later
Clearing the folder with old updates and copies
Restore points and versions of previous updates are stored in the computer's memory so that in case a new update causes an error or any other problem, the system can be rolled back. Under no circumstances should you delete the WinSxS folder, as this may cause Windows to stop starting, and it will not be possible to roll back or restore it without this folder. It is recommended to empty the folder only when its weight exceeds 8 GB.
- From a command prompt running as administrator, run the command Dism.exe /online /cleanup-image /AnalyzeComponentStore to let the system decide for you whether to delete the contents of the folder or not. The diagnostic result will be displayed in the penultimate line of the command result. Even if the result is negative, i.e. the computer does not recommend emptying the folder, you can do it your way, but it’s better to listen to the system. Run the command Dism.exe /online /cleanup-image /AnalyzeComponentStore
- To delete the contents of the folder, the same command is used, but the last value that triggered the diagnostic is changed to /StartComponentCleanup, which starts the cleanup. After the operation is completed, reboot your device.
Run the command Dism.exe /online /cleanup-image /StartComponentCleanup
Clearing downloaded updates and cache
Updates that have been downloaded but for some reason not yet installed or installed recently are also stored in the computer’s memory. Some downloaded updates freeze and cannot be installed because of this. All such updates are located in the Primary_disk folder:\Windows\SoftwareDistribution\Download. By going to this folder, you will find subfolders with long names; you can delete all of them or only certain ones, focusing on the code in the name and the date of creation. Removal is carried out by simply moving to the trash, that is, right-click on them and use the “Delete” function.
We delete the contents of the folder in the Main_disk:\Windows\SoftwareDistribution\Download
It is worth clearing the DeliveryOptimization subfolder, located in the same SoftwareDistribution folder; it stores the update cache. You cannot delete the folder itself, only its contents.
Clear the folder in the Main_disk:\Windows\SoftwareDistribution\DeliveryOptimization
Cleaning up from a previous build
After installing the anniversary update, the system build version changes. In order for the user to have the opportunity to cancel the transition to a new global version of the operating system, a Windows.old folder is created containing all the necessary files for 30 days. After this period expires, the folder will self-destruct, but if you don't want to wait, follow these steps:
- Run a disk cleanup program.
Open the Disk Cleanup program - Select drive C and wait for it to be scanned. Selecting a disk to clean
- Proceed to clean up system files, this will require administrator rights. Windows will ask you again to select the drive you want to scan. Click the “Clean up system files” button
- Check the boxes for “Previous Windows installations” and “Temporary installation files”.
Check the boxes for “Previous Windows installations” and “Temporary installation files” - Begin the uninstallation process and agree to all warnings that appear on the screen.
We indicate that we still want to delete the files
Cancel automatic update
By default, all available updates are downloaded and installed automatically, notifying you only that the system is updated. The negative aspects of this action are that a load on the Internet may appear at any time. The traffic spent on downloading updates is not controlled. There are several ways to deactivate automatic system updates, the easiest and fastest is to close the update center:
- Using the system search bar, find the “Services” program. Open the “Services” application
- In the general list, find Update Center services and open it. Open the Windows Update service
- Stop the process. To avoid it starting again after a system reboot, set the startup type to Disabled. Done, the update center is deactivated, which means that there will be no one to install updates. Stopping the Windows Update service
Third-party software for managing updates
There are several third-party programs that help you manage updates, one of them is Windows Update MiniTool. In it you can select updates to download and install, delete installed and downloaded versions, and block certain updates. The application has the Russian language installed, almost all actions are performed in the main menu using the list and action icons on the left side of the window. It is recommended to download the program, which is distributed free of charge, from the official website of the developer.
Managing updates via Windows Update MiniTool
Another program, IObit Uninstaller, is designed to remove various Windows components, including updates. The application has built-in support for the Russian language. The trial version can be downloaded for free from the official website of the developer. In the Windows Updates section, you can uninstall each update individually or uninstall several of them at once. The application allows you to create restore points that will help you configure the system if failures occur after uninstalling the next update.
Uninstalling updates using IObit Uninstaller
Removal through a third-party program
If system utilities do not help, you can use third-party applications specifically designed to work with Windows updates. Among such programs, we can highlight Revo Uninstaller - this is a completely free application that replaces the Windows “Uninstall Programs” tool. In addition to its main purpose - removing installed applications, Revo Uninstaller can also be used to clear the Windows 10 update cache:
- Turn on the program and go to the “Tools” section in the panel at the top. After the window opens, find the “Uninstaller” sub-item, check the boxes as in the attached image and confirm.
- After closing the tools window, click the “Update” button so that OS updates also appear in the list of installed services. Unlike regular programs, updates are marked with a separate icon and have a type number KB:*******
- Now, while holding down the Ctrl button on your keyboard, select the updates you want to get rid of and press the Del button.
- After the work has been done, you need to restart the computer.
You can remove the update by cleaning the system disk
You can remove the update using OS tools - use system disk cleanup. With all this, Windows itself will automatically get rid of garbage, without user intervention.
So, to use this utility, do the following:
- Open: “PU” > “System and Security” > “Administration”.
- Find the subsection “Freeing up space.” Wait until information on the topic is collected. Then check the boxes where necessary (you need to select “Clean up updates”) and confirm.
- Click “Clean up system files”
- Select “Previous settings”
After this, the cleaning process of unnecessary updates will begin. This takes quite a lot of time, and pausing the process can critically affect the operation of the OS, so it is not recommended to run System Disk Cleanup if you urgently need your computer.
Deleting the assistant and its folder permanently
The procedure is quite simple:
- We remove Update Assistant using standard or special tools.
- Then go to the root of drive C and delete the Windows10 Upgrade folder.
- After that, in “Programs and Features”, select “View installed updates” and look there for the KB4023057 update, which the Assistant installs on the outdated system. Let's delete it.
Find update KB4023057
Using the update center
To remove components via the central authority, do the following:
- Enter the settings menu (Win+I). There, go to the “Update and Security” tab.
- The first item on the left panel is to open the update center. In it, select “View update log”.
- A list of all updates will open.
- Select the updates you want to get rid of. After uninstalling Windows 10 updates, do not forget to restart the system.
How to empty the update cache or get rid of the Windows 10 update error with a bug
Downloading and installing cumulative updates in 10 sometimes leads to system errors, the causes of which are not always intuitive. The procedure may not be completed, for example, because the installation file is incompatible with the system, damaged, or there is simply not enough space on the disk. And we’re not talking about dozens of unknown errors.
For such situations, Microsoft has provided, although not the most convenient, but still a working tool for deleting installation files located in the system folder and awaiting installation. This will not get rid of the cause, but at least you will be able to reinstall or skip the update altogether. Follow the instructions:
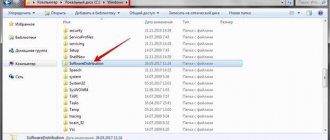
- Open the Run command and enter the path C:\Windows\SoftwareDistribution\Download
- The corresponding directory with many folders will open in Explorer: Select all contents using the keyboard shortcut Ctrll + A and press the Delete key. In the dialog box, confirm that you want to move the selected files to the trash. Please remember that this will not roll back already installed patches and will not stop Windows CO from downloading them. This method will only clear the Windows 10 update cache. That is, if any of them failed to be installed completely, deleting the mentioned files will allow you to restart the installer.
Update cache, frozen and uninstalled updates
In addition to the actions already discussed, there is also often a need to delete the update cache on Windows 10 because they were installed incorrectly or were frozen.
This happens when, at the moment of downloading fresh packages, the Internet starts to glitch, the voltage jumps, the computer accidentally turns off in the middle of the process, etc. That is, the downloading occurs with errors, which is why the downloaded updates cannot work normally.
When accessing new files, they respond with errors, which disrupts the normal functioning of the operating system.
To resolve such problems, you must:
- open the control panel;
- go to “System and Security”;
- then go to “Administration”;
- from there to “Services”;
- find the update center in services;
- double click and open the service properties;
- change the filter and set the value “Disabled” next to the “Startup type” item;
- save changes by clicking OK;
- to restart a computer;
- through any file manager, open the Windows-SoftWareDistribution-Download folder;
- delete all contents from this folder, thereby clearing the cache.
If there are problems with previously installed updates, it is also worth clearing the contents of the folder called DataStore. She is on a similar path.
After completing these procedures, re-enable the update center that was previously disabled and restart your computer.
Now the system will again start looking for fresh updates, install them without errors, and thus the OS will continue to function normally.
How to remove the update icon
We have already learned how to clear the Windows 10 update history. Now we will tell you how to make sure that update notifications do not bother us at all. The fact is that notifications in Windows 10 are associated with ubiquitous banners, which, when repeated many times, begin to cause healthy irritation. Fortunately, disabling them is very simple:
- To change your notification configuration, first go to Settings (using the Win + I key combination or via the taskbar). Find the "Notifications & Actions" tab in the "System" category and the "Notifications" section in it. Toggle the slider above the "Receive notifications" line from apps and other senders" to Off. If you wish, you can disable unnecessary checkboxes below. This is the simplest method of deactivating notifications in Windows 10. However, it has a significant drawback: it completely disables notifications in the system, including from constantly used applications, as well as important system notifications, which is very inconvenient. It is much better to configure the notification configuration manually. The second method does not affect notifications as such, but simply disables the icon that notifies the user about new updates, located in the system tray. There are also two ways to disable this icon: temporary and permanent.
The temporary method only works until the system is restarted and is as follows:
- If there are hidden icons in the system tray under the arrow, then you can simply hide the update icon there:
If the tray does not contain icons, then enter the task manager (Ctrl + Shift + Esc), find the GWX process and close it. If you want to disable the updates icon for good, then you will need to enter the CO, open the “Installed updates” tab, in the opened list, find the most recent one and simply hide it.
Disabling updates in Windows 10 1903-1909
In 2022 OS builds, Microsoft has improved protection against users accidentally disabling the update function, so the methods listed for builds 1803-1809 may not function or have a temporary effect.
Windows Updates Disabler
One of the easiest to use tools that allows you to block updates, Defender and Firewall.
- Run the utility and check the appropriate box:
- Click " Apply Now
" and agree to reboot.
It is also possible to use the indicated tool in the 2004 release, but there is a high probability that after a certain period of time the deactivated services will start again.
Windows 10 Update Disabler
Another effective portable utility from the developer WinAero, which allows you to disable Windows 10 updates on your PC by creating an alternative service that constantly ensures that the Update Center cannot start on its own. This is its main advantage over other utilities that change policies or registry keys one-time. Since Windows 10 Update Disabler is a console tool, we will work with it through the command line.
- After unpacking the archive with the utility, drop its executable file into the System32 folder for convenience:
- Open an elevated CMD or PowerShell console, enter C:\Windows\system32>UpdaterDisabler.exe –install
and press Enter:
As a result, you will have a new background process Update Disabler
, to disable which you will need to run the same command, but with the –remove switch. The utility does not protect against manually checking for updates. It is also noteworthy that it can be launched in build 1809.
WUmgr
A special utility to provide the most complete control over the update procedure. Allows you to independently select, download, view, install and remove update packages. Also, thanks to it, you can stop installing updates and even hide the corresponding subsection in the Settings
».
- Unpack the archive with the utility from and run its executable file;
- In the right column, switch to the “ Auto-update
” tab and turn on the “
Disable update
” radio button.
Optionally, you can disable receiving files through “ Intermediaries
”; - Agree to restart your computer.
Postponement of the update procedure for a year
Unlike the above options, this method does not prevent the transition to a new build, but only suspends the automatic receipt of updates for already installed components for 1 year. It should not be considered as a radical method; if your goal is to clearly prevent the downloading of updates, there is no point in resorting to it. This method is available only in the Pro edition and higher.
- Open the local group policy editor with the gpedit.msc command;
- The path to the section you need is shown in the screenshot; on the right, select the “ When to receive preliminary builds...
” policy: - Set the settings as shown in the second screenshot, only specify your own start time for the suspension.
Problems uninstalling updates
If you try to remove the update manually, you may experience problems. Very often, a removed update will be automatically reinstalled. The main possible reason is that your system is simply set to install updates automatically. It can be disabled as follows:
- Open Windows CO.
- In the top area, select “Check for updates.”
- When Windows detects updates, right-click on the problematic update and click “Hide.” In some situations, the cause of this problem is a specific network setting in which the user’s computer is influenced by Group Policy settings that determine the conditions for updates. This is, for example, a normal situation for office computers. To resolve this issue, you should use the system administrator.
After unsuccessful updates, roll back the system
If the update was installed unsuccessfully and this led to problems (for example, Windows does not start properly, a BSOD screen appears, bugs and errors appear every time you start), you can restore the stable version.
Windows will automatically open the recovery interface if your computer has problems starting. It is also possible to open this process manually by holding down the Shift button on the keyboard while clicking the “Restart” button in the “Start” menu. However, to successfully roll back you will need a disk or flash drive with a copy of Windows.
So, let's take a step-by-step look at how to roll back the system if the update fails:
- Insert a disk or flash drive with a copy of Windows 10.
- When the blue recovery drive menu appears, click "Troubleshooting"
- Click "Advanced Options" and then "System Restore."
Follow the instructions in the recovery wizard. To successfully carry out the procedure, you must log into your account using your working username and password.
Clearing the update log
In this article, we have already found out in what ways you can return the system before installing the update and how to uninstall the patch itself. Now we’ll tell you how to clear update logs. The fact is that Windows 10 autonomously logs all computer actions related to updates (if the auto-update function is enabled).
There is no direct user access to the log, so it will not be possible to clear it using Windows tools. However, this can be done using the command line. To do this you need to do the following:
- Open the cmd.exe tool.
- Enter six commands in turn (when entering, all capital letters are preceded by a space):
- NetStopWuauserv
- NetStopWuauserv
- ScConfigWuauservStart=disabled
- DEL/F/S/Q/A%Systemroot%SoftwareDistributionDataStoreLogsedb.log
- ScConfigWuauservStart=auto
- NettSartWuauserv
- The system will automatically pause the update center, clear all update logs, and then launch it again.
- The cleared update log will look like this:
Cancel automatic update
One of the features of Windows 10 that is available to every user of the system, regardless of whether we want it or not, is auto-update to the latest available version of the system. To prevent negative consequences, Microsoft does not allow users to freely disable patches at will. But if you have a professional, corporate or educational version of Ten, you can control the terms of updates. Of course, even in the pro version you will be limited, but the available options are quite enough to solve our problem.
So, Group Policy has a function for configuring updates. It is available in the above versions of Windows and greatly simplifies this process. To use it, follow the step-by-step instructions:
- Open the “Run” line. Once the window appears, enter: gpedit.msc and confirm.
- We need the “Computer Configuration” category and the option to configure automatic updates.
- You need to do this way
- In the window that opens, check the box to On, and then in the options below, select: “Download and installation notifications.”
- Save your changes and close the editor window. From now on, your computer will no longer download anything without your knowledge. To do this, you will need to confirm the upload to the Windows CO yourself.
Clearing log history
To clear the history log, you should use the Disk Cleanup function. To do this, do the following:
- Run Disk Cleanup from the This PC window.
- Click on the OS drive and click “Properties”.
- After analysis, in the window that opens, check the box next to “Windows update log files.”
- After clicking the “OK” button, the program will completely clear the Windows 10 update history, freeing up some free disk space.
Why is the update not uninstalled?
When you try to get rid of some unnecessary patches through PU, you may find that they basically do not have a “delete” button, although the rest have one. And if you try to delete the update via cmd.exe, the system will tell you that this file is required for the system to function and cannot be deleted.
If you encounter such an error, it means that Windows 10 considers the update an important part of the system and therefore does not allow you to remove it to avoid problems. However, this does not mean that you cannot insist on your own.
How to remove uninstallable updates
Windows marks some files as “required” and does not allow any manipulation with them, incl. deletion. To overcome this ban, simply remove the parameter that is responsible for this. For this:
- Launch any text editor - be it Notepad or regular Notepad. The main thing is to run it with administrator rights to have access to all extensions.
- Open the path C:WindowsServicingPackages (don't forget to insert a \ between the words).
- A window will open with many files. You need to find a category of files with a .MUM extension whose name begins with Package_for_KB_ХХХХХХХ (the last one is the update number).
- Locate the file for the specific update that is not being removed. If you are not sure which file is needed, then look for one that does not have a serial number starting with KV.
- Open this file in a text editor.
- Press Ctrl + F to open the search window and find the permanence parameter, which has one of two values: permanent or removable (the one we need). If this is the first value, then simply replace it with the desired one and save the file.
Now you can get rid of harmful download files using the usual methods.
Prohibition of installing individual updates
Microsoft has provided a special mechanism for uninstalling certain updates. This feature is not particularly replicated to ensure that users install absolutely all expected updates.
- Download the utility from the official website. It is not recommended to use other sources to avoid the introduction of malicious code.
- Launch the downloaded file. Click the Hide updates button.
Click the Hide updates button - We check the boxes next to the updates that we do not want to receive. And click the “Next” button. We wait until the utility applies the changes, after which it is recommended to restart the computer. Check the boxes next to the updates that do not need to be installed and click “Next”
Uninstalling older updates
To deliver its updates to the end user, Windows automatically downloads update packages from Microsoft servers. The system works in such a way that even after a successful update, multi-gigabyte packages remain dead weight in the system folders. It is not uncommon for installation files to accumulate into tens of gigabytes, and the user has no idea about it.
One of the annoying aspects is that after any global updates, Windows 10 automatically creates a directory with old files called Windows.old on drive C. For owners of large drives, this is not a problem, but if your computer is equipped with an SSD drive with a capacity of only 128 or 64 GB , then several gigabytes of unnecessary files become a heavy burden. Anyone who tried to manually delete the Windows.old directory found that the system did not allow them to completely get rid of the folder. At best, you'll remove about 4GB. Therefore, in order to get rid of excess load, it is necessary to clean the system disk.
Windows 10 has a utility for recovering used space and deleting old Windows files, it is called Disk Cleanup. To open them, do the following:
- Open File Explorer by clicking the icon next to the Start button or keyboard. Win+E.Open “My Computer”, right-click on drive C and open “Properties”.
- In the window that opens (the “General” tab), select “Disk Cleanup” (next to the graph visualizing disk usage). After about a few seconds of scanning, the Disk Cleanup window will appear again, but now more options will appear in the list, including any previous installations.
- Another window will open where you need to check the box next to “Clean up Windows updates”.
- Now just click “OK”, wait a few minutes and the system will restore the hard drive capacity from 10 to 18 GB - depending on how many update files have accumulated.
Cleaning up from a previous build
Windows.old is nothing more than a build of the previous OS. This build is around 5-10 GB, so it is recommended to delete the folder.
Before deleting, make sure that all personal files have been correctly copied from the old OS to the new one. If necessary, you can copy them manually by going to the Windows.old directory. Once deleted, these files cannot be recovered.
To remove an old assembly:
- Click on the drive where the Windows.old folder is located and click Disk Cleanup.
- After a short wait, files that can be deleted will be shown. However, you are interested in the “Clean up system files” feature.
- In the list about and click "OK".
After this, the folder will be deleted. This action will help save almost 8 GB of space.