| What problems can arise with a computer mouse, how to check the mouse, identify the cause of the problem and fix it yourself. |
A computer mouse is a familiar and indispensable accessory for any user of not only a PC, but also a laptop or tablet. Any problems with it can interfere with your work or rest.
But, if a computer mouse suddenly stops working, this is not a reason to throw it away and go for a new one. You can try to find and fix the problem yourself.
Mouse hardware problems
First, you should check the integrity of the device itself and the connection. If you dropped or splashed liquid on your mouse, this could be the problem. But even if you are sure that there was no mechanical damage, inspect the case and cable of the device. Make sure that nothing interferes with the operation of the optics. Check the battery of your wireless mouse.
If it's a USB mouse, try plugging it into a different port. It will be more difficult with PS/2, since the system unit usually has only one slot for it. But if there is another computer at hand, check whether the mouse will work there.
By the way, checking the mouse on another computer will allow you to determine with almost one hundred percent accuracy whether the problem is in the computer or in the accessory. You can test another mouse with this computer in the same way.
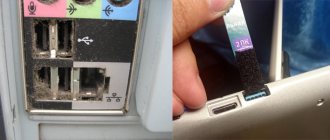
Inspect the socket on the system unit for dust, liquids, and other contact obstructions. Make sure the mouse or Bluetooth transmitter plug fits snugly but without force.
Thoroughly clean the connectors from dust and wipe the contacts with a match and a thin layer of cotton wool soaked in alcohol or use other available means.
Carry out work on cleaning the connectors only after unplugging the system unit from the outlet or removing the battery from the laptop, since even when turned off, voltage may be supplied to them.
If the connectors are oxidized, it will not be possible to completely clean them with alcohol. Repeatedly insert and remove the mouse plug into the oxidized connector until the contacts are rubbed clean.
If the problem is not detected during external inspection, the problem may be due to internal damage to the mouse. Carefully open the device case and inspect whether the contacts have come loose somewhere.
It could also be a broken wire (you can test it with an ohmmeter) and feel the wire along its entire length. This will allow you to find the break point and repair the cord.
If the mouse generally works, but the keys become stuck, often accompanied by a double click when pressed once, then you need to carefully disassemble it, clean it and bend the contact plate in the microswitches under the buttons.
If the wheel on the mouse begins to act up, which often causes reverse scrolling and weakening of the cutoffs, then you need to rinse its mechanism several times with alcohol and drop a little machine oil into it.
In most cases, this is enough and the wheel will work for a long time. But, do not rush to assemble the mouse and check its operation. If the wheel mechanism is very loose, you can gently tighten its metal frame just a little with pliers. Be extremely careful; if too much pressure is applied, this mechanism may break.
It also happens that the mouse cursor begins to move across the screen on its own. This usually means that the electronic mouse controller has started to malfunction. In this case, the problem can be solved mainly by replacing the mouse and nothing can be done about it. But don’t rush to write off the mouse as scrap, perhaps it will work fine on another computer, it happens. In addition, such problems can be caused by the mouse pad, try how the mouse will work on a clean white sheet of paper. If it’s ok, then change the rug, preferably to a plain one without patterns.
Hotkey combination
You can enable/disable the touchpad in most laptops using a specific key combination. Usually this is the “Fn” key + one of the top row keys F1-F12. For the most common laptop models it is as follows:
- Gigabyte-Fn+F1;
- Sony-Fn+F1;
- Fujitsu-Fn+F4;
- Samsung-Fn+F5;
- Dell-Fn+F5;
- Toshiba-Fn+F5;
- Lenovo-Fn+F6;
- Acer-Fn+F7;
- ASUS-Fn+F9.
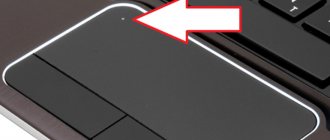
Hewlett-Packard devices do not have such a “magic” combination. Engineers have allocated a key for this. If the model is older and does not have a button, you can perform this task by double-clicking (press and hold) on the left corner of the touchpad.
In addition to HP devices, some manufacturers allow you to turn on the touchpad with one special key, by pressing a recess, an insignificant or quite noticeable point located next to the panel. A special designation serves as a guide.
Purpose
A hotkey combination is an extremely useful function that will significantly speed up the process of work, navigation, and access to folders and files. The destination is configured through a special dialog box. You can customize the mouse in detail specifically for yourself, your tasks and preferences.
But there are already configured default key combinations (which can always be changed if desired). They are the same for all devices. For example, several standard combinations:
- The “NumLock” key turns on/off the laptop keyboard;
- By pressing keys, with the exception of “0” and “5”, you can control the cursor;
- You can speed up/slow down its movement using the “Shift” / “Ctrl” buttons;
- Lock the laptop “Win+L”, launch the Explorer call “Win+E”, context menu “Shift+F10”.
IMPORTANT. The keyboard layout (language selection) does not matter when using hot keys. The command will be executed for any of them.
Mouse software problems
If the mouse is intact and works with other devices, then the problem may be in the software part. You can absolutely say this with confidence if another mouse behaves the same way on your PC. But there are exceptions when failures in the software appear only with a specific mouse.
One of the signs of software problems may be spontaneous movement or, conversely, a delay in cursor movement, as happens with problems with the mouse controller. In this case, it is difficult to distinguish a hardware failure from a software one. But, if hardware problems are not confirmed, then proceed to identifying software ones.
If you installed some programs and updates before the mouse failed, then the problem is almost certainly in them. Try removing them or, if possible, temporarily disabling them.
Be sure to check your computer for viruses and malware. For these purposes, I recommend using the free utility “Kaspersky Virus Removal Tool”, the latest version of which can be downloaded from the official website of the anti-virus laboratory.
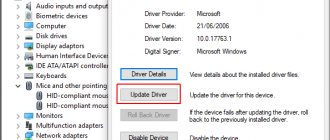
If the mouse does not work at all, then go to the device manager and check whether the computer sees the mouse, USB controllers, and there are no unknown or error-prone devices.
If the device is not recognized, the descriptor request failed, or something similar, then follow these steps:
- Disconnect all peripheral devices, briefly unplug your PC, and after booting up, connect the mouse and check its operation. Some devices such as external drives, modems and some other (possibly faulty) devices can overload the USB ports with power and the mouse begins to malfunction.
- If the device is displayed with an exclamation mark, then go to the properties of this device, select the “Driver” tab and click the “Roll Back” button (if it is active) or “Delete”. Then, from the Action menu, select Update Hardware Configuration.
- You can delete outdated records about previously connected equipment (flash drives, modems, etc.). They often interfere and lead to failures of devices connected to USB. To do this, go to the View menu and select Show hidden devices. Find and remove everything you connected to the USB connectors. Don’t worry, the next time you connect, the desired device will be detected and installed again, and the problem with the mouse will disappear.
- If the problem with driver rollback and removal of old devices does not go away, then try updating the drivers, especially for USB controllers. I recommend using the free Driver Booster utility for this.
- Check your power settings. This problem usually occurs on laptops - to save energy, they turn off power to ports that have not been functioning for some time. This can be corrected in the system settings. Go to “Power management” – “Configure power plan” – “Change advanced power settings” – “USB settings”. In different versions of Windows, you can access the power settings in different ways; detailed information on this topic can be found on the Internet.
Special function
The reason that the touchpad does not turn on may also be a special function that is configured manually. The touchpad is automatically disabled when an external mouse is connected to the laptop. This option will have to be disabled manually if you are going to use both external peripherals and the built-in panel.
To do this, just five steps are enough:
Step 1. Find yourself in the “Control Panel”. How to do this without an external mouse is described above.
Click on the button with the Windows logo
Use arrows to move to the “Control Panel” line, press “Enter”
Step 2: Find the Hardware and Sound section.
In the “View” mode, check or set the “Category” value, find and open the “Hardware and Sound” section
Step 3. Select "Mouse".
Select "Mouse"
Step 4. In the properties there is a section “Pointer Parameters”, which is what you need.
In the “Pointer Options” tab, use the arrows to set up the ones that suit us
Step 5. Next, you should go to the appropriate tab, on different laptops it has a different name, “Enable” or “Disable” the option “Turn off the touchpad when an external mouse is connected”, confirming the decision with the “OK” button.
Go to the “Elan” tab, check the box “Disable when connecting an external USB mouse”, click “OK”
When a special function is not active, it is worth looking deeper for the reason. You can try setting up the mouse on the laptop keyboard via Bios.
Wireless mouse problems
Most often, problems with the operation of a wireless mouse are due to a low battery. This is mainly expressed in loss of connection, spontaneous shutdown or jerky operation of the mouse.
Even if you bought and installed a new battery, there is no guarantee that it is of high quality. It is advisable to check it with a voltmeter. The voltage should be 1.3-1.5 V, otherwise lack of power can lead to problems and the battery needs to be replaced.
Problems with the operation of a wireless mouse can also be caused by poor location of the transmitter. For example, when connected to the rear connector of a PC, the signal may be greatly muffled by the metal case. Connect the transmitter either to the front panel of the case or via a USB extension cable. In the latter case, the receiver can be placed on the table right next to the mouse. In addition, this will save battery power. Well, don’t forget to use the switch on the mouse (if there is one).
If after pulling out and reinserting the receiver into the connector the mouse does not work, then try repeating this procedure with the mouse button held down.
The problem may also be interference from the Wi-Fi router. Temporarily disable it and try how the mouse behaves. If the problem disappears, you will have to select a channel in the router settings on which Wi-Fi will not interfere with the mouse. First, try the most unloaded channels, which can be found using the Wi-Fi Analyzer mobile application.
What can't you do?
- If you recently purchased a mouse that is under warranty and it stops working, do not try to repair it yourself - this may void your warranty.
- You can damage the device if you try to repair it yourself without the necessary skills. Therefore, I recommend contacting specialists with such problems.
*****
Finally, I will say that in most cases it is quite easy to solve the problem yourself; to do this, you just need to find the cause of the problem, which most often lies in the “software”. If you have any questions, please contact us.
If all else fails
If the search for hardware and software problems does not produce results, the mouse still does not work correctly, then make a backup copy of the system and install an absolutely clean one from the original image (since assemblies may contain tweaks that lead to various problems, including with the mouse).
If the problem appears on a clean system, then the problem is definitely in the mouse and it will have to be replaced. If installing a clean system solved the problem, then it’s time to set up your PC again; you will already have a clean Windows.
This way you can solve almost any problem related to the operation of the mouse. If you know other ways, write about them in the comments
Mouse A4Tech Bloody Blazing A9 Mouse A4Tech Bloody A91 Mouse A4Tech Bloody Blazing A9
BIOS
Any user can configure laptop settings via Bios, but if you don’t understand anything about this, it’s better to entrust the work to an experienced user. Setting up is easy and takes place in several steps:
Step 1 : Reboot the laptop. During startup, you need to have time to press the “F2” or “Delete” keys to get into the BIOS.
When the system boots, you can see a key to enter the BIOS
Step 2. In the “Internal Pointing Device” parameter in the “Advanced” tab, make sure that the value is “Enabled”. If not, install it yourself.
Go to the “Advanced” tab, in the “Internal Pointing Device” parameter, check the value so that it is “Enabled” or set it yourself
Step 3. Press the key combination “F10+Y” to save the setting.
Press the key combination “F10+Y” to save the setting
Important! There is a problem at this point. It lies in the fact that the BIOS can be of different versions, they all have different partition names.
The above are classic, but not available on every laptop. To find out exactly what parameters you need, you should go to the manufacturer’s website and carefully read the important operating instructions directly for your device model.
Method 2: Eliminate the virus threat
Often the cause of the problem is the activity of malware: it can intercept signals coming from the mouse to the system, which makes it appear that the cursor is not working. The method of checking for the presence of a threat and eliminating it has already been discussed by one of our authors in the article below.
Read more: Fighting computer viruses
Changing the driver
For standard devices, the system installs drivers independently. But for some gaming mice, they are supplied complete with the manipulators themselves, and you need to install them manually. In such a situation, the drivers need to be reinstalled or updated. But what to do if the cursor doesn’t move?
This is where knowledge of entering commands and using the keyboard to switch between various functions, applications and sections of the system will come in handy. To quickly access the “Device Manager”, you need to use the console call “Run” (Win + R), in which the command devmgmt.msc is entered, after which movement in the manager itself is carried out using the arrow buttons and tabulator. You can also use the Start menu, opened with the Win key. Functions are called and confirmed by pressing buttons using the enter key, and the Esc key is sometimes used to cancel actions.
When reinstalling a driver, the system will need to specify its location (removable media or a folder on your hard drive) rather than using the recommended installation from the Windows database. Once driver integration is complete, it is advisable to reboot the system, although this is not always required.