Where is the Temp folder in Windows 10?
The Temp folder in Windows 10 is designed to store temporary files that are necessary for the operation of the system or some application. Unfortunately, the contents of this folder are not always cleared automatically after completing a specific task. Therefore, users often clean this folder manually. However, in order to delete unnecessary files from this folder, you need to know how to find the Temp folder in Windows 10.
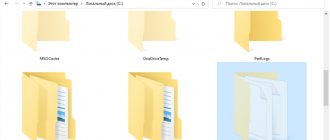
There are several Temp folders in Windows 10. All of them are stored in different places, namely:
To get to these folders, you can manually go to the specified addresses or perform a few simple steps.
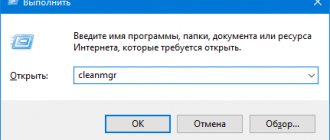
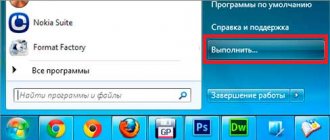
Method number 1. Using the Run line
Method number 2. Using the Explorer address bar
In order to get to the Temp folder in Windows 10, you should open Explorer and enter “%USERPROFILE%\AppData\Local\Temp” or “%TEMP%” (without quotes) into the address bar.
You learned where the Temp folder is located in Windows 10. Now you can clean it. To do this, you should use the following recommendations.
Method number 1. Standard cleaning Temp
Method number 3. Using the Task Scheduler
It is important to note that the last two methods are suitable for cleaning the temporary files folder of only one user. If your PC has several profiles, then cleaning must be done for each profile separately.
In order not to go to the address: C:\Users\USERNAME\AppData\Local\Temp\ every time, the folder with temporary files can be moved to a top-level directory, for example, to the C:\Temp folder. To do this we do the following:
After completing the above steps, the location of the folder with temporary files will change.
Source
Cleaning the system from viruses
In addition to system garbage and forgotten files, there may be more unpleasant things that it wouldn’t hurt to get rid of. And even if you already have an antivirus, this does not guarantee you protection from all sorts of nasty things and may require checking with a program from alternative developers.
To download an antivirus, it is not at all necessary to shell out money for a full-fledged edition or surf torrents. Many security software developers provide free versions of their programs that do not even need to be installed on your computer.
- Download free antivirus Dr.
Web CureIt. The application is free - Launch the downloaded application and accept the license. There is no need to worry about passwords and personal data; the antivirus will not send such information to the server.
No need to worry about passwords and personal data - Start the scan, it will take some time.
The verification will take some time - When the antivirus scans the entire computer, neutralize everything it finds.
When the antivirus scans the entire computer, neutralize everything it finds
Even after activating automatic removal of temporary files, do not forget to periodically clean your computer yourself, since standard Windows tools are far from all-powerful. And if you start to notice a gradual decline in performance and a long system loading time when you turn on the computer, it’s time to repeat a couple of points from the above.
The Temp folder in Windows 10 is designed to store temporary files that are necessary for the operation of the system or some application. Unfortunately, the contents of this folder are not always cleared automatically after completing a specific task. Therefore, users often clean this folder manually. However, in order to delete unnecessary files from this folder, you need to know how to find the Temp folder in Windows 10.
- How to delete temporary files in Windows 10
How to clear the Temp folder in Windows 10
After using the operating system for a long time, users may notice the disappearance of free disk space. The Temp folders store various data, from drivers to copies of installation files for various applications. In fact, the Temp folder is called temporary because it should be cleaned automatically, but this does not always happen.
This article will tell you how to properly clean up the Temp folder in Windows 10. First, let's figure out where to find the Temp folder and whether its contents can be deleted. We do not recommend manually deleting all data; it is better to use suitable means for this. If you prefer manual deletion, you can independently open the location of temporary files and delete folders with names that have not been used for a long time.
Let's sum it up
The Temp folder is located in one of these following paths:
- C:WindowsTemp
- C:UsersUsernameAppDataLocalTemp
Its direct purpose is to store temporary files and documents when the user uses certain programs and utilities. In this regard, the location, called Temp, can take up a significant amount of space in the computer’s memory: sometimes this weight reaches several gigabytes! An occupied space can negatively affect the operation of a computer or laptop. Therefore, users are recommended to promptly empty this folder in order to free up memory from downloaded information.
Many people wonder: is it possible to delete the Temp directory? As mentioned above, this is not possible, since this is a system directory. You can only clean it by deleting the files located in it, but not the location itself. We hope that everything worked out for you without any problems, dear readers. Let us share in the comments who had what amount of information along this path and whether you were able to free up space.
Is it possible to delete the contents of the Temp folder
The Temp folder contains temporary files saved on the system disk without notifying the user. In fact, temporary files appear only after direct user intervention. For example, during the driver installation process, the installer is unpacked and automatically launched from the Temp folder.
Now about whether it is possible to delete the Temp folder and its contents. It is definitely not recommended to completely delete the Temp folder, especially in the Windows folder. And its contents need to be cleaned up occasionally, since the system disk will become very clogged. In principle, experienced users can easily manually clear temporary files, but for beginners we recommend using cleaning tools.
Where are temporary files stored?
Files that are automatically created after installing or uninstalling software are placed on the system drive, usually called “Disk C”.
The following directories are used as storage folders:
- C:\Windows\Temp;
- C:\Users\All Users\TEMP;
- C:\Users\"Username"\AppData\Local\Temp.
These folders also contain other temporary files that appear after updating operating system components, as well as documents downloaded from the Internet.
It is worth paying attention to the fact that third-party programs and applications installed on other logical drives of the computer create separate folders, but the name remains the same - “Temp”.
Where is the Temp folder in Windows 10
By default, Temp folders are located on the system drive in several locations. All users can find the Temp folder on their local disk where the system is installed. See below for specific locations of the Temp folder on the system drive. However, before searching, do not forget to enable the display of hidden folders in Windows 10.
Malicious programs often end up in the Temp folder and, even after being removed, are installed in the background the first time you connect to the Internet. You can find the folder with temporary content by running the command %temp% in the Win+R .
In the current location, you can basically use the keyboard shortcuts Ctrl+A to select all files and delete them. In this case, some applications may begin to work incorrectly or stop working altogether.
Error uninstalling updates
Updates may not be removed for the following reasons:
- they are currently being downloaded or installed;
- the update being removed is involved in some process or application;
- The update is stuck.
First of all, disable all unnecessary processes, programs and disconnect from the Internet. If this does not help, then boot into safe mode and try to remove the update through it. Try uninstalling updates in different ways, described above in the article: through the control panel, command line, third-party applications and cleaning folders.
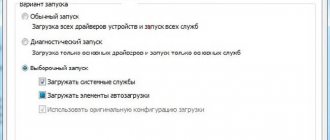
To enter Safe Mode, follow these steps:
- Launch the “Run” shortcut program using the Win + R combination, and then enter the msconfig command. Execute the msconfig command
- In the window that opens, expand the “Boot” tab and check the box next to “Safe Mode”. Enable booting in safe mode
- Restart your computer, it will automatically enter safe mode. Try all the methods described above to remove the unnecessary update. To return to normal operation, complete the previous two steps, unchecking the “Safe Mode” value. Reboot the computer to enter safe mode
If all else fails, then there are two options left: roll back the system to the moment when the update was not yet installed, or reinstall the system using an image of the desired version. When you manage to remove the update, do not forget to deactivate its automatic installation, otherwise the update will install again the first time you connect to the Internet.
If Windows updates or lack of memory lead to uncomfortable work, then it is worth removing harmful updates. There are many system methods for this in Windows 10, such as uninstalling using Update, uninstalling using Control Panel and using the command line. Third-party programs are also suitable, the functions of which are not limited to this. Remember, if auto-updates are not disabled, the data will be transferred to your computer again.
How to clean the Temp folder in Windows 10
Disk Cleanup
Memory control
CCleaner
After cleaning using the built-in operating system tools, you can additionally use third-party proven software. I constantly use and recommend CCleaner to everyone. Let's briefly look at how to clean your computer using CCleaner, but we still recommend that you read the instructions: How to use CCleaner in Windows 10.
All the user needs to do is go to the Cleaning and click the Analysis . After completing the operation, click the Clear and confirm the action. Basically, all locations of temporary files that will be deleted are specified.
Uninstall via Options
As already mentioned, to delete temporary files in Windows 10, it is advisable to use the built-in tools. This way you don’t risk deleting something important and disrupting the operating system.
The first thing you can do is delete temporary files through the Options menu. To do this, open the Start menu and click on the gear button or use the Win-i key combination. After entering the “Options” menu, go to the “System – Device Memory” (or “System – Storage”) section.
In this section you will see a list of disks that are installed on your system. Here you need to click on the drive on which you want to delete temporary files.
After this, you need to wait until Windows 10 analyzes the disk and go to the “Temporary Files” subsection.
In this section, you need to mark those objects that you would like to delete and click on the “Delete” button.
In addition, Windows 10 can be configured to automatically delete temporary files. To do this, return to the “System – Device Memory” section in the “Options” menu and scroll down the settings to the “Memory Control” function, which is responsible for cleaning unnecessary files. To configure this feature, click on the “Change method” link.
After this, a window with settings will appear. Here you can specify when to automatically delete temporary files, and also set up the removal of items from the Recycle Bin and Downloads folder.
For temporary files, you can specify daily, weekly, or monthly cleaning here, and files from the Recycle Bin and Downloads folder can be deleted after 1, 14, 30, or 60 days.
Correctly Cleaning Temp Folder Windows XP 7 8 10 Three Methods
Good afternoon friends. Cleaning the Temp windows folder, is it really necessary, or can we do without it? I have already mentioned this system folder many times in my articles, but I have never written an article about this folder and what exactly it was created for, I also have not mentioned. In this article we will fill this gap.
We have already mentioned various means of freeing up space on the system disk, since this disk, especially if there is little space on it, can very quickly become clogged with system junk, and your computer, no matter how new it is, will start to work slowly.
I have already said, and I will repeat again, any partition of the Windows system must have at least 20% free space, otherwise problems with this partition may begin. This is especially true for the system disk. All system files need free space to function smoothly. Otherwise, speaking in Russian, the files will have nowhere to expand, and various failures and errors may begin.
Third party programs
Although there are quite a few third-party junk cleaning software programs, I would like to pay special attention to the CCleaner program. And, although this is my subjective opinion, I consider this program to be one of the best free programs in this category for “care” for your computer.
In most cases, it is enough to clean folders once every six months or once a year. The frequency criterion is how quickly the free space on the system disk of your computer or laptop decreases.
That's all for today. I told you what the TEMP folder is and whether its contents can be deleted.
Is it possible to delete the Temp folder and what is it for?
Most likely, you will not be able to remove it, since it will contain programs that are currently functioning. But, let's first figure out why it is needed?
So, in the Windows system, all folders with files are divided according to certain parameters. They can be divided into system folders and user folders.
Folders and system files are those that are used only by the Windows OS itself for its normal functioning. When a person interferes with the operation of such files, for example, deletes them, this action can end disastrously for the overall operation of the computer. The computer will start to malfunction or stop starting altogether.
But, if a person uninstalls a user folder, this will in no way affect the system itself. The program whose folder you deleted will simply stop working for you. Or it will start to have errors and glitches. In this case, it is better to completely remove this program and install it again if you still have its distribution.
Regarding the Temp folder, I want to say that it belongs specifically to the system folder. Its name is an abbreviation of the word "temporary". It can be translated as “Temporary”, which, in essence, is what it is. It stores temporary information in itself.
What does temporary information mean? This has its own nuances. The first is based on the fact that when you install any software, the OS uses this folder to save intermediate information. In other words, it transfers elements of the installed software into it, which then begin to form special modules necessary for installing this program on a PC. Then, after you have completely installed the software, these modules are no longer needed, and the system leaves them in the Temp folder.
Why it turns out that Windows does not always delete these files automatically is a topic for another article. But, most importantly, the system junk remains in this folder. Then, over time, it becomes more and more. And, if you do not remove it at least once a month, this may end badly for the system.
Another nuance is based on the fact that even Windows, during its operation, constantly adds certain information to our folder. But the OS tries to deny access to these system files to users.
Where is the Temp folder?
This folder, starting from Vista OS and up to Windows 10, is contained at the following address:
Interestingly, in the Windows OS there is only a system Temp folder, but there is also a user folder. It is also called Temp. This folder belongs to the account of a specific PC user, and is contained inside another folder, which has the same name as your account. This is the account you are currently signed in to.
The OS dumps information directly related to your work on the PC at this time into this folder.
When you turn on the PC and the main software starts, this software sends some of its elements and various calculations to this folder. Later, when required, the system takes the necessary information from this folder to perform various functions.
Why is this necessary? To save space on the PC RAM board, which is always loaded anyway. Typically, the system deletes the created temporary information for the day upon completion of work. If your computer sometimes freezes, then the information from the Temp folder becomes unnecessary junk.
If you really want to look at this folder and remove unnecessary junk from it, it is possible to temporarily create a visible folder from this folder. Also, if you are confident in your computer knowledge, you can leave it as such.
Opening hidden files
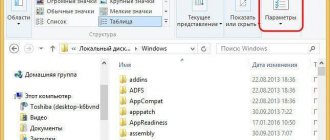
So, to see such files, let's go to the “Control Panel”. Select “Large icons”, at the bottom “Explorer options”.
In the new window, select the “View” menu. In this window, scroll the slider down, and above the very bottom line put the “Show hidden files...” checkbox. Then click “Apply”, then OK.
After this, you will be able to view hidden folders with files. Now we need to find daddy Temp. It is contained at:
User_name is the folder with your account. The first folder can be called “Users”. We go to this address through the conductor.
Removing stealth mode and location of daddy
This operation is performed almost identically in all versions of the Windows operating system. Recently, many computer owners have been using version 10 of the OS.
Therefore, the instructions below apply to this version:
- The “Control Panel” opens. This can be done by right-clicking on the system icon in the lower left corner of the screen and selecting the appropriate line in the menu that appears.
- In the “View” item of the window that opens, “Small icons” are installed.
- You will be taken to the “Explorer Options” section.
- The View tab opens. Here you need to scroll the window to the line “Show hidden files, folders and drives”, on which a mark is placed in the form of a dot.
- The “OK” button is pressed.
After these steps, the user can easily find Appdata. By the way, in Windows XP it is called Application Data. In order to find it in the system explorer, you need to select “This PC” on the left side of the window.
Then you will need to double-click on drive C. Next, the “Users” directory opens and goes to the folder with the name of the computer owner.
Having followed the designated path, a person will see “Appdata”, which was previously hidden. This is where the three main directories are located. Among them he will easily find Local. After opening it, you can easily find Temp.
After opening the hidden folder you will have access to the files
Cleaning manually
So, now we will clear your Temp account folder. You will clean the system folder using the same method.
The deletion will begin, but not all folders will be deleted. Windows will start to pop up saying that some folder or file does not want to be deleted. This shows that Windows is currently using this folder. In this case, simply click “Skip” in the window that appears and continue deleting. Many such messages may appear. Click “Skip” on all of them and delete the remaining elements.
But, this is a little tedious, especially if you have not deleted items from this folder for a long time. Therefore, in the window that opens, you need to check the “Run for everyone...” checkbox and the OS will stop bothering you with such questions.
Removal of temporary folders continues. The longer you have not removed such items, the longer it will take to remove them. As a result, after deleting, I was left with a few files out of many. This is fine. Don’t forget to empty the trash bin yourself afterwards, or using the lower method.
Disk Cleanup utility
I have already written how to use this utility, so I will not tell you in detail how to do it. I'll write briefly:
Click on the “Computer” shortcut and enter Explorer. In the window that opens, select the system disk and right-click on it. In the context menu, select “Properties”.
In the window that appears, we need the “General” tab. In this window we see information about the system partition. How much space is free, how much is occupied. But, we are interested in the “Disk Cleanup” button. There is no need to be afraid to press it. The utility will clean only junk and will not touch the necessary files. Click "Disk Cleanup".
The program starts scanning the disk.
After this, a window appears with the result of the scan. On my disk, 424 MB can be cleared. It would have been more if I had not cleared the Temp folder first. Do you think which files need to be cleaned (check the boxes)?
You can safely clear all files that the system itself has ticked. Also, I checked the “Downloads” line (before cleaning, I advise you to see if this folder has the necessary information), and also “Trash” to remove from it all the items that we placed in it during the last cleaning. But, most importantly from the topic of our article, check the box above the “Temporary files” line. Click “Clean up system files”.
The program began to estimate the amount of freed up space. After that, in a new window, again check the boxes above the required elements. Click OK.
The program asks us:
Click “Delete files”. This is done to give us time to think about whether we are really going to delete these files? Our files have been deleted.
Built-in operating system tools
Cleaning up unnecessary “garbage” is a standard operating procedure of the Windows operating system. Accordingly, the call to this procedure is located in the folders of the same name:
Start - All Programs - Accessories - System Tools - Disk Cleanup.
- If you have two or more logical drives (for example, “C” and “D”), then first the operating system will “ask” which logical drive you want to clean. In this case, use the select button to select drive “C”, since by default this is where our temporary folders are located, and left-click on the “OK” button. After this, a window will appear to analyze the state of the data on the disk.
- If you have one logical drive (only “C”), then the analysis window will appear immediately without additional questions.
- The disk cleanup program, according to the algorithms embedded in it, will begin to collect information about the state of the logical disk and the amount (as it believes) of “garbage” that can be removed to free up space on the disk.
- Depending on the “junk clutter”, assessing the amount of space that can be freed up can take from a few seconds to several minutes. You just have to wait.
- After a while, a window will appear in which you need to check the boxes next to the types of files that need to be deleted.
- The functionality here is a little broader. To clean the disk, it is proposed to delete not only temporary data from the user and system “Temp” folders, but also all temporary files that are left behind by various auxiliary system programs, as well as some application programs.
- To see what kind of files are proposed to be deleted and what types of data they belong to, just move the mouse pointer over the selection item and click on it with the left mouse button.
- Those types of files that have “checkmarks” in the checkboxes can be safely deleted without hesitation. Well, it’s up to you to decide about the rest.
- In the context of this article, we are addressing the issue of cleaning temporary Temp folders. Therefore, click on the checkbox with the name “Temporary files”. Next, click the “OK” button.
Usually, the disk cleaning process goes quite smoothly. But, as in the case of manual data deletion, it may turn out that some file or files are currently being used by the system and access to it is denied. And in this case, the system will definitely warn you about this. Well, you already know how to proceed.
The author recommends:
We clean the disk with an optimizer program
There are many such programs, both paid and free, you can choose any, for example, CCleaner. For thorough disk cleaning, I suggest a program created by Russian specialists called “Computer Accelerator”. The program can, in addition to high-quality disk cleaning, clean the registry, remove errors from it, and remove unnecessary programs from startup. You can organize planning for searching and removing such errors, etc.
I don’t want to talk in detail about this unique program now, since I have already written a detailed article about it: - Computer accelerator. In the article you will find most of the answers to your questions. In addition, this software has its own support service that will qualitatively answer all your questions. Also, you can find out the answers to your questions from the video, which I also attach.
How to clean your computer from Windows 10 junk: popular methods
Windows 10, like its predecessors, has the amazing ability to accumulate a bunch of junk files and remnants of long-deleted applications. All this can be aggravated by viruses that accumulate during work. And despite the fact that the operating system has its own resources for automatically removing garbage, they must still be activated, and to fully believe in cleanliness and order, periodically clean the computer manually.
How to clean your Windows 10 computer from junk using an application
A bad feature of the Temp folder is that only those files that the system has assessed as temporary are stored in it. But Windows 10 is not omnipotent and it does not consider a large amount of system garbage as such and leaves it lying in place. You can, of course, remove all this junk manually, carefully searching through the dark corners of your system, but it will be much easier and more practical to download a special application that can clean everything in just a couple of clicks.
We will look at cleaning the system using a third-party application using the example of the CCleaner program, which is the simplest and most powerful among all its analogues.
Run a problem search
Click "Fix Selected"
When finished, restart your computer and delete your backups