Hello everyone, today I’ll tell you about three ways to disable driver digital signature verification in Windows 10: one of them works once when the system boots, the other two remove driver signature control forever. Let me remind you that I told you earlier How to disable driver digital signature verification in Windows 7
I hope you know why you needed to disable this feature, because such changes to Windows 10 settings can lead to increased vulnerability of the system to malware. Perhaps there are other ways to install the driver of your device without disabling digital signature verification and, if such a method is available, it is better to use it.
Method 1: Through Boot Options
The advantage of this method is that it disables digital signature verification for only one session of the operating system. After a normal reboot, turning off and on, the test will turn on again. I still recommend using this option, since in this case the system will not remain vulnerable, and the installation of third-party drivers will be under your control.
- Click on the “Windows” logo in the lower left corner of the screen and go to “Options”.
- Among all the icons we find the section “Update and Security”.
- On the left, click on the inscription: “Recovery”. Scroll down a little to the “Special download options” item. Before clicking the restart button, close all programs and save the data you need.
- “Safe-mode” mode will turn on. Select "Troubleshooting".
- Click on the second item.
- From the entire list, select “Download Options”.
- Very important - on older versions of Windows 10 you had to select the OS boot option. In new versions this thing has been removed. Now, just after a reboot, driver signature verification is automatically disabled. Be careful at this step, as you may have an old version and you will need to select the appropriate item using the F1 - F9 keys.
- Next, the system will boot with the verification function disabled. Install the driver and reboot the computer.
All answers
Yes, every time. Kick the equipment manufacturer, have them buy a certificate and sign the drivers. In my opinion, for any hardware manufacturer, a few hundred dollars a year is not money.
This is done through the command line, launched as administrator, with the command bcdedit -set loadoptions DDISABLE_INTEGRITY_CHECKS
If you want to delete it, run the command bcdedit -deletevalue loadoptions
Disabling (enabling) the scan is possible only in a 32-bit OS (it is disabled by default). In a 64-bit OS, the check can be disabled only temporarily, until the next reboot of the PC (while loading and rebooting the PC, press F8 and select the appropriate item in the menu that appears). The same action is permissible in a 32-bit OS.
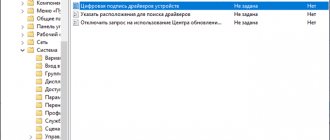
On x64, do this: Run gpedit.msc => User_configuration => Administrative_templates => System => Driver_installation => Digital_signature_device_drivers => Set to Disabled. All. There are no hemorrhoids. And no signatures are needed, this is insanity.
Or by signing drivers - for example: 1. Download the program: Driver Signature Enforcement Overrider v1.22. Disable User Account Control (UAC). 3. Launch the program. 4. Turn on the test mode by setting the switch to the “Enable Test Mode” position.
By the way, the reverse action “Disable Test Mode” is also provided here, disabling the test mode. 5. Write down a list of drivers (their full path and name) for your device. To do this, go to “System Properties” - “Device Manager”, find there the device with the “problematic” driver and look at information about the drivers. 5.
We rewrite the folders with drivers into a separate directory and add signatures for unverified system files. To do this, select "Sign a System File" and enter the file name, including the full path. For example, if the ATITool64.sys driver file is located in the C directory:
:/> Commands cmd Windows | Blog for a lover of experiments - Blog for a lover of experiments
WindowsSystem32Drivers, then you need to specify C:WindowsSystem32DriversATITool64.sys. If you need to sign several files, then simply repeat this procedure several times. But I strongly recommend doing this in a separate folder and then installing the driver, and not in System 32.5. Reboot the computer.
Of course, before this I recommend kicking the manufacturer’s support by writing an official letter for an official answer about the lack of support for Vista x64 or Win7 x64 (their drivers often overlap).
- Suggested as an answer Vinokurov Yuriy Moderator November 16, 2009 10:59
- Marked as answer Vinokurov Yuriy Moderator December 1, 2009 9:34 am
On x64, do this: Run gpedit.msc => User_configuration => Administrative_templates => System => Driver_installation => Digital_signature_device_drivers => Set to Disabled. All. There are no hemorrhoids. And no signatures are needed, this is insanity. Or by signing drivers - for example: 1. Download the program: Driver Signature Enforcement Overrider v1.2 2. Disable User Account Control (UAC). 3. Launch the program. 4. Turn on the test mode by setting the switch to the “Enable Test Mode” position. By the way, the reverse action “Disable Test Mode” is also provided here, disabling the test mode. 5. Write down a list of drivers (their full path and name) for your device. To do this, go to “System Properties” - “Device Manager”, find there the device with the “problematic” driver and look at information about the drivers. 5. We rewrite the folders with drivers into a separate directory and add signatures for unverified system files. To do this, select "Sign a System File" and enter the file name, including the full path. For example, if the ATITool64.sys driver file is located in the C:WindowsSystem32Drivers directory, then you need to specify C:WindowsSystem32DriversATITool64.sys. If you need to sign several files, then simply repeat this procedure several times. But I strongly recommend doing this in a separate folder and then installing the driver, and not in System 32. 5. Reboot the computer.
Of course, before this I recommend kicking the manufacturer’s support by writing an official letter for an official answer about the lack of support for Vista x64 or Win7 x64 (their drivers often overlap).
There is a problem with the Media-Tech 4016 USB webcam driver, in the policies I tried the “disabled” or “enabled” parameter “ignore”, the effect was zero, when loading via F8 the driver was installed and the device worked fine.
Any suggestions on what other options there might be?
Method 2: Command Line
The second option allows you to disable mandatory driver signature verification forever. True, this is not always possible, so be prepared for this. The idea is that we will change the operating system's main boot setting so that the check is disabled.
IMPORTANT! If you have a UEFI system installed on your laptop or computer, then you need to disable “Secure Boot” in it. If there is a “OS Type” setting, then set the “Other OS” setting. What is it for? This is necessary so that UEFI does not block booting with changed parameters. Otherwise, we may not succeed.
Now we launch the console with admin rights. You can find Command Prompt in Programs in the Start menu or use Windows 10 search.
First we enter the command:
bcdedit.exe -set loadoptions DISABLE_INTEGRITY_CHECKS
As soon as it is completed, enter another:
bcdedit.exe -set TESTSIGNING ON
Restart the computer. That's it, after this the digital signature will be disabled, but there is one small nuance - the system will work in test mode. In fact, it will fully function, and its operation will not differ in any way from the normal functioning of the OS, you just should see the corresponding inscription in the lower right corner of the screen.
To enable driver signature verification and remove the test mode sign, launch the console again (necessarily with administrator rights) and enter:
bcdedit.exe -set TESTSIGNING OFF
Reboot the OS again.
Why deactivate driver digital signature verification in Top Ten?
A digital signature is a mark embedded in the program or driver code. It means that the utility is licensed and safe - you can install it on your computer with peace of mind.
The developers of Windows 10 included in the operating system scanning for the presence of such a signature, which starts itself when you open a software installer file previously downloaded from the Internet. By default, verification is enabled in the system, but you can deactivate it if, for example, when installing the driver, a system message appears about the lack of a proper digital signature.
When installing the driver, you may receive an error message stating that the publisher could not be verified
Of course, the message contains the option “Install this driver anyway,” however, even if you click on it, the “firewood” will be installed with errors - in the “Device Manager” an exclamation mark in a yellow triangle will be displayed in the future, and the equipment itself will either will not function, or will work, but with frequent failures. The description in the dispatcher will also indicate error code 52.
Forced driver installation may fail
You should only disable the scan if you are completely confident in the security of this software. Otherwise, you risk the security of your PC and the data on it - it may be attacked by a virus hidden in the utility code, or hacked by hackers.
Method 3: Through Safe Mode
If the previous method did not give any results, and this is quite possible, then you can try another option. Essentially, we will use the same system utility “bcdedit.exe”, but with a different parameter. First, we need to boot the system in safe mode.
- We use the + R keys - first hold down the first one, and then click on the second one. A window will open where you will need to enter the command:
- In the system configuration, on the “Boot” tab, set the boot option to “Safe Mode”. Click “Apply” and restart the computer.
- The system will boot into safe mode. We launch the command line with administrator rights - you already know how to do this, so I won’t tell you about it again.
- Enter the console command:
bcdedit.exe /set NOINTEGRITYCHECKS ON
- Go back to System Configuration (+R=msconfig) and turn off Safe Mode.
- Restart the computer.
If you need to turn signature verification back on, then we perform all the same steps, only we enter another command - instead of “ON”, we specify the “OFF” parameter (that is, we turn off the function).
Answers
On x64, do this: Run gpedit.msc => User_configuration => Administrative_templates => System => Driver_installation => Digital_signature_device_drivers => Set to Disabled. All. There are no hemorrhoids. And no signatures are needed, this is insanity.
Or by signing drivers - for example: 1. Download the program: Driver Signature Enforcement Overrider v1.22. Disable User Account Control (UAC). 3. Launch the program. 4. Turn on the test mode by setting the switch to the “Enable Test Mode” position.
By the way, the reverse action “Disable Test Mode” is also provided here, disabling the test mode. 5. Write down a list of drivers (their full path and name) for your device. To do this, go to “System Properties” - “Device Manager”, find there the device with the “problematic” driver and look at information about the drivers. 5.
We rewrite the folders with drivers into a separate directory and add signatures for unverified system files. To do this, select "Sign a System File" and enter the file name, including the full path. For example, if the ATITool64.sys driver file is located in the C directory:
WindowsSystem32Drivers, then you need to specify C:WindowsSystem32DriversATITool64.sys. If you need to sign several files, then simply repeat this procedure several times. But I strongly recommend doing this in a separate folder and then installing the driver, and not in System 32.5. Reboot the computer.
Of course, before this I recommend kicking the manufacturer’s support by writing an official letter for an official answer about the lack of support for Vista x64 or Win7 x64 (their drivers often overlap).
- Suggested as an answer Vinokurov Yuriy Moderator November 16, 2009 10:59
- Marked as answer Vinokurov Yuriy Moderator December 1, 2009 9:34 am
:/> Windows 10 virtual desktops: how to create and delete using hotkeys
