Installing drivers is an integral part of the process of setting up a PC after installing the Windows 10 operating system. As a rule, the Windows 10 installer during its work installs the necessary drivers and configures the equipment, but these drivers are standard and devices operate at the minimum of their capabilities. For example, after installing Windows 10, you see a slightly stretched picture, and you cannot set the resolution to match the screen of your monitor, or the resolution is applied, but games with basic graphics do not start. Common situation? It's all due to the standard video driver.
Driver installation sequence
A computer is a complex of interconnected devices, and their coordinated operation directly depends on the correct sequence of driver installation. You might say, “Old school!” But isn’t it logical to first install drivers on the USB controller before installing drivers on the printer connected via USB? Does your printer work over Wi-Fi? Great! Will you install drivers for the printer, and then drivers for the network controller that is responsible for the correct operation of Wi-Fi?
And so, the correct sequence for installing drivers is as follows:
Firstly , you need to install drivers responsible for the correct operation of the chipset and other controllers installed on the motherboard (for example: USB 3.0/3.1, Ethernet, Wi-Fi, Bluetooth, etc.).
Secondly , install drivers for the audio controller and video card. Attention! If the motherboard contains an integrated video chip or your processor is equipped with a graphics core, then the video drivers for these components must be installed first. A similar algorithm of actions should be applied if you use a sound card. You can always choose your default device in Windows 10 audio settings.
Thirdly , install drivers for other equipment installed inside the computer (audio-video capture cards, DVB-S2 satellite cards, TV tuners and other additional hardware).
Fourth , install drivers for external devices: printer, scanner, MFP, projector, etc.
Motherboard
If you need to install new drivers for your motherboard, the first thing you should think about is finding out its name. If you do not know this information, then follow the instructions below:
- Click on the “ Start ” button.
- Type “ Command Line ” into the search engine.
- Enter the following commands:
- wmic baseboard get product
- wmic baseboard get Manufacturer
This way you can accurately find out the full name of the motherboard model and its manufacturer.
Driver installation methods
There are two main ways to install drivers: automatic and manual.
You can install drivers automatically using standard Windows 10 tools or using special programs (“DriverPack Solution”, “DevID”).
Manual installation of drivers involves searching for the necessary drivers and installing them directly.
Next, we will look at each of the methods in detail, but first, let's figure out how to open the Device Manager in Windows 10.
Specialized programs
Now the time has come for the most popular solution to the issue under consideration - the use of third-party specialized software.
Programs in this category have always aroused user interest, since they automated the entire process of searching and installing the necessary drivers, offering to do everything necessary in just a few clicks.
There are a huge number of similar programs, but not all of them do their job efficiently, because any automated process also involves possible errors.
It’s worth focusing on the three most popular programs, which enjoy enormous user support and demonstrate the fewest or at least minimal number of errors and third-party elements in their work.
DriverPack Solution
“DriverPackSolution” (hereinafter referred to as DRP) is a mega-popular project with more than 10 years of development history authored by Arthur Kuzyakov and a talented group of developers.
To date, the number of active DRP users has already exceeded 43,000,000, which sufficiently speaks of the quality of the product it offers.
To simplify it as much as possible, “DRP” and all other representatives of this category are huge databases of drivers, the functionality of which is related to the comparison of the software versions they have and the ID equipment on the target computer.
Essentially, this is the automation of the process that was described above.
In order to download “DriverPackSolution”, just visit the official website of the developers - https://drp.su/ru and click on the “Install all necessary drivers” button.
It is worth noting that since the beginning of 2022, many antiviruses, as well as the Yandex browser, recognize the “DRP” executable file as malicious software, which can be ignored if you commit to opening the file.
Next, you will need to run the downloaded file and wait until the program functionality automatically completes scanning the equipment, after which you will be asked to make a choice:
- Trust the program’s conclusions and give them access to update drivers automatically;
- Switch to Expert mode to manually select which devices need the update.
Before installing any new drivers, we recommend making a system restore point.
Of course, the most reasonable option is to switch to Expert mode, since it is always useful to know what exactly is installed on your operating system, even if it is a verified and trusted source.
So, to switch to the advanced interface, you need to click on the “Expert Mode” button, which is located in the center at the very bottom of the active window.
Please note that in addition to drivers, “DRP” also offers to install additional software, which you should be more careful with.
Check all the checked boxes in the first three sections, and only after that click on the “Install all” button, next to which it will be indicated exactly how many files are selected for installation.
After installing all the drivers and software you need, restart your computer and check the quality of the operating system.
Separately, it offers everyone the opportunity to download an offline driver database (an image of about 20GB), burn them onto bootable media, and install all the necessary hardware components even without an active Internet connection, and not all competitors can boast of this.
Driver Booster
Driver Booster, authored by the well-known, is a rather controversial option according to many experts, but is extremely popular among users due to its bright interface design, and yet quite good functionality.
You can also download “Driver Booster” on the official website - https://ru.iobit.com/driver-booster.php completely free, where you can also purchase the “Pro” version with an expanded set of features.
Unlike “DRP”, this software requires installation on your computer, for this:
- At the first stage after launching the installer, select the “Custom installation” section;
- Select a folder to save and click on the “Install” button;
- Uncheck the boxes where it is proposed to install additional software from Yandex, then click “Accept and install”;
- Wait for the installation to complete and click on the “Check Now” button;
- The program will begin automatically checking the installed hardware and then display a list of outdated drivers, the installation of which is a priority according to “Driver Booster”
Check the box next to all the options you need, then click on the “Update Now” button.
It makes no sense to argue with the statement that the “Driver Booster” wrapper is designed very worthy, in a modern black and bright red style, for which many users appreciate this product.
It’s up to everyone to decide for themselves how they feel about it and iobit products in general, but it copes with updating drivers quite well.
DRIVER GENIUS
"Driver Genius" is a development that is also known for several other interesting projects.
Official website - https://www.driver-soft.com - the utility is available for free download.
It is updated on an ongoing basis, for example, at the time of writing this article (early March 2022), the last update released was dated January 29, 2022.
It’s worth noting right away that the installer and program interface are not localized, so you should be careful where and with what “checkmarks” you agree.
Despite these language nuances, “Driver Genius” has a fairly clear interface, so searching for new driver versions takes literally a few minutes:
- But first, run the installation file and click “Next”;
- Scroll through the licensing terms and if you agree with them, check the box in the “I accept the agreement” line;
- Select the folder in which the program will be installed and click “Next”;
- Click “Next” again at the step with choosing whether to place the program in the start menu;
- And leave a checkmark in the line “Create a desktop shortcut” if you want the shortcut to launch the utility to be placed on the desktop, and click “Next” again and in the next step “Install”;
- After installation is complete, click on the “Finish” button and using the shortcut or section of the start menu, launch the “Driver Genius” program;
- In the window that opens, go to the “Driver Update” section; as a result, an automatic search for drivers that need updating will be initiated;
- Upon completion of the scan, you will be provided with a report with a list of drivers proposed for updating;
- If the equipment presented there suits you (you can view detailed information about each by clicking on the “View driver update details” button), then click on the “Update All” button to update all marked items;
- Wait until the work is completed, restart the computer and make sure the operating system is working correctly.
Special attention should be paid to the fact that “Driver Genius”, in addition to direct updating, also offers additional functionality:
- “Driver Backup” section – allows you to create a backup copy of all installed drivers;
- “Driver Restore” section – allows you to restore drivers, including using the created backup file;
- The “Driver Cleanup” section allows you to clean and remove problematic files that may interfere with the correct operation of other components.
“DriverGenius” is a somewhat more complex software than was presented above, therefore, without detailed familiarization with the functionality of the program, there is no point in deleting, cleaning, or updating anything.
Otherwise, this is a quiet and inconspicuous assistant who can and does everything on his own, and for the most part correctly.
Windows 10 Device Manager
In order to get to the “Device Manager”, just right-click on the “Start” menu and select the item of the same name in the context menu.
If such an item is missing, use the search bar, type “Device Manager” and launch the corresponding program.
3DP Net
3DP Net automatically detects the network card and installs the most suitable driver. Installation takes place offline. You need to download the installer (just over 100 MB) and run it.
Advantages and disadvantages
Small size
Fast work
Detects network bugs well
Updates only drivers from network cards
Outdated interface
The site also has the 3DP Chip Lite program, which detects the devices you have installed and makes it possible to copy their drivers. Make, so to speak, their Backup.
Automatic driver installation
Standard method
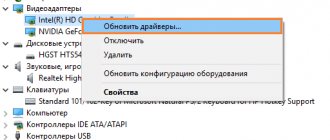
To automatically install drivers using standard Windows 10 tools, you need to open “Device Manager” and right-click on the desired device, then select “Update drivers...”.
After which Windows 10 will offer one of the ways to update drivers; you need to select “Automatically search for updated drivers.”
Windows 10 will search system folders on your computer and on the Internet for drivers.
The disadvantage of this method is that the OS often does not find the necessary drivers or reports that the latest version of the driver is already installed.
Special programs
You can also run automatic installation of drivers using special programs that analyze the system and, based on the data obtained, search for drivers on a remote server, then download them to your PC and offer to install them. There are many such programs, but the most popular are: “DriverPack Solution” and “DevID”. I will not describe these programs in detail, because they have a very clear intuitive interface.
Do I need to update?
Exactly. The question of the need to update drivers is not as clear-cut as some might think, just like the question of updating the operating system itself.
Some users agree that updating drivers should only be done when necessary, when one or another Windows component has stopped functioning properly.
Users who agree with this statement adhere to one well-known statement, which has been interpreted on this topic:
“Do you want the operating system to work properly? Then don’t stop her from doing it.”
That is, if Windows does not experience any problems with existing drivers, then it does not need to update them.
One can quite agree with this, but only partly.
For example, to maintain the best performance of the graphics module (video card), it is extremely important to keep the driver software up to date, including in order to mitigate the risk of various errors appearing in gaming products.
The conclusion suggests itself - finding a balance between the need and the desire to update something.
Manual driver installation
This method of installing drivers is preferable, since you have complete control over the process and will not allow unnecessary software to be installed on your PC.
Let's start with the fact that you must have disks with the necessary drivers included with your PC or a list of Internet resources from where you can download them (indicated in the instructions). To install drivers from a disk or its image, just run the setup or install file, after which an interface will open in which you need to select automatic or custom software installation mode.
Standard method of installing drivers manually
To install drivers in Windows 10 manually, you need to open “Device Manager” and right-click on the desired device. Select "Update drivers..." and then select "Search for drivers on this computer."
Then you need to specify the location for searching for drivers using the “Browse” button.
Be sure to check the “Including subfolders” checkbox - this option allows you to select a shared folder in which to search for drivers. Then click Next and wait for the device driver installation process to complete.
Solution 6: Use a USB keyboard
Of course, this is not a solution to the problem, but you can use a separate USB keyboard while you fix the built-in one in your laptop.
As a rule, disabling input filtering and updating all drivers solves the problem that the keyboard on a laptop does not work.
Each of us connects an input device to our PC. But what if it doesn't work correctly? You need to download drivers for the Windows 10 keyboard. This is one of the main computer control devices. Thanks to it, we can enter characters, write messages, search for necessary information, play, and so on.
Where can I download the missing drivers?
Drivers can always be downloaded from the device developer’s website; however, you need to take into account the version of the operating system and its bit depth.
But, there are times when drivers are not available on the developer’s website due to the fact that the device version is outdated or we are talking about operating systems that are no longer supported. Don't despair! Drivers can be found and downloaded from the Internet.
Download drivers by hardware ID
In order to download exactly the drivers that are needed, you need to determine the “Hardware ID” - this can be easily done using the “Device Manager”. Right-click on the desired device and select “Properties”. Then go to the “Details” tab, where in the “Property” drop-down menu, select “Equipment ID” and in the “Values” field, select the first line - this is the “Equipment ID”.
You can copy a line using the right mouse button by selecting “Copy” from the drop-down context menu. Then paste the copied line into the search engine input field and add “download driver”.
Select the most relevant site for your request and download the required driver.
Then update the device driver manually as described earlier.
Solution 1: Change the Start value of the I8042prt parameter
The first three steps are a description of how to open the on-screen keyboard. Because you need to use the keyboard to enter text.
- Click the Start , then Settings , then Accessibility .
- On the left side of the Settings , scroll down and click on Keyboard , then on the right side of the window, turn on the Use on-screen keyboard .
- You can now use the on-screen keyboard to type text with your mouse.
- Type regedit in the search box using the on-screen keyboard and select the Registry Editor .
- In the Registry Editor, go to the branch
Attention! Unlike USB, the PS/2 port is detected only when the computer starts. Now the system will detect the PS/2 port when you turn on the computer, and this can solve the PS/2 keyboard problem.
For a USB keyboard, in the Registry Editor, go to the branch
Attention! Below are the possible values of the Start with a brief description: -Boot - calls the driver, which is loaded (but not started) by the bootloader. If there are no errors, the driver is started during kernel initialization before any non-boot drivers are loaded.
1-System - Calls a driver that is loaded and executed during kernel initialization after drivers with a Start value of "0" have been started.
2-Startup—calls a driver or service that is initialized when the system starts by the session manager (Smss.exe) or services.
3-On Demand—Calls a driver or service that the Service Control Manager (SCM) will run only when requested. These drivers must be launched manually by calling the Win32 SCM application programming interface (API), such as the Services snap-in.
4-Disable—calls a disabled (not running) driver or service.
5-Delayed startup - less critical services will start after boot, so that the operating system responds faster to user requests. This startup type was first introduced in Windows Vista.
How to remove the driver?
There are situations when the native device driver does not work correctly, in which case it needs to be reinstalled. To install the driver completely, it must be completely removed from the computer. To do this, remove the device itself in the “Device Manager” using the right mouse button and select “Delete”, be sure to check the “Remove driver programs for this device” checkbox and click “OK”. The device will be removed and the accompanying drivers too.
"Update your hardware configuration" in the Device Manager window.
The hardware list will update and you will see your device with an exclamation mark, indicating that there is no driver available for that device.