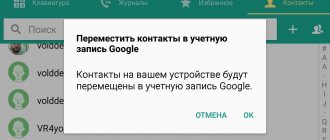
If you changed your phone, but the old contact information (including Gmail contacts) remained on the old device, then it is possible to import using your SIM card to update the entire contact database (including Google contacts). To do this:
- Insert the SIM card into your old phone, and then go to the contacts menu.
Copy information from the device to the SIM card.
The method has many limitations (length of contact, transfer of not all information, number of transferred contacts at a time), so it is used quite rarely.
How to Transfer Contacts to Android Using SD Card
A flash card is another way to import Gmail contact information into your phone. The procedure is similar to transferring using a Google account, but has its own characteristics:
- Log in to the Google account from which you are going to import.
- From the More menu, select Export, but instead of CSV, click the vCard extension.
- Save the contacts on the SD card in the root directory in the Contacts folder.
- Insert the flash device into your phone.
- In the “Contacts” of your device, select “Menu”, and in it “Import”. Specify SD card as the source.
All files will be transferred to your phone. They will be automatically added to the contact menu. In the same way, you can backup all address data on the device. To do this, in the “Import/Export” section, select a flash card as a storage medium.
Option 3: Sync with another account
If you have multiple accounts on your Android device and want to save all new contact information to one of them, do the following:
- Repeat the steps from the first two steps of the previous instructions.
- Tap on the settings item “Account for new contacts”.
- In the pop-up window, select the account in which you want to store your address book entries in the future.
In order for new data to be saved correctly, check whether synchronization is enabled for the selected account, in particular, contacts, using the instructions from the first part of the article.
How to transfer contacts using Bluetooth
This kind of method is suitable for cases when the gmail contacts that need to be transferred are on another phone.
Turn on Bluetooth connection on both devices. On the phone from which you want to transfer, select the desired contact information or click “Select All”. Then click “Send Contacts” and select Bluetooth as the transfer method. Find the second device. Select it from the search list. Confirm the transfer and wait for it to complete. Select the resulting file and import it into your phone's contact menu.
How to transfer contacts using special applications
MOBILedit is considered one of the most multifunctional programs when working with contact information! With its help, you can import this data from a variety of sources, as well as transfer it to other devices in a more user-friendly form.
After installing the program on your computer, connect the phone from which you want to transfer address information using a USB cable. The program can also import data directly from Gmail. Here you need to take only 2 steps, namely:
- After synchronizing your computer and phone, go to the “Phonebook” menu, and then click the “Export” button.
- Whichever method you choose, save the contact information on your computer (for example, in CSV format). Connect the device you want to transfer to.
The program allows you to display data using:
The remaining options do not involve synchronization, so they are suitable for users who simply need to transfer data from Gmail without the ability to operate user information from other devices.
Methods
Synchronization is a built-in feature in the Android operating system. It is useful if the user has several gadgets and it is important for him to quickly transfer the phone book or other personal information from one device to another. Recording the numbers of your friends and colleagues in the cloud using Google services is a guarantee that they will be saved regardless of failures or flashing of the gadget, or its loss.
You can synchronize both contacts from Google to Android, and in reverse order.
The only nuance in using the system is the presence of a mailbox in the Google Mail system. You can register your email for auto synchronization in Android in a matter of seconds.
Using a Google Account
You can import from Google to your phone by setting up synchronization between accounts. To do this, on the smartphone screen, select the “Settings” menu item and go to “Accounts”. Sometimes, instead, the item may be called “Synchronization”, displayed separately.
Add an account and enter the email address of the Gmail account you registered earlier. At the same time, on your smartphone, you need to go to “Contacts” and select the “Export/Import” option. The device itself is indicated as the source. You need to find a Google account in the storage.
A dialog box prompts you to select what you want to transfer.
When you add each new item to the phone book, it will automatically be entered into the Google cloud, provided there is an Internet connection.
How to view subscribers on Google
If you don’t have a mobile phone at hand, but urgently need a number, you can look it up in the Google service. Before viewing the subscriber book, the device and account must be synchronized.
To view, go to your mail (personal account) gmail.com and select “Contacts” in the drop-down menu. Here you can get acquainted with all synchronized devices and phone book positions, if necessary, change it or transfer it to another phone.
How to transfer using a SIM card
Google services are not the only way to save information and transfer it to a new device. A SIM card is also suitable for these purposes. To do this, you need:
- insert the SIM card into the old smartphone, go to “Contacts”;
- transfer from the smartphone to the SIM of each subscriber individually or by selecting all at once. With this method, there is a limit of 250 memory cells on the SIM card;
- place the mobile phone card in a new Android device;
- transfer phone numbers using the “import contacts” menu.
The disadvantages of this method include the fact that it has many limitations. The length of the name, the transfer of not the entire amount of information and the limitation on the number of transferred numbers - all this complicates the transfer.
Transfer using SD card
A memory card can also be used not only for storing, but also for transferring the necessary data. The method involves using the Gmail service.
To use this method, you must be logged into your Google account. After that, on the PC, select the “More” - “Export” menu. Instead of the *.csv file type, select the vCard resolution. We save the database of numbers in the device memory in the Contacts directory.
Importing is simple - you need to insert the SD card into the device, and select “Import” in the book menu. The map is indicated as the source.
Importing contacts through the application
The most convenient way to quickly and efficiently transfer personal information is to use the MOBILedit program. You can download it from the official website - the developers distribute the utility free of charge.
Using the program, you can import phone numbers from a variety of sources in any user-friendly form. MOBILedit is installed on a personal computer.
Next, the USB cable is connected to the PC connector, and its other end to the mobile phone. You can display the necessary phone numbers without a cable, using the same Google services or bluetooth.
- after establishing a connection between the computer and the mobile phone, you need to go to the Phonebook menu, and then select the “Export” item;
- Select “Import” and “Save data” on the cell phone.
Whichever method the user chooses, the system recommends saving the contact information as a CSV file. At any time you can transfer the phone book or edit the file using Excel.
Other options for importing contacts to Android
How else can you import your contacts from Gmail to your Android device? Each well-known manufacturer provides special software for working with user contact information. This greatly simplifies the synchronization of devices, and also eliminates errors and bugs that are often found in third-party programs.
Such utilities work with universal extensions (VCF or CSV), which allows you to comfortably move, delete and create new contacts using the proprietary equipment of your device manufacturer.
When purchasing a new smartphone or tablet on the Android platform, many users are looking for how to easily and quickly transfer contacts from Android to Android. In fact, this is done very simply. Using one of the methods below, you can transfer the numbers you log into your phone or tablet.
We use a Google account
The easiest way to copy recordings to a new phone is to sync with Google. The fact is that any Android device has a Google account connected to it. It is through Google that the Play Market operates, thanks to which you can download games and applications to your smartphone.
Moreover, mostly users of Android gadgets work in Gmail. Therefore, you need to resort to using a Google account to copy contacts from your old phone. This is done as follows:
If not, go through the process of connecting your Google account to your device. To do this, click “Add account”, enter your username and password.
Rice. 1. “Accounts” in settings
Rice. 2. Email in the “Accounts” section
Rice. 3. Synchronization menu
The entire contact list will be transferred.
Method 1: Official Google Sync
As mentioned above, there are two ways to sync contacts with Google on Android:
- official Google synchronization;
- manual import.
The first method is perhaps the easiest and most reliable way to sync your Android device with your Google account. Official synchronization from Google allows you to synchronize applications such as:
- Google contacts;
- calendar;
- Gmail;
- application data;
- photos;
- Google drive.
Official synchronization from Google allows you to synchronize not only contacts, but also other application data
Thus, using the official method, you synchronize not only your Google contacts, but also a number of other useful applications. The official Android account sync feature, when enabled, automatically backs up all your contacts and allows you to import those contacts to another Android device simply by using your Google account information. This function will not only save all contacts, but also save time, which cannot be said about manual synchronization.
However, if the sync feature on your device is not working properly, then you can go straight to the manual sync method.
Step 1 . Sign in using your Google account information.
Log in using your Google account information
Step 2: Go to the Google Contacts website by clicking on the Google Apps icon. Scroll down the menu, click on the “Contacts” icon.
Click on the “Google Apps” icon, scroll down the menu, click on the “Contacts” icon
The screenshot above shows the fastest and most convenient way to log into Google Contacts.
Step 3. A list of your contacts can be found in the “All Contacts” section. Make sure all your contacts are saved in your account.
In the “All contacts” section we find a list of our contacts
On a note! If you can't find your contacts, you can import any vCard contacts stored on your PC by clicking More and selecting Import. In the picture below you can see what it looks like.
If you can’t find contacts, click “More” and select “Import”
Step 4: Go to Settings on your Android device, then tap on Accounts & Sync. On some devices, you'll only see "Accounts" instead of "Accounts & Sync."
Click on “Accounts and Sync”
Important! We must not forget that this process will look slightly different on different devices.
Step 5 . Click "Add Account". Then, under the list of available accounts, you need to select the Google account type (as shown in the pictures below).
Selecting your Google account type
Step 6 . If you have several accounts, select the one with your contacts and log in to that account.
Select the account where the contacts are located and log into it
If you have not added an account on Android, enter your email address and password and log in.
Enter your Google account information to log in
Step 7 . When you sign in to your Google account, syncing will start automatically. To do this, you need to check the sliders in the Contacts and Google+ Contacts options to ensure they are active.
Check the sliders in the “Contacts” and “Google+ Contacts” options to ensure they are active
In some versions, you need to check the “Synchronize contacts” options, as in the screenshot below.
Check all the “Synchronize” checkboxes
On a note! You can also turn on the automatic sync feature to automatically sync all your Google contacts in the future.
About to automatically sync contacts in the future
The synchronization process may take some time, depending on the speed of your Internet connection and the number of contacts. Once the process is complete, the sync icon next to Sync Contacts will disappear.
Step 8 . Open the Contacts or People app on your Android device, tap the Menu button and select Show Contacts. Some devices may have a Contacts Filter option instead of Contacts.
Open the Contacts or People app on your Android device
Click on the “Menu” button and select “Show contacts”
In the screenshot below you can see that by clicking on “Contacts” you will automatically enable synchronization of all your contacts.
Click on “Contacts” to automatically synchronize all contacts
All your Google contacts should now be available on your Android device. If you previously selected the automatic sync feature, your device will sync automatically every time a new contact is added to your Google account. This is very convenient, as you will save your time in the future and be sure that not a single contact of yours will be lost.
Using vcf file
This is also a very simple method to transfer contacts from Android to Android. It allows you to move data to the device's memory, to a flash drive and to a Windows computer, and then transfer it via Bluetooth, USB cable, email and other methods.
Now let's figure out how to transfer contacts from Android using a vcf file. First of all, you need to export the data to a file:
Rice. 4. “Import/export” in the phone application
Rice. 5. Copy path options
Rice. 6. Record selection process
That's all. Now you have a file in vcf format (aka vCard, in some cases a csv is also created, but it is practically useless), which can be sent via Bluetooth.
You can also transfer the data to a memory card, then insert it into a second smartphone or tablet. You can also use any cloud. If it is most convenient for you to transfer contacts to a new device via a computer (first to the PC, then from it), then this is done via a USB cable.
To do this, we first connect the first gadget using a computer and cable, copy the file with the vcf extension, then change phones and transfer it to a new one.
This way you will transfer data from Android to a personal computer, and then to a second device. Of course, transferring information from your phone to your computer is not the best option.
It is much more convenient to use Bluetooth or a memory card. In any case, this method works and you can also quickly transfer Android contacts to a computer, and then from it to the desired device.
Rice. 7. .vcf file with data
Once the file transferred via USB or other method is on the new device, simply open it and watch as the Android system imports the necessary contacts.
There is another “tricky” option - use Outlook. Its only advantage is that you can edit data as the program runs. True, there may be problems with encoding, so if you decide to switch from Outlook to Android, this is fraught with headaches.
We figured out how to copy contacts as a file from Android to a computer. Then you can simply open them in the same Outlook or the Windows Contacts program.
Rice. 8. Open a file on your computer
Transferring contacts for subsequent recovery.
In the modern world, the mobile phone has greatly accelerated and simplified the lives of not only business people, but also ordinary residents of the earth. The phone, the contact directory, stores the numbers of our loved ones, relatives, friends and business partners. Sometimes, the loss of the mobile phone itself is not as expensive as the irretrievable loss of the list of contacts with phone numbers in its directory. Contacts can be lost, for example, when resetting the phone to factory settings, when flashing the phone, when the phone itself is lost, in case of a failure, children can accidentally delete etc. Therefore, sooner or later everyone begins to think about how to protect their phone contacts from these misfortunes.
There are several ways to transfer phone contacts to save them and then restore them at the right time. But, after saving contacts, we also need to restore them at the right time. And this due to the fact that there are several different operating systems ( Android , WindowsPhone , IOS ) presents a certain problem. The problem can be easily solved. We will save contacts in a format that is supported by all of the listed mobile operating systems, namely in the .vcf format - vCard .
Transfer contacts (export) from your phone in vCard format
vCard is a special format for exchanging business cards. Has the extension .vcf. This format is supported by major mobile operating systems. These are Android , IOS , WindowsPhone , as well as other modern mobile phones on other platforms. This format allows you to transfer contacts without losing information . If we export contacts to a SIM card, and then import them to a mobile phone in a new phone, then often the full name of the contact is shortened to a certain number of characters. In addition, information about e-mail is lost, addresses are lost, etc.
Export (transfer) contacts from android.
To export contacts in .vcf format from the Android platform, go to the Contacts . Next, go to the context menu. This is done differently in different devices. But as a rule, the transition to the context menu is carried out by clicking on a button in the form of three dots or three stripes. In the context menu (again, it’s different for different devices - options, additionally) follow the link “ Export contacts ”. The following window will open, where we select the location where you want to transfer the contacts, and in some devices you will be offered a choice of formats in which the contacts will be exported. After export you will receive a file with the extension .vcf
Export (transfer) contacts from Google.
On Android, if synchronization of contacts with Google , then they are stored on their servers in the user's profile. To manage your contacts on Google, go to the “ Google Contacts ” service at contacts.google.com. Here on the left there will be a menu in which we click the “ More ” button. The menu will open and then click the “ Export ” button. If you are in the new service interface, you will be prompted to switch to the old version (at least at the time of writing this was the case). You can also immediately go to the old version by clicking the “ Return to old version ” link in the menu of the new version. In the old version, check the boxes in front of those contacts that you want to transfer to another medium and then click the “ More ” -> “ Export ” button. You can also select all contacts at once by checking the box in the top line. All this can be seen in the screenshot below. Next, a window will open in which we just have to select the format of the exported contacts and click the “ Export ” button. The contacts will be downloaded by the browser in vCard to your computer.
Export (transfer) contacts from WindowsPhone.
WindowsPhone syncs contacts with their cloud service live.com . To use this service, you must have a registered profile on microsoft.com. To transfer contacts, we need to go to their service at profile.live.com and click on the menu button (see the picture below) and select the “ People ” service. Manage ” -> “ Export contacts button in the menu . A window will open on the right where we select “ All contacts ” and the format (unfortunately, there is only one option for the export format - “Microsoft Outlook CSV”) and click the “ Export ” button at the top.
As for the upload format, contacts exported in this way can be imported into Google contacts and uploaded from there in vCard , so that there are no problems with their further restoration directly on the phone.
Export (transfer) contacts from iOS.
For iPhone , to transfer contacts from your phone, you first need to enable contact synchronization with the iCloud . After synchronization, go to the page www.icloud.com and select the “ Contacts ” section there. A page with a list of contacts will open. To upload contacts, click on the gear icon in the lower left corner. From the menu that opens, select “ Export vCard ”. iCloud will be downloaded in one .vcf file.
Restoring (importing) contacts on your phone [vCard]
Above in the article, we learned how to transfer contacts from your phone to another medium to save them. Now we need to find out how to restore them if necessary. I will also show you how to restore contacts using the example of the above-listed operating systems and services. In principle, a more or less prepared user will be able to do this without any hints, but we may have completely unprepared people on our site, so let’s start.
Import (restore) contacts to android from vCard.
To restore contacts to Android, we need to import them from a vcard file with the extension .vcf. To do this, go to “ Contacts ”, click the context menu button and select “ Import contacts ” from the drop-down list. Next, select the location where you store your backup contacts. In my case it is an SD card. The system itself will find the file, if there is one (usually it is stored in the SD cardSystemPIM path). Select it and click ok . (in the example Android version 5.1.1 on a Sony phone).
Import (restore) contacts to Android from Google.
There is nothing complicated here. You can simply enable synchronization with Google and enable contact synchronization. To do this, go to “ Settings ” -> “ Accounts ” and select Google (it is assumed that you have an account and have already added it to your accounts). Click on your account and select what should be synchronized on the phone. In our case, this is “ Contacts ”. We activate them, click the context menu button in the upper right corner and select the “ Synchronize now ” item.
Import (restore) contacts into iOS.
On iOS devices, contacts can be imported in several ways. Let's list them, and let's dwell in more detail on one of the easiest ones:
- Import via iTunes
- Import via iCloud
- Import via CopyTrans Contacts (a service for exporting and importing contacts to an iOS device)
- Import using applications from the AppStore (Excel Contacts, Contacts Backup - IS Contacts Kit, etc.)
- Import from vcard - .vcf
The easiest way is to email yourself a vcard with contacts and open it in mail on your IOS device. And whether it’s an iPhone or iPad, they themselves will offer you to add contacts to the directory.
PS About WindowsPhone recovery, I hope dear readers will add in the comments. There, to import contacts from other services, they need to be in .csv format, i.e. excel tables . Otherwise they will not be imported correctly. And there is no point in describing this whole matter. The article turned out to be very long. Perhaps I will write about importing contacts into WindowsPhone in a separate article.
If you are faced with the question of transferring contacts from a SIM card to the memory of a Xiaomi smartphone, you can most likely be congratulated on purchasing a new electronic assistant. In fact, you are not alone in your problem, since most users who pick up Xiaomi technology for the first time find it difficult to copy contacts. Therefore, this article will discuss several ways to import phone book content to allow the reader to choose the most suitable option for themselves.
Copy numbers to SIM card
Now let's look at how to transfer contacts from Android to a SIM card. To transfer data from your phone to a SIM, go to the phone number book application, click the additional functions menu, select “Import/export” and select “Export to SIM card”.
Rice. 9. Export numbers to a SIM card
After which you need to select all the numbers, or which ones to save, the only disadvantage of this method is the limitation on the number of contacts - 200-220 pieces. If you have fewer numbers, then you can safely use this method.
Import contacts from SIM card to Andro >
Rice. 10. Menu in the phone book
Now let's look at how to transfer contacts from a SIM card to Android. This is done just as easily, go to the phone book, click on the menu (three dots on the right), then select “Import/export”
The next step is to choose where to download contacts from; in our case, select “Import from SIM card”
Rice. 11. Import numbers from SIM
This way, the information of each contact will be copied to the phone.
We described a slightly different method in the article about transferring contacts using the SIManager program. To do this, you also need to select “Contacts” on Android and use the same “Import/Export” menu to transfer information from the SIM card to the phone.
Using a computer and MOBILedit
Exactly the same principle is used in special programs, each of which transfers information. For example, there is MOBILedit, one of the best working programs that perform the task in question.
The process of using this software, which helps you understand how to transfer contacts to Android, is as follows:
It is presented as an apk file. If it is not possible to download it directly from your smartphone, download it to your computer and copy it to your device.
Rice. 12. Working with the MOBILedit program
Via computer
This method is useful if phones do not support SD cards or you do not use them personally. It will also allow you to save a backup copy on your computer’s HDD. Transferring information via a PC helps when your smartphone screen breaks down.
Synchronization is carried out as follows:
- connect your old phone or both devices to your computer via USB;
- find the file with contacts and download it to your computer;
- transfer data to a new phone;
- When both devices are connected, the transfer can be done directly from smartphone to smartphone.
pros
This method does not require an Internet connection or the use of Google services. It also takes minimal time.
Minuses
Photos and music installed on the contact are not transferred. It is also not possible to selectively export numbers.
We also separately described in detail the process of all the ways to transfer photos from Android to Android.
Yandex moving and third-party programs
There are many other programs that help you complete the task without the participation of a computer. Here is a list of the best of them:
- Yandex.Moving . We also talked about how to use this application in our article (method 2). There are also links to download Yandex.Moving.
- Contact Backup. The process of use is extremely simple - in the main menu, click “Backup”, select the format and transfer path, and then open vcf or pdf on the new device. This is shown in the screenshots from the application page on Google Play.
- Contact Backup & Restore. Here everything is as easy as possible. On the main page, click “Backup” (there is only one button) and select the forwarding path. Next, open the file on the second device.
As you can see, transferring contacts from Android to Android is simple, and there are also quite a few possible ways to do this. In terms of complexity, they do not require special knowledge of a PC or smartphone. You just need to follow the instructions that we have described.
The task at hand is almost always accomplished by transferring the vcf file in one way or another. Well, or synchronization with any cloud.
Thematic video:
When replacing an old smartphone with a new gadget, the question often arises - how to transfer numbers from one device to another? how to transfer contacts from Android to Android using a SIM card, Bluetooth or other methods.
Copying numbers to a SIM card
Transferring the phone book using a SIM card is the simplest, but at the same time the least convenient solution, relevant only if other methods are not available. When moving contacts to a SIM card, additional information is lost - email, photo, ringtone, etc. In addition, the SIM card memory is limited; a maximum of 250 numbers can be transferred to it.
- Open contacts, click on the “Menu” button with the image of three dots and select “Import/Export”.
- Specify the smartphone as the device from which contacts should be transferred.
- Mark the SIM to which the data is saved.
- Select the numbers to be copied and confirm the action.
Now you need to remove the SIM card, move it to a new phone and follow these steps:
- Open contacts, then “Menu”, click “Import/Export”.
- Specify mobile device.
- Mark the numbers to be transferred and confirm the action.
Import and export
Android OS can archive contact databases. It's called "Import/Export". The phone creates a backup copy of your phone book, which you can save to your PC or download to a new smartphone. To create an archive, follow these steps:
- Open "Directory".
- Activate the menu (shortcut with 3 dots) and select the “Import/export” line.
- Click "Export to VCF File".
- Save the file by clicking on the shortcut with 3 stripes (top left corner). If the device memory is not displayed, go to the settings again and activate the “Internal memory” line.
- Select the desired folder and confirm saving.
Important point
: Older phones often don't have a file manager. In this case, the archive ends up in the root memory section. Additional contact information is often not copied. Photo quality is automatically compressed to save space.
To import contacts, follow these instructions:
- Enter the directory on your new phone and open the menu (shortcut with 3 dots).
- Select Import/Export.
- Specify where to save the backup: phone memory or Google account.
- Select the file and wait for the procedure to complete.
- When working with a file manager, open the archive folder. Click on it, then select your Google account or phone.
Using Bluetooth
Importing contacts via Bluetooth is an easier and faster way to transfer data, in which all additional information is saved.
- Enable Bluetooth on both devices.
- Open the menu, click “Submit”
- Select the contacts you want to transfer to another Andro >
- The search for devices will begin. In the list that appears, select the device to which the data is copied.
- On the second phone, confirm data reception.
- After a notification appears about the successful completion of the operation, click on it, click on the received file, and then select “Import to phone.”
This process takes very little time and does not require any extra steps, such as moving a SIM or memory card from one device to another.
Number recovery
The phone may be lost or broken. How to return lost numbers in this case? Actually this can be done in 2 ways:
- synchronizing your Google Disk account;
- by downloading the VCF file.
We will consider each option separately.
Method 1. Synchronization with your account
Before you can add numbers from your Google account, you need to connect your mailbox. After this you need:
- Open phone settings.
- Click on the inscription: “Accounts” .
- Select "Google" .
- Open the menu by clicking on the three dots.
- Click "Synchronize" .
After this, all data stored in the cloud service will be imported into the mobile device.
Important: the account must be connected to the one on which the previously copied numbers are stored.
Via Google account
On most Android devices, users create Google accounts to log into the Play Market, install games and programs, as well as other actions. You can store a backup copy of your contacts in your Google profile and use it to restore information or transfer data from one smartphone to another.
- In the device from which you need to transfer the telephone directory, open the settings and in the “Accounts” section find the Google profile and click on it.
- At the top right, click the menu button and select “Synchronize.”
- After synchronization, contacts will be stored in the user profile. You can view them by opening Google Contacts on your PC in the browser. From here they can be transferred to another device or easily restored if lost for any reason.
- Next, on the new smartphone you need to log in to your Google account, and then perform synchronization in the settings.
The data in the phone book will not appear immediately, but after some time. Therefore, you should not be surprised if you do not find the number in the directory immediately after synchronization.
No vcard files were found in the internal memory
Author M. Prokosha asked a question in the Mobile devices
Doesn't allow synchronizing contacts to Google account, gives an error: “vcard files were not found in the device memory” and got the best answer
Answer from Yoery [guru] vCard files, each of which stores information about one contact ... in vCard format. The sequence of transferring files is as follows: first, the necessary contacts must be copied to the internal memory of the Android device, then in the “Contacts” application go to the Menu > Import/Export, then select “Import from memory”. You will be asked to import one file in vCard format, several or all at once. Select the required item, after which the transfer process will automatically begin, of which you will be notified via a corresponding message that will appear on the screen for a few seconds. The disappearance of the message box indicates the completion of the import process. Read more: link
Reply from 2 replies [guru] Hello! Here is a selection of topics with answers to your question: Does not allow you to synchronize contacts in your Google account, it gives the error: “vcard files were not found in the device memory”
Sources used:
- https://pc-assistent.ru/perenos-kontaktov-s-telefona/
- https://migadget.ru/faq/perenesti-kontakty-na-xiaomi.html
- https://www.favor.com.ua/ru/blogs/12847.html
- https://2oa.ru/v-pamiati-ustroistva-ne-naideny-faily-vcard/
SHARE Facebook
- tweet
Previous articleBasics of Android operating system security. Native user space, part 1
Next articlePhantom touchscreen clicks: how to treat, causes of occurrence
Using a VCF file
The next way to import contacts from one gadget to another is to use a VCF file.
- Open contacts, then click on the “Menu” button and select “Import/Export”.
- Specify your phone as the data source, and then select the internal or external memory into which a copy of the files will be placed.
- Indicate the numbers that are transferred to the new device.
- A notification appears indicating that a new file has been created.
Next, you need to find a document in .vcf format. If it is on an installed memory card, you can remove it and install it in a new gadget. Otherwise, the file can be moved via Bluetooth, sent to yourself via email, Telegram, WhatsApp or other messenger, VK or other social network, or in another way in an archive or in its original form, and then downloaded to the memory of a new gadget.
After moving, you need to click on the file and indicate where the data will be moved - to your phone or Google account.
Another way to import numbers is to click “Import/Export” in Contacts, select internal or external memory (the one in which the VCF file is located), and then specify the Google account or gadget into which the data will be entered. Next, documents are searched and contacts are subsequently imported.
Via home PC and MOBILedit application
The next way to transfer contacts between Android devices is to use a computer. To do this, install the MOBILedit application on it, and Android Forensic Connector on the smartphone. When you launch the utility on your PC, you are prompted to download the driver database. You should choose your own manufacturer and perform the installation.
In order for the phone and PC to interact correctly, you first need to connect the equipment to each other with a cable, Wi-Fi or Bluetooth.
After this, turn on the developer mode on the mobile gadget by opening the settings, then the “About device” section and click on the build number several times in a row. Then return to the settings and select the “For Developers” tab. It needs to enable USB debugging.
Next, you need to click on the icon with the image of a mobile device, and then in the tab that opens, select “Phonebook”, mark the necessary contacts and click “Export”. After this, you need to select the extension type - .vcf - and click “Export”. The resulting file is moved to a new device and contacts are uploaded from it to the gadget’s memory.
Via FTP connection
Another way to transfer contacts from Android to Android is to make a .vcf file using the “Import/Export” function and transfer it via an FTP connection to a PC, and from there to a new smartphone. To do this, you will need a special application to set up such a connection between your phone and PC, for example, “File Manager”, available on Google Play.
After installing the application, you need to launch it, and then click on the “Access from PC” button and in the window that appears, click “Start”. An address like: ftp://192.999.9.999:9999 will appear.
Now you need to open any folder on your computer and change the “Path” line by specifying this value instead of the directory address. If everything is done correctly, folders will appear indicating the internal and external memory of the gadget.
In them you should find a file with saved phone numbers and move it to your PC. Now you can break the connection and connect a second smartphone to your computer in the same way, and then move the downloaded file to it and import contacts from it into the gadget’s memory.
The advantage of this method is that its implementation does not require cables to connect the equipment to the computer, nor does it require installation of drivers.