After purchasing a wireless router, we think about how to configure the device to ensure a stable signal level and access to the Internet without interruptions in communication. Almost all routers have the same configuration principle; you can enter the parameters manually or use the express configuration wizard. It all depends on your experience and desire. In this guide, we will tell you in detail about Netis routers and how to configure these devices, since almost all models have identical firmware, the only differences are in the names of the parameters.
How to connect the Netis WF2780 WiFi router to the Internet?
In order to log into the personal account of the Netis router, you first need to reset all network configurations on the computer itself. To do this, we need to go to the network connections settings and make sure that all the checkboxes are in the “Automatic” mode (IP address, Subnet mask and DNS servers)
After this, we connect the Netis router to an electrical outlet using the power adapter that came with it. We insert the cable from the Internet provider into the WAN port (on this model it is blue), and the cable with which you connect the router to the computer into the LAN port
FOR WHAT REASONS THE ROUTER MAY NOT WORK
Often such reasons are caused by a non-working power supply, damaged network cable and faulty firmware. Simply, the user may enter the settings incorrectly or select the wrong connection type.
Double-check the power cord and network cable for visual damage. It is recommended to update the router firmware from time to time. Perhaps the latest software version has been released for your model. It is best to perform the update procedure on a computer connected via a cable from the router. Consult your provider's hotline operator before choosing a connection type. Please enter your details carefully to avoid double work.
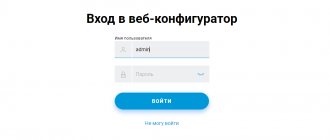
Login to your personal account NETIS.CC - 192.168.1.1
To log into the Netis router, launch the browser and go to either the web address https://netis.cc or the IP of your personal account, which by default is the standard https://192.168.1.1 (do not confuse it with the address 192.168.LL - on at the end you need to write numbers, not the letters “l”).
If everything was done correctly before, the quick setup page will open - no additional authorization in the admin is required at the initial stage.
Troubleshooting
When you configure the router yourself, various types of malfunctions may occur. Some are due to incorrectly set parameters, while others may be the result of a software glitch. Next, we’ll look at how to find and fix typical problems with the Netis router.
Reset
Resetting the settings is the most preferable option. This will clear all settings and allow you to reconfigure your device. A factory reset is performed as follows:
- On the back panel of the device, find a button called “Reset” or “Default”. It all depends on the model of the device.
- Press and hold the button for 8–10 seconds.
- The indicator on the router will go out completely.
- The device will turn on automatically and the default settings will be restored.
No connection
Typical problem. In most cases, malfunctions occur on the provider's side. In this case, there is no need to reset or configure anything again. Try calling technical support. In addition, if you have a single operator in your apartment building, you can simply go to your neighbors and ask if there is a connection. In a situation where everything is fine with the provider, let's try to fix the problem through the router's web interface:
- Log in using your admin credentials.
- On the main page, check what type of connection is being used.
- Try setting "DHCP" if your ISP uses dynamic routing. Otherwise, use a “Static IP” connection.
How to configure a Netis router through your personal account 192.168.1.1?
For the convenience of further work, I would recommend immediately changing the interface language to Russian. This is done by simply selecting a language from the drop-down list at the top of the netis.cc page.
Also, the first thing that will be useful is to reset Netis settings so that you can use the login and password for the web interface that were set by default from the factory. Perhaps someone has already tried to connect a router before you and set their own parameters.
Section "Network"
The router can operate via a wired connection and Wi-Fi. When you open the “Network” tab, you can select any of these connection methods.
The remaining parameters will appear next. For example, if you are using a Wi-Fi network, a list of networks will be displayed, and when a cable connection is made, you should select the WAN type. The “LAN” subsection is also located here, where IP and DHCP are entered. Some modifications of "Netis" provide an IPTV connection, which is turned on by specifying the "Bridge" mode and entering the used LAN connector.
Connecting the Netis router to the Internet
All basic Netis settings are located right on the start page. First of all, this is the configuration of the Internet and wireless networks. To connect the router to the Internet, you need to select one of the types:
- Dynamic IP
- Static IP
- PPPoE
- Other
Which one you have, you need to look at the contract for the provision of services with the provider - depending on this, you will need to enter certain data for connection. You also need to find them out from your operator.
What is your opinion: is WiFi harmful?
Yes
22.91%
No
77.09%
Voted: 36453
Here you can activate MAC address cloning. This is done if the provider binds a specific connected computer to your contract. In this situation, to change it, you need to call technical support. To avoid this, check the “MAC Clone” box and it will automatically be copied from the main computer.
The procedure for connecting the device to a PC, laptop or mobile device
Before setting up, the device must be properly connected.
The following sequential steps must be taken:
- Insert the plug of the wire from the power supply into the socket labeled “Power”, which is located on the rear panel of the device. Insert the adapter into a 220 volt power outlet;
- Install the wire from the Internet provider into the “WAN” port;
- Use a patch cord to connect the Netis router to a laptop or desktop PC; to do this, insert one end of the cable into the “LAN port” of the device, and the other into the connector of the computer’s network card.
The connection instructions described above are preferable and will eliminate possible failures during subsequent settings. However, if you do not have a computer, it is quite possible to enter the necessary parameters using any mobile device connected to the router via wireless technology. As soon as the router is turned on, it will immediately begin broadcasting its Wi-Fi network with a name, for example, “netis_C2323B”. All you need to do is connect to it using the “password” code from a smartphone or tablet and enter the equipment interface. The login name and password are written on the bottom of the device.
Sometimes the specified access codes and login do not work. This happens when the equipment has previously been configured and used in the provider’s network. In this case, it is recommended to reset the device to factory settings. For this purpose, you should simply press and hold the special “Reset” button, recessed in the case, for about ten seconds.
Setting up a Netis wifi network
The next block is the wifi settings on the Netis router. The model I presented supports two frequency ranges, so here you can set data for two networks at once. Namely
- SSID (network name)
- Security (must be checked ON)
- Password
Initially, the two networks will work simultaneously, but later they can be activated separately in the Netis advanced settings.
After entering all the parameters, click on the “Save” button, after which two new wifi networks will appear in the field of view of all devices with a wireless module.
WiFi mode
To enter WiFi parameters, you need to enter the “Wireless Mode” section, where you specify the name of the WiFi being created, its access code, type of encryption protection, channel width, etc.
After completing the adjustments, click on “Save”.
In the future, when connecting devices to the created network, you will need to specify the name and password entered in this window, so it is strongly recommended to write them down in a notepad, since even the worst notepad is always better than the best memory.
How to change the default password and set your own on the Netis router?
Now let's see how to change the password on the wifi router, which was the default for connecting to your wireless network. Go to the administrator section (how to do this is described here) and click on the “Advanced” button
If your router is dual-band, that is, it distributes the Internet at 2.4 and 5 GHz frequencies simultaneously, you need to understand the password for which specific band you want to change. The settings for each of them are located in different subsections of the same name. I will show the example of the most used of them - I open the “2.4 GHz Wireless Mode” section, the “Wi-Fi Settings” section.
Here in the “Access point security parameters” block we look for the “Password” item - this is where you can register a new key for connection.
To apply the change, click the “Save” button and wait for the router to reboot.
Initial setup
First of all, you need to connect the router to your computer. See below for step-by-step instructions:
- Find an Ethernet port on the router. All ports are located on the back of the device.
- Use a patch cord to connect the computer to the router.
- Connect the device to the network via a power adapter.
- Wait until the LEDs start flashing.
Now you know how to connect the device via a patch cord to a computer or laptop.
Network connection settings
It doesn't matter which router you use, Netis WF2411E or N4, you need to do the initial setup. To do this, you need to change the network configuration settings on your personal computer. How to do this, see the following step-by-step guide:
- In the system tray, find the Network Connection Control Center icon.
- Now let's go to the adapter parameters.
- Click on the wireless connection and select “Properties” from the dialog menu.
- You need to go to the IPv6 and IPv4 protocol parameters.
- It is necessary to check the checkbox with the name “Receive an address automatically”.
- Click the “OK” button for the new settings to take effect.
We have configured the network and connected the router to the personal computer, now let’s set up the modem.
Login to the web interface
Many people ask: how to enter the settings of the Netis router. Our algorithm will help you log into the router through a web browser. Please note that absolutely any browser will do:
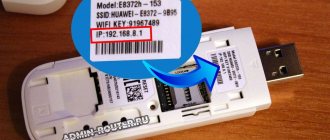
- Turn the device over and find the sticker on the back cover.
- The sticker will contain your login credentials. On a Netis router, the following combination is usually used: “guest” and “guest”. In addition, you need to look at the IP to log into the web interface. Typically, the following address is used: 192.168.1.1.
- Open a browser and write the device IP in the address bar.
- Enter your login and password.
- Click on the “Login” button.
Access Point Settings
After we have entered the admin panel, we need to select the firmware language. Click the "Language" button and click "Russian". Let's start configuring:
- Click on the “Advanced” button.
- Select the “Network” button in the side menu.
- Go to the “WAN” section and check the checkbox with the desired connection option: “Wired” or “Wireless”.
- In the “WAN connection type” item, set the parameter “Russia PPTP” or “Russia L2TP”.
- In the “Username” line, enter a custom login using the Latin layout. Special characters and punctuation are prohibited.
- In the “Password” column, set the key for the access point. The minimum password length is 6 characters.
- In the “Connection type” section, specify the router address. It can be found on a sticker located on the back cover of the router.
- In the “Subnet Mask” item, write the address 255.255.255.224.
- In the “Gateway” line, enter the following address 166.37.27.205. If you use a static IP, then look for the necessary parameters in the service agreement or contact your provider.
- It is not necessary to fill in the “Primary DNS” and “Secondary DNS” items if you are using dynamic routing. Otherwise, also contact the provider’s technical support or look for the necessary information in the agreement for the provision of telecommunications src=”https://ustanovkaos.ru/wp-content/uploads/2021/04/16-parametry-seti-L2TP.jpg” class =”aligncenter” width=”580″ height=”267″[/img]
- Select how the connection to the network will be made: “Automatically”, “On demand”, “Manually”. The first option implies that after the operating system starts, the connection to the network will be made immediately. In the second case, you do not need to enter your login and password. Everything is done simply - go to the system tray, click on the button with the name of the access point and click “Connect”. In a few seconds you can go online. If you select the third item, the user himself specifies the login and password for the access point.
- Click "Save".
On a Netis router, setting up an access point takes a few minutes, there is nothing complicated, the main thing is to know the parameters. If the necessary data is not available, then, of course, you should contact the provider.
Routing options
We continue to configure the Netis Wi-Fi router. Now let's set the parameters for routing:
- In the right column we will find the “Advanced” item.
- Let's go to the "Static routing" section.
- The static routing rule parameters form will appear on the screen.
- In the line “Destination IP address” we indicate 172.16.0.0.
- In the “Subnet Mask” section we will write the following value: 255.225.0.0.
- In the “Main gateway” column we write 166.37.27.205.
- Click on the “Add” button.
Setting up a Wi-Fi network
Our instructions for connecting a Netis router will help you configure the settings for your wireless network. This point in the user manual is important, because if the setup is done incorrectly, you will not be able to access the Internet:
- Enter the "Wireless" section.
- In the submenu, select “Wi-Fi Settings”.
- In the “Wi-Fi connection status” line, set the switch to “On”.
- There is no need to change the MAC address, the value will be set automatically.
- Under Radio Mode, select Access Point.
- In the “SSID” column, enter a custom name for the network. You can use Cyrillic or Latin.
- In the “SSID Broadcasting” section, Fr.
- In the "Region" section, select a country. If necessary, values can be entered manually.
- In the “Channel” column, you can select any of 12 possible channels. The manufacturer recommends that we use the “Auto” value, since the router will automatically select a less loaded gateway.
- In the “Channel Width” section, set the value to “40 MHz”.
- Select the authentication type, it is recommended to use "WPA/WPA2-PSK".
- Specify the encryption type "TKIP&AES".
- In the “Key Type” item, do not change the parameters.
- Go to “Password” and enter the access key. The minimum length of the cipher is 8 characters.
- Click on the "Save" button.
Bandwidth
Bandwidth will allow you to set values for incoming and outgoing data transfer rates:
- Go to the side menu and select the “Bandwidth” section.
- In the item “Status” o.
- Open "Rule".
- In the “Incoming speed” column, set the value “100000 Mbit/s”.
- In the “Outgoing speed” line, set the parameter “100000 Mbit/s”.
- Leave the “Configuring Bandwidth Management Rules” section unchanged.
- Click on the “Save” tab.
If, when you go to the rules section, you see arbitrary values set automatically, then you need to replace them, as indicated in our instructions.
Restart
At this point, setting up the router parameters is complete; for the changes to take effect, you need to reboot the device:
- Go to the side menu and select “System”.
- In the dialog box, click “Restart system”.
- On the main screen, click “Restart”.
- The indicator on the router will start flashing and after a few seconds will go out completely.
- After 2 minutes, the router will start working again, so you can try to connect to the Internet.
Instructions on how to change the password on a Wi-Fi router
Below are ways to change the password on the most famous routers.
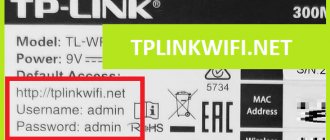
TP-Link
The action plan is as follows. Having connected to the router via cable or via radio waves, launch any Internet browser. In its top line, enter 192.168 1.1 (the address that allows you to log into the router and change the password). Sometimes the login address may be 192.168 0.1. And in the windows for login and password - either the word “admin” (set by default by the manufacturer), or those that you previously came up with yourself.
Next, we password-protect access to the network again. We proceed like this:
- select the wireless connection tab (wireless);
- put a checkmark next to the boxes entitled WPA/WPA2;
- in the first two we select automatic mode, in the third we enter a unique set of characters.
How to change the password on a TP-Link router without anyone guessing it? It is recommended to use a minimum of eight characters, using capital letters, small letters and numbers. Naturally, we save the changes. It’s a good idea to write down the access code so you don’t have to rack your brains remembering it. The mobile application Evernote can handle this task perfectly.
Figure 3. TP-Link router management menu interface
Huawei
The procedure is very similar. The connection is made as described above. The IP address and factory login/password are indicated by a sticker on the device body. Next, in the Basic menu, look for the option to select a wireless (wireless lan or WLAN) connection. Then:
- in the SSID box we indicate the name of our network (we can come up with any name);
- select an encryption certificate (authentication) – for example, WPA2-PSK;
- indicate the password opposite the Pre-Shared Key inscription.
Let's save. In general, anyone can figure out how to change the password on a Huawei router.
Figure 4. Huawei router management menu interface
Beeline
It’s no less easy to figure out how to change the password on a Beeline Wi-Fi router. Moreover, the menu is in Russian. We indicate in the browser the same address as in the previous options. The router management menu appears. Following the prompts, we get to the advanced settings. In the “Wi-Fi” section, select “Security”. Having chosen the authentication type and other nuances, we get to the password window, where we print a unique “password”. Save the changes.
Figure 5. Beeline router management menu interface
D-Link
The beginning of the procedure is standard: we establish contact with the access distributor via the browser, enter twice, follow the menu prompts: Wi-Fi, then “Security Settings”, where we enter the PSK security key in the appropriate window. Before you change the password on your D-Link router, it is better to write it down on paper.
Figure 6. D-link router management menu interface
MTS
How to change the password on an MTS router is not difficult to guess, knowing how this is done on devices we are already familiar with. By the way, this company uses devices manufactured by Huawei. Access to their interface is already familiar to us: we enter the address indicated on the case in the browser line, enter a standard word. Go to settings and click on WLAN. Next, enter the new network name in the SSID line, and the key in the box of the same name.
Figure 7. MTS router management menu interface
Zyxel Keenetic
There's nothing special here either. The procedure is the same: standard address in the browser, the word “admin” as the factory key, simple operations in the control menu. We give preference to the WPA2-PSK authentication type, enter a new key in the “Network Key” window. Now we know how to change the password on the Zyxel Keenetic router.
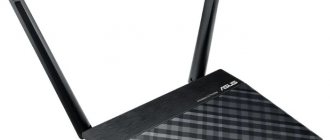
Asus
There is no point in dwelling on the topic of how to change the password on an Asus router - everything is the same as the previous options. Once in the settings menu in the familiar way, we set the name of the wireless network, select the verification method (WPA2-Personal is preferred), as well as a unique WPA-PSK key.
Figure 8. Asus router management menu interface
Rostelecom
On the home page, where we get to in a familiar way, select the Wi-Fi item. In it we mark the item “Router”. Going further, enter the network name (SSID), and in the next step, the security key. In general, how to change the Wi-Fi password of a Rostelecom router is not God knows what kind of science!
Early termination of the contract
Connecting to the network is free of charge when you deposit any amount from 1000 rubles to your personal account. Money is credited to your account and spent on the Internet at any tariff you choose. In case of termination of the contract before spending the funds paid as an advance payment, the subscriber pays the cost of connection according to the current connection tariff (1000 rubles), when using an unexpired subscription, recalculation is made in accordance with the conditions for early recalculation of subscription tariff plans. Refunds from the account are made at the request of the subscriber at the central office within 14 days against receipt of funds.
Preparing your computer
Review and configuration of the D-Link Dir-320 modem
In order for the router itself to start working as expected, you need to perform some actions on the PC. Instructions will be given below.
To configure the network configuration on a PC you need:
- Go to Control Panel;
- Find there “View network status and tasks”;
- Select “Change adapter settings”;
- Define a local connection and select its properties using RMB;
- In Properties, find the IPv4 item in the list and double-click on it;
- Check the boxes to receive IP and DNS automatically.
Small but bold - Netis N4 in action
The first thing that catches your eye is its small size. netis N4 is one of the most compact routers with external antennas that I have ever seen. After the rather large bodies of modern Keenetic, TP-Link or ASUS access devices, this model literally looks like a baby.
Even compared to the fairly compact D-Link DIR-300, the Netis N4 router is almost 40% smaller. Usually, I treat such decisions with some doubt, because, as a rule, cooling is worse in a cramped case. Having driven it properly on the stand, I did not notice that it was not just overheating, but at least getting very hot - everything was within normal limits. The main thing is to place it on a flat surface, since the technological holes are located on the bottom wall of the device.
For all its minimalism, netis N4 is a full-fledged AC1200 router with support for IEEE 802.11ac and external (albeit non-removable) antennas with a gain of 5 dBi. Thanks to this, it is possible to easily cover an average two- or three-room apartment with a standard layout with a wireless network. I would like to note that good quality coverage is generally one of the main distinguishing features of Netis modems and routers. Over the course of a year of using the modem, I did not have a single complaint about the WiFi operation. This model uses dual 2.4 GHz and 5 GHz High Gain antennas, so there should be no difference in quality for the worse.
The only thing that netis N4 is limited in is the number of LAN ports - there are only two of them. And one WAN for the provider cable. On the other hand, do you have a lot of devices at home that will be connected via Ethernet? For example, I only have an STB set-top box for interactive television. All other gadgets use WiFi.
By the way, this model works without problems with digital interactive television of any Russian provider thanks to VLAN support (802.1q traffic tagging).
If your provider allows you to use the IPv6 protocol on its network, then in this case you can easily configure the router to work with it. Another feature is that, if necessary, Netis N4 can be used as a WDS repeater.
Telecom operators will be interested in support for the TR-069 protocol, which allows remote control of a client device for initial configuration and monitoring of the device’s operation.
Well, in the end, the most “delicious” bun is the price. In large retail chain stores, the Netis N4 wireless router now costs 1,350 rubles. This is actually the lowest price among dual-band routers on the market. And, I must say, the device works out its cost 100%!
Main technical characteristics
Platform: Processor - RTL8197FNT 660 MHz RAM memory (RAM) - 8 MB Flash memory - 64 MB WiFi: 2.4 GHz - 802.11 b/g/n up to 300 Mbit/s 5 GHz - 802.11 a/n/ac up to 867 Mbit/s Antennas - 2 x 5dBi, non-removable Ports: 1 x WAN 10/100 Mbit/s 2 x LAN 10/100 Mbit/s
Return of borrowed equipment
The return of equipment from use or rental is made by the subscriber in its entirety (product, components, connecting wires, instructions, box). The subscriber also has the right, within 14 days, to return the equipment taken from the Company without traces of use, in its original completeness, salable condition and with a full set of documents for any reason, while the company returns the funds paid by the subscriber in the amount of 100% to the subscriber’s personal account . All goods are subject to return, i.e. the main product, its components and accessories (power supply, remote control, connecting wires), packaging, instructions and warranty card. If the complete set is not met when returning the goods, the subscriber pays for the missing set in accordance with the established cost indicated in the price list.
Restoring the router after flashing the firmware
Here I want to tell you about another reason why you cannot log into the interface of your router. We are talking about unsuccessful device firmware. In fact, this can cause many problems: it does not go into settings, the Internet does not work, there is no Wi-Fi connection. What to do in such a situation? I’ll tell you using the example of a TP-Link router.
- Download the Tftpd utility. Unpack the archive and extract the file with the .exe extension from it.
- We go to the officials - to the TP-Link website tp-link.com. We look there for the firmware we need, always according to the router model and its version. Download and extract the file with the .bin extension from the archive.
- Move the .bin and .exe files that you downloaded before to the same folder.
- Now we need to change the IP address. I wrote above how to do this.
- In the IP address line we write 192.168.1.66, 192.168.0.66 or 192.168.0.86. You may have to struggle and find an address.
- The subnet mask will be determined by itself, leave it as it is and click “Ok”.
- Disable antivirus and firewall.
- We connect the router and the computer with a network cable.
- Let's go to our folder and run the .exe file as administrator.
- In the “Server interface” column we look for a network adapter with the address that we set earlier.
- Click “Show Dir” and look for our file with the .bin extension. You don't need to press anything, you just need to make sure that the firmware is there.
- On the router, press and hold the WPS/RESET button and plug it into a power outlet.
- The firmware installation will begin. You will see this on your PC.
- We wait for the router to reboot and try to go into the settings.