Author of the article
Maxim aka WisH
Higher education with a degree in Information Systems. Experience as a system administrator - 5 years.
Today we’ll talk about how to go into the settings of the Netis router and the features of the brand. The article will contain a general algorithm that is suitable for all models. If you have any questions, write them in the comments or look for instructions for your specific router on our portal. Netis routers are not widespread in Russia, but are gradually beginning to penetrate the market because they have a number of advantages compared to other routers.
Features of routers and reviews about Netis
Before we move on to setting up the Netis router, let's talk about the manufacturer and product reviews. The company produces not only routers, but also other network equipment. It focuses on the entire network infrastructure, producing products from network adapters to SNMP switches. Narrow specialization for a fairly large Chinese company, but the products do not raise any questions regarding quality.
Reviews of Netis products are mostly positive. Some models do not have the most powerful processors, which affects the performance of the entire system. Some people complain that the two antennas included in the standard kit do not cover the required volume. Here it must be said that they are sufficient for an ordinary three-room apartment; something more powerful is worth taking if you have strong walls or a really large area. The main complaint from buyers is the paucity of router settings. There is such a problem, but the settings are enough for home use. If you want to deploy your own server or some complex system, then you should choose more expensive models. The main advantage of this company is the price-quality ratio. At a fairly low price tag, they have a good service life and good fault tolerance.
Additionally
If something goes wrong, then click on this “Advanced” button:
A lot of settings will open, many of which we described in the article indicated at the very top. Here I will focus on brief points:
This is where we end our short tutorial. Links to detailed articles on models are above, questions and suggestions are below. See you soon!
- https://wifika.ru/nastroyka-routera-netis-kak-zayti-na-netis-cc.html
- https://help-wifi.com/netis/kak-zajti-v-nastrojki-routera-netis/
- https://lumpics.ru/how-to-configuring-netis-router/
- https://drugoytele.com/support/nastrojka-routerov-netis/
- https://wifigid.ru/netis/nastrojka-routera-netis
Connection
To connect the Netis router to the network and to the computer, you need to choose a convenient place near the outlet. It is advisable to install it approximately in the center of the room if the area is large and there is a possibility that the router will not reach the edge of the room. Also consider the length of the provider cable and the wire from the computer. The package includes a cable to connect the router to your computer, but it is quite short.
After choosing a location, you need to connect the wire from the computer to any of the free LAN connectors. Plug the cable that comes into your apartment from your provider into the WAN port. It is usually located separately from the rest and highlighted in blue. Connect the power cable to the appropriate connector. If you plan to receive the Internet via a mobile modem, then connect it to the USB port. At this point, the connection can be considered complete; all that remains is to go to the web interface and set the parameters.
Full review
Netis N2 is a full-fledged home dual-band gigabit router without any frills. He will organize a home network, there will be no reminders about himself, the Internet will always be at hand. Well, this is my personal impression after a week of use - there were no noticeable differences in operating scenarios compared to their much more expensive counterparts. And most likely, most of you will not notice these discrepancies over the years of operation of this device - such is the job of modern routers “to serve the owner, to be in the shadows.”
And now I propose to go directly to the review of the device.
Equipment
The theater starts with a hanger, and the router starts with a box. Previously, I somehow didn’t pay attention to them, but now something has happened - there are some very interesting solutions.
But here everything is even very simple - a white box, a black router. The box immediately shows all the main characteristics, and you can safely write a review of the external appearance of the router here - there is both a general view and a look at the ports. And here in the box there is an interesting solution for separating the router itself from the peripherals - and I quite liked it. Well, okay, the boxes didn’t come to discuss what awaits us inside:
- The router itself.
- Power adapter (12 V, 1 A).
- Quick setup instructions (attached below).
- Ethernet cable (to be honest, very short, but gone are the days of good quality bundled cables).
Separately, I would like to note the additional language on the box – Ukrainian. The positioning of the product in our countries is once again emphasized.
Characteristics
First, I propose to take a look at the very essence of the characteristics of this model. For those interested, I put all the detailed specifications under the spoiler here.
- Wi-Fi 5 (802.11ac), AC1200 class is not the latest innovation, but it has two operating bands and high speeds (2.4 GHz up to 300 Mbit/s, 5 GHz up to 867 Mbit/s). I won’t reveal all the main features of the standard here.
- 4 foldable antennas (not detachable) with 5 dBi gain.
- 1 WAN + 4 LAN (all ports 1 Gb/s).
- Guest networks, IPTV and even the emerging IPv6.
- Three operating modes – access point (standard), repeater (our visitors often use routers as repeaters) and client (I’ll definitely try this mode right in the settings below).
- Supports all current types of Internet connection - DHCP (dynamic IP), static IP, PPPoE, L2TP, PPTP, Dual Access, WISP.
FULL SPECIFICATIONS
| Wireless network | |
| Standards | IEEE 802.11b/g/n at 2.4 GHz IEEE 802.11a/n/ac at 5 GHz |
| Transmission speed | Up to 300 Mbps at 2.4 GHz and Up to 867 Mbps at 5 GHz |
| Frequency range | 2400-2483.5 MHz;5150-5350 MHz;5650-5725 MHz |
| Transmitter power | less than 20dBm or 100mW |
| Data transfer rate | 802.11ac: 80 MHz (450, 900 Mbps) 802.11n: 40 MHz (300, 270, 240, 180, 120, 90, 60, 30 Mbps) 20 MHz (144, 130, 115, 86, 57 , 43, 28, 14 Mbps) (auto-detection) 801.11g: 54, 48, 36, 24, 18, 12, 11, 9, 6 Mbps 802.11b: 11, 9, 6, 5.5, 2 , 1 Mbit/s |
| Equipment | |
| WAN connection type | DHCP, Static IP, PPPoE, L2TP, PPTP, Dual Access (Russia L2TP, PPTP, PPPoE), WISP |
| Interfaces | 1*10/100/1000Mbps Auto MDI/MDIX RJ45 WAN port 4*10/100/1000Mbps Auto MDI/MDIX RJ45 LAN port |
| QoS (traffic prioritization) | WMM, Bandwidth Management |
| Access Control | IP/MAC/Domain filtering |
| Passing VPN traffic | PPTP, L2TP, IP SEC |
| Others | IPTV, Dynamic DNS, Static Routing, WOL, Backup and Restore, Firmware Upgrade, IPv6 |
| Light indicators | SYS, WPS, 5G, 2.4G, WAN, LAN1 ~ LAN4 |
| Other | |
| Specification | Chipset: RTL8197FS 1Ghz RAM/ROM: 128MB/8MB |
| System requirements | Windows XP/Windows Vista/Windows 7/Windows 8, MAC OS 10.4/10.5/10.6.10.7/10.8, Linux |
| Environmental parameters | Operating temperature: 0…40 ℃ Storage temperature: -40…70 ℃ Relative air humidity during operation: 10…90%, non-condensing Relative air humidity during storage: 5…90%, non-condensing |
| Equipment | Device N2 (212*145*40 mm) — 1 pc Power supply 12 V/1A — 1 pc Ethernet cable — 1 pc Quick (multilingual) installation guide — 1 pc |
| Certificates | FCC, CE, EAC |
| Producer | China |
| Life time | 5 years |
| Guarantee | 2 years |
Appearance
Let's move on to the appearance. The N2 model in appearance is not a logical continuation of the N1, and is not at all similar to the N4; here there is a clear departure from the understandable line. But the essence is preserved. Even in the last review of another model, I emphasized the obvious similarities with their Chinese counterparts. Here my impression only intensified:
In fact, it’s for the better - personally, I’m just happy with the trends in Chinese fashion in the field of home routers, so I don’t see anything wrong. And as a solid argument, the appearance of the device does not turn your nice room into a work office (and some routers can do this). 4 antennas deserve special attention. Unfortunately, they do not come unfastened, but they rise quite comfortably and are fixed in the upper position.
And this is what it looks like out of the box
At the top you can see the organically integrated netis logo and the display panel (explained below). If he were still white, all questions would disappear altogether. Of course, the effect of visual thinning of the product catches your eye - well, we know that routers have almost nothing inside anyway, but it looks beautiful.
The texture of the top panel is also interestingly chosen. But in my sample it was openly stained with something (very similar to spilled glue). But that’s why these are samples; I hope something like this won’t end up in serial production.
What I didn’t like is that the display panel could be shortened or removed to the edge, the body is very light (you feel a kind of flimsiness, although the material itself seems to be solid on all sides), the WPS button shakes (maybe again exclusively for me, but it’s usually don't touch).
Let's go to the bottom:
Here we have rubberized feet to prevent this lightweight design from rolling around on your beautiful lacquered shelf. The entire surface is perforated for cooling. But there are no slots for hanging on the wall. Of course, I understand that this is overkill for this model, and such placement would spoil the designers’ idea and signal distribution - but for some reason the most vicious comments in the reviews on our website come down to discussing the lack of suspension capabilities - they really love this thing (I myself have a couple of such friends who adore mounting the router somewhere under the ceiling).
Here is the main sticker with default access: for the control panel via the web interface and to both raised Wi-Fi networks. I will describe the features of generating this data in the settings section.
Back panel
Let's look at the rear ports of the model:
In order:
- WPS – button to activate quick connection via WPS.
- 4 LAN ports.
- 1 WAN port.
- Power connector.
- Reset to factory settings - again a hole instead of a function on the WPS button.
Indication
In order:
- Food – green.
- An empty space, not lit, there is no information about this hole in the documentation.
- WPS – activation after pressing a button.
- Wi-Fi – both networks 2.4 and 5 GHz, lights up blue. When 5 GHz is turned off - green.
- Internet.
- LAN ports.
Go to the web interface
To log into the router, type netis.cc or 192.168.1.1 in the address bar of any browser. The first point is only suitable for routers of this company; usually the entrance is carried out at the address.
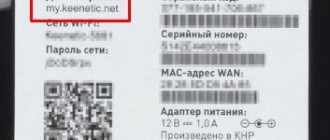
The connection to the router should be made from the computer that is connected to it via cable. Manufacturers have also taken care of those who do not have a computer. Turn the router over and look at the bottom of it, where the SSID and password are written. The first means the name of the wireless network that the router creates immediately after turning it on. The second is the password for it. So you can simply connect to this network, open a browser from your phone and enter netis.cc in the address bar to enter your personal account.
How to contact support staff
Before receiving advice, each client must independently study the background information located on the website. Detailed instructions for setting up a wireless router and computer equipment are provided. By consistently following the tips, you can solve common problems on your own. If you cannot fix the problem yourself, you should consult with employees.
The easiest option is to send a message to [email protected]
When writing a letter, it is important to indicate the name and contract number
The second method of communication is through your personal account. Each client of the company receives an account that allows them to independently manage services. There is a “Help” section for contacting consultants. It is necessary to describe in detail the circumstances of the problem. There is no need to attach the contract number - employees can see it through the use of the account. The answer comes within one business day. If necessary, you can continue the conversation. For example, if you need to clarify some questions.
Quick setup
After the first launch, no input data is required; you will immediately be taken to your personal account, where you can configure the Netis router. This is a quick setup window that allows you to set all basic functions. You won’t need to log in often, because the Internet is configured right in this section.
Here, first of all, click on the top line to change the language to Russian. You can also work in English; with quick setup, no special knowledge is required. In the top menu, select the connection type: dynamic address, static, PPPoE or other.
You can find out the type of connection in the instructions from your provider.
In addition, only when selecting a dynamic address, no other settings are required. With any other choice, you will have to specify the address, login with password, and may also need to specify the server. It is better to clarify all this in advance in the contract or read the instructions from your operator.
Just below is the section with wireless networks. Here you can change the Wi-Fi password on your Netis router, as well as set names for networks. If your model supports broadcasting in two bands, then there will be settings for two networks; if not, then only for one. Set your options here.
Section "Network"
The router can operate via a wired connection and Wi-Fi. When you open the “Network” tab, you can select any of these connection methods.
The remaining parameters will appear next. For example, if you are using a Wi-Fi network, a list of networks will be displayed, and when a cable connection is made, you should select the WAN type. The “LAN” subsection is also located here, where IP and DHCP are entered. Some modifications of "Netis" provide an IPTV connection, which is turned on by specifying the "Bridge" mode and entering the used LAN connector.
Manual setting
If the quick setup did not work, then you need to switch to manual mode. Click on the Advanced tab, which is not always translated into Russian. This way you will be able to enter the full parameters section, where the exact configuration of the equipment is carried out to suit your requirements. Although for a typical home network this is not required very often. Everything here will be in English again. Look in the left column, at the very bottom. Click on the language selection, select Russian, this will allow you to change the language in the advanced options.
Click on the “Network” section and select “WAN”. It is selected automatically, but it is better to make sure that the correct partition is selected. In the top line, which is called “Connection type,” indicate the type of connection that your provider uses. Depending on it, the settings items will change. Enter the required information. Usually this is a login and password; you may also need to enter the server address or some other additional parameters.
At the bottom of the window, select “Connect automatically”, and then click on save. Consider setting up your Internet connection complete. If there are no necessary fields for changing parameters here, then try updating the firmware.
Payment methods
Finam company personal account
Timely payment of the subscription fee guarantees the subscriber full access to the Internet, TV or telephony without restrictions. Payment can be made using one of the methods suitable for the client:
- using the personal account service with VISA, MasterCard, Mir cards (no commission is paid), as well as YuMoney electronic money;
- non-cash payment against an invoice for prepayment;
- in cash at the provider's office cash desk;
- at ATMs using Maxima, Promsvyazbank, Sberbank cards;
- using the Sberbank Online service using cards from this bank;
- payment in cash or bank cards at Sberbank payment terminals (no commission is provided);
- in cash at UltraTelecom payment points (no commission);
- in cash using Ugra Bank ATMs with the “Cash-in” option, as well as through QIWI terminals and other systems (with a commission of up to 3%);
- electronic money “Single Wallet” or QIWI (no commission).
When paying a subscription fee, you should take and save all receipts and checks. It is necessary to indicate the personal account (different from the contract number), as well as the amount of payment.
Wi-Fi setup
Let's move on to setting up Wi-Fi. Log in to your personal account again if you have closed it. Click on “Wireless mode” in the left column and select “Wi-Fi settings” from the menu that opens. The wireless adapter settings will open on the right side of the window. In the top line, put “On” if you plan to use a wireless network. In the “Radio Mode” line, select “Access Point” if this device is used to distribute a wireless network directly from the provider. Set the configuration mode to manual. In the “SSID” line, write the name of your future wireless network.
Now go to the security settings section, which is located just below. In the “Authentication Type” line, put “WPA2-PSK”, this is the best available method. Leave the next two lines with the default values, and in the last section enter the password. If you have a dual-band router, then both settings will be located here and all parameters will have to be set twice. Leave the channel settings at default for now, then change them if it turns out that too many devices are broadcasting on a certain channel. The “SSID Broadcast” option should be enabled if you want the network to be visible to all devices.
Changing the administrator password
Now you need to set your username and password. You can enter without them. But if someone can connect to your Wi-Fi, they can also reconfigure the router. So it’s better not to let this happen and change the password for the device. Go to the parameters, in the left column find the “System” section and click on it. In the menu that opens, click on the “Password” item.
Account settings will become available on the right side. Enter your new username and password.
Write them in such a way that you can remember them later without problems. If you forget, you will have to completely reset the configuration and configure everything again. Although this can be done quickly on Netis routers, it is better not to let it get to this point.
That’s it, the password has been changed, now you need to enter it to log in, it just won’t log in anymore.
Coverage map
My traditional test of the coverage of an ordinary “kopeck piece” in the field. In practice, I should once again show that all routers cope with this task approximately equally.
Repeater mode
Working in repeater or amplifier mode allows you to amplify and transmit further a signal from another device. That is, you have one router that is connected to a cable from your ISP. You configure it according to the instructions above, and install a second router at the border of its broadcast. You set it up in repeater mode so that it picks up the signal and transmits it further. This results in two routers on the same network. This way you can greatly expand your Wi-Fi coverage area.
Enter the settings and go to “Wireless mode”, select “Wi-Fi settings” from the menu that opens. In the Radio Mode section, select Repeater. Set the configuration mode to “Auto”. In the next line, enter the name of the network to which you will connect. If you click on the button next to the name, you will see all available Wi-Fi networks. Select the one that belongs to your first device. In the section below, enter the password for this network.
If you set it to manual mode, then in the security section you will have to set all the parameters. This will have to be done if the router fails to connect on its own. Then set there all the data that is in the security settings of the main router.
Speed tests
For those who are still in the tank, I remind you that on this little thing we have gigabit ports in all directions and fast Wi-Fi. I wouldn’t like to do vacuum theoretical measurements, so let’s look at standard home user tests: Internet speed test and movie transmission over a local network (for a 4K viewing scenario via DLNA).
For the Wi-Fi test, I have an AX200 installed on my laptop, so in theory it should reach all existing speeds, then only if it all comes down to the SSD.
With the first test, we don’t see any problems – the 100 Mbit/s Internet bandwidth is more than fully implemented.
And here are the results of measurements on fiber optics:
At the same time, let me remind you once again that ALL ports on this model are gigabit, so it is possible to take the maximum tariffs from your provider for the current day.
Now let's move on to transferring the file:
First measurement – AX200
Second measurement – AC 8260
We make a mistake for the strange operation of the AX200 this day, but the second measurement shows a quite confident result of WLAN-LAN communication at a speed of about 612.8 Mbit/s.
And finally, full speed measurements using iperf3. Data are averaged over several measurements. No division into incoming and outgoing speeds is given, since in general the results were similar. At the same time, channel connection speeds showed a maximum of 867 Mbit/s for Wi-Fi, 1 Gbit/s for LAN.
| Direction | Speed |
| WLAN-LAN (2.4 GHz) | 128 Mbit/s |
| WLAN-LAN (5 GHz) | 598 Mbit/s |
| LAN-LAN | 925 Mbit/s |
| LAN-WAN | 933 Mbit/s |
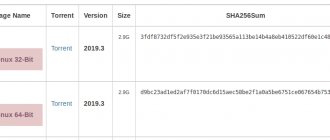
Firmware
Updating the firmware will allow the router to eliminate errors in operation, eliminating some failures. Sometimes new settings are added to them or old ones are edited. You shouldn’t specifically hunt for new versions, but if you decide to reconfigure your device, you can update the program. First, go to the manufacturer's official website and find your router model there. Download the latest version for it, just check first which version is already installed. The firmware version is written on the right side of the window, right under the button to go to quick settings.
Open settings, in the left column click on “System”, and then on “Software Update”. There is one line available on the right side. Click on the “Browse” button and specify the path to the downloaded file. Click on the “Update” button and wait for the process to complete.
During flashing, do not turn off the router or pull out the cables from it.
Once the process is complete, it will reboot and be ready to go.
Account Features
The main functions of the Netis personal account include:
- payment for the use of telecommunications services through Internet banking or popular electronic wallets;
- obtaining information about the status of the account, the presence of debts, along with their subsequent repayment;
- obtaining information about current promotions;
- filling out an application to disconnect or connect additional services from the operator;
- call to the house of a master;
- filing complaints and suggestions.
What to do if the device does not connect
Sometimes problems arise that the computer or phone cannot connect to the router at the specified address.
There are several reasons for this:
- The cable from the computer is not tightly connected or Wi-Fi is disconnected on the router itself. Check that the phone can connect to the specified wireless network and that the cable is plugged in tightly at both ends.
- Power failure. The wire may not be connected or connected loosely.
- Reboot the router; the problem may lie in the device itself.
- If you are connecting via a computer, check that you have configured the network adapter correctly. If the address is automatically received, then try changing the setting to manual. Enter 192.168.1.2 as the computer address, and 192.168.1.1 as the gateway.
- If all else fails, reset the router to factory settings and try again.
FOR WHAT REASONS THE ROUTER MAY NOT WORK
Often such reasons are caused by a non-working power supply, damaged network cable and faulty firmware. Simply, the user may enter the settings incorrectly or select the wrong connection type.
Double-check the power cord and network cable for visual damage. It is recommended to update the router firmware from time to time. Perhaps the latest software version has been released for your model. It is best to perform the update procedure on a computer connected via a cable from the router. Consult your provider's hotline operator before choosing a connection type. Please enter your details carefully to avoid double work.
Factory reset
Resetting your router will help if you have forgotten its password, if you need to change many settings at once, or if it has serious malfunctions. If you remember the password, then go to settings, then to the “System” section, then to “Factory settings”. There is only a “Restore” button, click on it and wait for the process to complete.
If it is not possible to log into your personal account, then take the router and find the “Default” or “Reset” button there. Press there with a thin, but not sharp, object and hold for 10 seconds. The router will begin rebooting, wait for the procedure to complete. At this point, the reset is complete, go to your personal account and enter all the parameters again.
Technical support
A few simple tips that will help you and I more quickly diagnose and troubleshoot problems with your work on the network:
- The more accurately you describe the problem to us, the faster we will fix it. By the way, you can try to fix many problems yourself by restarting your computer and modem.
- A change of the pin code. It is best to change your password every six months or immediately when you suspect that it has become known to someone else. The password can only be changed by personally appearing at our company with an identification document.
- The modem connection is not established. Turn on the sound when your modem dials.
- If after dialing a number you hear short hang up beeps or long ringing beeps, check that the number you dialed is correct.
- If the connection is established, i.e. modems generate a characteristic whistle after a response - see below.
- If the number is correct, call technical support.
- Check that the entered password is correct. If you have forgotten your password, then you need to change it.
- If you have Internet Control Server installed, you can perform initial diagnostics using it.