- 65shared
- 2Facebook
- 63Twitter
- 0VKontakte
- 0Odnoklassniki
As in any other operating system, all applications available on Android can be divided into two groups. The first includes programs that start with the system. Most of them are background services, without which the normal functioning of the operating system itself is impossible. The second group includes applications that users install and launch on demand. These, for example, are Internet instant messengers and email clients, which can be added to startup at will.
Autorunning applications on Android has both its pros and cons. By putting a frequently used app in startup, you no longer need to launch it manually when you turn on your device. On the other hand, applications that are constantly running in the background consume memory, thereby reducing the overall performance of the device. This is probably why users are more often interested in how to disable autorun applications on Android, rather than how to add this or that program to it.
Removing from startup using system tools
The built-in functionality of Android allows you to remove programs from startup, but this method has a number of limitations. Firstly, due to the lack of root rights, you will not be able to unload some integrated applications from memory. Secondly, there is no guarantee that the application will not start again after some time.
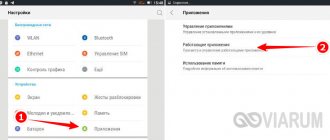
Open Settings, go to the Applications section and select Running Applications.
Tap on the program you want to remove from startup, and then click “Stop.” Next, go to the “All” section, find the same application there and stop it too.
The application must remain in an inactive state even after a reboot, otherwise you will have to use more advanced methods.
In Android 6.0 and higher, the Running Applications section is hidden by default. Its display is enabled in the “Developer Options” section, which also needs to be activated by several clicks on the “Build Number” item in the phone information.
What is autoboot on Android
Autorun is the process of independently launching an application (or part of it) to work in the background.
Working in background mode does not imply direct human intervention. Background processes include updating software products, instant messenger notifications, etc.
Disabling autorun using third-party programs
There are not so many startup managers. “All-In-One Toolbox” to manage autorun on Android . It is positioned as a cleaner and performance optimizer, but it also has a good tool in its arsenal that allows you to remove not only user applications, but also some system applications from startup.
To use this feature, you need to scroll down the All-In-One Toolbox window a little and click the Startup tab there. The same component is available in the most commonly used tools section. The program will scan the device for installed software and display a list of it, in which a switch will be located opposite each application. Set it to “Disabled” and the selected application will be removed from startup.
Should I disable autorun applications?
If you install a dozen programs on the platform every day, then, in principle, there should be no problems here. Because the platform itself must, so to speak, fight for RAM. That is, if the gadget’s performance begins to decline, the system automatically closes unused applications to stabilize the OS.
You can disable auto-starting programs in Android manually, but these will be counterproductive measures, and in some cases they are simply not necessary. But it also happens that some program does not want to be closed, even through the efforts of the platform itself. As a result, the processor is overloaded, the RAM is cluttered, and performance along with the battery charge tends to zero.
Adding to autorun
Now let's see how to enable autorun applications on Android. Here you will also need third-party tools. The simplest and most convenient of them is “AutoStarts – No root” from the developer Guro Labs. Using this utility, you can create a list of programs that will start when the OS starts with a specified time interval. After installing the application from Google Play, launch it, then click the “ADD” button next to the “Applications” option and select the application to add to startup from the list that opens.
Repeat the procedure for other programs. If the application you need is suddenly not in the list, check the “Show all applications” checkbox. All that remains is to activate the autostart of applications on Android when you turn on the device, for which you simply switch the “Auto startup” button to the “ON” position. Additionally, AutoStarts supports setting the autostart delay (Start delay) for the first program and all others in the list.
Summary
Unlike Windows, managing application startup in Android is quite inconvenient. Adding a program to startup in this operating system is easier than removing it. Many programs, including third-party ones, run in Android as background services, starting with a higher priority, so disabling them is problematic. In most cases, everything is resolved by obtaining Root rights, but this is not the best solution, since rooting reduces the security level of the device.
- 65shared
- 2Facebook
- 63Twitter
- 0VKontakte
- 0Odnoklassniki
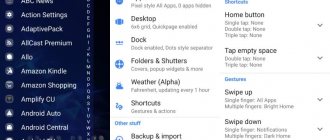
Using the Greenify app
If the system tools are not enough or you want to limit the background activity of applications, download and install the Greenify . The utility is effective on smartphones without root access and works on any version of Android.
Installing and using the program is quite easy:
Step 1: Search for Greenify on Google Play and click the Install button.
Step 2. Wait for the installation to complete and launch the application. To do this, click the “Open” button.
Step 3. The utility's welcome window will open. Click "Next" to continue.
Step 4. On devices with and without root access, the program uses excellent operating algorithms. Select the desired item and click “Next”.
Step 5: For Greenify to work properly, it needs permission to access app usage data. Click the "Grant Permission" button.
Step 6: Find “Greenify” in the list of applications and tap it.
Step 7: Turn on the “Access Usage History” toggle.
Step 8. Tap the Finish button to begin working with the program.
Step 9. Click on “+” to add programs whose background activity Greenify will restrict.
Step 10: Select Show other apps.
Step 11. Select the programs whose startup you want to control and click the green “Confirm” button.
Step 12. Now, in order to limit the selected applications, you can use the “Put to Sleep” button.
Note! In the program settings, you can set automatic restriction of background activity.
CCleaner - memory cleaning
An application adapted for Android from Windows computers, which is famous for its wide capabilities and automation of all cleaning processes. The functionality of the starter version is somewhat reduced, but purchasing a Pro account is mainly aimed only at receiving extended support from the developer and disabling advertising.
The main program window, after accepting all permissions, looks like this.
The quick scan function available from it is comprehensive and covers not only too power-hungry applications, but also cleaning temporary files, cache, RAM and recommendations for deleting applications that have not been used for a long time.
You can unload applications from RAM as follows:
- First, you need to go to the side menu and select “Manage Applications.”
- Next, you can select individual programs or all of them by ticking them.
- After this, a blue button appears in the lower right corner; by clicking it and selecting “Stop,” you can unload all programs at once.
After the process is completed, there will be more space in RAM, which will be reflected in the indicators in the main window. It is worth noting that cleaning can be done more quickly through a widget that is added to the main screen of the smartphone. By clicking on it, all the actions that were described above are performed, but automatically.
Advantages:
- Fast and high quality work.
- Availability of a widget that speeds up all processes.
- Clear menu.
- Flexible configuration of all parameters.
Flaws:
- Annoying offers to buy the Pro version.
QR Code
CCleaner: garbage cleaning and optimization
Developer: Piriform
Price: Free