The SmartScreen filter is designed to improve security when visiting web pages on the Internet. Thanks to this tool, the system analyzes sites, finds and blocks access to unwanted pages that offer the installation of various potentially dangerous programs, plugins and extensions. Site ratings, available on a special cloud service, help with such analytics.
In general, this filter can be called useful, but what should you do if you still need to disable it because you cannot access some desired site? Let's figure out how to do this in Windows 10.
- Settings in Control Panel
How SmartScreen Filter works in Windows 10
See also: “Updates are not installed on Windows 10 x64”
SmartScreen monitors programs installed by the user in real time and sends their IDs to Microsoft servers, where they are checked for digital signatures and then determined whether the program is safe or not.
In addition, this filter performs auxiliary functions to detect potentially dangerous and malicious pages/sites:
- The page we decided to visit is checked for presence in the list of phishing resources, which is constantly updated. If the result is positive, such page/site is blocked.
- The content of the page (site) is analyzed. If suspicious or inappropriate content is detected as a result, such page (site) is blocked.
- The downloaded files are checked for security, which is set taking into account the download history of other users.
Now that we have an idea of what SmartScreen is and how this filter works, let's look at ways to disable it.
Purpose of the program
SmartScreen is not a full-fledged antivirus solution, it does not use heuristics or any other analysis of an application or files to determine its potential danger, instead its main criterion is the digital signature of the program .
Note! It is this system that sometimes does not allow running programs that are known to work, since not all developers can obtain a certificate from Microsoft.
While in most cases SmartScreen is a boon for the inexperienced user, many experienced users prefer to disable it, as it is quite common to run unsigned applications, especially if you are a developer of your own applications, which can be quite problematic to verify.
Disable SmartScreen in Security Center
This method is suitable for the latest version of Ten (at the time of writing this article) and is implemented through the Security Center:
- Go to Windows Settings. You can do this in different ways:
- Press the key combination Win+I;
- right-click on the Start icon (or press the Win+X key combination) and in the menu that opens, click on the desired item;
- In System Settings, click on the “Update and Security” section.
- In the security settings, in the list on the left, click on the “Windows Security” subsection, and then on the right side of the window, click the “Open Windows Defender Security Center” button.
- In the Security Center that opens, click on the “Manage applications/browsers” section. This can be done by clicking on the icon on the left sidebar or scrolling through the main contents of the window and finding the corresponding item in it.
- As a result, we get to a window where you can turn off scanning using the SmartScreen filter:
- for applications and files
- for Microsoft Edge browser
- for applications from the Microsoft Store
- That's all you need to do to disable the filter in Security Center.
Deactivation for applications from the Microsoft Store
To disable the feature for programs downloaded from the Windows 10 built-in tool, you must do the following:
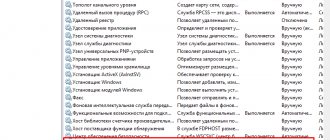
- Use a system search to find and run the Windows Security tool.
- Go to the "Application/Browser Management" category and click on the "Reputation-based protection settings" hyperlink.
- Disable the "SmartScreen for Microsoft Store apps" switch.
Deactivating a filter via Registry Editor
See also: “How to install a sound driver on Windows 10: two methods”
The algorithm for disabling the filter is as follows:
- Press the Win+R key combination to open the “Run” window. Writing a command "regedit" and click the Enter key (or press the OK button).
You can also launch the Registry Editor through the search bar by typing the name of the utility or the command above. - In the editor window, go to the “System” directory, the full path to which looks like this: HKEY_LOCAL_MACHINE\SOFTWARE\Policies\Microsoft\Windows\System.
- Once in the desired folder, right-click on any free space, select “New” from the pop-up menu, then “DWORD value (32 bits)” (if you have a 64-bit system, you still need to select this parameter).
- Give the parameter a name – “EnableSmartScreen”. Then double-click on it to open the properties, set the value to zero (should be the default) and click OK.
- Now you can close the Editor and restart your computer.
Disabling a filter using the Local Group Policy Editor
This method only works on Professional and Enterprise editions of Windows 10. Here's what we're doing here:
- By pressing the Win+R key combination, we open the “Run” window, in which we type the command “gpedit.msc” and click OK (or press Enter).
- In the editor, open the contents of the “Windows Defender SmartScreen” folder. The full directory path is as follows: Computer Configuration\Administrative Templates\Windows Components\Windows Defender SmartScreen.
- In this directory we see two folders (subsections): Explorer and Microsoft Edge. Inside each of them we will find a line responsible for setting up the SmartScreen function (in the figure below - for the “Explorer” folder).
- Double-click on this line to open the filter options, where you can disable it. To do this, select the desired option, and then click the OK button at the bottom of the window.
- The filter in the “Microsoft Edge” folder is disabled in the same way.
- You can now close the Local Group Policy Editor. And everything is ready, the SmartScreen filter is turned off.
Conclusion
Note! If you don't care about SmartScreen notifications and want to take full advantage of the security benefits of Windows 10, then just leave the filter turned on. This is especially true for children, parents, and grandparents who are working on a computer running Windows 7, 8.1, or 10. It is definitely better for them to leave this tool running, especially in Internet Explorer 11.
Experienced users are unlikely to suffer much if they stop using SmartScreen when installing software that they believe is not malicious. Safe tools include open source utilities. You can always turn the filter back on if you wish.
Read more information in the new article - “How to disable SmartScreen in Windows 10.”
Disable SmartScreen in Microsoft Edge
You can deactivate the filter for Microsoft Edge directly in your web browser settings.
- Click on the ellipsis icon located in the upper right corner of the program window. In the proposed list, click on the “Options” item.
- Scrolling down the parameters, we find the “View additional” button. parameters” and click on it.
- At the very bottom we can find an item responsible for protecting your computer from malicious sites and downloads using the SmartScreen filter. Switch the button to the “Off” position.
Settings in Control Panel
This method disables the filter at the system level. This means that, for example, it will not work when opening previously downloaded files and programs. Please note that you must perform these actions with administrator rights.
- Go to the Control Panel. To do this, for example, you can use the Start context menu, which is called up by pressing the Win+X keys.
- Set up viewing in the form of large and small icons and click on the “Security and Maintenance” section.
- In the list of settings on the left, click on the item “Change Windows SmartScreen settings”.
- To deactivate the filter on the system request (What do you want to do with unidentified objects), stop at the option “Do nothing (disable Windows SmartScreen)” and press the OK button.
- All is ready. The assigned task after these actions should be successfully completed.
Note: In some cases, settings may be grayed out in the SmartScreen window. But this can be fixed, and in different ways:
In the Registry Editor:
- Launch the Registry Editor (how to do this is written above) and go to the path: HKEY_LOCAL_MACHINE\Software\Policies\Microsoft\Windows\System.
- Check to see if the “System” folder contains the “EnableSmartScreen” parameter. If yes, delete it, and then restart the computer.
In the Local Group Policy Editor:
- Open the Editor (see above how this can be done). Go to the section: Computer Configuration\Administrative Templates\Windows Components\Explorer.
- Find the “Configure Windows SmartScreen” option in the contents of the “Explorer” folder and double-click on it. Select “Disabled” and click OK.
- Now the filter settings will become active in the Control Panel.
Using the Local Group Policy Editor
As we mentioned earlier, this tool is not available in the home version of Ten, so it is only suitable for corporate or professional publications.
- Launch the Local Group Policy Editor.
- Now we need to get to the “Explorer” folder at the following path: Computer Configuration\Administrative Templates\Windows Components\Explorer.
- In the directory we find the “Configure Windows SmartScreen” parameter, double-click to open its properties.
- Select the “Enabled” item, then in the selection parameters indicate “Disable SmartScreen”.
- Done. The filter is now disabled, but you may need to restart your PC.
Disable the Windows Store filter
Sometimes SmartScreen can block addresses accessed by dozens of applications, which leads to problems with their functioning. Therefore, in such cases it is necessary to disable this filter.
- Launch System Settings using one of the methods described above and click on the “Privacy” section.
- In the window that opens, being in the “General” subsection, disable the “Enable SmartScreen filter to scan web content...” option.
Note: Some users prefer to make adjustments to the system using the Registry Editor. In this case, our task can also be performed through registry settings:
- Go to the Editor along the path: HKEY_CURRENT_USER\Software\Microsoft\Windows\CurrentVersion\AppHost.
- Find the “EnableWebContentEvaluation” parameter, go to its properties by double-clicking on it and set the value to “0”.
Is it advisable to disable it?
In general, the answer is no, it is not recommended to disable this feature that the Microsoft operating system offers us initially and for free. A simple message "SmartScreen prevented an unknown application from launching" should already be a clear example of the level of protection we can achieve, at least for the vast majority of users, especially less experienced ones.
With the increasing number of threats surrounding us, increasingly sophisticated malware and methods of stealing our data, an extra layer of protection on our computers never hurts. Another thing is that we are experienced users or for some reason we need to disable this protection from time to time. Be that as it may, we will always do so at our own risk and expense.
In fact, some legitimate websites may experience temporary issues with this tool, although it is usually a matter of time before they are resolved. In certain cases, it can be used to solve error 0xc0000005 , so many people rely on disabling it.